Redirects are something that every web developer or website owner will probably need to do at one time or another. Redirects are primarily a way of automatically mapping old or broken URL's to new ones and are also a signal to search engines that your content has moved.
This article is going to focus on creating a small number of redirects and won't touch on more advanced redirects using regular expressions and wildcards.
Google says:
If you need to change the URL of a page as it is shown in search engine results, we recommend that you use a server-side 301 redirect. This is the best way to ensure that users and search engines are directed to the correct page. The 301 status code means that a page has permanently moved to a new location.
Common use cases for 301 redirects include:
- You've changed your website significantly. For example, you've gone from a static website to a WordPress website. When people visit your old pages you don't want them to get a nasty 'Error 404' message. A redirect will automatically push visitors to your new website address.
- You have moved your website to a whole new domain.
- You've changed a URL for a page or post. This is pretty common. You've published an article and then you have gone back to optimize the URL, but what if that URL has already been tweeted or indexed by Google? You don't want those links breaking. Creating a redirect would solve this problem.
You will notice that the redirect we are looking at is called a "301 Redirect". 301 is the response status code for and is defined as being a redirect when something has been permanently moved. There are many other status codes, but in this article we are only going to be looking at 301 redirects.
This article is written with the assumption that you are using an Apache (LAMP) web host. If you are not sure about this then please ask your web host before making any changes.
A Quick Disclaimer
Before we start looking at our options, there's a quick disclaimer: Editing .htaccess and redirects can easily mess up a site and cause errors. As always, with any change on a website you should take a full backup first and work on a staging website before making any changes to a live website.
Manually Editing The .htaccess File
A .htaccess file is a configuration file that sits on a web server and allows you to make changes to how your web server works. .htaccess can be used for creating redirects amongst many other useful things such as caching and password protecting directories.
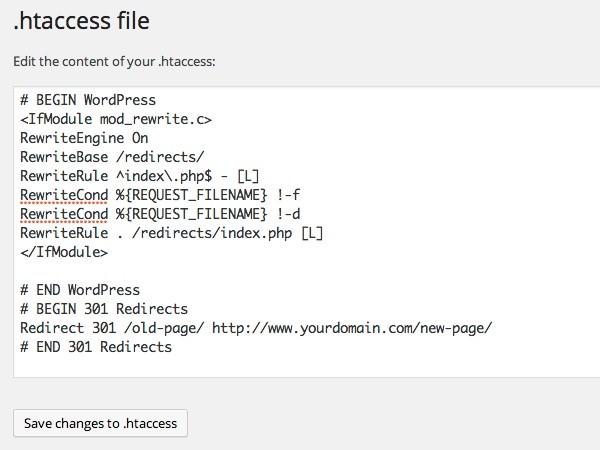
The .htaccess file is a dot-file or hidden file, so if you are developing locally you may need to enable viewing hidden files to see it. The file sits in the root directory if your WordPress installation and can be edited with any text editor. It's very important to make a backup of your .htaccess file before making any changes.
Your WordPress .htaccess file will likely already have some information inside, especially if you have enabled permalinks or installed a plugin like W3 Total Cache or iThemes Security.
For example:
# BEGIN WordPress
<IfModule mod_rewrite.c>
RewriteEngine On
RewriteBase /redirects/
RewriteRule ^index\.php$ - [L]
RewriteCond %{REQUEST_FILENAME} !-f
RewriteCond %{REQUEST_FILENAME} !-d
RewriteRule . /redirects/index.php [L]
</IfModule>
# END WordPress
For our redirects, we want to start right below any existing code (such as the above). The hash in the code (#) represents a comment.
Let's say we want to redirect an article with the permalink /old-page/ to its new permalink called /new-page/ - we would add the following to our .htaccess file:
# BEGIN 301 Redirects
Redirect 301 /old-page/ http://www.testdomain.com/new-page/
# END 301 Redirects
The code is declaring what type of redirect we are using (301 permanent), is giving the relative URL of the old page and is then the new URL to which you should be redirected. If you want to create more then just add them below on a new line. It's a good idea to put in some comments where your redirects start and end as this makes the file much more reader friendly.
If your WordPress install is in a directory, such as http://www.testdomain.com/wp/ then your 301 redirect will also need to include the directory name that WordPress is installed in. Using the above directory example, our redirect would look like this:
# BEGIN 301 Redirects
Redirect 301 /wp/old-page/ http://www.testdomain.com/wp/new-page/
# END 301 Redirects
This is a nice and quick way to create redirects - you can even use regular expressions here, but that's beyond the scope of this article. This method doesn't rely on any plugins so it's a very reliable way of creating redirects as long as you are careful.
There are however, a few cons of doing redirects this way:
- You need to be comfortable editing basic code
- Mistakes here can easily take your website offline
- You will need FTP (or similar) access to be able to edit the file*
There are actually some plugins available to edit .htaccess directly from within WordPress (one of which i.es mentioned later). I would treat these with caution, as any mistakes could make your website unusable which would need FTP access to fix anyway.
Using Plugins
Like most things in WordPress, there's also a plethora of plugins available for creating 301 redirects - I've chosen just two popular ones to show you. It's important to remember that if the plugin ever breaks or you disable it, then your redirects may be lost and no longer work.
Using WordPress SEO by Yoast
The extremely popular WordPress SEO plugin by Yoast has the ability to create 301 redirects, but in quite a different way. As this plugin is so popular, you may well have it installed already - if you just want to make a few quick redirects then it may be a good option without having to add another plugin to your website.
When you have WordPress SEO installed, you should have a metabox that displays on all of your posts and pages. Under the "Advanced" tab within the metabox, there is an input field called "301 Redirect". Inputing a URL in this section will create a 301 redirect from that page.

The main disadvantage with this method is that you need to create a page in order to create your redirect, so there's a situation where you could end up with a load of blank pages that are solely there for redirects.
There is another bonus that comes with WordPress SEO by Yoast with regards to redirects - it actually comes with an .htaccess editor. To access the editor, from your WordPress dashboard go to "SEO" and then "Edit Files". You should see two text fields here - the top is for editing your robot.txt file and the bottom is your .htaccess file. As explained above, be very careful editing your .htaccess in this way - one small mistake could render your site unreachable.
Using the Redirection Plugin
Redirection is a popular (free) plugin in the WordPress.org repository that can handle 301 redirects and much more, but for this article we're just focusing on the 301 redirect functionality within the plugin. As well as being able to create custom redirects, this plugin has a very nice feature: it will automatically create 301 redirects when you change a post URL.
After installing the plugin, to create a simple 301 redirect, follow the below instructions:
- Go to Tools >Redirection
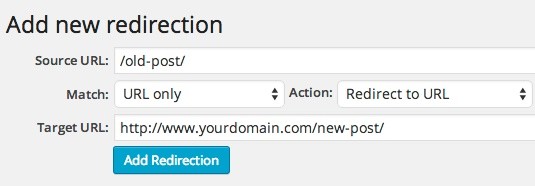
- Under the "Add new redirection" heading. Enter the URL you want to redirect (source URL) and the new URL that you want it to go to (target URL) - all of the other options here should remain as their defaults (match: URL only and action: redirect to URL).
- Click the "Add Redirection" button.
The page should now reload and you should see your redirect in a table which displays the type (this will be 301), URL, hits (how many people have used the redirect) and last access (the date of which this redirect was last used).

Mix and Match
There's no standard for creating redirects for WordPress and the exact method you choose may depend on factors such as the amount of redirects you have to do and the frequency in which you need to create new ones.
You also don't need to stick to one method. I personally use a combination of .htaccess redirects when I change a significant amount of URL's but sometimes use SEO by Yoast if I need to quickly make a redirect.
Wrapping It Up
You now should be able to create simple 301 redirects for your WordPress site. 301 redirects aren't only a great way of telling search engines that your content has moved - they make the user experience better too as broken links can mean lost customers and traffic.

Comments