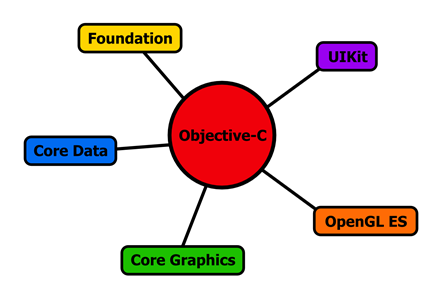
Objective-C is the programming language behind native Apple applications. The language was originally designed in the 1980s as a way to add object-oriented capabilities to the ANSI C programming language, and it has since been used to create everything from command-line tools to Mac programs to mobile apps. You can think of Objective-C as Apple's version of the C# programming language.
However, learning Objective-C is only one aspect of iPhone, iPad, and Mac app development. On top of the language lie a handful of frameworks that provide the tools necessary to build apps for any of these platforms. For example, the UIKit framework defines the basic UI components you see on your iPhone (buttons, lists, images, etc.), while the Core Data framework provides an API for saving and retrieving data from a device. Objective-C is the glue that lets you pull together these tools and assemble them into a useful program.
Objective-C Succinctly is the first installment in a two-part series on Apple app development. In this series, we'll explore the entire Objective-C language using hands-on examples. We'll focus on learning core language concepts by building command-line tools, which means we won't be building graphical applications in this book. This lays the foundation for iOS Succinctly, which explores the iOS framework underlying iPhone and iPad apps. Both books utilize Xcode, Apple's official integrated development environment.
The Objective-C Language
For developers coming from a C# background, Objective-C retains many of the same workflows and object-oriented concepts. You still write code, compile it into an executable, and, of course, use objects to organize your application. Objective-C provides standard object-oriented constructs like interfaces, classes, class/instance methods, and accessors. That said, there are a few important differences between Objective-C and languages like C++ and C#.
person.sayHello();    // C# method calling.
[person sayHello];    // Objective-C message sending.
The first thing you'll notice is that Objective-C uses a completely different syntax for communicating between objects. For example, compare the method calling syntax of C# to the message sending syntax of Objective-C:
Instead of calling a method that's bound to an object, Objective-C "sends messages" from object to object using the square bracket notation. For most practical purposes, you can approach message sending as method calling, and we'll use the terms interchangeably unless it leads to confusion.
Second, Objective-C is designed to be a superset of C, meaning it's possible to compile C code with any Objective-C compiler. This also means you can combine Objective-C and C in the same project or even in the same file. In addition, most modern compilers add C++ to the mix, so it's actually possible to mix Objective-C, C++, and C in a single file. This can be very confusing for newcomers to Objective-C, but it also makes the entire C/C++ ecosystem accessible to Mac and iOS apps.
We'll explore these differences and much more throughout Objective-C Succinctly.
Sample Code
You will learn more from this book if you recreate the samples using the code provided in the book.
A select set of samples using the code provided in the book is available online. These samples are essential to understanding Objective-C. These samples are available for download from https://bitbucket.org/syncfusion/objective_c_succinctly. Samples that apply to specific sections are mentioned in the section they apply, using the following format:
Included code sample: {name of the sample folder}
Setting Up
There are a number of compilers for Objective-C, but this book will focus on the Xcode IDE, which comes with a compiler, text editor, debugger, interface editor, and everything else you need to create iOS apps in a convenient package. At the time of this writing, Xcode is only available for OS X, so you'll need to be on a Mac before you can run any of the code in this book.
We'll start by walking through the installation of Xcode, and then we'll learn how to create an application and explore some of the prominent features of the IDE.
Installation

Xcode can be downloaded from the Mac App Store. Navigate to the link or search for Xcode in the Mac App Store, and then click Free in the upper left-hand corner to start the download. The Xcode app is rather large, so it will take at least a few minutes to download. If you're not sure whether the download is working, you can check its status in the Purchases tab of the Mac App Store:

Scroll down to find the Xcode download and you should see a progress bar indicating how far along it is. Once the download has completed, the installation should be straightforward, and you should (hopefully) see a friendly welcome screen when you launch the program.
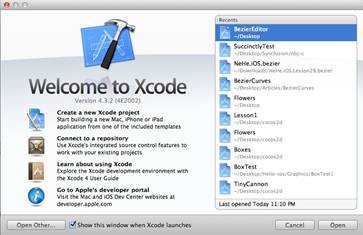
Creating an Application
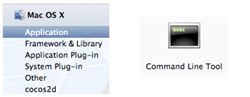
Our first Objective-C application will be a simple command-line "Hello, World!" program. To create the Xcode project, click Create a new Xcode project in the welcome screen. As an alternative, you can also select File > New > Project.... This gives you the opportunity to select a project template. As you can see, templates are categorized as either iOS apps or Mac OS X apps. In the second part of this series, we'll work with several of the iOS templates, but for now, let's stick to the simple Command Line Tool template under Mac OS X > Application:
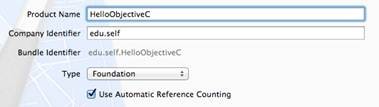
Next, you should be presented with some configuration options for your new project. For the Product Name, use HelloObjectiveC. If you were planning on distributing this program, you would need to acquire a Company Identifier by registering as a developer with Apple, but since this is a personal project, you can use edu.self. This serves as a unique namespace for the application. For Type, select Foundation (more on this later), and be sure to select the Use Automatic Reference Counting check box since we don't want to manually manage memory. Your final configuration options should look like the following:
Finally, you should be able to select a location to save your project. Save it wherever you like, but deselect the Source Control option at the bottom of the window. This would initialize a Git repository in your project folder, but we're working with such a small project that we don't need to worry about revision control.

After selecting a location for the project and clicking Create, Xcode creates a new folder called HelloObjectiveC. In it, you should find another HelloObjectiveC folder containing the project files, along with a HelloObjectiveC.xcodeproj folder; however, the latter acts more like a file than a folder. HelloObjectiveC.xcodeproj defines the metadata for your application, as well as local configuration settings for the IDE.
The only file that you actually need in a .xcodeproj folder is the project.pbxproj file, which contains build settings and other project-related information. That is to say, if your project was under source control, project.pbxproj is the only file in HelloObjectiveC.xcodeproj that would need to be under version control.
Double-clicking the HelloObjectiveC.xcodeproj folder will launch Xcode and open the project.
Getting to Know the Xcode IDE
Xcode is a large application with many capabilities, and it has a correspondingly complex interface. It's worth taking some time to familiarize yourself with the various UI components highlighted in the following screenshot.
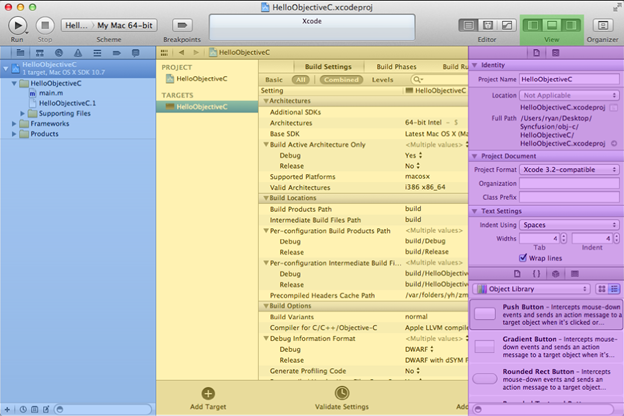
As you can see, the Xcode interface is split into three main windows: a project navigator (blue), an editor/work area (yellow), and a utilities area (purple). The navigator lets you select files, find code breaks, and debug your program. The editor is where you'll do the bulk of your work-it's where you edit code and, for graphical applications, where you design your user interfaces and control the flow of an app. But again, for Objective-C Succinctly, we won't need any of the interface editing tools. Finally, the utilities area lets you define options for the selected component (e.g., the build targets associated with a particular file).
You can control which of these windows are visible using the view selector (green) in the upper right corner; however, it's not possible to hide the work area. Clicking the center button in the view selector will display an output window where we can see log data for our application.
Editing Files
Our command-line template comes with a single Objective-C file, main.m. The .m extension is used for files that only contain Objective-C code, and the .mm extension is for files with a mix of Objective-C and C, Objective-C and C++, or a combination of all three. To edit main.m, select it in the navigator panel, and you should see the following code appear in the editor window:
//
// main.m
// HelloObjectiveC
//
// Created by Ryan Hodson on 8/21/12.
// Copyright (c) 2012 __MyCompanyName__. All rights reserved.
#import <Foundation/Foundation.h>

int main(int argc, const char * argv[])
{

	@autoreleasepool {

		// Insert code here...
		NSLog(@"Hello, World!");

	}
	return 0;
}
The next chapter provides an in-depth explanation of this code, but for now, the only important thing is the NSLog() function, which outputs a string to the console. Also notice that Objective-C strings are prefixed with an @ symbol (as are most constructs that are exclusive to Objective-C), and they must be double-quoted.
Compiling Code
Included code sample: HelloObjectiveC
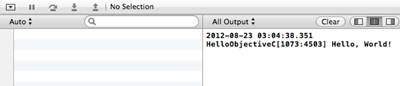
To compile this code and run the resulting executable, simply click the Run button in the upper-left corner of the IDE. Alternatively, you can select Product > Run in the main menu bar, or use the Cmd+R keyboard shortcut. This should open the output panel at the bottom of the screen with a "Hello, World!" message:
Summary
And those are the basics of installing the Xcode IDE and using it to create and compile an Objective-C project. We didn't do any coding, but hopefully you're feeling more comfortable with the Xcode interface and are at least able to navigate your way through a project's files. In the next chapter, we'll start actually writing Objective-C code, defining classes, instantiating objects, and sending messages to them.
This lesson represents a chapter from Objective-C Succinctly, a free eBook from the team at Syncfusion.

Comments