At this point in the series, we're finally able to begin building our plugin using the object-oriented techniques that we've learned thus far in the series.
If you're just now joining us, I highly recommend catching up on the series thus far; otherwise, you risk missing out on some of the key points that we're going to be demonstrating as we build out the plugin over the next few articles.
- An Introduction
- Classes
- Types
- Control Structures: Conditional Statements
- Control Structures: Loops
- Functions and Attributes
- Scope
Alright, so with that said, it's finally time to start writing code. Before we begin, it's important to understand that building a plugin - or any type of software for that matter - requires a number of steps, and although we're going to write a bit of code in this particular article, we won't be adding a lot of functionality until we have the scaffolding or the foundation of the plugin.
In order to do that, we need to review several things:
- Defining the features of the plugin that we're going to be writing,
- Share anything that we may not be building into this first version,
- Discuss the architecture and file organization of the plugin.
So let's cover those points really quick, and then we'll get into the details of the plugin.
Post Meta Viewer
Throughout the next few articles, we're going be building a plugin that introduces a post meta box into the single post editor view that displays all of the meta data that's associated with the current post.
1. The Features
The plugin will be read-only in that you can only view the meta data associated with the plugin. We won't be able to introduce any new meta data - at least not for the first version.
The other features are that it will display it in a clean, organized format so that we can easily identify the key and the values for the post ID. We'll also introduce an anchor that will allow us to copy a line of code that will allow us to make a call to the piece of information in the form of get_post_meta( $post_id, $meta_key, $meta_value );.
2. A Strong 1.0
Before going any further, there are a lot of neat features we could implement into this plugin.
We could introduce the ability to:
- add new custom post meta data
- update existing post meta data
- delete existing post meta data
- sort the columns by meta keys
- sort the columns by meta values
- ...and so on
But in keeping with the philosophy of creating a "strong 1.0," we're going to be building a lean, focused foundation on which we can continue to build out the plugin as we see fit after this series.
Perhaps we'll cover some of the above features before the end of the series, perhaps you'll want to introduce your own set of features. Either way is fine. The bottom line is that we're going to build a strong core off of which we can continue to iterate on to expand functionality.
3. The Architecture and File Organization
So with all of that said, let's first talk through the high points of the plugin, then we'll take a look at how we'll organize the files and the components of the plugin.
- The plugin requires a base plugin file that will serve as a sort of boot loader (or bootstrap file) for registering itself for WordPress and for loading up the components of the plugin.
- The plugin will need a class that coordinates the hooks and the callbacks used throughout the plugin. This will help decouple functionality from the hooks and the classes responsible for actually displaying the work which allows us to make sure that each of our classes are specialized and ideally performing a single job.
- The plugin will need a class that will be responsible for displaying information in the single post dashboard that will actually render the meta box.
- We'll need a core plugin class that will register all of the dependencies and provide information about the plugin's version, is aware of the loader and the administration functionality in order to register information between the two components.
- And finally, we'll need some stylesheets in order to make sure that the information looks good within the dashboard.
Sound confusing? Hopefully seeing and taking a look at the file structure and the basic sample code will help this continue to make more sense.
With that said, let's take a high-level look at the components that will interact with each other, then we'll take a look at how the files will be organized. After that, we'll get into stubbing out the code for the plugin on which we'll be filling out in the next article.
Plugin Components
Specifically, the plugin will consist of the follow components - or files - that will make up the source of the plugin. After taking a look at the file listing, we'll take a look at a diagram of how all of the pieces will interact.
-
single-post-meta-manager.phpis the primary file the registers the plugin with WordPress and sets everything in motion. -
class-single-post-meta-manager-admin.phpis the file that is responsible for registering and enqueueing stylesheets as well as displaying the user interface elements that will contain the post meta data. -
single-post-meta-manager-admin.cssis the stylesheet that will style the user interface. -
class-single-post-meta-manager-loader.phpis the file that will coordinate actions and filters between the core plugin and the administration class. -
class-single-post-meta-manager.phpis the core plugin file that maintains plugin version information, plugin slug information, references to the loader, and the file in which we instruct the loader which objects and functions are responsible for displaying the administrative user interface. -
README.mdprovides the usual instructions for how to get started with the plugin. -
CHANGES.mdprovides a list of changes that occur throughout each version of the plugin that we release.
Depending on your level of experience with object-oriented programming, this may or may not seem like a lot of files for a relatively simple set of features; however, there's still more to it: We aren't going to be dropping all of these files into the root of the plugin directory.
Instead, we're going to take it a step further and organize things in proper directories, as well. Once we review that, we'll then take a look at the organization of the components in the form of a diagram, and then we'll review the code that provides the scaffolding for the plugin.
File Organization
The file organization is relatively simple and is probably best demonstrated through the use of an image:
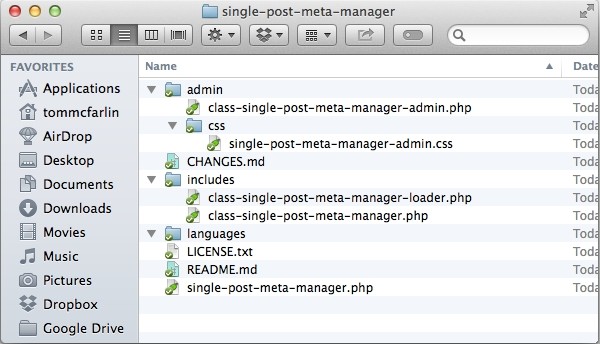
To be clear, here's the break down of what you see in the screenshot above:
admin/class-single-post-meta-manager-admin.phpadmin/css/single-post-meta-manager.admin.cssincludes/class-single-post-meta-manager-loader.phpincludes/class-single-post-meta-manager.phplanguages/single-post-meta-manager.phpCHANGES.mdREADME.mdLICENSE.txt
This is important to recognize and there are a couple of places in the code where we are going to be registering dependencies and it's important to know where the dependencies are so that we can provide the proper paths to them.
Building The Plugin
At this point, we're ready to begin stubbing out the classes that we're going to use. There are several important things to note about the code you're about to see:
- We're only going to be stubbing out the classes and the methods - we'll not be introducing any real functionality in this article.
- By the end of the implementation, the plugin should appear in the WordPress dashboard and can be activated (although nothing will actually happen).
- Despite the fact that I think that documentation is key for quality development, we won't be introducing the comments in this article because there's a tradeoff to be made: This article can become excessively long with an extraordinary amount of detail, or we can continue to take each aspect of this series step-by-step. I'm opting to do the latter so that we're not overwhelmed with the amount of information.
With that said, if you have questions about the code, feel free to leave comments about this; however, I may say wait until the next article to see the answer.
Now, on to the code.
The Core Plugin File
The core plugin file is responsible for registering the plugin with WordPress, and will ultimately be responsible for importing the core plugin class (which we'll review in just a bit), and actually setting the plugin in motion.
<?php
/*
 * Plugin Name:       Single Post Meta Manager
 * Plugin URI:        http://github.com/tommcfarlin/post-meta-manager
 * Description:       Single Post Meta Manager displays the post meta data associated with a given post.
 * Version:           0.1.0
 * Author:            Tom McFarlin
 * Author URI:        http://tommcfarlin.com
 * Text Domain:       single-post-meta-manager-locale
 * License:           GPL-2.0+
 * License URI:       http://www.gnu.org/licenses/gpl-2.0.txt
 * Domain Path:       /languages
 */

if ( ! defined( 'WPINC' ) ) {
    die;
}
Note that the conditional that we have at the bottom of the file. This will make sure that the plugin file can't be accessed within the web browser directly.
Administrative Files
All of these files reside in the admin directory as listed above.
The Single Post Meta Manager Admin Class
This class will enqueue the stylesheet and render the meta box that will be used to display the given post meta.
<?php

class Single_Post_Meta_Manager_Admin {

    protected $version;

    public function __construct( $version ) {
        $this->version = $version;
    }

    public function enqueue_styles() {

    }

    public function add_meta_box() {

    }

}
In this class, notice that it has a single protected attribute for the $version of the plugin. This attribute is setup in the constructor of the class.
We'll see how this fits together later in the code.
The Single Post Meta Manager Stylesheet
Right now, there's no code to display for this particular file; however, go ahead and add it to the admin/css subdirectory as its what we'll eventually be using to style the dashboard.
Includes
These are core plugin files that are responsible for coordinating information between the various hooks and the administrative area of the plugin.
Single Post Meta Manager Loader
This class will be used by the primary plugin class to coordinate all hooks that exist in the plugin and the administrative class that we defined above.
<?php

class Single_Post_Meta_Manager_Loader {

    protected $actions;

    protected $filters;

    public function __construct() {

    }

    public function add_action( $hook, $component, $callback ) {

    }

    public function add_filter( $hook, $component, $callback ) {

    }

    private function add( $hooks, $hook, $component, $callback ) {

    }

    public function run() {

    }

}
Notice that in the class above, we've marked the attributes as protected. This is done so that this class has access to its attributes, but no other classes do.
Additionally, we've gone ahead and done this just in case we subclass this particular class in a future iteration of the plugin.
Single Post Meta Manager
Finally, we have the primary plugin class is is responsible for loading the dependencies, setting the locale, and coordinating the hooks.
<?php

class Single_Post_Meta_Manager {

    protected $loader;

    protected $plugin_slug;

    protected $version;

    public function __construct() {

        $this->plugin_slug = 'single-post-meta-manager-slug';
        $this->version = '0.1.0';

    }

    private function load_dependencies() {

    }

    private function define_admin_hooks() {

    }

    public function run() {

    }

    public function get_version() {
        return $this->version;
    }

}
Notice in the code above, we have additional protected attributes, a couple of private functions, and a public function used as a getter which we'll be using as we continue to build out the plugin.
In the next article, we'll be spending a lot of time in this class as this is the entry point for where a lot of the functionality happens.
Coming Up Next
We've covered a lot of material in this article, but there's obviously much more to do. Aside from providing documentation for our functions, we need to actually implement functionality that brings this scaffolding to life.
In the next article in the series, we're going to do just that, after which we'll turn our attention to documenting the code.
As previously mentioned, please feel free to leaves any questions and/or comments about the code above. For those who are interested, you can always browse the current state of the project on GitHub.
Until the next article!

Comments