If your site relies on data sent to clients, you can boost its performance using client-side templates and WebSockets. In this tutorial, I will show you how.
Introduction
We will begin by transforming a preexisting application to be faster and more durable under high traffic. I will show you how to locate pieces of code which could be modified to improve the app. Start by downloading the sample application that I prepared. It's really simple, it displays random posts rendered on the server, but it will do just fine for this tutorial.
Step 1: Preparation
Unzip the app that you downloaded previously into a preferred folder or location and run it:
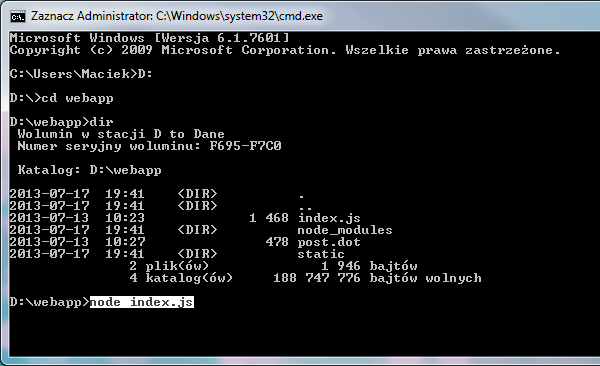
Now navigate to http://localhost:8080/ and take a look. You should see only a button. You'll also need to be using a browser with developer tools, so you can see the size of the HTTP requests. Open the developer tools and go to the Network tab. Then, click the button a couple of times and take a look at the size of the /getpost request:

It's only about 830 bytes right? Well, imagine that this site gets really popular and one million users want to see this post. It gets to about 830 megabytes. Per post! Not so small a number any more.
Step 2: Inspection
In this step I will show you how to find code that can be modified to boost up the app. In the previous step, you've found the request used to get the post. You will now have to find how it is served in the code. Open up the index.js file in your favorite code editor. Now go to the lines 16-20:
var postTemplate = dot(fs.readFileSync('./post.dot'));

app.get('/getpost', function (req, res) {
	res.end(postTemplate(posts[Math.floor(Math.random() * 3)]));
});
Here it is! First, the post's template is compiled into the postTemplate variable. Then, on the /getpost GET request the template is served. Nothing fancy, just a classic approach to the problem. We'll need to change this to improve its performance.
Step 3: Setting-Up Socket.IO
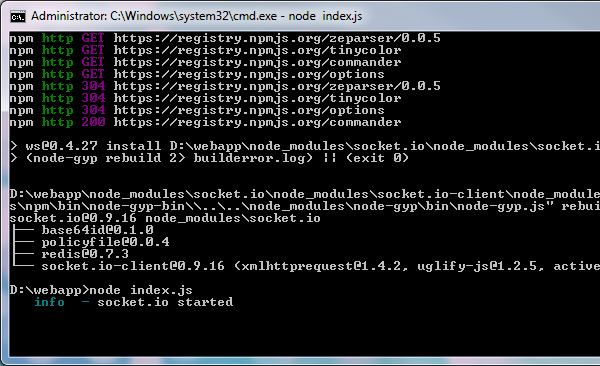
To begin the improvements, first, install Socket.IO. In your terminal type:
npm install socket.io
Wait for the command to complete. Require it in the code by adding the following line after all requires in index.js:
var sio = require('socket.io');
Now you will have to change the Express set-up, to work with Socket.IO. First, after the app definition, add this:
var server = require('http').createServer(app);
var io = require('socket.io').listen(server);

server.listen(8080);
And remove the last line in this file:
app.listen(8080);
You need to do this because Socket.IO requires the HTTP Server to work, not the Express app.
Now, if you run the app you should see something like this in your terminal:
Step 4: Client-Side Template
To start boosting up the app you will need to save the compiled template on the client-side. Javascript files are cached, so it will be downloaded only once. To compile the template, go to http://olado.github.io/doT/index.html and scroll down to the Usage section. Because there will be no need to compile the template every time the user visits your site, you can just add the compiled function to the code. Open the post.dot file and paste its content into the Template field like this:
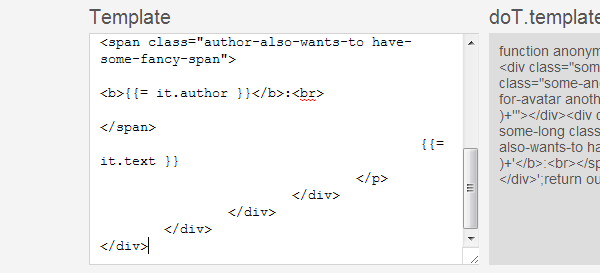
Now copy the content of the field and paste it into the static/main.js file before all code in there. Change or remove the anonymous function name and assign it to the postTemplate variable like this:
var postTemplate = function (it) { ... }
Now go to the index.js file and remove unused lines, because you will not be compiling templates on the server-side any more:
var dot = require('dot').template;
var fs = require('fs');

...

var postTemplate = dot(fs.readFileSync('./post.dot'));
The post.dot file can also be deleted too.
Step 5: From AJAX to WebSockets
Instead of using AJAX to communicate with the server, we will now use WebSockets. It's best to do this using Socket.IO, because the WebSocket API itself does not provide any fail-overs in case the user's browser doesn't support it. The server is already set-up, so now we will need to connect to it. First, add this in the head of the static/index.html file (before main.js):
<script src="/socket.io/socket.io.js"></script>
Next, open the static/main.js file and after the template definition, add this code:
var socket = io.connect();
It will connect to the Socket.IO server (notice that you've added Socket.IO's script to the page earlier). Since the server is on the same host as the client, you don't need to provide any parameters to the function. Now, you need to add an event listener to the socket, so we know when the post arrives. Add this just after the previous line:
socket.on('getpost', function (data) {
	$('button').after(postTemplate(data));
});
As you can see, the callback looks the same as the success callback in jQuery's $.ajax() method but it's running the template function on the data first. Now, replace the $.ajax() call with this:
socket.emit('getpost');
This line will notify the server that the user wants to display a new post. Of course, in a real-world app, the server would send the posts when they are published.
Step 6: Sending the Posts
For now, the client can connect to the server and request a post, but the server will not send anything yet. You need the server socket to listen to the getpost event and respond with a random post. Go to the index.js file and change it to this:
app.get('/getpost', function (req, res) {
	res.end(postTemplate(posts[Math.floor(Math.random() * 3)]));
});
To this:
io.sockets.on('connection', function (socket) {
	socket.on('getpost', function () {
		socket.emit('getpost', posts[Math.floor(Math.random() * 3)]);
	});
});
This will make the server attach the getpost handler to every client that connects to it and respond him with a random post. Now you can run the app again and try it out. Then go to the developer tools in your browser again, go to the Network tab, filter it out so you can only see WebSockets and click on the one that is visible there. You should see the data sent between the browser and the server, and notice that it is much smaller then it was with the server-side template and AJAX (the length is in bytes):

Conclusion
As you can see, using WebSockets and client-side templates can (and probably will) improve the performance and durability of your app. I'm sure there are plenty of sites that could be boosted with this technique and I hope that you will use it to provide a better user experience, both for your mobile and desktop users.

Comments