Networking is hard. There are various moving parts involved and many factors need to be considered to make it work. Fortunately, a number of open-source libraries have emerged over time to make networking easier. AFNetworking, created and maintained by the people of Gowalla, is one such library. This tutorial will introduce you to the AFNetworking framework while also showing how to query the iTunes Store API!
In this tutorial, I will introduce you to AFNetworking and show you a glimpse of what this library has to offer. After spending a few minutes with this library, you will notice that it was designed with ease of use in mind. It will not only speed up your development, but it will also take care of many painstaking networking tasks. We will build a simple application that queries the iTunes Store for movies that match the search term "harry". The results of our query will be displayed in a table view.
Project Summary
The application we are about to build queries the iTunes Store Search API. In particular, we search the iTunes Store for movies that match the search term "harry". If our query is successful, we process the results and display them in a table view. Each row represents a movie with a title, a director, and a thumbnail showing the movie artwork. Ready? Let's get started.
Project Setup
Before we get our hands dirty with AFNetworking, we need to build a basic foundation. This means setting up our project, creating a table view, and adding an activity indicator view. We will show the activity indicator when our request is being processed by the iTunes Store. This will give the user that valuable extra bit of feedback that is often overlooked.
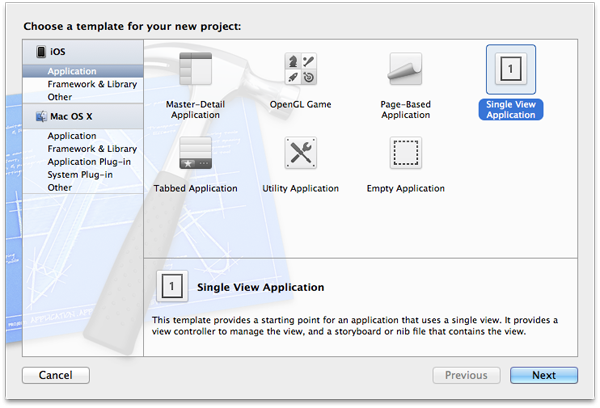
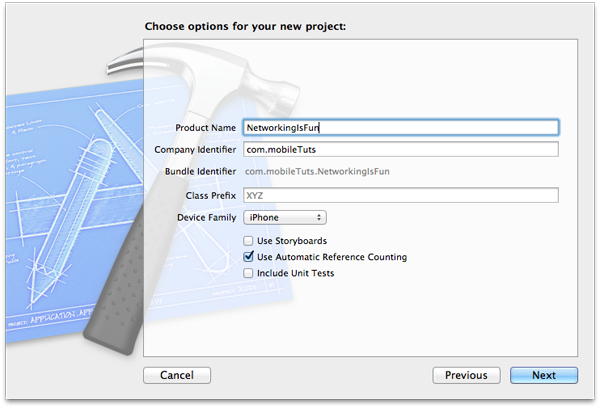
Create a new project in Xcode by selecting the Single View Application template from the list of templates. Name your application NetworkingIsFun, enter a company identifier, set "iPhone" for the device family, and uncheck "Use Storyboards". You can leave the rest untouched, but make sure that Use Automatic Reference Counting is checked. Tell Xcode where you want to save your project and hit "Save".
Adding the Table and Activity Indicator Views
Even though Interface Builder is great, I often build my interfaces programmatically, and that is what we will do in this tutorial as well. It will allow us to just focus on the code without being distracted by Interface Builder. Open ViewController.h and create three instance variables (ivars) as well as properties for these ivars. Since we are going to work with a table view, don't forget to make your view controller conform to the UITableViewDataSource and UITableViewDelegate protocols. Your view controller's header file should now look similar to the one below:
#import <UIKit/UIKit.h>

@interface ViewController : UIViewController <UITableViewDataSource, UITableViewDelegate> {
    UITableView *_tableView;
    UIActivityIndicatorView *_activityIndicatorView;
    NSArray *_movies;
}

@property (nonatomic, retain) UITableView *tableView;
@property (nonatomic, retain) UIActivityIndicatorView *activityIndicatorView;
@property (nonatomic, retain) NSArray *movies;

@end
If you are confused by the use of underscores, I recommend that you read about it here. Feel free to omit the underscores if you think it looks ugly or makes you feel uncomfortable. Apart from the underscores, there shouldn't be any surprises. We declare our UITableView and UIActivityIndicatorView as well as an NSArray, which we will use to store the results that we get back from our search query. Ready? Let's head over to our view controller's implementation file.
Since we declared three properties in our header file, we need to synthesize their accessors in ViewController.m. Again, if the underscores confuse you, you can leave them out.
@synthesize tableView = _tableView, activityIndicatorView = _activityIndicatorView, movies = _movies;
In our viewDidLoad method, we set up our table and activity indicator views. The code below should be self-explanatory for the most part. If you have never set up a table view without using Interface Builder, you might see a few lines that are unfamiliar to you. Instead of wiring the table view up in Interface Builder, we take care of this in the viewDidLoad method. After calling the superclass' viewDidLoad method, we initizalize our table view with a frame and a style, and we set our view controller as the data source and delegate of our table view. When our application launches, we hide our table view since we don't have anything to show as long as our query hasn't returned any results. Before adding the table view as a subview to our view controller's view, we set its autoresizing mask. The autoresizing mask defines how the table view should be resized if the parent view - the view controller's view to which we add the table view - changes in size. This happens when the device is rotated, for example. Confused? Don't worry about it. It isn't important for this application.
- (void)viewDidLoad {
    [super viewDidLoad];

    // Setting Up Table View
    self.tableView = [[UITableView alloc] initWithFrame:CGRectMake(0.0, 0.0, self.view.bounds.size.width, self.view.bounds.size.height) style:UITableViewStylePlain];
    self.tableView.dataSource = self;
    self.tableView.delegate = self;
    self.tableView.autoresizingMask = UIViewAutoresizingFlexibleWidth | UIViewAutoresizingFlexibleHeight;
    self.tableView.hidden = YES;
    [self.view addSubview:self.tableView];

    // Setting Up Activity Indicator View
    self.activityIndicatorView = [[UIActivityIndicatorView alloc] initWithActivityIndicatorStyle:UIActivityIndicatorViewStyleGray];
    self.activityIndicatorView.hidesWhenStopped = YES;
    self.activityIndicatorView.center = self.view.center;
    [self.view addSubview:self.activityIndicatorView];
    [self.activityIndicatorView startAnimating];

    // Initializing Data Source
    self.movies = [[NSArray alloc] init];
}
Setting up the activity indicator view is just as easy. We initialize the activity indicator view with a pre-defined style, set its hidesWhenStopped property to YES, and position it at the center of its parent view. After adding it to the view controller's view, we start animating the activity indicator. The activity indicator will automatically display itself since we set its hidesWhenStopped property to YES.
At the end of our viewDidLoad method, we initialize the movies array. We will use it later to store the results of our search query.
Table View Protocols
For this tutorial, we will only implement two methods of the table view data source protocol. Both of these methods are required. This is the minimum implementation required to get our table view up and running. Even though we have set our view controller as the table view's delegate, we won't use any of the delegate methods in our application. If you have used a table view before, you won't find any surprises in the method implementations shown below.
- (NSInteger)tableView:(UITableView *)tableView numberOfRowsInSection:(NSInteger)section {
    if (self.movies && self.movies.count) {
        return self.movies.count;
    } else {
        return 0;
    }
}

- (UITableViewCell *)tableView:(UITableView *)tableView cellForRowAtIndexPath:(NSIndexPath *)indexPath {
    static NSString *cellID = @"Cell Identifier";

    UITableViewCell *cell = [tableView dequeueReusableCellWithIdentifier:cellID];

    if (!cell) {
        cell = [[UITableViewCell alloc] initWithStyle:UITableViewCellStyleSubtitle reuseIdentifier:cellID];
    }

    return cell;

}
In tableView:numberOfRowsInSection:, we need to return the number of rows in each section of the table view. In our example, the table view contains only one section (default), which makes everything a bit easier. First we check if our movies variable is not nil and we verify that it contains items. If both of these requirements are met, we return the number of items in the movies array, if not, we return zero.
Our tableView:cellForRowAtIndexPath: method is basic as well. We start by asking our table view whether there is a cell we can reuse. If this is not the case, we create a new cell with a style and reuse identifier. We end our implementation by returning our cell. This will do for now. You can now build and run your application. If you followed the steps correctly, you should see the activity indicator spinning like crazy and the table view should be hidden.
Adding AFNetworking to the Mix
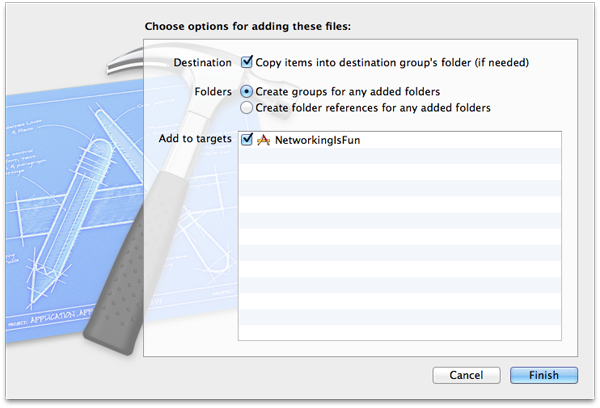
Adding AFNetworking to your project is easy as pie. Start by downloading the library from GitHub and extract the archive. The archive contains a folder named AFNetworking, which contains the source files we need to include in our project. Drag this entire folder into your Xcode project and make sure that you check Copy items into the destination group's folder (if needed) and add the source files to your target as well.
After adding the AFNetworking library to your project, build and run your application and watch as everything falls apart. What happened to our project? Why do we get all these warnings and errors? When we set up our Xcode project, we enabled Automatic Reference Counting (ARC). At the time of writing, the AFNetworking library does not use ARC. Don't worry, though, we can still use this neat library with very little effort. All we need to do is tell the compiler that all the source files of the AFNetworking library do not use ARC. That's it.
How do we do this? Select your project in the Project Navigator and select your target. Click the Build Phases tab in the top navigation and open the Compile Sources drawer. This table shows you all the source files the compiler will compile at compile time. The left column shows the names of the files and the right column shows the flags the compiler should know about.

You can see these flags as instructions or messages for the compiler. All you need to do is add a compiler flag to each source file of the AFNetworking library. To do this, select a source file from the list and double click the cell in the right column. A small window will appear in which you can add one or more compiler flags. In our case, simply type -fno-objc-arc and click Done. This flag tells the compiler that the source file does not use ARC. Make sure that you add this flag to all ten source files of the AFNetworking library.

Querying the iTunes Store Search API
AFNetworking is a library that can do a lot for you, but today we are only going to make use of two neat features. Before we can start using the AFNetworking classes, we need to add the following import statement just below the first import statement in your view controller's implementation file.
#import "AFNetworking.h"
This import statement will give us access to all the AFNetworking classes. Head back to our view controller's viewDidLoad method and add the following snippet immediately after the initialization of the movies array.
NSURL *url = [[NSURL alloc] initWithString:@"http://itunes.apple.com/search?term=harry&country=us&entity=movie"];
NSURLRequest *request = [[NSURLRequest alloc] initWithURL:url];

AFJSONRequestOperation *operation = [AFJSONRequestOperation JSONRequestOperationWithRequest:request success:^(NSURLRequest *request, NSHTTPURLResponse *response, id JSON) {
    NSLog(@"%@", JSON);

} failure:^(NSURLRequest *request, NSHTTPURLResponse *response, NSError *error, id JSON) {
    NSLog(@"Request Failed with Error: %@, %@", error, error.userInfo);
}];

[operation start];
Let me explain what is going on. In the first line, we create the NSURL for our request. The string we use in the initialization conforms to the format that the iTunes Store Search API expects. The syntax of the Search API is fairly straightforward: The term we are searching for is "harry", we restrict our search to the US iTunes Store, and we are looking only for movies. Easy, Right?
Next, we initialize a NSURLRequest and pass in the NSURL we just created. Then AFNetworking kicks in. AFNetworking contains a few very specialized classes that make our job very easy. The one we use here is AFJSONRequestOperation. This is a class that is designed to fetch and parse JSON data in the background. As the name implies, this class is a subclass of NSOperation or, to be more precise, one of the superclasses of this class inherits from NSOperation. The class lets you fetch the requested data and it also parses the JSON response. This means that we don't have to deal with raw JSON. The data it returns is ready to use in your application. AFNetworking uses the built-in JSON parser on iOS 5 and falls back to its own JSON parser for older iOS versions.
Using AFJSONRequestOperation is easy since it has only one class method. This class method accepts three arguments: (1) a NSURLRequest, (2) a success block, executed when the request succeeds, and (3) a failure block, executed when the request fails. If blocks are new to you or you are not comfortable using them, then I recommend reading the tutorial by Collin Ruffenach about blocks and enumeration on Mobiletuts+. The success block takes three arguments: (1) our NSURLRequest, (2) the NSHTTPURLResponse of our request, and (3) a parsed JSON object. The failure block is almost identical. The only difference is that it takes an additional argument, an NSError that contains more information about what went wrong in case our request fails.
For testing purposes, we log the parsed JSON object to see what the iTunes Store Search API sends back to us. In addition, we also log the error in the failure block in case our request happens to fail. Before building and running our application once again, we need to start the operation by calling start on our operation object. Build and run your application and take a look at the output in the console.
If all went well, you will see the results of our request logged to the console. The parsed JSON object is a dictionary with two keys: (1) resultCount, which contains the number of results returned and (2) the actual results as an array of dictionaries. We not only logged the response to the console to see if our request was successful, we can now see the keys for each item in the results array. We will need these keys to display some information in our table view.
Populating the Table View
We are now ready to show the results in our table view. Replace the log statement in the success block with the snippet shown below. We start by assigning the results array of the response object to the movies array. The only thing left to do is hide the activity indicator by stopping it, showing the table view, and reloading the table view with the new data stored in the movies array.
self.movies = [JSON objectForKey:@"results"];
[self.activityIndicatorView stopAnimating];
[self.tableView setHidden:NO];
[self.tableView reloadData];
Next we amend the tableView:cellForRowAtIndexPath: method. Adjust your implementation to reflect the one below. After obtaining a reference to a cell, we query the movies array for the correct item, and update the labels of the cell with the title and director of the movie. Build and run your application.
- (UITableViewCell *)tableView:(UITableView *)tableView cellForRowAtIndexPath:(NSIndexPath *)indexPath {
    static NSString *cellID = @"Cell Identifier";

    UITableViewCell *cell = [tableView dequeueReusableCellWithIdentifier:cellID];

    if (!cell) {
        cell = [[UITableViewCell alloc] initWithStyle:UITableViewCellStyleSubtitle reuseIdentifier:cellID];
    }

    NSDictionary *movie = [self.movies objectAtIndex:indexPath.row];
    cell.textLabel.text = [movie objectForKey:@"trackName"];
    cell.detailTextLabel.text = [movie objectForKey:@"artistName"];

    return cell;
}
You may have noticed that there are no thumbnails to be seen. Let's fix that by adding three extra lines to our tableView:cellForRowAtIndexPath: method. Build and run your application.
NSURL *url = [[NSURL alloc] initWithString:[movie objectForKey:@"artworkUrl100"]];
NSData *data = [NSData dataWithContentsOfURL:url];
cell.imageView.image = [[UIImage alloc] initWithData:data];
Did you notice that our table view does not scroll smoothly. Why is that? As I mentioned in a previous tutorial, you always have to make sure that the main thread of your application remains responsive. In the current implementation of our tableView:cellForRowAtIndexPath: method, we are downloading the thumbnails on the main thread. This means the user interface cannot be updated until a request for a thumbnail is finished. Our thumbnails are tiny so the requests don't take too long to complete, but imagine taking the same approach for larger assets. The user experience would be terrible. Even for our simple application, the user experience is unacceptable. However, we can remedy this with a very useful feature of the AFNetworking library.
AFNetworking to the Rescue
The creators of AFNetworking saw the need for downloading assets in the background as well. They therefore created a category for UIImageView. This category allows you to download images in the background with only two lines of code. This category is a true life saver. Have a look at the snippet below.
NSURL *url = [[NSURL alloc] initWithString:[movie objectForKey:@"artworkUrl100"]];
[cell.imageView setImageWithURL:url placeholderImage:[UIImage imageNamed:@"placeholder"]];
The first line of code stays the same. In the second line, we tell the image view where the thumbnail is located by passing an NSURL and we pass in a placeholder image, which is shown as long as our request has not returned a response. How cool is that? All we need to do is add a placeholder image to our project. This can be any image you want, but you can find the image I've used as a placeholder in the download file attached to this tutorial. Once you've added the placeholder image, build and run your application and test for yourself how smooth the table view scrolls!
Conclusion
Note that our application is very basic in its execution as it doesn't do any caching and we can only search the iTunes Store for the term "harry" in the movies section. However, with very little effort you can make a neat application to search the iTunes Store in a more dynamic way.
I hope this tutorial has convinced you that the AFNetworking library is a great tool to have in your arsenal. It can do a lot more than what I showed you in this post, but the main goal of this tutorial is to get you up and running with AFNetworking and ready to use it in a real world scenario.

Comments