If you've been following this series, you now have a theme for a knowledge base with a structure and front end. The final step is to make the knowledge base live.
If the requirements of your knowledge base are simple, then you won't need to worry about access, roles or hosting before you make your knowledge base live. Just make it visible to search engines, install and configure an SEO plugin, and you're good to go.
But if you need to host your knowledge base differently or restrict access to it in some way, you'll need to make some additional changes prior to launch.
In this tutorial I'll look at some of the considerations you may need to take into account and some of the solutions to them. I'll cover:
- populating the knowledge base
- creating extra user roles
- restricting access to the knowledge base to logged-in users
- hosting the knowledge base locally
1. Populating the Knowledge Base
It's unlikely that it will be your job to populate the knowledge base if you're creating it for a client—they'll probably have in-house staff who are experts on the subject it covers, or will have access to the materials and information needed to populate the knowledge base.
It's possible that they'll start this before you've completed the final build of the theme, and that the client will start to populate the knowledge base at beta stage, requesting tweaks to the final version based on their experience.
If this is the case, you'll need to ensure that any development work you do on the final version is on a separate copy of the site and that when you launch the knowledge base, you ensure that you don't overwrite anything in the database or any files in the wp-uploads directory. You might also need to amend page IDs referred to in the theme if the client is creating and populating these pages.
You might also need to provide training or guidance to the client to help them populate the knowledge base, particularly if you have made significant customizations via taxonomies and custom post types.
In some cases, you may need to customize the WordPress admin to provide help—you can add extra dashboard widgets to the main dashboard as well as removing unneeded ones, and also add help to the editing screens for each post type.
2. Creating User Roles
If your client has multiple staff who will be accessing the knowledge base in different ways, perhaps to populate or view specific sections of it, you might need to create extra user roles.
You can do this programmatically using the add_role() function, which takes the following parameters:
<?php add_role( $role, $display_name, $capabilities ); ?>
-
$roleis a unique name for the new role. -
$display_nameis the name that will be seen in the users' screens. -
$capabilitiesmeans the capabilities for this role.
If the capabilities for the new role are different from the default WordPress capabilities, you may need to add your own, using add_cap(). You can then use if ( current_user_can( $capability ) ) in your theme or plugins to define code which will only run if the current user has the new capability.
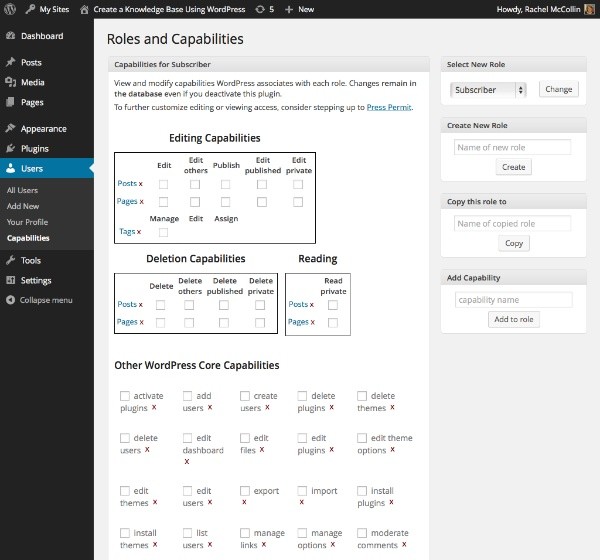
An alternative and quicker option is to use a plugin to manage user roles. A popular plugin which lets you create new roles using existing WordPress capabilities is the Members plugin. With this plugin, you can create custom roles and select their capabilities via the WordPress admin, as shown in the screenshot:

If you want to go further and create custom capabilities, the Capability Manager Enhanced plugin lets you create new capabilities and define what actions users with those capabilities can take in relation to different post types, meaning you can restrict access to certain parts of your knowledge base:
3. Restricting Access to Logged-in Users
If the knowledge base is just for internal use by your client or your team, then you'll need to restrict access to users who are logged in, or alternatively restrict access to some parts of the site to logged-in users. There are a few ways to do this.
Private Posts
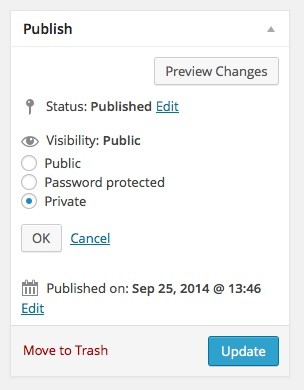
To restrict access to specific pages and/or posts, make them private by selecting the Private radio button above the Publish button in the post editing screen.
This restricts the site to Editors and Administrators only, which may not be appropriate if you want to allow subscribers to view private posts. However you could use the add_cap() function to add the read_private_posts capability to additional user roles:
function tutsplus_add_private_cap() {

    $role = get_role( 'subscriber' );

    $role->add_cap( 'read_private_posts' );
}
add_action( 'admin_init', 'tutsplus_add_private_cap');
Note that this will save changes to the user role to the database, so make sure you roll back any changes on theme or plugin deactivation.
If you want to do this without adding code, you could use the Members plugin to add the read_private_posts capability to as many roles as you like.
Hide the Site From All but Logged-in Users
There are a few plugins available that force people to log in as users before they can access your site at all. I tend to use the Force User Login plugin, which simply redirects users who aren't already logged in to the WordPress login screen before they can access content. Once they've logged in they'll be directed to the page they were originally looking for.
Create a Password-Protected Area of the Site
Another option is to create an area of the site which is restricted to logged-in users, with a login screen as its main screen. There are a couple ways you could do this.
The first is to use a login widget in the site footer for users to log in, after which they can access the restricted section.
Alternatively you could create a page with a login form included in it, using the wp_login_form() function. If you're doing this it's good practice to check if users are logged in before displaying the form, using the following code:
function tutsplus_login_form() {

    if ( is_user_logged_in() ) {
		return '';
    }

	return wp_login_form( array( 'echo' => false ) );

}
You then add the tutsplus_login_form function to your page templates as required or attach it to a hook in your theme, maybe using conditional tags to display it only on specific pages or post types. In your templates you can then check if the user is logged in before displaying content using the if( is_user_logged_in ) tag.
If you want to use a plugin to do this, the Members plugin lets you restrict content by role (such as to subscribers).
Alternatively you could use both of these methods—a login widget and a login form.
4. Hosting the Knowledge Base Locally
If you or your client will only be allowing access to the knowledge base to people who are all co-located, then it might be best to host it on a local server.
If you or your client do go down this route, you'll need to ensure that the server meets the minimum requirements for hosting WordPress:
- PHP version 5.2.4 or greater
- MySQL version 5.0.15 or greater
- Apache mod_rewrite module (for Permalinks)
You or your client will need to ensure that this is kept up to date in line with the requirements of future WordPress releases.
While this may seem like the most secure option, it has a number of disadvantages:
- If new people join your team working from a different location, they won't be able to access the knowledge base.
- If any of your team need access while out of the office, they won't be able to get to it.
- You'll need to manage your server, fix any problems and keep it up to date, while with web hosting your hosting provider will do this for you.
In the end, the choice is yours (or your client's).
Summary
If your knowledge base needs to have restricted content, additional user roles, or non-standard hosting, then the above tips will be useful in helping you make that rollout as smooth as possible. WordPress lets you create user roles and capabilities, restrict access to all or part of the site, and more.
The next challenge is to populate it with useful information—an unenviable task for the content team!

Comments