In the previous tutorial in this series, we started modifying the header section of the home page. In this tutorial, we'll start where we left off with the header section improvement, and then we'll create the new slider CMS block and call it from our template files. As we have a lot to cover in this article, let's start without further delay.
As we have partially fixed the top header, the only thing which needs fixing there is the top cart section. To customize the header cart, first we’ll try to find out which template files are responsible for rendering that part. To analyze that, let's first add some products to the cart, so that we can fully investigate it.
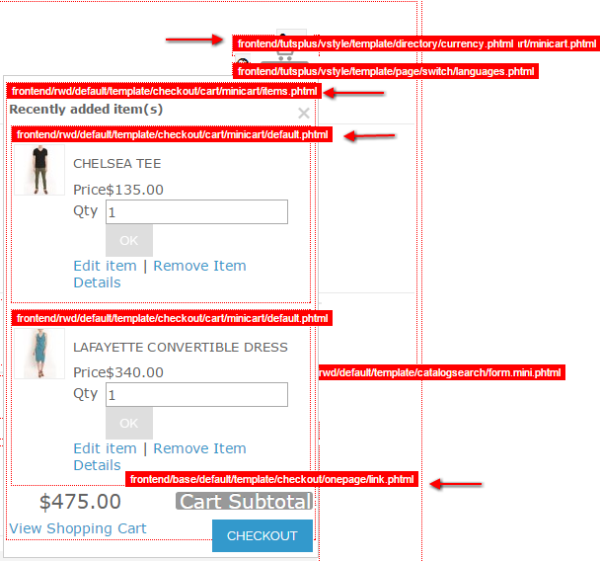
As we enable the template hints, we can see that the
header cart’s outer container is coming from this template file: frontend/rwd/default/template/checkout/cart/minicart.phtml. Then on click, the expanded portion is rendered through this file: frontend/rwd/default/template/checkout/cart/minicart/items.phtml. Finally, each cart item is rendered through this file: frontend/rwd/default/template/checkout/cart/minicart/default.phtml.
We’ll import all these files into our newly created theme, and then start modifying them.
Let’s start the modification process with the outermost minicart.phtml file. This is the current code of this file:
<?php
    $_cartQty = $this->getSummaryCount();
    if(empty($_cartQty)) {
        $_cartQty = 0;
    }
?>

<a href="<?php echo $this->helper('checkout/cart')->getCartUrl(); ?>" data-target-element="#header-cart" class="skip-link skip-cart <?php if($_cartQty <= 0): ?> no-count<?php endif; ?>">
    <span class="icon"></span>
    <span class="label"><?php echo $this->__('Cart'); ?></span>
    <span class="count"><?php echo $_cartQty; ?></span>
</a>

<div id="header-cart" class="block block-cart skip-content">
    <?php echo $this->getChildHtml('minicart_content');?>
</div>
Now before we start any modifications in it, let’s check the code of our header cart section in our original HTML file. The code there looks like this:
<ul class="option">
                  <li class="option-cart"><a href="#" class="cart-icon">cart <!--<span class="cart_no">02</span>--></a>
                <ul class="option-cart-item">
                  <li>
                    <div class="cart-item">
                      <div class="image"><img src="images/products/thum/products-01.png" alt=""></div>
                      <div class="item-description">
                        <p class="name">Lincoln chair</p>
                        <p>Size: <span class="light-red">One size</span><br>
                          Quantity: <span class="light-red">01</span></p>
                      </div>
                      <div class="right">
                        <p class="price">$30.00</p>
                        <a href="#" class="remove"><img src="images/remove.png" alt="remove"></a></div>
                    </div>
                  </li>
                  <li>
                    <div class="cart-item">
                      <div class="image"><img src="images/products/thum/products-02.png" alt=""></div>
                      <div class="item-description">
                        <p class="name">Lincoln chair</p>
                        <p>Size: <span class="light-red">One size</span><br>
                          Quantity: <span class="light-red">01</span></p>
                      </div>
                      <div class="right">
                        <p class="price">$30.00</p>
                        <a href="#" class="remove"><img src="images/remove.png" alt="remove"></a></div>
                    </div>
                  </li>
                  <li><span class="total">Total <strong>$60.00</strong></span>
                    <button class="checkout" onClick="location.href='checkout.html'">CheckOut</button>
                  </li>
                </ul>
              </li>
            </ul>
So, we’ll start modifying the PHP file code to make it similar to our HTML code. We’ll just use an anchor tag here to wrap the cart icon, and after that we'll show the minicart content. Hence our code will look like this:
<a href="<?php echo $this->helper('checkout/cart')->getCartUrl(); ?>" class="cart-icon">cart <!--<span class="cart_no">02</span>--></a>
<?php echo $this->getChildHtml('minicart_content');?>
Here we have replaced the outermost wrapper of the top cart,
but now we need to edit the drop-down section wrapper. As we have already seen,
that wrapper is coming from frontend/rwd/default/template/checkout/cart/minicart/items.phtml. Let’s check the current code of this file:
<?php
$_cartQty = $this->getSummaryCount();
if(empty($_cartQty)) {
$_cartQty = 0;
}
?>
<div id="minicart-error-message" class="minicart-message"></div>
<div id="minicart-success-message" class="minicart-message"></div>
<div class="minicart-wrapper">
<p class="block-subtitle">
<?php echo $this->__('Recently added item(s)') ?>
<a class="close skip-link-close" href="#" title="<?php echo $this->__('Close'); ?>">×</a>
</p>
<?php $_items = $this->getRecentItems() ?>
<?php $countItems = count($_items); ?>
<?php if($countItems): ?>
<div>
<ul id="cart-sidebar" class="mini-products-list">
<?php foreach($_items as $_item): ?>
<?php echo $this->getItemHtml($_item) ?>
<?php endforeach; ?>
</ul>
</div>
<script type="text/javascript">
truncateOptions();
decorateList('cart-sidebar', 'none-recursive');
$j('document').ready(function() {
var minicartOptions = {
formKey: "<?php echo $this->getFormKey();?>"
}
var Mini = new Minicart(minicartOptions);
Mini.init();
});
</script>
<div id="minicart-widgets">
<?php echo $this->getChildHtml('cart_promotion') ?>
</div>
<div class="block-content">
<p class="subtotal">
<?php if ($this->canApplyMsrp()): ?>
<span class="map-cart-sidebar-total"><?php echo $this->__('ORDER TOTAL WILL BE DISPLAYED BEFORE YOU SUBMIT THE ORDER'); ?></span>
<?php else: ?>
<span class="label"><?php echo $this->__('Cart Subtotal:') ?></span> <?php echo Mage::helper('checkout')->formatPrice($this->getSubtotal()) ?>
<?php if ($_subtotalInclTax = $this->getSubtotalInclTax()): ?>
<br />(<?php echo Mage::helper('checkout')->formatPrice($_subtotalInclTax) ?> <?php echo Mage::helper('tax')->getIncExcText(true) ?>)
<?php endif; ?>
<?php endif; ?>
</p>
</div>
<div class="minicart-actions">
<?php if($_cartQty && $this->isPossibleOnepageCheckout()): ?>
<ul class="checkout-types minicart">
<?php echo $this->getChildHtml('extra_actions') ?>
<li>
<a title="<?php echo $this->__('Checkout') ?>" class="button checkout-button" href="<?php echo $this->getCheckoutUrl() ?>">
<?php echo $this->__('Checkout') ?>
</a>
</li>
</ul>
<?php endif ?>
<a class="cart-link" href="<?php echo $this->getUrl('checkout/cart'); ?>">
<?php echo $this->__('View Shopping Cart'); ?>
</a>
</div>
<?php else: ?>
<p class="empty"><?php echo $this->__('You have no items in your shopping cart.') ?></p>
<?php endif ?>
</div>
When we compare it to our HTML template, there are couple
of things we need to do. First of all, inside the minicart-wrapper div, we’ll
start implementing our ul, and for each item we’ll iterate under the li tag. At
the end, we’ll show the cart total, or indicate that there are no items in the
cart. Our final code for this file will look like this:
<?php
$_cartQty = $this->getSummaryCount();
if(empty($_cartQty)) {
    $_cartQty = 0;
}
?>
<div id="minicart-error-message" class="minicart-message"></div>
<div id="minicart-success-message" class="minicart-message"></div>

<?php $_items = $this->getRecentItems() ?>
<?php $countItems = count($_items); ?>

<div class="minicart-wrapper">
    <ul class="option-cart-item">
        <?php if($countItems): ?>
            <?php foreach($_items as $_item): ?>
                <?php echo $this->getItemHtml($_item) ?>
            <?php endforeach; ?>
            <li>
                <span class="total">
                    <?php if ($this->canApplyMsrp()): ?>
                        <span class="map-cart-sidebar-total"><?php echo $this->__('ORDER TOTAL WILL BE DISPLAYED BEFORE YOU SUBMIT THE ORDER'); ?></span>
                    <?php else: ?>
                        <?php echo $this->__('Cart Subtotal:') ?> <strong></strong><?php echo Mage::helper('checkout')->formatPrice($this->getSubtotal()) ?>
                        <?php if ($_subtotalInclTax = $this->getSubtotalInclTax()): ?>
                            <br />(<?php echo Mage::helper('checkout')->formatPrice($_subtotalInclTax) ?> <?php echo Mage::helper('tax')->getIncExcText(true) ?>)
                        <?php endif; ?>
                    <?php endif; ?>
                </span>
                <button class="checkout" onClick="location.href='<?php echo $this->getCheckoutUrl() ?>'">CheckOut</button>
            </li>
        <?php else: ?>
            <p class="empty"><?php echo $this->__('You have no items in your shopping cart.') ?></p>
        <?php endif ?>
    </ul>
</div>
Now the final part which is left is styling the cart list
item itself. As we have already figured out, the file responsible for that part
is: frontend/rwd/default/template/checkout/cart/minicart/default.phtml.
The current code of this file looks like quite long and difficult to understand, but don’t be intimidated. We don’t need to edit all of this, because the main part of the file code is just calculating the right price, and other product options. Again, we’ll check our HTML code, put it in this file, and start replacing the static text with dynamic values. This is the code for each cart item in our HTML:
<li>
                    <div class="cart-item">
                      <div class="image"><img src="images/products/thum/products-01.png" alt=""></div>
                      <div class="item-description">
                        <p class="name">Lincoln chair</p>
                        <p>Size: <span class="light-red">One size</span><br>
                          Quantity: <span class="light-red">01</span></p>
                      </div>
                      <div class="right">
                        <p class="price">$30.00</p>
                        <a href="#" class="remove"><img src="images/remove.png" alt="remove"></a></div>
                    </div>
                  </li>
We’ll replace the img tag with this one:
<img src="<?php echo $this->getProductThumbnail()->resize(50, 50)->setWatermarkSize('30x10'); ?>" alt="<?php echo $this->escapeHtml($this->getProductName()) ?>">
Next, we’ll replace the name with dynamic code:
<?php if ($this->hasProductUrl()): ?><a href="<?php echo $this->getProductUrl() ?>"><?php endif; ?><?php echo $this->escapeHtml($this->getProductName()) ?><?php if ($this->hasProductUrl()): ?></a><?php endif; ?>
To display the product options, we’ll use this dynamic code:
<?php if ($_options = $this->getOptionList()):?>
                    <?php foreach ($_options as $_option) : ?>
                        <?php echo $this->escapeHtml($_option['label']) ?>:
                        <span class="light-red">
                        <?php if (is_array($_option['value'])): ?>
                            <?php echo nl2br(implode("\n", $_option['value'])) ?>
                        <?php else: ?>
                            <?php echo $_option['value'] ?>
                        <?php endif; ?>
                    </span>
                    <?php endforeach; ?><br>
                <?php endif; ?>
Then we’ll determine and show the quantity using this code:
<?php echo $this->__('Qty:'); ?> <span class="light-red"><?php echo $this->getQty()?></span>
For price calculation, we’ll enter this code in the place of the static price:
<?php if ($canApplyMsrp): ?>

                    <span class="map-cart-sidebar-item"><?php echo $this->__('See price before order confirmation.'); ?></span>

                <?php else: ?>

                    <?php if ($this->helper('tax')->displayCartPriceExclTax() || $this->helper('tax')->displayCartBothPrices()): ?>
                        <?php if ($this->helper('tax')->displayCartBothPrices()): ?>
                            <?php echo $this->__('Excl. Tax'); ?>:
                        <?php endif; ?>
                        <?php if (Mage::helper('weee')->typeOfDisplay($_item, array(0, 1, 4), 'sales')): ?>
                            <?php echo $this->helper('checkout')->formatPrice($_item->getCalculationPrice()+$_item->getWeeeTaxAppliedAmount()+$_item->getWeeeTaxDisposition()); ?>
                        <?php else: ?>
                            <?php echo $this->helper('checkout')->formatPrice($_item->getCalculationPrice()) ?>
                        <?php endif; ?>
                        <?php if (Mage::helper('weee')->getApplied($_item)): ?>
                            <br />
                            <?php if (Mage::helper('weee')->typeOfDisplay($_item, 1, 'sales')): ?>
                                <small>
                                    <?php foreach (Mage::helper('weee')->getApplied($_item) as $tax): ?>
                                        <span class="nobr"><?php echo $tax['title']; ?>: <?php echo Mage::helper('checkout')->formatPrice($tax['amount'],true,true); ?></span>
                                    <?php endforeach; ?>
                                </small>
                            <?php elseif (Mage::helper('weee')->typeOfDisplay($_item, 2, 'sales')): ?>
                                <?php foreach (Mage::helper('weee')->getApplied($_item) as $tax): ?>
                                    <span class="nobr"><small><?php echo $tax['title']; ?>: <?php echo Mage::helper('checkout')->formatPrice($tax['amount_incl_tax'],true,true); ?></small></span><br />
                                <?php endforeach; ?>
                            <?php elseif (Mage::helper('weee')->typeOfDisplay($_item, 4, 'sales')): ?>
                                <small>
                                    <?php foreach (Mage::helper('weee')->getApplied($_item) as $tax): ?>
                                        <span class="nobr"><?php echo $tax['title']; ?>: <?php echo Mage::helper('checkout')->formatPrice($tax['amount_incl_tax'],true,true); ?></span><br />
                                    <?php endforeach; ?>
                                </small>
                            <?php endif; ?>
                            <?php if (Mage::helper('weee')->typeOfDisplay($_item, 2, 'sales')): ?>
                                <span class="nobr"><?php echo Mage::helper('weee')->__('Total'); ?>:<br /> <?php echo $this->helper('checkout')->formatPrice($_item->getCalculationPrice()+$_item->getWeeeTaxAppliedAmount()+$_item->getWeeeTaxDisposition()); ?></span>
                            <?php endif; ?>
                        <?php endif; ?>
                    <?php endif; ?>


                    <?php if ($this->helper('tax')->displayCartPriceInclTax() || $this->helper('tax')->displayCartBothPrices()): ?>
                        <?php $_incl = $this->helper('checkout')->getPriceInclTax($_item); ?>
                        <?php if ($this->helper('tax')->displayCartBothPrices()): ?>
                            <br /><?php echo $this->__('Incl. Tax'); ?>:
                        <?php endif; ?>
                        <?php if (Mage::helper('weee')->typeOfDisplay($_item, array(0, 1, 4), 'sales')): ?>
                            <?php echo $this->helper('checkout')->formatPrice($_incl + Mage::helper('weee')->getWeeeTaxInclTax($_item)); ?>
                        <?php else: ?>
                            <?php echo $this->helper('checkout')->formatPrice($_incl-$_item->getWeeeTaxDisposition()) ?>
                        <?php endif; ?>
                        <?php if (Mage::helper('weee')->getApplied($_item)): ?>
                            <br />
                            <?php if (Mage::helper('weee')->typeOfDisplay($_item, 1, 'sales')): ?>
                                <small>
                                    <?php foreach (Mage::helper('weee')->getApplied($_item) as $tax): ?>
                                        <span class="nobr"><?php echo $tax['title']; ?>: <?php echo Mage::helper('checkout')->formatPrice($tax['amount'],true,true); ?></span><br />
                                    <?php endforeach; ?>
                                </small>
                            <?php elseif (Mage::helper('weee')->typeOfDisplay($_item, 2, 'sales')): ?>
                                <?php foreach (Mage::helper('weee')->getApplied($_item) as $tax): ?>
                                    <span class="nobr"><small><?php echo $tax['title']; ?>: <?php echo Mage::helper('checkout')->formatPrice($tax['amount_incl_tax'],true,true); ?></small></span>
                                <?php endforeach; ?>
                            <?php elseif (Mage::helper('weee')->typeOfDisplay($_item, 4, 'sales')): ?>
                                <small>
                                    <?php foreach (Mage::helper('weee')->getApplied($_item) as $tax): ?>
                                        <span class="nobr"><?php echo $tax['title']; ?>: <?php echo Mage::helper('checkout')->formatPrice($tax['amount_incl_tax'],true,true); ?></span><br />
                                    <?php endforeach; ?>
                                </small>
                            <?php endif; ?>
                            <?php if (Mage::helper('weee')->typeOfDisplay($_item, 2, 'sales')): ?>
                                <span class="nobr"><?php echo Mage::helper('weee')->__('Total incl. tax'); ?>:<br /> <?php echo $this->helper('checkout')->formatPrice($_incl + Mage::helper('weee')->getWeeeTaxInclTax($_item)); ?></span>
                            <?php endif; ?>
                        <?php endif; ?>
                    <?php endif; ?>

                <?php endif; //Can apply MSRP ?>
And as the last step, we’ll replace the href to remove the URL with this one:
<?php echo $this->getAjaxDeleteUrl() ?>
I have found all this code from the actual default.phtml.
You don’t have to figure out all the logic and code on your own, but if you look
closely you can find it in the file you are trying to modify.
So, the final code of our default.phtml file looks like this:
<?php
    $_item = $this->getItem();
    $isVisibleProduct = $_item->getProduct()->isVisibleInSiteVisibility();
    $canApplyMsrp = Mage::helper('catalog')->canApplyMsrp($_item->getProduct(), Mage_Catalog_Model_Product_Attribute_Source_Msrp_Type::TYPE_BEFORE_ORDER_CONFIRM);
?>
<li>
    <div class="cart-item">
        <div class="image"><img src="<?php echo $this->getProductThumbnail()->resize(50, 50)->setWatermarkSize('30x10'); ?>" alt="<?php echo $this->escapeHtml($this->getProductName()) ?>"></div>
        <div class="item-description">
            <p class="name"><?php if ($this->hasProductUrl()): ?><a href="<?php echo $this->getProductUrl() ?>"><?php endif; ?><?php echo $this->escapeHtml($this->getProductName()) ?><?php if ($this->hasProductUrl()): ?></a><?php endif; ?></p>
            <p>
                <?php if ($_options = $this->getOptionList()):?>
                    <?php foreach ($_options as $_option) : ?>
                        <?php echo $this->escapeHtml($_option['label']) ?>:
                        <span class="light-red">
                        <?php if (is_array($_option['value'])): ?>
                            <?php echo nl2br(implode("\n", $_option['value'])) ?>
                        <?php else: ?>
                            <?php echo $_option['value'] ?>
                        <?php endif; ?>
                    </span>
                    <?php endforeach; ?><br>
                <?php endif; ?>
                <?php echo $this->__('Qty:'); ?> <span class="light-red"><?php echo $this->getQty()?></span>
            </p>
        </div>
        <div class="right">
            <p class="price">
                <?php if ($canApplyMsrp): ?>

                    <span class="map-cart-sidebar-item"><?php echo $this->__('See price before order confirmation.'); ?></span>

                <?php else: ?>

                    <?php if ($this->helper('tax')->displayCartPriceExclTax() || $this->helper('tax')->displayCartBothPrices()): ?>
                        <?php if ($this->helper('tax')->displayCartBothPrices()): ?>
                            <?php echo $this->__('Excl. Tax'); ?>:
                        <?php endif; ?>
                        <?php if (Mage::helper('weee')->typeOfDisplay($_item, array(0, 1, 4), 'sales')): ?>
                            <?php echo $this->helper('checkout')->formatPrice($_item->getCalculationPrice()+$_item->getWeeeTaxAppliedAmount()+$_item->getWeeeTaxDisposition()); ?>
                        <?php else: ?>
                            <?php echo $this->helper('checkout')->formatPrice($_item->getCalculationPrice()) ?>
                        <?php endif; ?>
                        <?php if (Mage::helper('weee')->getApplied($_item)): ?>
                            <br />
                            <?php if (Mage::helper('weee')->typeOfDisplay($_item, 1, 'sales')): ?>
                                <small>
                                    <?php foreach (Mage::helper('weee')->getApplied($_item) as $tax): ?>
                                        <span class="nobr"><?php echo $tax['title']; ?>: <?php echo Mage::helper('checkout')->formatPrice($tax['amount'],true,true); ?></span>
                                    <?php endforeach; ?>
                                </small>
                            <?php elseif (Mage::helper('weee')->typeOfDisplay($_item, 2, 'sales')): ?>
                                <?php foreach (Mage::helper('weee')->getApplied($_item) as $tax): ?>
                                    <span class="nobr"><small><?php echo $tax['title']; ?>: <?php echo Mage::helper('checkout')->formatPrice($tax['amount_incl_tax'],true,true); ?></small></span><br />
                                <?php endforeach; ?>
                            <?php elseif (Mage::helper('weee')->typeOfDisplay($_item, 4, 'sales')): ?>
                                <small>
                                    <?php foreach (Mage::helper('weee')->getApplied($_item) as $tax): ?>
                                        <span class="nobr"><?php echo $tax['title']; ?>: <?php echo Mage::helper('checkout')->formatPrice($tax['amount_incl_tax'],true,true); ?></span><br />
                                    <?php endforeach; ?>
                                </small>
                            <?php endif; ?>
                            <?php if (Mage::helper('weee')->typeOfDisplay($_item, 2, 'sales')): ?>
                                <span class="nobr"><?php echo Mage::helper('weee')->__('Total'); ?>:<br /> <?php echo $this->helper('checkout')->formatPrice($_item->getCalculationPrice()+$_item->getWeeeTaxAppliedAmount()+$_item->getWeeeTaxDisposition()); ?></span>
                            <?php endif; ?>
                        <?php endif; ?>
                    <?php endif; ?>


                    <?php if ($this->helper('tax')->displayCartPriceInclTax() || $this->helper('tax')->displayCartBothPrices()): ?>
                        <?php $_incl = $this->helper('checkout')->getPriceInclTax($_item); ?>
                        <?php if ($this->helper('tax')->displayCartBothPrices()): ?>
                            <br /><?php echo $this->__('Incl. Tax'); ?>:
                        <?php endif; ?>
                        <?php if (Mage::helper('weee')->typeOfDisplay($_item, array(0, 1, 4), 'sales')): ?>
                            <?php echo $this->helper('checkout')->formatPrice($_incl + Mage::helper('weee')->getWeeeTaxInclTax($_item)); ?>
                        <?php else: ?>
                            <?php echo $this->helper('checkout')->formatPrice($_incl-$_item->getWeeeTaxDisposition()) ?>
                        <?php endif; ?>
                        <?php if (Mage::helper('weee')->getApplied($_item)): ?>
                            <br />
                            <?php if (Mage::helper('weee')->typeOfDisplay($_item, 1, 'sales')): ?>
                                <small>
                                    <?php foreach (Mage::helper('weee')->getApplied($_item) as $tax): ?>
                                        <span class="nobr"><?php echo $tax['title']; ?>: <?php echo Mage::helper('checkout')->formatPrice($tax['amount'],true,true); ?></span><br />
                                    <?php endforeach; ?>
                                </small>
                            <?php elseif (Mage::helper('weee')->typeOfDisplay($_item, 2, 'sales')): ?>
                                <?php foreach (Mage::helper('weee')->getApplied($_item) as $tax): ?>
                                    <span class="nobr"><small><?php echo $tax['title']; ?>: <?php echo Mage::helper('checkout')->formatPrice($tax['amount_incl_tax'],true,true); ?></small></span>
                                <?php endforeach; ?>
                            <?php elseif (Mage::helper('weee')->typeOfDisplay($_item, 4, 'sales')): ?>
                                <small>
                                    <?php foreach (Mage::helper('weee')->getApplied($_item) as $tax): ?>
                                        <span class="nobr"><?php echo $tax['title']; ?>: <?php echo Mage::helper('checkout')->formatPrice($tax['amount_incl_tax'],true,true); ?></span><br />
                                    <?php endforeach; ?>
                                </small>
                            <?php endif; ?>
                            <?php if (Mage::helper('weee')->typeOfDisplay($_item, 2, 'sales')): ?>
                                <span class="nobr"><?php echo Mage::helper('weee')->__('Total incl. tax'); ?>:<br /> <?php echo $this->helper('checkout')->formatPrice($_incl + Mage::helper('weee')->getWeeeTaxInclTax($_item)); ?></span>
                            <?php endif; ?>
                        <?php endif; ?>
                    <?php endif; ?>

                <?php endif; //Can apply MSRP ?>
            </p>
            <a href="<?php echo $this->getAjaxDeleteUrl() ?>" class="remove"><img src="<?php echo $this->getSkinUrl('images/remove.png'); ?>" alt="remove"></a></div>
    </div>
</li>
Now if you save all these files, and reload the homepage, you should see something like this:

We have some problems with the styles, but the HTML rendering is pretty close to our required HTML design. Now that we have completed the top header section, the next is the logo section. Luckily there is nothing much to do there except the styling part (to make the logo center aligned) that we’ll do in the styling article. Our menu items also seem pretty close to what we expect, so we’ll just need to modify the search bar, and then the main slider.
To modify our search bar, let’s turn on the template hints,
and see which part is responsible for rendering this code: frontend/rwd/default/template/catalogsearch/form.mini.phtml.
Currently this file looks like this:
<form id="search_mini_form" action="<?php echo $catalogSearchHelper->getResultUrl() ?>" method="get">
    <div class="input-box">
        <label for="search"><?php echo $this->__('Search:') ?></label>
        <input id="search" type="search" name="<?php echo $catalogSearchHelper->getQueryParamName() ?>" value="<?php echo $catalogSearchHelper->getEscapedQueryText() ?>" class="input-text required-entry" maxlength="<?php echo $catalogSearchHelper->getMaxQueryLength();?>" placeholder="<?php echo $this->__('Search entire store here...') ?>" />
        <button type="submit" title="<?php echo $this->__('Search') ?>" class="button search-button"><span><span><?php echo $this->__('Search') ?></span></span></button>
    </div>

    <div id="search_autocomplete" class="search-autocomplete"></div>
    <script type="text/javascript">
    //<![CDATA[
        var searchForm = new Varien.searchForm('search_mini_form', 'search', '');
        searchForm.initAutocomplete('<?php echo $catalogSearchHelper->getSuggestUrl() ?>', 'search_autocomplete');
    //]]>
    </script>
</form>
If we look at the HTML of the search bar in our HTML design file, it looks like this:
<div class="col-md-3 col-sm-2">
            <div class="search">
            	<input type="text" value="Searching here...">
                <button type="button"></button>
            </div>
        </div>
So, we’ll use the outer divs of the HTML, and replace the
inner content with the dynamic content. Our new form.mini.phtml file will look
like this:
<form id="search_mini_form" action="<?php echo $catalogSearchHelper->getResultUrl() ?>" method="get">
    <div class="searchContainer">
        <input id="search" type="search" name="<?php echo $catalogSearchHelper->getQueryParamName() ?>" value="<?php echo $catalogSearchHelper->getEscapedQueryText() ?>" class="input-text required-entry" maxlength="<?php echo $catalogSearchHelper->getMaxQueryLength();?>" placeholder="<?php echo $this->__('Search here...') ?>">
        <button type="submit" class="button search-button"></button>
    </div>
    <div id="search_autocomplete" class="search-autocomplete"></div>
    <script type="text/javascript">
        //<![CDATA[
        var searchForm = new Varien.searchForm('search_mini_form', 'search', '');
        searchForm.initAutocomplete('<?php echo $catalogSearchHelper->getSuggestUrl() ?>', 'search_autocomplete');
        //]]>
    </script>
</form>
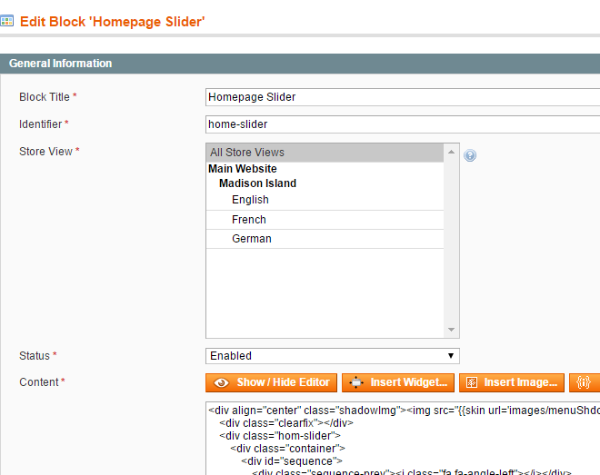
In the last part of this article, we’ll edit the main slider. For that, we’ll create a new static block, by going to CMS > Static Blocks > Add New Block. We’ll name this Block ‘Homepage Slider’, and we’ll insert the Identifier as ‘home-slider’—that’s how the code will be able to find this block.
Now we’ll enter the slider code from our HTML.
<div align="center" class="shadowImg"><img src="{{skin url='images/menuShdow.png'}}" alt=""></div>
    <div class="clearfix"></div>
    <div class="hom-slider">
        <div class="container">
            <div id="sequence">
                <div class="sequence-prev"><i class="fa fa-angle-left"></i></div>
                <div class="sequence-next"><i class="fa fa-angle-right"></i></div>
                <ul class="sequence-canvas">
                    <li class="animate-in">
                        <div class="flat-image formBottom delay200" data-bottom="true"><img src="{{skin url='images/slider-image-02.png'}}" alt=""></div>
                        <div class=" formLeft delay300 text-center bannerText" >
                            <h1>Ray of light</h1>
                            <p>Lorem Ipsum is simply dummy text of the printing and typesetting industry.</p>
                            <a href="#" class="more">Shop Now</a>
                        </div>
                    </li>
                    <li class="animate-in">
                        <div class=" formLeft delay300 text-center bannerText float-right secondSlideText" >
                            <h1>Ray of light</h1>
                            <p>Lorem Ipsum is simply dummy text of the printing and typesetting industry.</p>
                            <a href="#" class="more">Shop Now</a>
                        </div>
                        <div class="flat-image formBottom delay200 secondSlideImg" data-bottom="true"><img src="{{skin url='images/slider-image-01.png'}}" alt=""></div>
                    </li>
                </ul>
            </div>
        </div>
    </div>
    <div class="clearfix"></div>
Note that we have replaced the image source relative to the
skin directory using the skin_url tag like this:
<img src="{{skin url='images/slider-image-01.png'}}" alt="">
Now we’ll add these lines in the header.phtml file we
created in the last article, just above the last line <?php echo
$this->getChildHtml('topContainer'); ?>.
<?php if($this->getIsHomePage()): ?>
    <?php echo $this->getLayout()
        ->createBlock('csms/block')
        ->setBlockId('home-slider')->toHtml(); ?>
<?php  endif; ?>
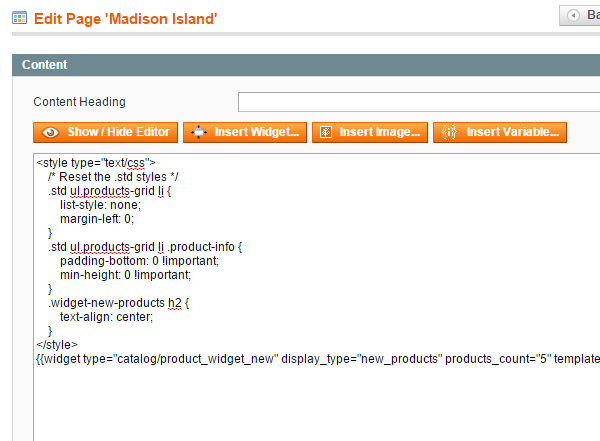
The last step is to remove the current slider. To do that, go to CMS-Pages > Madison Island, and from the Content section, remove all the code up to the start of the style section.
Save everything and reload the home page, and now you should see it all coming along very well. Some styles are off, but we’ll deal with that in a separate styling tutorial. For now we just need to take care of the content section of the home page, where we’ll show a latest products carousel, and then we’ll customize the footer. We’ll do all this in the next tutorial, so stay tuned for it!

Comments