Picturing animation in terms of vectors is intuitive, but understanding vector mathematics is a pain. In this tutorial, I hope to ease that pain and provide a solution to animation problems using a custom written Vector2D class. We will look at some fundamental concepts of linear kinematics in the Eulerian approach: displacement, velocity and acceleration. Then, we'll build a simple application with it.
Final Result Preview
Let's take a look at the final result we will be working towards. Click on the Flash panel below and control the arrowhead by pressing the four directional keys.
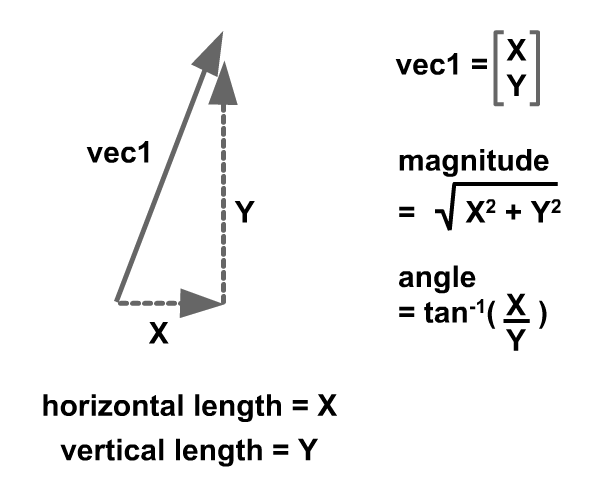
Step 1: Vector Quantity
All vector quantities have two components: magnitude and direction.
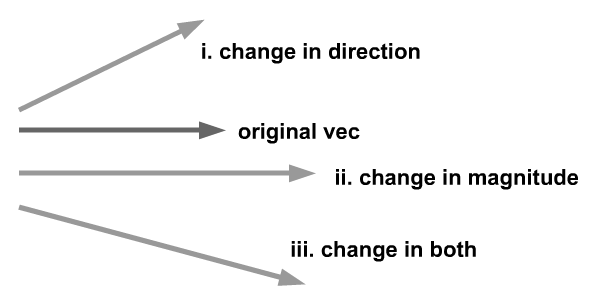
Step 2: Change in Vector Quantity
A change in vector quantities refers to one of these cases:
- Change in direction
- Change in magnitude
- Change in both magnitude and direction
Step 3: Displacement as a Vector Quantity
Displacement, velocity and acceleration are vector quantities. Their definitions are as follows:
- Displacement - Vector of the shortest path pointing from origin to destination. I define origin as point (0, 0) and destination as the particle's location relative to this point. Basically, it refers to the Cartesian Coordinate system as implemented by Flash.
- Velocity - Velocity is the change of displacement over time.
- Acceleration - Acceleration is the change of velocity over time.
The animation below shows displacement as we are going to implement in Flash later.
Step 4: Velocity as a Vector Quantity
Velocity is illustrated by the animation below. Note velocity is constant, which means acceleration is absent in this scenario. If velocity is zero, displacement will remain constant throughout.
Step 5: Acceleration as a Vector Quantity
Acceleration is illustrated by the animation below. Note: kinematics implies constant acceleration. If acceleration changes over time, it falls under the topic of dynamics. Dynamics is the study of forces that cause of acceleration to vary over time. One such force is gravity, and I've written a post on animating that.
Step 6: Start Building a Projectile
Now that you have gotten a brief understanding of linear kinematics quantities and able to related them to vectors, we can start building our Projectile class. We would like the projectile be able to capture all these quantities: displacement, velocity and acceleration - so that it can be manipulated on each frame.
Below is the data we shall record in our Projectile class:
private var displace:Vector2D;
private var velo:Vector2D;
private var acc:Vector2D;
Step 7: Initialize Projectile
Upon initiation of this Projectile class, we shall initialise the mentioned variables and draw its graphical representation.
public function Projectile()
{
	//draw graphics
	this.draw();

	//init all vector quantities
	displace = new Vector2D(this.x, this.y);
	velo = new Vector2D(0, 0);
	acc = new Vector2D(0, 0);
}

protected function draw():void
{
	//drawing the arrowhead
	var height:Number = 30;
	var width:Number = 60;
	graphics.beginFill(0x0000FF);
	graphics.moveTo(0, 0);
	graphics.lineTo(width / -3, height / -2);
	graphics.lineTo(width / 2, 0);
	graphics.lineTo(width / -3, height / 2);
	graphics.lineTo(0, 0);
	graphics.endFill();
}
Step 8: Accessors of Vector Quantities
The following are accessors of our private variables - displace, velo, acc - in the Projectile class.
public function setDisp(mag:Number, angle:Number):void
{
	displace.redefine(mag, angle);
}

public function getDisp():Vector2D
{
	return displace;
}

public function setVelo(mag:Number, angle:Number):void
{
	velo.redefine(mag, angle);
}

public function getVelo():Vector2D
{
	return velo;
}

public function setAcc(mag:Number, angle:Number):void
{
	acc.redefine(mag, angle);
}

public function getAcc():Vector2D
{
	return acc
}
Step 9: Updaters of Vector Quantities
Upon refreshing every frame, we need to update velocity (using acceleration) and update displacement (using the said velocity). This can be achieved using the following functions. For a thorough explanation on Vector addition, do visit this great post from Daniel Sidhon.
public function applyVelo():void
{
	this.displace = this.displace.add(velo);
}

public function applyAcc():void
{
	this.velo = this.velo.add(acc);
}

//update sprite's position by displacement.
public function animate():void
{
	this.x = this.displace.x;
	this.y = this.displace.y;
}
Step 10: Updater for Sprite'S Orientation
We will also need to update the orientation of the Sprite. This can be achieved through the rotation property of Sprite.
public function orient():void
{
	this.rotation = Math2.degreeOf(velo.getAngle());
}
I have also implemented a Math2 static class, in which I've written a function to easily convert back and forth from the angle's units of degrees and radians.
public static function radianOf (deg:Number):Number
{
	return deg/180*Math.PI;
}

public static function degreeOf (rad:Number):Number
{
	return rad/Math.PI*180;
}
Step 11: The Main Class
Now that we have established our Projectile and Math2 class, we can start to code our Main class. We will need a Vector2D class as well although thorough explanation is not included due to the aforementioned article on Vectors by Daniel Sidhon. I assume readers understand the Vector2D class after reading it. However, if clarifications are needed, do prompt me with your queries.
First of all, we need to know private variables of this class.
private var b1:Projectile;

//keypress flags
private var UP:Boolean = false;
private var DOWN:Boolean = false;
private var LEFT:Boolean = false;
private var RIGHT:Boolean = false;
Step 12: Initializing Main
Upon initialization of Main, function init will be launched. This function will create a new Projectile and set its initial velocity. Then, listeners to events will be assigned.
private function init(e:Event = null):void
{
	removeEventListener(Event.ADDED_TO_STAGE, init);
	// entry point

	b1 = new Projectile();
	stage.addChild(b1);

	//setting initial velocity
	b1.setVelo(5, Math2.radianOf(30));

	//setting event listeners
	b1.addEventListener(Event.ENTER_FRAME, proj_enterFrame);
	stage.addEventListener(KeyboardEvent.KEY_DOWN, handle_keyDown);
	stage.addEventListener(KeyboardEvent.KEY_UP, handle_keyUp);
}
Step 13: Keyboard Event Listeners
I have defined user control as keypresses of Up, Left, Down and Left arrow keys. Upon pressing and releasing those keys, flag variables of Main (Step 11) will be turned true and false. Based on these flags, the Vector quantities will be manipulated on every frame. Note as well I have divided controls into horizontal and vertical axis manipulators.
private function handle_keyDown(e:KeyboardEvent):void
{
	if (e.keyCode == Keyboard.UP) UP = true;
	else if (e.keyCode == Keyboard.DOWN) DOWN = true;

	if (e.keyCode == Keyboard.LEFT) LEFT = true;
	else if (e.keyCode == Keyboard.RIGHT) RIGHT = true;
}

private function handle_keyUp(e:KeyboardEvent):void
{
	if (e.keyCode == Keyboard.UP) UP = false;
	else if (e.keyCode == Keyboard.DOWN) DOWN = false;

	if (e.keyCode == Keyboard.LEFT) LEFT = false;
	else if (e.keyCode == Keyboard.RIGHT) RIGHT = false;
}
Step 14: EnterFrame Event Listeners
Upon refresh of each frame the following code will be executed. It is long, but don't worry; just read on.
private function proj_enterFrame(e:Event):void
{
	//define acceleration
	var accMag:Number = 0.1;
	if (UP) {
		b1.setAcc(accMag, Math2.radianOf(-90));
		b1.applyAcc();
	}

	else if (DOWN) {
		b1.setAcc(accMag, Math2.radianOf(90));
		b1.applyAcc();
	}

	if (LEFT) {
		b1.setAcc(accMag, Math2.radianOf(180));
		b1.applyAcc();
	}

	else if (RIGHT) {
		b1.setAcc(accMag, Math2.radianOf(0));
		b1.applyAcc();
	}

	//decelerate as nothng is pressed to simulate friction.
	if (UP + DOWN + LEFT + RIGHT == 0) {
		var currentVeloMag:Number = b1.getVelo().getMagnitude();
		var currentVeloAng:Number = b1.getVelo().getAngle();

		if(currentVeloMag > 1){
			b1.setAcc(accMag * -1, currentVeloAng);
			b1.applyAcc();
		}
	}

	b1.applyVelo();

	//restricting sprite to borders of the stage
	b1.getDisp().x = Math2.implementBound(0, stage.stageWidth, b1.getDisp().x);
	b1.getDisp().y = Math2.implementBound(0, stage.stageHeight, b1.getDisp().y);

	b1.animate();
	b1.orient();
}
Step 15: Update Motion
Updating the motion should be done in the following order:
- Define new acceleration according to user keypress.
- Using acceleration, update current velocity.
- Using current velocity, update current displacement.
- Refine displacement to keep object inside boundaries.
I've highlighted the codes for easy identification of these steps.
private function proj_enterFrame(e:Event):void
{
	//define acceleration
	var accMag:Number = 0.1;
	if (UP) {
		b1.setAcc(accMag, Math2.radianOf(-90));
		b1.applyAcc();
	}

	else if (DOWN) {
		b1.setAcc(accMag, Math2.radianOf(90));
		b1.applyAcc();
	}

	if (LEFT) {
		b1.setAcc(accMag, Math2.radianOf(180));
		b1.applyAcc();
	}

	else if (RIGHT) {
		b1.setAcc(accMag, Math2.radianOf(0));
		b1.applyAcc();
	}

	//decelerate as nothing is pressed to simulate friction.
	if (UP + DOWN + LEFT + RIGHT == 0) {
		var currentVeloMag:Number = b1.getVelo().getMagnitude();
		var currentVeloAng:Number = b1.getVelo().getAngle();

		if(currentVeloMag > 1){
			b1.setAcc(accMag * -1, currentVeloAng);
			b1.applyAcc();
		}
	}

	b1.applyVelo();

	//restricting sprite to borders of the stage
	b1.getDisp().x = Math2.implementBound(0, stage.stageWidth, b1.getDisp().x);
	b1.getDisp().y = Math2.implementBound(0, stage.stageHeight, b1.getDisp().y);

	b1.animate();
	b1.orient();
}
Step 16: Slowing Down Motion
You may find that there are other functions slotted in between these highlighted codes. What are they? One is to apply another vector to slow down our projectile as the user does not press on any keys. This is applied before we add velocity to our displacement.
//decelerate as nothng is pressed to simulate friction.
if (UP + DOWN + LEFT + RIGHT == 0) {
	var currentVeloMag:Number = b1.getVelo().getMagnitude();
	var currentVeloAng:Number = b1.getVelo().getAngle();

	if(currentVeloMag > 1){
		b1.setAcc(accMag * -1, currentVeloAng);
		b1.applyAcc();
	}
}
Step 17: Stay Inside
The next one is to restrict our projectile to always stay on the stage, otherwise it will fly out of the screen. Again, implementBound is a function I've included in the Math2 static class. Given an upper bound, lower bound and a random value, implementBound will return a value that is within the boundaries.
After applying this constraints onto our displacement (and only after that), we update the Sprite's position with this displacment value.
//restricting sprite to borders of the stage
b1.getDisp().x = Math2.implementBound(0, stage.stageWidth, b1.getDisp().x);
b1.getDisp().y = Math2.implementBound(0, stage.stageHeight, b1.getDisp().y);
Step 18: Orient Sprite
Before we leave this sprite as it is, we should orient it so that it always points in the position it's heading using function orient.
Step 19: Get Set and Go!
Now everything is set to go. As you launch this piece by pressing on Ctrl + Enter, you will see an arrow that gradually slows down as it heads diagonally down the screen. Press on the four directional keys to move the arrow about. Don't worry about losing your arrow; it'll stay inside your view.
Conclusion
This article should get you familiar with using vectors to animate motion. Once you have understood kinematics, do proceed to read up on my post on dynamics. Let me know how it goes. Terima Kasih.

Comments