In the last post, we introduced the idea of spriting, an easy way to animate in JavaScript that works in all browsers. We also walked through how to set up the sprite as a background image for a div and then use a line of JavaScript to change the background position to make it appear as if the image has moved.
In this post, we will use this technique to animate both running and jumping motions. In order to create the animation, we will need to quickly change the background position at a regular interval. Take a look again at the sprite we are using.
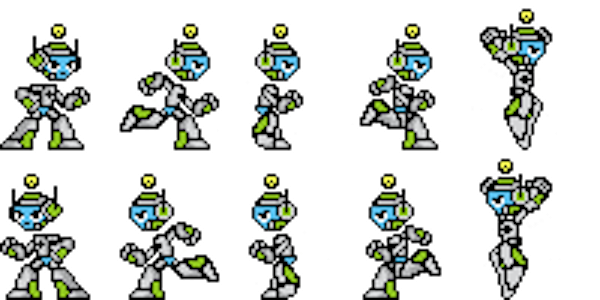
Meet J, the mascot for my company, Joust Multimedia.
In our example, we have ten total images: one of J standing facing right, three of J running to the right and one of J jumping while facing right (with the same number of each frame facing left). Let's start with making him run to the right. In order to make our image look like it is running, we will need to do two things: change the sprite to a different image and move the div towards the right.
Running to the Right Animation
We certainly won't want to be stuck clicking different buttons to cycle through the sprites, so we will need to create some functions that do this automatically.
For our running function, we want to:
- Move the
divtowards the right slightly - Move to the next frame of animation
- Pause for a fraction of a second (to preserve the "persistence of vision" illusion)
- Loop the function again
Fortunately, there is an easy way to loop with functions. A native command in JavaScript called setTimeout will allow us to create a timed delay, after which we will call the function again (from inside the function).
function run_right(){
  // Move slightly to the right ...
  // Change to the next frame of animation ...

  // this will call 'run_right' again after 200 milliseconds
  setTimeout(function(){run_right();}, 200);
}
So now we have a function that will call itself again five times a second (which will be fast enough to create animation for our purposes). Remember here that browsers are not terribly accurate with their timers. You can specify timing to the millisecond, but that doesn't mean your script will run at that timing exactly!
Our next problem to tackle is how is our function going to know which sprite to change to? In our example, we will need to cycle back and forth through our three images (to have four total frames of animation). To do this, we are going to pass our function a bit of information to tell it which slide to switch to. Once in the function, we will do a test that will check which slide we should be on, then switch the background position to the correct sprite. When we call the function again, we will pass the next slide as the argument.
function run_right(slide){
  // Move slightly to the right ...
  switch (slide){ // this switch statement checks for different possibilities for 'slide'
    case 1: // if 'slide' equals '1' ...
      document.getElementById('j').style.backgroundPosition = "-40px 0px";
      setTimeout(function(){run_right(2);}, 200);
      break;
    case 2: // if 'slide' equals '2' ...
      document.getElementById('j').style.backgroundPosition = "-80px 0px";
      setTimeout(function(){run_right(3);}, 200);
      break;
    case 3: // if 'slide' equals '3' ...
      document.getElementById('j').style.backgroundPosition = "-120px 0px";
      setTimeout(function(){run_right(4);}, 200);
      break;
    case 4: // if 'slide' equals '4' ...
      document.getElementById('j').style.backgroundPosition = "-80px 0px";
      setTimeout(function(){run_right(1);}, 200);
      break;
  }
}
And now when we call the function for the first time, we will need to make sure we pass the starting slide.
<input type="button" value="Run Right" onclick="run_right(1);" />
Similarly, to move our div to the right slightly, we can pass the initial left attribute of the div, then move the div slightly each time the function is called.
function run_right(slide, left){

  left = left + 15; // Increase his left attribute by 15px
  document.getElementById('j').style.left = left+"px";

  switch (slide){ // this switch statement checks for different possibilities for 'slide'
    case 1: // if 'slide' equals '1' ...
      document.getElementById('j').style.backgroundPosition = "-40px 0px";
      setTimeout(function(){run_right(2, left);}, 200);
      break;
    case 2: // if 'slide' equals '2' ...
      document.getElementById('j').style.backgroundPosition = "-80px 0px";
      setTimeout(function(){run_right(3, left);}, 200);
      break;
    case 3: // if 'slide' equals '3' ...
      document.getElementById('j').style.backgroundPosition = "-120px 0px";
      setTimeout(function(){run_right(4, left);}, 200);
      break;
    case 4: // if 'slide' equals '4' ...
      document.getElementById('j').style.backgroundPosition = "-80px 0px";
      setTimeout(function(){run_right(1, left);}, 200);
      break;
  }
}
And when we initially call the function, we need to make sure we pass the current left position of our div.
<input type="button" value="Run Right" onclick="run_right(1, document.getElementById('j').offsetLeft);" />
Stopping the Animation
So, now we have a function that, when called, will animate J to run to the right. Unfortunately, we have no way to stop it. First of all, we will need to make the function stop calling itself if J runs to the edge of our stage. To do that, every time the function runs, we will check an if statement to see if J has room to keep running. If so, we will run the function like normal. If not, we will stop calling the function and return him to the standing sprite.
function run_right(slide, left){
  // If we can add 15 pixels to the left and have J's right edge not be at the stage's right edge ...
  if ((left + 15) < (document.getElementById('stage').offsetWidth - document.getElementById('j').offsetWidth)){
    // We have room! Continue like normal here
  } else { // if we are on the right edge, we need to stop calling the function and return to standing
    document.getElementById('j').style.backgroundPosition = "0px 0px";
  }
}
Finally, we will want to have a way to stop the function, when needed. We can set the setTimeout() command to a variable, then stop it with the clearTimeout() command. In order to do this, we will need to declare that variable outside of the function, so that we will be able to refer to it later. For now, we will declare it as a global variable. This is terrible coding practice, but we will correct this in the next post. This is what our function looks like.
var timer;

function run_right(slide, left){
  if ((left + 15) < (document.getElementById('stage').offsetWidth - document.getElementById('j').offsetWidth)){
    left = left + 15; // Increase his left attribute by 15px
    document.getElementById('j').style.left = left+"px";

    switch (slide){ // this switch statement checks for different possibilities for 'slide'
      case 1: // if 'slide' equals '1' ...
        document.getElementById('j').style.backgroundPosition = "-40px 0px";
        setTimeout(function(){run_right(2, left);}, 200);
        break;
      case 2: // if 'slide' equals '2' ...
        document.getElementById('j').style.backgroundPosition = "-80px 0px";
        setTimeout(function(){run_right(3, left);}, 200);
        break;
      case 3: // if 'slide' equals '3' ...
        document.getElementById('j').style.backgroundPosition = "-120px 0px";
        setTimeout(function(){run_right(4, left);}, 200);
        break;
      case 4: // if 'slide' equals '4' ...
        document.getElementById('j').style.backgroundPosition = "-80px 0px";
        setTimeout(function(){run_right(1, left);}, 200);
        break;
    }
  } else {
    document.getElementById('j').style.backgroundPosition = "0px 0px";
  }
}
And we can create another function to stop the running timer and return the sprite to the standing image.
function stop_running(){
  document.getElementById('j').style.backgroundPosition = "0px 0px";
  clearTimeout(timer);
}
Running to the Left Animation
Now by borrowing the code from our run_right function, we can create another function to make a run_left function, with just a few modifications.
function run_left(stage, left){
  if ((left - 15) > 0){
    left = left - 15;
    document.getElementById('j').style.left = left+"px";
    switch (stage){
      case 1:
        document.getElementById('j').style.backgroundPosition = "-40px -50px";
        timer = setTimeout(function(){run_left(2, left);}, 200);
        break;
      case 2:
        document.getElementById('j').style.backgroundPosition = "-80px -50px";
        timer = setTimeout(function(){run_left(3, left);}, 200);
        break;
      case 3:
        document.getElementById('j').style.backgroundPosition = "-120px -50px";
        timer = setTimeout(function(){run_left(4, left);}, 200);
        break;
      case 4:
        document.getElementById('j').style.backgroundPosition = "-80px -50px";
        timer = setTimeout(function(){run_left(1, left);}, 200);
        break;
    }
  } else {
    document.getElementById('j').style.backgroundPosition = "0px -50px";
  }
}
Jumping Animation
Finally, we need to create a jump function. We will pass two arguments to this function, one that will track whether the div is currently moving up or down and another that will track the current top attribute of the div. Between the two, we will determine which direction the div needs to move next, and how far (we will move the div less distance near the arc of the jump to simulate acceleration with gravity).
function jump(up, top){
  /*
   * We change J to his jumping sprite ...
   */
  document.getElementById('j').style.backgroundPosition = "-160px 0px";
  /*
   * Here, we need to decide whether he should be traveling up or down...
   */
  if (up && (document.getElementById('j').offsetTop > 20)){
    // if he is currently moving up, and he is more than 20 pixels from the top of the stage ...
    top = top - (top * .1); // This gives us a slight arc in the jump, rather than a constant movement like running
    document.getElementById('j').style.top = top+"px"; // Change his position
    timer = setTimeout(function(){jump(up, top);}, 60); // Then call the function again
  } else if (up) {
    // if he is currently moving up, but he is almost at the top of the stage and needs to come back down...
    up = false; // we switch the 'up' variable so he will be falling in the next loop
    timer = setTimeout(function(){jump(up, top);}, 60);
  } else if (!up && (document.getElementById('j').offsetTop < 115)){
    // if he is moving down, but is more than 5px from the ground, he will continue to fall...
    top = top + (top * .1); // His fall will slightly accelerate
    document.getElementById('j').style.top = top+"px";
    timer = setTimeout(function(){jump(up, top);}, 60);
  } else {
    // If he is moving down, and he is within 5px of the ground...
    document.getElementById('j').style.top = "120px"; // Place him on the ground
    document.getElementById('j').style.backgroundPosition = "0px 0px"; // return to standing sprite
    // We do not call the loop anymore since he is standing still at this point
  }
}
Now we can put all four of our functions into buttons and have a working prototype of a running and jumping animation! Please check out the source code for this page with comments and download the sprite sheet that I used, if you'd like.
Conclusion
Now, although we have a working prototype here, you may notice it is a little buggy. When you click on more than one button at a time, the script will try to run both at once. Or, if you click the jump button again on the way down, J will continue to fall forever. Also, as I mentioned earlier, we have global variables in our script, which means it might be difficult to add this code into an existing page without crashing other JavaScript (which is also why I didn't try to run this code within this blog page). In our next post, we will clean up all of these bugs and talk about the concept of encapsulation and why it is important to write good code in the real world.

Comments