Almost every eCommerce website will need to add, edit, and delete products. Throughout the series, we've been taking a look at iTheme Exchange and in this article, I will show you how to add, edit, and delete both physical and digital products in iThemes Exchange.
Adding Products
All Exchange products are added from the Exchange menu within the WordPress admin. Once you click the Exchange menu you should see the follow options:
- Add Digital Download: A downloadable product. This means there is no shipping. This is ideal for eBooks and other digital goods.
- Add Physical Product: A product that you ship. This would include something like real books, computer parts, and other tangible goods.
- Add Simple Product: No shipping. Great for digital items that require no download.
Don't worry if not all of these show - it probably means that you haven't enabled that type of product. If you want to go back and enable or disable other product types, then go to the Add-ons section of the Exchange menu. This was also covered earlier in the series.

Adding Physical Products
Once you have clicked the link to add a physical product, you will be presented with a simple screen that is similar to when you add a post or page.
Here, you need to enter a product title, price, description, shipping method and some images. You may find that the description section doesn't have the standard WordPress editor controls. No big deal, though as this can be enabled from the Exchange settings. You can find more out about Exchange settings in part one of this series.
Clicking the Add Images link on this page brings up the standard WordPress media library. Here, you can select multiple images that you have already uploaded or upload some new images using the drag and drop interface.
Be sure to save your product by clicking the Publish button or Save Draft if you want to come back to your product at a later time. Clicking the Preview Product button will allow you to see what the product looks like on your website. More advanced settings and publishing options are discussed later in this article.
Shipping
The shipping method box lets you select from your user defined shipping methods. These are discussed in more detail in the next part of this series of articles.
Adding Simple Products
Simple products are added in exactly the same way as physical products, except that you have to click the Add Simple Product link from the Exchange menu.
Adding Digital Download Products
Click the Add Digital Download link in the Exchange menu and you will be presented with a screen that is very similar to adding physical products, with a few key differences.
Of course, there are no shipping options present here but there is a space to upload your digital download files. Give your file a name and hit the Upload link to add your files - this uses the standard WordPress media uploader. To add multiple files, click the Add New Download button and follow the same procedure. To remove a file click on the small "x".
There are some advanced options you can use for download products such as expiration and limit. These are further explained later on in this article.

Advanced Options
Underneath the description text area there is an Advanced button. Clicking this gives many more options for your product.

These are:
- Extended Description: By default, the extended description appears on the product page below the regular description and below the Add To Cart and Buy Now buttons. This can be used for more information about a product, perhaps a table of technical data or some links to more information about the product.
- Downloads Expiration: This only appears on digital download products. You have two options here: download expiration and download limit. The download expiration has a default of "do not expire" which means download purchases can be re-downloaded again at any time. If you change this setting to "expire" then a text input and another dropdown appear. The text input if the length length of time (e.g. 30) and the dropdown has options for hours, days, weeks, months and years. The download limit option (default: unlimited) allows you to limit the amount of times a digital product can be downloaded after purchase. The dropdown menu has options from 1 to 20.
- Page Template: This will only show if the Page Template add-on has been enabled (see the add-ons article earlier in the series). This allows you to select an alternative page template for your product, if your theme has multiple templates available. This can be a really great way of customising a store.
- Product Categories: This will only show if the Product Categories add-on has been enabled (see the add-ons article earlier in the series). This allows you to select a category (or categories) for your product and add new categories if you need to.
- Tags: This will only show if the Product Tags add-on is enabled (see the add-ons article earlier in the series). This works in the same way as the standard WordPress tags; you can add new tags or choose from a list of most used tags for your product.
- Product Type: This will only show if the Switch Product Types add-on has been installed. The options that appear under this heading will differ depending on which product type add-ons you have installed. If you have all of the product types installed it will show digital downloads, physical product and simple product. Choosing Digital Download here will convert the product from a physical product to a downloadable product. A good use case for this is switching a physical book to be sold as an eBook. You must save after changing this option for changes to take effect.
- Product Slug: The product slug setting changes the URL of the product. By default, the value in this field will be all lower case, no special characters and hyphens for spaces. This option is very useful if you want to change your URL's for search engine optimization.
- Purchase Message: This is a simple text box where you can write a particular message for a product. This message is appended to the receipt when the product is purchased and allows you a good opportunity to add special instructions for particular products or perhaps even sales messages such as "Don't forget, filters need replacing every month; get 10% off your next filter with coupon code FILTER10".
- Availability: The availability setting determines when a product is available to purchase. You have the option of setting a start date, end date or both. To change the availability dates, tick the desired option or options and use the date picker to pick your dates. This is really useful for time sensitive products or for listing products that you don't yet have in stock but want to show on your website.
- Purchase Quantity: This product option has two inputs; a checkbox (checked by default) that allows customers to modify the quantity of an item they want to purchase and an input box for the maximum quantity of this product that someone can purchase (it is blank/unlimited) by default. This may be handy for sale items if you want to restrict quantities, for example: "Whilst this item is on sale, we have limited purchases to 5 per order to give everyone a chance of grabbing a great deal!". If you uncheck the "allow customers to modify quantity" option then it means that customers will always just be able to purchase one of the product.
- Inventory: With physical products, it's likely they you are going to have a finite number in stock, this setting allows you to input that number. To input an inventory, check the "Enable inventory tracking for this product" checkbox. Once you have done this an input box will appear where you can insert a number.
- Store Order: This is a number input field and is used if you want to manually order products. There's more information on this in part one of the series.
Publishing
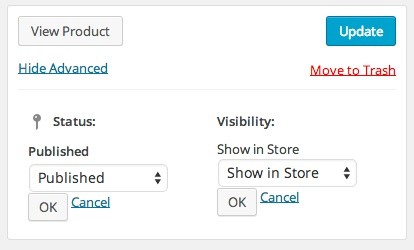
Products are published in the same way that posts and pages are. You will notice in the publishing window that there is a Show Advanced link. Clicking this link brings up a few more options:
- Status: This can be either published, draft or pending review and is the same as standard WordPress posts/pages.
- Visibility: You have two options here: show in store (default) or hide from store. Choosing the hide from store option will set the product live but it won't show in product listings pages. This could be handy for creating specific products on offer that you want to link to in a marketing campaign but don't want displaying with the rest of your products.
Editing Products
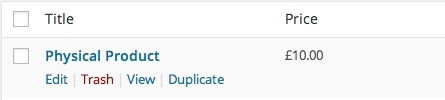
All products can be edited by clicking the All Products within the Exchange menu. You will now see a list of products - you can either click on the product name to edit or hover over the product name and click the Edit link. This will bring up the same screen that you used to add the product; be sure to click the Update button once you have finished making changes.
Duplicating Products
In many eCommerce stores, it's likely that you are going to be adding quite a few products that have similar characteristics. In this case, it may be quicker to duplicate a similar product and change any details than create a new product from scratch. To duplicate a product, go to All Products" within the Exchange menu.
When you hover over the product that you want to duplicate, a Duplicate link will show. Upon clicking this link you will be presented with a screen for adding a new product but all of the details will have been pre-filled. You can now change what you need to and publish your new product.
Deleting Products
Just like WordPress posts and pages, iThemes Exchange has the concepts of Trash and Permanent Deletion. By adding a product to the trash, WordPress removes this product from your website but keeps it in the database just incase you want to restore it at a later time. Permanent deletion does what it says - deletes a product permanently from the database.
There's three ways to send an Exchange product to the trash:
The first method allows you to bulk send products to the trash - handy if you've stopped selling a certain type of product. To do this, from the All Products section within the Exchange menu, tick the products you want to remove and from the Bulk Actions dropdown select Move to Trash and click the Apply button.

To move a single product to the trash, again, from the All Products screen, you can hover over a product name and click the red Trash link.
An alternative way of doing this is clicking on the product name itself to edit the product. After all, you may not know that this is the product you want to delete just by its title. Once you are on the product edit screen, just under the Update button there is a red link to Move to Trash.
Restoration or Permanent Deletion
After moving a product to the trash you have the options to either restore or permanently delete. To access the trash, click on the All Products link within the Exchange menu. Near the top of the screen you will see three links:
- All
- Published
- Trash
Click on Trash.
You will now see all items within your trash. To permanently delete or restore a product, hover over the product name and click either Restore or Delete Permanently. You can not preview products that are in the trash - you can only see the title. If you want to have a look at the content then you would need to restore the item.
You can also bulk restore or delete in the same way as adding products to the trash; tick the products you want to restore or delete and select the appropriate option from the dropdown menu. Remember to click the Apply button for the changes to take effect.
That's a Wrap
You should now be able to add, edit and delete both physical and digital products. Still to come in this series we have shipping, taxes, coupons and basic theming.

Comments