In this iOS SDK Basics tutorial, we are going to create a UITextView, implement the UITextViewDelegate protocol methods, and use NSLog to see when the methods are called. We'll also touch on how to limit the amount of characters in a text view and how to use the return key to resign the keyboard. Read on to learn how to implement these features in your application!
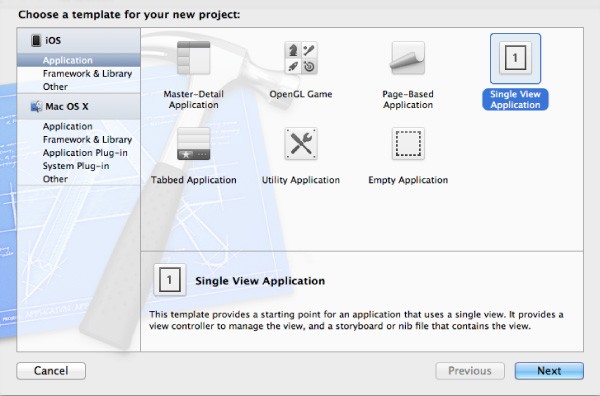
Step 1: Create a New Xcode Project
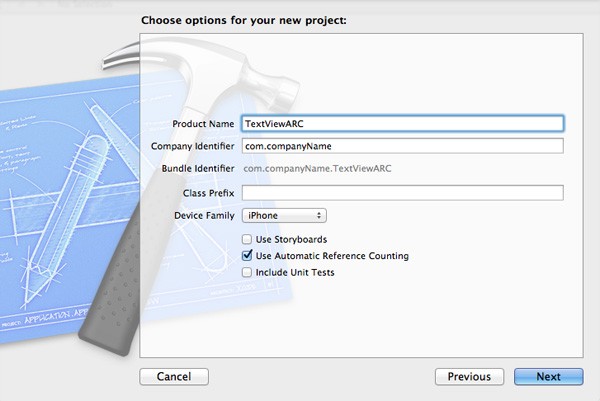
Launch Xcode and click File > New > Project. Click "Application" under the iOS pane on the left. Click on the icon titled "Single View Application" and click "Next." In the "Product Name" field, type "TextViewARC" and enter a name for your Company Identifier, such as "com.companyName." Choose "iPhone" from the "Device Family" menu. Make sure to uncheck "Use Storyboards" and "Include Unit Tests," and check "Use Automatic Reference Counting" before clicking "Next." Choose a location to store your project and click "Create."
In the "Product Name" field, type "TextViewARC" and enter a name for your Company Identifier, such as "com.companyName". Choose "iPhone" from the "Device Family" menu. Make sure to uncheck "Use Storyboards" and "Include Unit Tests" and check "Use Automatic Reference Counting" before clicking "Next." Choose a location to store your project and click "Create."
Step 2: Creating a UITextView
A UITextView object can be created either programmatically (i.e. in code) or graphically with the Interface Builder tool. This tutorial will briefly demonstrate how to create the object with both methods.
Programmatically
Click on the "ViewController.m" file and type the following code.
CGRect textViewFrame = CGRectMake(20.0f, 20.0f, 280.0f, 124.0f);
UITextView *textView = [[UITextView alloc] initWithFrame:textViewFrame];
textView.returnKeyType = UIReturnKeyDone;
[self.view addSubview:textView];
This programmatically creates a UITextView object and adds it to the view of the ViewController.
With Interface Builder
Alternately, you can create a UITextView in the .xib file. Begin by clicking on the .xib file in the "Navigator" pane of your Xcode window. Click "View" in the "Document Outline" pane on the left. Click View > Utilities > Show Object Library. Scroll the Object library in the bottom left corner until you find a "Text View" object. Click to select it, then drag-and-drop the text view on to the view. Adjust the text view so that it sits in the top portion of the view and is about 125 pixels tall.
Step 3: Removing the Keyboard
Resigning the keyboard when the background is tapped can be accomplished in different ways. The code below is an example of one such technique. Click on the "ViewController.m" file and add the following method implementation:
- (void)touchesBegan:(NSSet *)touches withEvent:(UIEvent *)event{
    NSLog(@"touchesBegan:withEvent:");
    [self.view endEditing:YES];
    [super touchesBegan:touches withEvent:event];
}
Step 4: Delegate Protocol Methods
Simply stated, a delegate helps two objects communicate with each other. In the case of the UITextViewDelegate methods, the UITextView is able to message the delegate methods when certain events occur, such as when the text view begins editing. When one of the methods is messaged, you have an opportunity to perform custom actions. The following UITextViewDelegate method implementations demonstrate how you might go about doing this.
Before implementing the delegate methods, let's go back and set the textView delegate property to self in order to set the ViewController object as the delegate of the UITextView. Click on the "ViewController.m" file. In the viewDidLoad method, where we programmatically created the text view, add the following code above the [self.view addSubview:textView]; line (you can always refer to the source code attached to this post for help).
textView.delegate = self;
To do the same with the text view created in Interface Builder, click on the "ViewController.xib" file. Select the text view and click View > Utilities > Show Connections Inspector. Click on the "Outlets" arrow in the "Connections Inspector" pane to open it. Click the circle opposite "delegate,", then click-and-drag from the circle to "File's Owner" to make the connection between the text view and the ViewController.
Click on "ViewController.h," and type the following code to conform to UITextViewDelegate protocol.
@interface ViewController : UIViewController <UITextViewDelegate>
The UITextViewDelegate protocol methods are all optional, meaning you don't have to implement them if you aren't using them. Let's talk about the methods as we add them.
textViewShouldBeginEditing: and textViewDidBeginEditing:
Click on "ViewController.m" and add the following code.
- (BOOL)textViewShouldBeginEditing:(UITextView *)textView{
NSLog(@"textViewShouldBeginEditing:");
return YES;
}
- (void)textViewDidBeginEditing:(UITextView *)textView {
NSLog(@"textViewDidBeginEditing:");
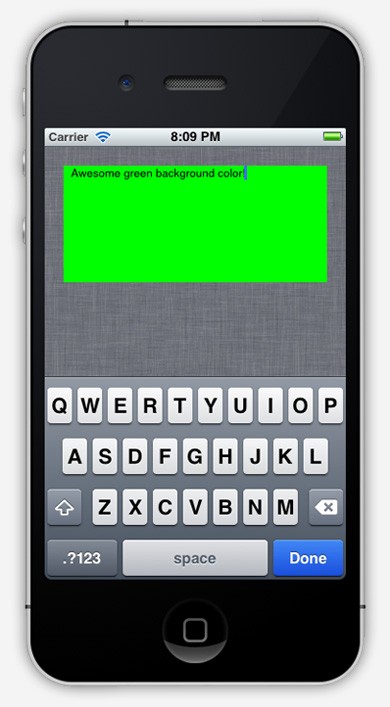
textView.backgroundColor = [UIColor greenColor];
}
The method textViewShouldBeginEditing: is called just before the text view becomes active. The method textViewDidBeginEditing: is called when the text view becomes active and changes to the first responder status. Behavior customizations that you want to happen as the text view becomes active should go here. In our example, the background color of the text view becomes green when the text view is active.
textViewShouldEndEditing: and textViewDidEndEditing:
Add the following code below the previous methods.
- (BOOL)textViewShouldEndEditing:(UITextView *)textView{
    NSLog(@"textViewShouldEndEditing:");
    textView.backgroundColor = [UIColor whiteColor];
    return YES;
}

- (void)textViewDidEndEditing:(UITextView *)textView{
    NSLog(@"textViewDidEndEditing:");
}
textViewShouldEndEditing: is called just before the text view becomes inactive. textViewDidEndEditing: is called when the text view becomes inactive. They are similar to the two methods called when the text view begins editing, and either method is an appropriate place for logic that is triggered as the user is done editing. In our example, we use textViewShouldEndEditing: to return the background color to its normal color.
textView:shouldChangeCharactersInRange:replacementString
Add the following code below the previous methods.
- (BOOL)textView:(UITextView *)textView shouldChangeTextInRange:(NSRange)range replacementText:(NSString *)text{
    NSCharacterSet *doneButtonCharacterSet = [NSCharacterSet newlineCharacterSet];
    NSRange replacementTextRange = [text rangeOfCharacterFromSet:doneButtonCharacterSet];
    NSUInteger location = replacementTextRange.location;

    if (textView.text.length + text.length > 140){
	if (location != NSNotFound){
	    [textView resignFirstResponder];
	}
	return NO;
    }
    else if (location != NSNotFound){
	[textView resignFirstResponder];
	return NO;
    }
    return YES;
}
Each time a user types a character on the keyboard, just before the character is displayed, the method textView:shouldChangeCharactersInRange:replacementString is called. This is a handy location to test the characters that a user is typing and disallow specific characters you want to restrict. In our example, we use the done key to resign the keyboard by testing to see if the replacement text contains any of the characters in newLineCharacterSet. If it is a character from the newLineCharacterSet, then it is the done button that has been pressed, and therefore the keyboard should resign. Additionally, by testing the text view's current length each time a character is typed and returning NO if it is greater than 140 characters, the text view becomes limited to no more than 140 characters.
textViewDidChange:
Add the following code below the previous methods.
- (void)textViewDidChange:(UITextView *)textView{
    NSLog(@"textViewDidChange:");
}
The method textViewDidChange: is called only when the text in the text view is changed by the user. There are a variety of behaviors you might like to customize based on when the user changes the text in the text view. One instance is if you were to display the number of characters remaining when a text view is limited to 140 characters. Each time the text changes, the displayed number can be updated.
textViewDidChangeSelection:
Add the following code below the previous methods.
- (void)textViewDidChangeSelection:(UITextView *)textView{
NSLog(@"textViewDidChangeSelection:");
}
The method textViewDidChangeSelection: is called when a section of text is selected or the selection is changed, such as when copying or pasting a section of text. While this is probably one of the lesser used delegate methods, in certain circumstances it may be beneficial to customize the behavior of the text view when text is selected.
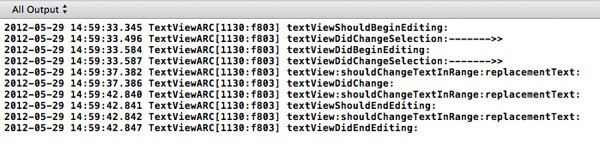
Step 5: Testing the Text Views
Click Build > Run, or click the "Run" arrow in the top left corner. Open the console and explore the text view. The NSLog in each method will display a string in the console when that delegate method is called.
Here is how the text view appears in the Simulator:
Conclusion
By understanding when the UITextViewDelegate protocol methods are called, you can take full advantage of the functionality built in to the delegate. If you find one delegate method isn't positioned at the right place in the user's interaction, try a different method. At some point you will find the right method to place your logic, making your application work exactly how you want!

Comments