UIKit provides developers with UIActivityIndicatorView, which is nothing more than a spinner. However, this simple UIView subclass tells the user that something is in progress -a vital UX consideration. In this tutorial, I will tell you all about UIActivityIndicatorView and, as an added bonus, I will introduce you to MBProgressHUD, an activity indicator class on steroids!
Whenever a user interacts with your application, it is important that the user is aware of what your application is doing. If your application is updating a large database in the background and you want to prevent the user from interacting with your application until this process is finished then it is not enough to just prevent the user from interacting with your application. Whenever a process takes more than a few milliseconds, it can be useful to show the user feedback. People love feedback as it tells them what is going on. If you don't believe me then I suggest that you spend an hour reading reviews on the App Store.
Project Setup
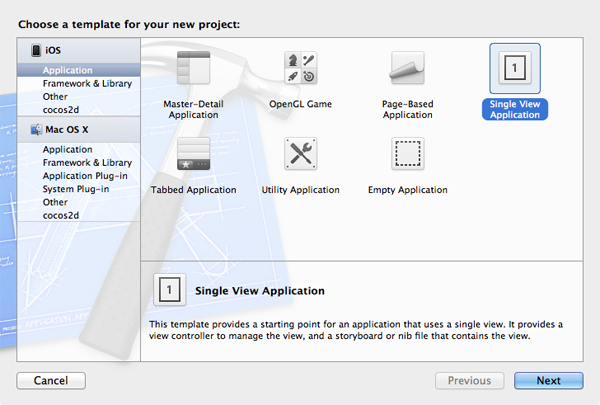
We don't need a complex setup for this quick tip. Fire up Xcode and create a new project using the "Single View Application" template.
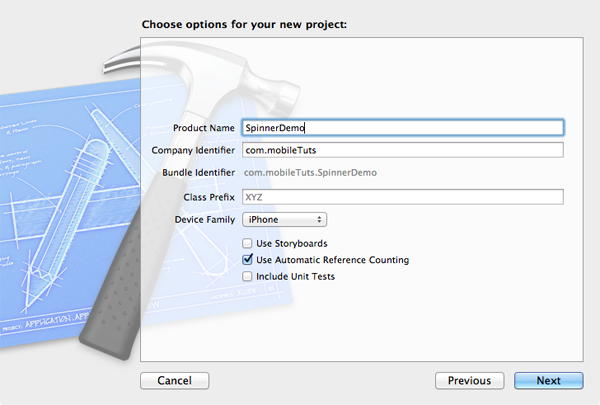
Name your application SpinnerDemo, enter a company identifier, set "iPhone" for the device family, and uncheck "Use Storyboards". You can leave the rest untouched. Tell Xcode where you want to save this project and hit "Save".
Adding UIActivityIndicatorView to a View
As its name indicates, UIActivityIndicatorView is a UIView subclass. UIActivityIndicatorView is easy to set up and use so let's do that right now. In the Project Navigator on the left, select ViewController.m and look for the - viewDidLoad method. Replace the default implementation with the one below.
- (void)viewDidLoad {
    [super viewDidLoad];

    UIActivityIndicatorView *ai = [[UIActivityIndicatorView alloc] initWithActivityIndicatorStyle:UIActivityIndicatorViewStyleWhite];
    ai.center = self.view.center;
    [self.view addSubview:ai];
}
Only three lines of code are required to display a UIActivityIndicatorView. In the first line, we initialize the activity indicator with a style. Three styles are available to us: (1) UIActivityIndicatorViewStyleWhiteLarge, (2) UIActivityIndicatorViewStyleWhite, and (3) UIActivityIndicatorViewStyleGray. The names of the styles speak for themselves, that is, the styles differ only in color and size. In the second line, we position the activity indicator at the center of our view controller's view and in the last line we add our UIActivityIndicatorView as a subview to the view controller's view.
When you build and run your application, you will be surprised that there is no activity indicator to be seen. Why is that? By default, the property hidesWhenStopped is set to YES. This means that the UIActivityIndicatorView will hide itself when it is not animating (spinning). Let's animate our activity indicator by adding one extra line to our implementation file.
- (void)viewDidLoad {
    [super viewDidLoad];

    UIActivityIndicatorView *ai = [[UIActivityIndicatorView alloc] initWithActivityIndicatorStyle:UIActivityIndicatorViewStyleWhite];
    ai.center = self.view.center;
    [ai startAnimating];
    [self.view addSubview:ai];
}
Build and run your application once more and you should now see your activity indicator spinning like it has never done before. Take a moment to change the style of the UIActivityIndicatorView to get an idea of what the different styles look like. In iOS 5, you can also change the color of the activity indicator by setting the color property of the activity indicator.
Stopping the activity indicator is straightforward. You simply call - stopAnimating on the UIActivityIndicatorView. As I mentioned before, if hidesWhenStopped is set to YES, the activity indicator will hide automatically. In the majority of use cases, this is the behavior that you want.
An indicator has a value when it is indicating something, but if it's not indicating something it shouldn't be there. -Jony Ive, Objectified (2009)
There is one more method that I'd like to talk about as it may come in handy when working with UIActivityIndicatorView. Calling - isAnimating on a UIActivityIndicatorView will tell you whether the activity indicator is currently animating.
Before we move on, I'd like to point something out that is very important and something that many new iOS developers run into. I don't want to go into too much detail and background today, but the gist of it is that you always have to make sure that you do not block the main thread of your application. You might have heard this before and it is especially true for UIActivityIndicatorView. Updating the user interface is done on the main thread and this means that when you block the main thread by performing a long running task on the main thread, it will render your application not only unresponsive to the user, but it will also prevent your activity indicator from showing up or animating. As I said, I will write about this a bit more in a future post.
What can MBProgressHUD do for you?
Let's now take a look at MBProgressHUD. If you have been developing iOS applications for some time, you will definitly see the benefits of this awesome open source class. You can find MBProgressHUD at https://github.com/jdg/MBProgressHUD. Kudos to Matej Bukovinski for developing and maintaining MBProgressHUD.
You will notice that MBProgressHUD (HUD stands for head-up display) looks familiar and that is because it looks much like the progress HUD that Apple uses in some of its own applications. However, the progress HUD that Apple uses is private and therefore not available to third-party developers.
Adding MBProgressHUD to your Project
Adding MPProgressHUD to your application is easy as pie. Download the project from GitHub, unpack the archive, and drag both MBProgressHUD.h and MBProgressHUD.m to your Xcode project. Make sure to check "Copy item into destination group's folder (if needed)" and also add MBProgressHUD to your target, SpinnerDemo.

MBProgressHUD was designed to give the user feedback when time consuming tasks are being performed in the background. Take note of that last word - background. As I mentioned earlier, you do not want to block your main thread by performing a time consuming task on the main thread. I cannot stress this enough.
Setting Up MBProgressHUD
Using MBProgressHUD is almost as simple as UIActivityIndicatorView. It takes a tiny bit more work to set everything up, but you get a lot in return for that effort. First, comment out the four lines of code we added to set up our activity indicator. We won't be needing that anymore. Next, we are going to add a new instance variable (ivar) to the header file of our ViewController class. Don't forget to also add the forward class declaration of MBProgressHUD so your ViewController class knows about MBProgressHUD.
#import <UIKit/UIKit.h>

@class MBProgressHUD;

@interface ViewController : UIViewController {
    MBProgressHUD *HUD;
}

@end
Switch back to ViewController.m and import the header file of MBProgressHUD by adding the following line just below the first import statement.
#import "MBProgressHUD.h"
If you followed the previous steps, the - viewDidLoad method of your ViewController class should now only contain a call to the superclass' - viewDidLoad method and four lines of code that have been commented out. Let's now initialize our MBProgressHUD by changing the - viewDidLoad method to the one below (code that is commented out is not shown).
- (void)viewDidLoad {
    [super viewDidLoad];

    HUD = [[MBProgressHUD alloc] initWithView:self.view];
    [self.view addSubview:HUD];
    [HUD show:YES];
}
The initialization of MBProgressHUD differs slightly from the one of UIActivityIndicatorView. Instead of passing a style, you pass a view as the argument of your - init method. This view is the view that MBProgressHUD will block (the user will not be able to interact with this view) when the progress HUD is visible. The second line should be familiar and in the third line we tell the HUD to show itself as it is hidden by default. Ready? Build and run your application in the iOS simulator and have look at the progress HUD that appears.
At first glance, you might think that this is less useful than UIActivityIndicatorView. It is splashed in the middle of the screen and there seems to be no way to position the progress HUD. This is because MBProgressHUD serves a different purpose as I stated earlier. It is meant to show the user that a task is in progress and it also prevents the user from interacting with the view to which the progress HUD is added.
MBProgressHUD has a lot more features than just showing and hiding itself. You can assign a delegate, for example, which gets notified when the progress HUD has hidden itself. In addition, you can customize the progess HUD to a large extent with a progress inidicator, one or two labels telling the user what your application is doing, and it can also be used to display a message. Seriously, MBProgressHUD is very useful and I suggest that you take a look at the demo application that comes with the project you downloaded to get an idea of what it can do for you.
Changing Mode
To end this tutorial, I would like to show you one example of how you could use MBProgressHUD in a more advanced scenario. We are going to perform a time consuming task in the background while our progress HUD shows the progess of that task. To be honest, we are not really going to perform a task in the background. We will mimic this with a clever solution that is also used by the demo application included with MBProgressHUD. Edit the setup code of your MBProgressHUD so it looks like the one below.
- (void)viewDidLoad {
    [super viewDidLoad];

    HUD = [[MBProgressHUD alloc] initWithView:self.view];
    HUD.labelText = @"Doing funky stuff...";
    HUD.detailsLabelText = @"Just relax";
	HUD.mode = MBProgressHUDModeAnnularDeterminate;
    [self.view addSubview:HUD];

	[HUD showWhileExecuting:@selector(doSomeFunkyStuff) onTarget:self withObject:nil animated:YES];
}
In the second and third line, we set the text of the primary and secondary label of the progress HUD to give the user some information about what is going on. The fourth line sets the mode of our HUD. MBProgressHUD comes with a number of different modes and the mode we choose, MBProgressHUDModeAnnularDeterminate, will show a circulr progress indicator that shows the progress of our background task. With the last line, we don't simply show the HUD, but we show the HUD and tell it that we are performing a task and it should show itself as long as the task is running. Didn't I tell you that MBProgressHUD is easy to use. Let's now take a look at - doSomeFunkyStuff.
- (void)doSomeFunkyStuff {
	float progress = 0.0;

	while (progress < 1.0) {
		progress += 0.01;
		HUD.progress = progress;
		usleep(50000);
	}
}
We declare a float named progress and set it to 0.0. Using a while loop, we increment progress and set the progess property of MBProgressHUD to that value. This will result in our HUD's progress indicator to advance. The last line of the while loop is a nifty trick to make sure that this method takes longer than a few milliseconds to run. Using the function usleep, execution of the main thread is suspended for the amount we pass as the argument (in microseconds). Finally, the while loop runs as long as progess is less than 1.0. The HUD will automatically disappear when our method finishes. Build and run your application to see all this in action.
Conclusion
As you can see, both UIActivityIndicatorView and MBProgressHUD have their use cases and both are tremendously useful if you want to build a user friendly application. Don't forget to take a look at the demo appliation of MBProgressHUD to see what it can do for you.

Comments