Welcome to the seventh installment in our series on how to both design and build a 1980s version of the iOS “Phone” app. In this tutorial, I’ll be demonstrating how to play the appropriate audio tone for each number on the phone keypad.
Final App Preview
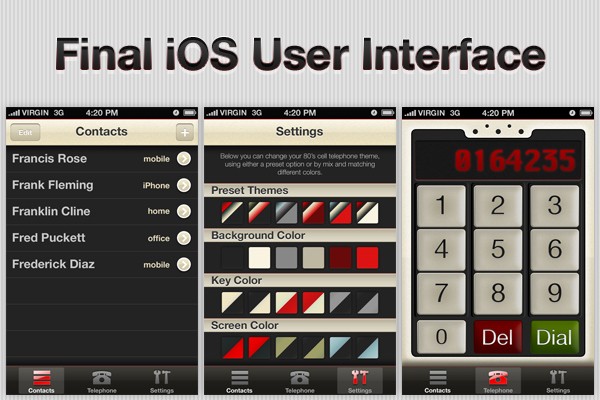
This is a snapshot of what we will be building over the course of this series:
Before You Begin. . .
This is a multi-part series designed to teach intermediate iOS SDK topics. The content will become increasingly complex as the series progresses. If at any point you find yourself lost in following this series, you might need to take a step back and work your way through our Learn Objective-C series or our Beginning iOS SDK Development series.
In the last tutorial in this series, I demonstrated how to actually initiate an iPhone call after dialing a number on the keypad and also how to format the number display when a user taps a digit. In this tutorial, we'll add the promised touch tones to each of the 0 - 9 buttons.
iOS Audio Overview
The iOS SDK ships with multiple frameworks that provide various methods of playing sound clips and even generating audio on-the-fly. Apple's Multimedia Programming Guide describes the purpose of each available audio framework as follows:
- Use the Media Player framework to play songs, audio books, or audio podcasts from a user’s iPod library. . .
- Use the AV Foundation framework to play and record audio using a simple Objective-C interface. . .
- Use the Audio Toolbox framework to play audio with synchronization capabilities, access packets of incoming audio, parse audio streams, convert audio formats, and record audio with access to individual packets. . .
- Use the Audio Unit framework to connect to and use audio processing plug-ins. . .
- Use the OpenAL framework to provide positional audio playback in games and other applications. iOS supports OpenAL 1.1. . .
-Multimedia Programming Guide: Using Audio
An entire series of tutorials could be dedicated to each of the frameworks in the above list, but suffice to say that for the purpose of this tutorial we'll be using the Audio Toolbox framework because of one unique offering: System Sound Services. System Sound Services are a C-level interface intended for playing short user interface sound effects and other small audio clips of 30 seconds in duration or less.
The process for playing an audio clip with System Sound Services spans three steps:
- Register an Audio Clip with System Sound Services for playback in the (not-so-distant) future
- Receive a System Sound ID (SSID) that uniquely identifies the audio clip registered with the system sound server.
- Call the system sound server with the appropriate SSID to start begin playback.
The remainder of this tutorial will implement this process to play pre-recorded DTMF tones for the keypad digits 0-9.
Why are we using pre-recorded tones instead of generating the appropriate frequency on-the-fly? Essentially to save time and to keep this tutorial more accessible by avoiding the mathematics involved in sinusoidal functions and frequency generation. If you'd like to go that route instead, you'll likely find the following articles handy:
- Dual-Tone Multi-Frequency Signaling
- Touch Tone Keypad
- Sine Wave
- iPhone Dev SDK Forums: Generate a Beep
Do you really want to know how to generate sound on-the-fly? If this post receives at least 10 comments requesting a tutorial on how to create audio from scratch by May 1st, 2011, I'll make an advanced iOS SDK series on that topic. No promises that it will involve DTMF touch tones specifically, but it will definitely be something awesome.
With the theoretical knowledge out of the way, let's dive into the code and get this feature done!
Step 1: Import the AudioToolbox Framework
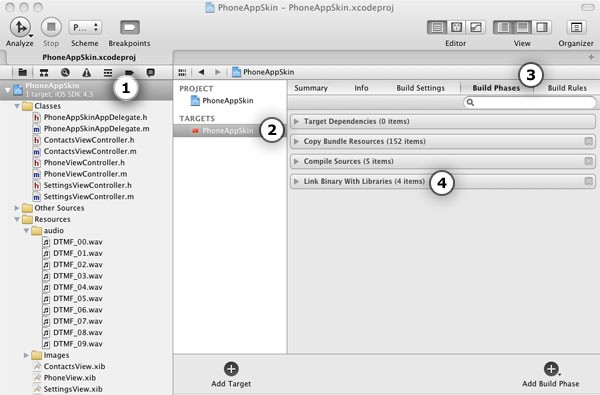
We'll need to begin by importing the Audio Toolbox framework into our application in order to make the System Sound Services available to our code. To do so, select the "PhoneAppSkin" project in the Project Navigator pane in Xcode, then select "PhoneAppSkin" under "TARGETS", and finally select the "Build Phases" tab. After doing so, your screen should look something like this:
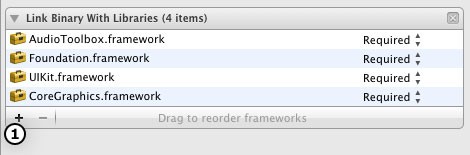
Next, click the "Link Binary With Libraries" drop down, and click the "+" symbol to add a new framework to our project's linking phase.
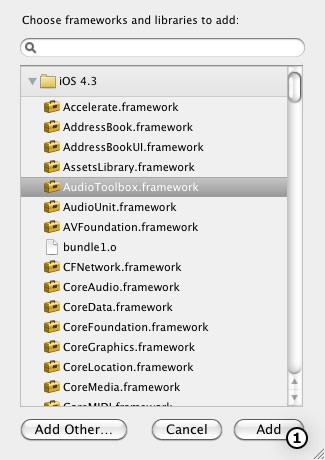
Finally, find the "AudioToolbox" framework in the popup window, and then click "Add".
Next, open up the PhoneViewController.h file and add the line necessary to actually import the Audio Toolbox framework into your class:
#import <UIKit/UIKit.h>
#import <AudioToolbox/AudioToolbox.h>
The Audio Toolbox functions should now be accessible to your class!
Step 2: Import the Touch Tone WAV Files
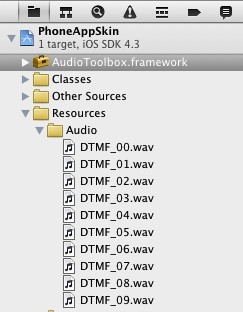
Download and open the source code attached to this Mobiletuts+ post and find the folder entitled "Audio". Drag this entire folder into the "Resources" folder of the Xcode Project Navigator, making sure to check "Copy" option when prompted. You should end up with a screen something like this:
Step 3: Create an Array for the SSID References
In PhoneViewController.h, add the following C-style array declaration:
@interface PhoneViewController : UIViewController {

    SystemSoundID toneSSIDs[10];

}
Line 13 declares a C-style array of type SystemSoundID with a maximum capacity of 10.
Storing System Sound IDs in this array will enable us to quickly reference the appropriate sound clip in the numberButtonPressed: method later.
Step 4: Register the Tone System Sounds
Open PhoneViewController.m and jump to the initWithCoder method on line 17. When the PhoneViewController is first initialized and the initWithCoder method is called, we want to register system sounds for each tone to be used on the Keypad with the iOS system sound server. After a sound clip is registered with the sound server, we can instruct the server to playback the sound file later when the keypad is pressed.
To register the 0-9 touch tones, add the following code:
-(id)initWithCoder:(NSCoder *)aDecoder
{
    self = [super initWithCoder:aDecoder];
    if(self)
    {
        phoneNumberString = [[NSString alloc] init];

        for(int count = 0; count < 10; count++){
            NSString *toneFilename = [NSString stringWithFormat:@"DTMF_%02d", count];

            NSURL *toneURLRef = [[NSBundle mainBundle] URLForResource:toneFilename
                                                        withExtension:@"wav"];
            SystemSoundID toneSSID = 0;

            AudioServicesCreateSystemSoundID(
                                                 (CFURLRef) toneURLRef,
                                                 &toneSSID
                                             );
            toneSSIDs[count] = toneSSID;
        }
    }

    return self;
}
On line 24, a for loop that will iterate 10 times begins. The purpose of this for loop is to add a new system sound ID to the toneSSIDs array for each of the touch tones associated with keys 0 - 9.
On line 25, an instance of NSString is instantiated that will hold the filename of the relevant DTMF touch tone. An interesting note on this line is the stringWithFormat: method call and the %02d format specifier. This format specifier will convert any digit to a zero-padded digit 2 characters in length. So, for example, 0 becomes '00', 1 becomes '01', 2 becomes '02', etc.
On line 27, the NSBundle class is used to generate a file system path to the filename generated on line 25 with an extension of "wav" appended. NSLog this value if you'd like to see the full path for yourself.
Line 29 creates a variable to hold the SystemSoundID that will be generated by the iOS system sound server next.
As a side note,
SystemSoundIDis just a typedef for the Mac TypeUInt32, which is itself a typedef forunsigned long. Consequently, we could have declared the variable on this line of typeunsigned long, but doing so would be poor practice because future iOS releases might modify theSystemSoundIDtype, causing the code to break. Nonetheless, it's good to keep this in mind when working withSystemSoundIDs because the compiler will sometimes warn about incompatibleunsigned longtypes.
Lines 31 - 34 are a c-style function call to AudioServicesCreateSystemSoundID, which takes a CFURL (Core Foundation URL) of the audio file path to generate a System Sound ID for and a SystemSoundID reference that will be used to store the SSID in after it is created. Notice how the ampersand character (i.e. '&') appears before the toneSSID variable on line 33? This is an unary prefix operator that converts the toneSSID parameter into the memory address of the variable instead of the value stored in memory for that variable. This is done so that the AudioServicesCreateSystemSoundID function can store the generated SSID number directly in the toneSSID memory address, allowing the function caller (i.e. our method) access to the generated SSID without actually passing the SSID back from the function.
Sound a bit confusing? It probably will unless you're already experienced with programming in a language like C, C++, or Go. Because Objective-C is a strict superset of the C language, the iOS SDK is sometimes reliant on libraries written in procedural C. If the C syntax doesn't make sense to you, don't worry about it too much right now, but take it as a challenge to complement your iOS SDK knowledge with the fundamentals of the C language in the future!
On line 35, the index of the toneSSIDs c-style array designated by the current count value is assigned the value created by the AudioServicesCreateSystemSoundID function. This SSID value will be referenced later to play the appropriate tone when the user taps on the keypad numbers.
Step 5: Play Touch Tones on Tap
The numberButtonPressed: method is called each time the touchUpInside event fires for buttons 0 - 9. Because indices 0-9 of the toneSSIDs array now contains the corresponding tone for each button, the following three lines of code are enough to play the appropriate tone:
-(IBAction)numberButtonPressed:(UIButton *)pressedButton
{
    int toneIndex = [pressedButton.titleLabel.text intValue];
    SystemSoundID toneSSID = toneSSIDs[toneIndex];
    AudioServicesPlaySystemSound(toneSSID);

    self.phoneNumberString = [self.phoneNumberString stringByAppendingString:pressedButton.titleLabel.text];
    [self displayPhoneNumber];

}
Line 96 converts the text value of the pressed UIButton title to an integer from a string.
With the dialpad digit obtained, line 97 retrieves a SystemSoundID from the toneSSIDs array.
On line 98, the AudioServicesPlaySystemSound function is called with the SSID just retrieved to begin the touch tone playback.
That's it! Go ahead and save and build the project now, and you should find that the keypad numbers have sound effects!
Step 6: Making it Snappy
There's one small problem with the current solution. Do you notice the delay between touching the button and the generated tone? In part 6 of this series, the keypad buttons were setup to trigger the touchUpInside action. This action fires after the user removes their finger from the button. However, the tone should play as soon as the user taps the button, not after removing their finger. To fix this, open PhoneView.xib, remove the touchUpInside IBAction references for all buttons, and then bind each button's touchDown action to the numberButtonPressed: method.
If you need help figuring out how to do this step, just refer back to Part 6, Step 1 in this series.
Wrap Up
This tutorial has been a whirlwind tour of the Audio Toolbox framework and System Sound Services. If you have questions, feel free to leave them in the comments below and I'll do my best to respond. Of course, there aren't enough hours in the day for me to check all of my past posts for new comments each day, so as the months wear on you might have better luck contacting me via Twitter: @markhammonds.

Comments