Welcome to the final installment in our series on building an iPad reader for the War of the Worlds with the Leaves project. In today's post, I will demonstrate several techniques that can be used to adjust the interface when the device orientation changes.
Where We Left Off. . .
It has been about two weeks since my last post in this series, so I'll give a quick recap of what we've covered so far:
In the first tutorial in this series, I introduced you to the Leaves project and showed how to get it integrated with Xcode 4. Next, I showed how to use a UISlider with Leaves to allow users to quickly scrub through a PDF. Finally, I demonstrated how to add a custom table of contents for users to tap between chapters.
After each of the above posts, I ended with a poll and asked you to vote on what feature or topic I should cover next. In response to the last tutorial, the majority of respondents wanted to see how to configure the reader interface for device orientation changes, and that's what I'll be covering today as the final installment in this series.
However, before I go any further, let me tell what this tutorial will not do: I won't be adding any new, core functionality to the Leaves project. There are some really awesome things you could make happen if you are up to hacking around in the the core project code or forking the Leaves project off on your own. I encourage those involved in the community to pick up the torch and do just that. Unfortunately, making significant core project changes in this series isn't feasible due to time constraints. Instead, I'll simply be demonstrating how to make the best with what Leaves already provides and also how to adjust the custom views and interface controls we created.
Tutorial Preview
This is a video demo of what this tutorial will teach you how to build:
Step 1: Enable Orientation Support
The first step in making the application orientation-aware is to specify which orientations WOTWViewController, the main project view controller, is able to support. This is done with the following method:
- (BOOL)shouldAutorotateToInterfaceOrientation:(UIInterfaceOrientation)interfaceOrientation
{
    // Support all orientations
    return YES;
}
The shouldAutorotateToInterfaceOrientation: method is inherited from UIViewController and allows each view controller to specify which interface orientations are supported. For this tutorial, we want to support all of them, so I simply return "YES". However, we could test for specific UIInterfaceOrientation values here by checking the interfaceOrientation parameter.
Step 2: Setup Autoresizing Masks
If you take a look at our project in the Simulator now, you'll notice that things are starting to shift-around when the orientation changes, but you'll also notice that these default changes leave a lot to be desired. There are two basic approaches that we could take to resolving this. One approach would be to hook into the UIViewController methods that are notified when an orientation change has occurred, such as didRotateFromInterfaceOrientation:, and manually make the necessary changes there. However, a better approach for our setup is to simply configure the autoresizingMask property on our interface elements to flexibly adapt to the screen changes automatically.
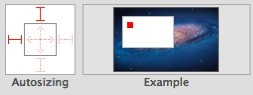
If you're new to the autoresizingMask property, don't worry. You've properly seen it in Interface Builder, where you can configure it graphically like this:
What you may not have realized is that you can also set the property manually in code (note: as a general rule, if you can do it in Interface Builder, you can do it in code), and that doing so allows you to control how automated orientation changes will take place. The possible orientation options are as follows:
- UIViewAutoresizingNone
- UIViewAutoresizingFlexibleLeftMargin
- UIViewAutoresizingFlexibleWidth
- UIViewAutoresizingFlexibleRightMargin
- UIViewAutoresizingFlexibleTopMargin
- UIViewAutoresizingFlexibleHeight
- UIViewAutoresizingFlexibleBottomMargin
Because the autoresizingMask property is an integer bit mask, you can combine multiple values into one simply by using the bitwise OR operator to combine them.
For example, if I wanted to set myContentView to have all the UIViewAutoresizing options, I could do this:
myContentView.autoresizingMask = UIViewAutoresizingFlexibleLeftMargin | UIViewAutoresizingFlexibleWidth | UIViewAutoresizingFlexibleRightMargin | UIViewAutoresizingFlexibleTopMargin | UIViewAutoresizingFlexibleHeight | UIViewAutoresizingFlexibleBottomMargin;
Or, if I wanted myContentView to not have any autoresizing behavior, I could configure that like so:
myContentView.autoresizingMask = UIViewAutoresizingNone;
We will be using this technique to configure the autosizing behavior of the following interface objects: contentsButton, pageSlider, tableOfContentsView, bookHeading, bookOneSubtitle, bookTwoSubtitle, and sectionButton.
Each of the changes below will be made in WOTWViewController.m, and the appropriate line number for the change is listed along with the source code.
The contentsButton Mask
contentsButton.autoresizingMask = UIViewAutoresizingFlexibleLeftMargin;
The pageSlider Mask
self.pageSlider.autoresizingMask = UIViewAutoresizingFlexibleTopMargin | UIViewAutoresizingFlexibleLeftMargin | UIViewAutoresizingFlexibleRightMargin;
The tableOfContentsView Mask
tableOfContentsView.autoresizingMask = UIViewAutoresizingFlexibleBottomMargin | UIViewAutoresizingFlexibleHeight | UIViewAutoresizingFlexibleLeftMargin | UIViewAutoresizingFlexibleRightMargin | UIViewAutoresizingFlexibleTopMargin | UIViewAutoresizingFlexibleWidth;
The bookHeading Mask
bookHeading.autoresizingMask = UIViewAutoresizingFlexibleLeftMargin | UIViewAutoresizingFlexibleRightMargin;
The bookOneSubtitle Mask
bookOneSubtitle.autoresizingMask = UIViewAutoresizingFlexibleLeftMargin | UIViewAutoresizingFlexibleRightMargin;
The bookTwoSubtitle Mask
bookTwoSubtitle.autoresizingMask = UIViewAutoresizingFlexibleLeftMargin | UIViewAutoresizingFlexibleRightMargin;
The sectionButton Mask
sectionButton.autoresizingMask = UIViewAutoresizingFlexibleLeftMargin | UIViewAutoresizingFlexibleRightMargin | UIViewAutoresizingFlexibleWidth;
sectionButton.autoresizingMask = UIViewAutoresizingFlexibleLeftMargin | UIViewAutoresizingFlexibleRightMargin | UIViewAutoresizingFlexibleWidth;
After you've added all of the above properties, save, build, and run the project. You should find that the table of contents looks A LOT better in landscape orientation now! However, if you're perceptive, you'll notice one glaring flaw: the "BOOK I" table of contents listing is cutoff vertically when in landscape orientation.
Step 3: Adding a TOC UIScrollView
There are, of course, multiple ways to deal with the fact that we don't have enough vertical space to display the BOOK I chapter listing. For example, we could try changing the height of the buttons or repositioning the listing to flow horizontally instead of vertically. In my opinion, the best user experience is to use a scroll view to control which portion of the listing is visible.
This is easy enough to accomplish. Start off by declaring a new UIScrollView to hold our chapter buttons in the WOTWViewController.h file:
UIScrollView *sectionScrollView;
Then initialize this variable in the WOTWViewController.m viewDidLoad method and set the autoresizing mask:
sectionScrollView = [[UIScrollView alloc] initWithFrame:CGRectMake(20.0f, 100.0f, 530.0f, 700.0f)];
sectionScrollView.autoresizingMask = UIViewAutoresizingFlexibleBottomMargin | UIViewAutoresizingFlexibleHeight | UIViewAutoresizingFlexibleLeftMargin | UIViewAutoresizingFlexibleRightMargin | UIViewAutoresizingFlexibleWidth;
Be sure to release this later.
Next, set the colYOffset and colXOffset variables to 0.0f for their initial value and then update the code in both for loops to add the sectionButton objects as subviews of sectionScrollView instead of tableOfContentsScrollView:
[sectionScrollView addSubview:sectionButton];
[sectionScrollView addSubview:sectionButton];
Then set the contentSize property of the scroll view:
sectionScrollView.contentSize = CGSizeMake(523.0f, 680.0f);
The contentSize property controls the length and height of the scrollable content and must be set for this object to work properly. The values supplied are A) the 2nd column X offset plus 250 (the length of a single button), and B) the first column y offset because the first column has the greater vertical height.
Now add the following lines of code:
sectionScrollView.hidden = YES;
[tableOfContentsView addSubview:sectionScrollView];
Above we add the scroll view to the main table of contents view, but do you realize why we hide it first? Recall from a previous tutorial in this series that we had to manually enable and disable the TOC UIButton objects to prevent leaves view touches from prematurely triggering chapter selection. All the button objects are embedded within the scroll view now, but we still want to prevent the scroll view from capturing any touch events when it isn't displayed.
Because there is no longer a need to manually switch the button objects between enabled and disabled states, search WOTWViewController.m for "enabled = YES" and "enabled = NO", and remove all lines that were responsible for toggling this value on the section buttons, including those within the displayTableOfContents and contentsButtonPressed: methods.
After removing the lines referred to above, make the following changes to trigger hiding and showing the scroll view instead:
- (void)displayTableOfContents
{
    // Hide the page slider
    self.pageSlider.hidden = YES;

    // Show the scroll view
    sectionScrollView.hidden = NO;

    // Animate the transition with a horizontal flip from right to left
    [UIView beginAnimations:nil context:nil];
    [UIView setAnimationDuration:0.5f];
    [UIView setAnimationTransition:UIViewAnimationTransitionFlipFromRight forView:self->leavesView cache:YES];
    [self->leavesView bringSubviewToFront:tableOfContentsView];
    [UIView commitAnimations];
}

- (void)contentsButtonPressed:(UIButton *)sender
{

    // Update the PDF display position
    self->leavesView.currentPageIndex = sender.tag;

    // Display the UISlider
    self.pageSlider.hidden = NO;
    self.pageSlider.value = (float) sender.tag;

    // Animate the PDF back to the top of the leavesView subviews
    [UIView beginAnimations:nil context:nil];
    [UIView setAnimationDuration:0.5f];
    [UIView setAnimationTransition:UIViewAnimationTransitionFlipFromLeft forView:self->leavesView cache:YES];
    [self->leavesView sendSubviewToBack:tableOfContentsView];
    [UIView commitAnimations];

    // Hide the scroll view added to the TOC when not in view
    sectionScrollView.hidden = YES;
}
The scroll view should now be hidden when the leaves view is displayed and shown when the TOC is displayed. Save, build, and run your project. All of our custom interface objects should now adapt to orientation changes!
Wrap Up
My goal in writing this series was both to demonstrate how to add useful features to a default Leaves implementation as well as to teach you iOS SDK programming tricks and techniques by example along the way. I hope you've learned at least a few interesting nuggets and found this series to be helpful in your own projects. Feel free to leave a comment below and to let me know if this helped out!
Are the Current Solutions Enough?
Over the course of this series, we've seen both benefits and limitations to using the Leaves project. Personally, I love how Leaves can quickly enable you to create the basic left/right page curl animation while supporting a number of different content formats (including PDF). However, as we've seen over the course of this series, the default project implementation needs a lot of work in order to be suitable for most professional projects. We've had to step around the core project code in attempting to add a slider and a table of contents, and we didn't even make it to some of the more complex yet commonly needed features like text highlights, bookmarks, annotations, etc.
Of course, Leaves isn't the only option for achieving this kind of functionality. In my first post I mentioned FlipView, HMGLTransitions, and the PaperStack project (still unreleased as of 10/6/2011). There are also a number of Leaves project forks and likely a few more projects I haven't listed here.
My question for the community is this: do the current open-source options for building eReader applications meet your needs? If not, why not? What features would you like to see added to existing projects that aren't currently available? Soundoff below. I'm currently considering either joining one of the eReader projects already out there or perhaps even kicking off a new one, so I'd love to hear your feedback!

Comments