This is the first part of a step-by-step tutorial on how to use Game Center in your app. Game Center is supported since iOS 4.1. It's Apple's new social network. Game Center enables users to track their best score on a leaderboard, compare their achievements, invite friends to play a game, and start a game through auto-matching. This tutorial is only useful if you are a paid developer, because if you are not, you can't setup the Game Center achievements and leaderboard in iTunes Connect. In the firts part we will create our project and create a new app in iTunes Connect with achievements and a leaderboard for this tutorial
Step 1: Creating the Project
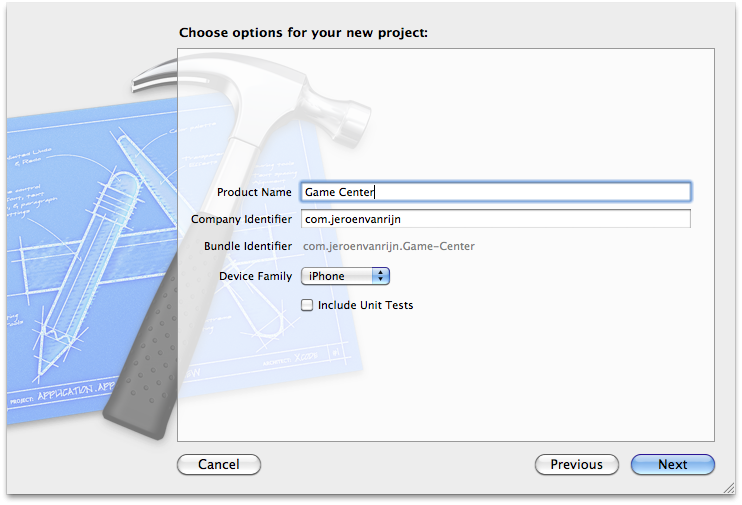
Open Xcode and select “Create a new Xcode project”. Select a View-based Application and click Next. Enter a name for your project, I called mine “Game Center”. Enter your Company Identifier and make sure you select iPhone for Device Family, because we are going to make an iPhone app. If you are done, click next. Choose a place to save your project and click create.
Step 2: Import the GameKit Framework
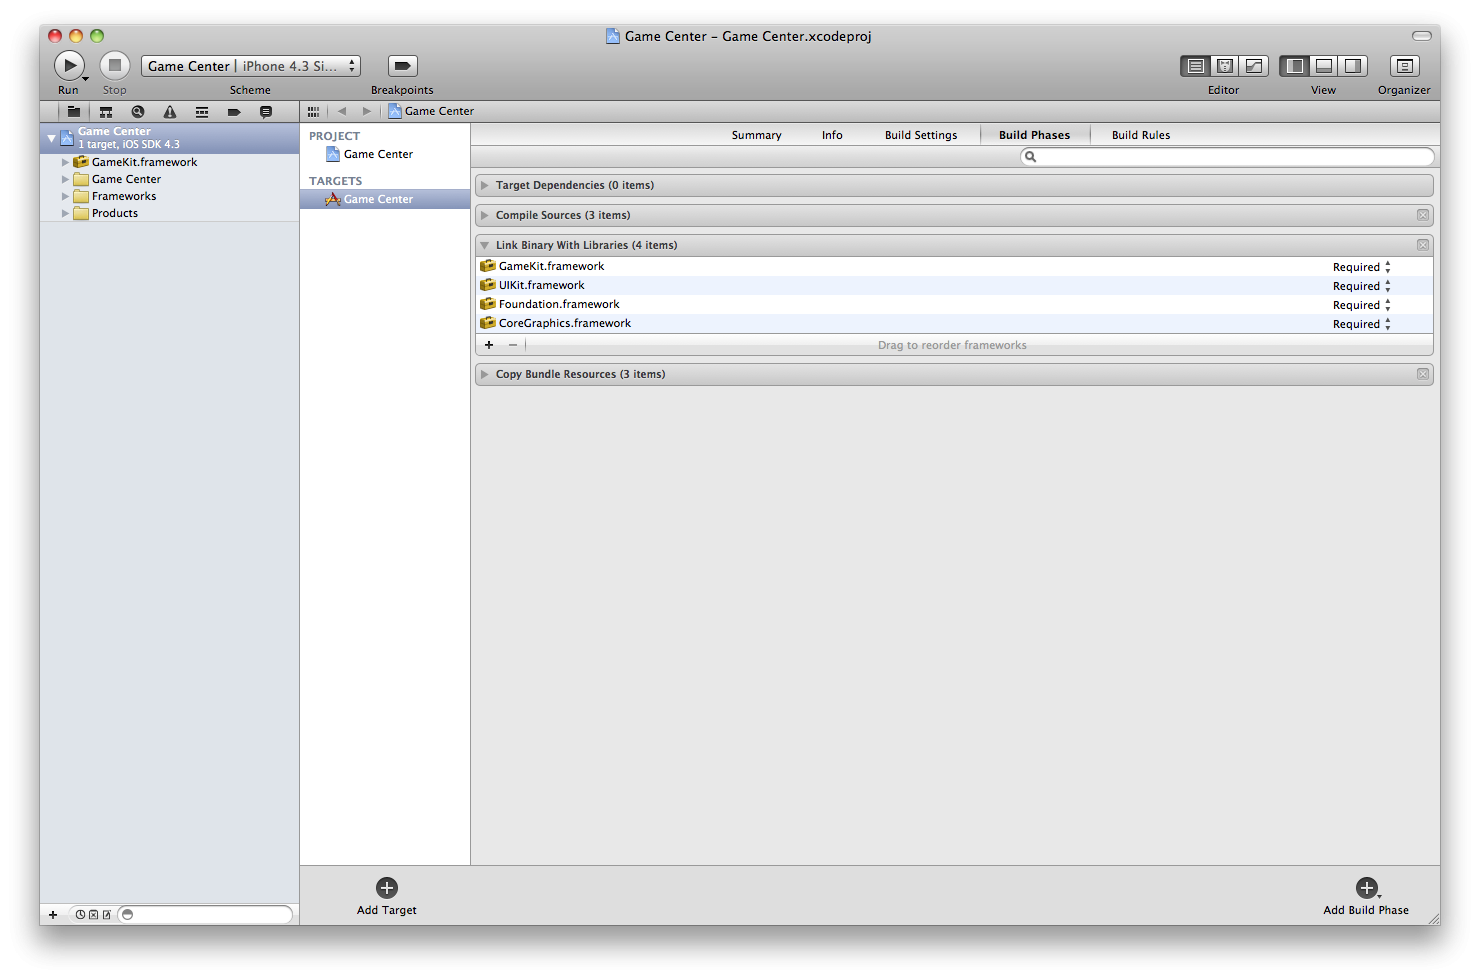
In the navigator area of Xcode 4, select the project name (in this case “Game Center”). Next, select the current target (“Game Center” here again), and then select the “Build Phases” tab. Expand the “Link Binary With Libraries” option, and then click the “+” button to add a new framework. Type “game″ into the search box, and select the GameKit.framework framework that appears in the list. Click “Add” to include this framework in the linking phase of your project.
Step 3: Creating the App ID
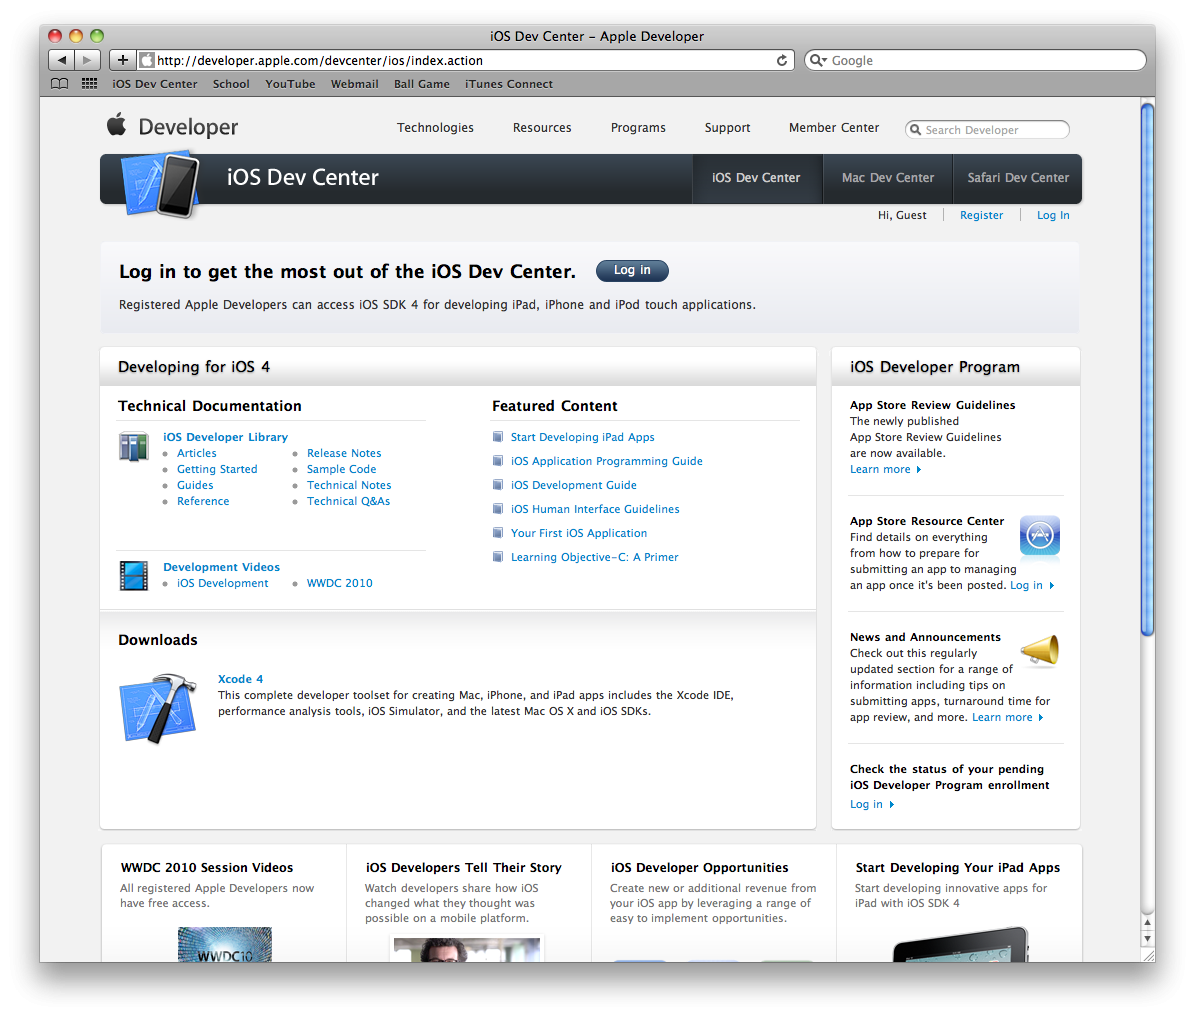
To do this, you have to be a paid developer. To use Game Center you need to add a new app and to that you need an App ID. Open up Safari or another web browser you prefer. Go to the iOS Dev Center and Log in to your iOS Developer account.
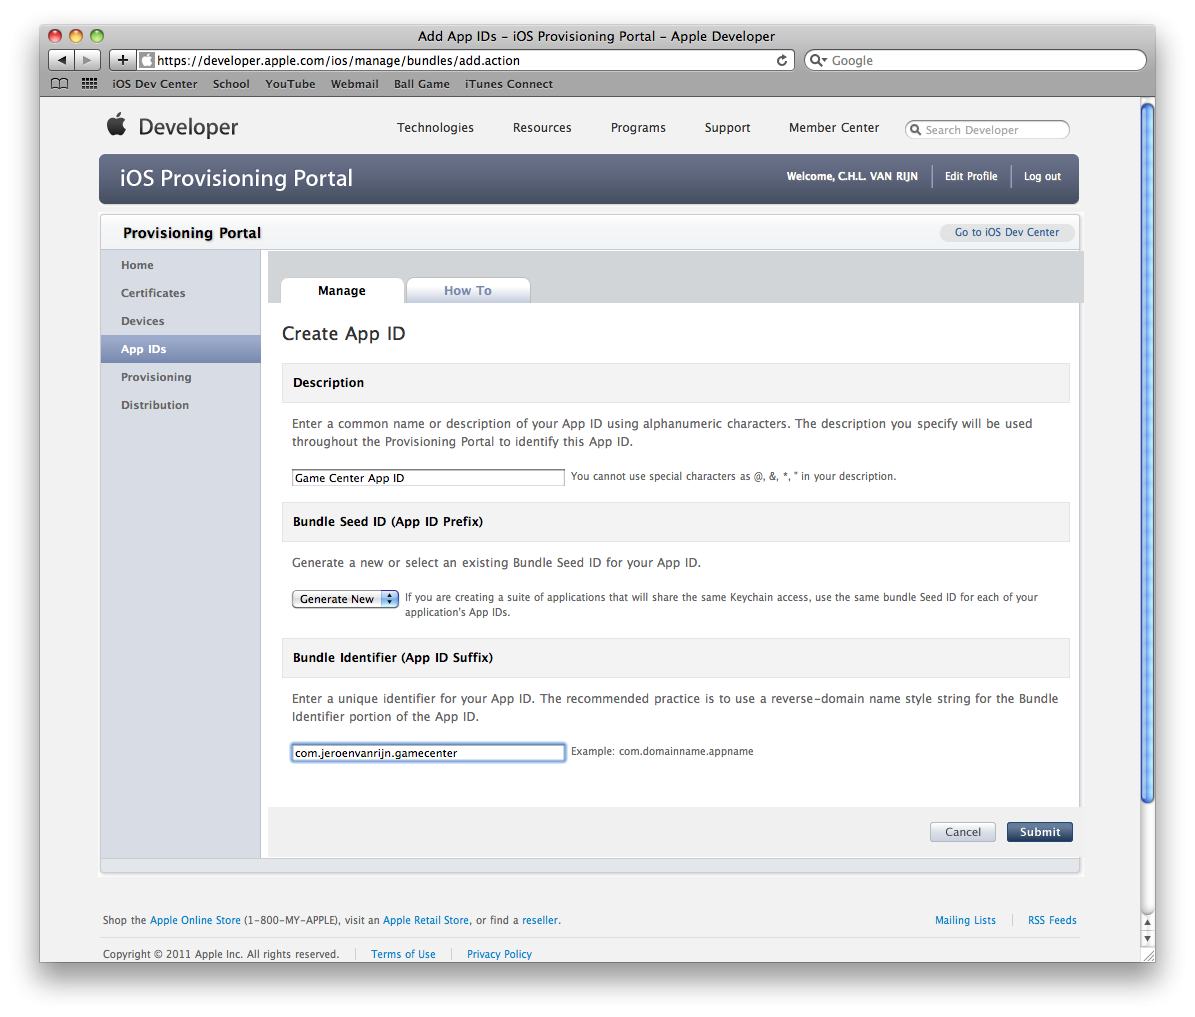
If you are logged in, you see a button to go to the iOS Provisioning portal. Click that button and go to "App ID's". Because we want to create a new app ID, click "New App ID". As description I choose "Game Center App ID" so I know that this app ID is for my Game Center app. We don't want to make a suite of applications that share the same keychain access, so we leave the Bundle Seed ID to "Generate New". The recommended usage for a Bundle Identifier is com.domainname.applicationname. As domainname I chose my own name, Jeroen van Rijn. I called my application "Game Center" so my Bundle Identifier is "com.jeroenvanrijn.gamecenter” (without the quotes). Click “submit” to finish the App ID.
Step 4: Adding a New App
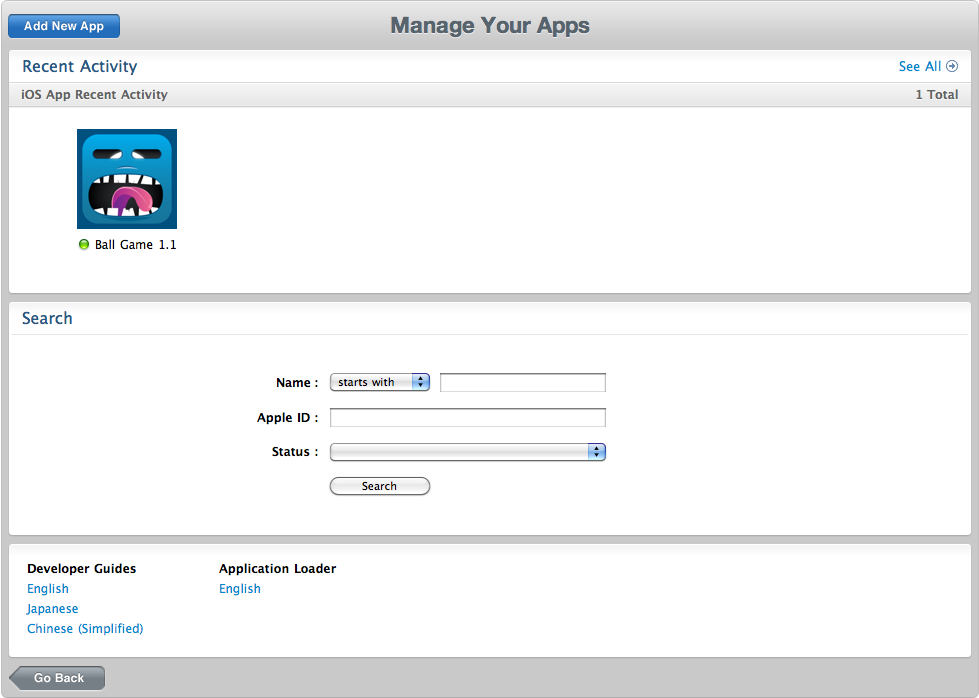
Go back to the iOS Dev Center and go to iTunes Connect by clicking the button that says "iTunes Connect" or go directly to iTunes Connect. Go to "Manage Your Applications", here we will create a new app, that we will use for our Game Center example. Because I've one app in the App Store, this window may look some different. Click "Add New App" to start creating or new app.
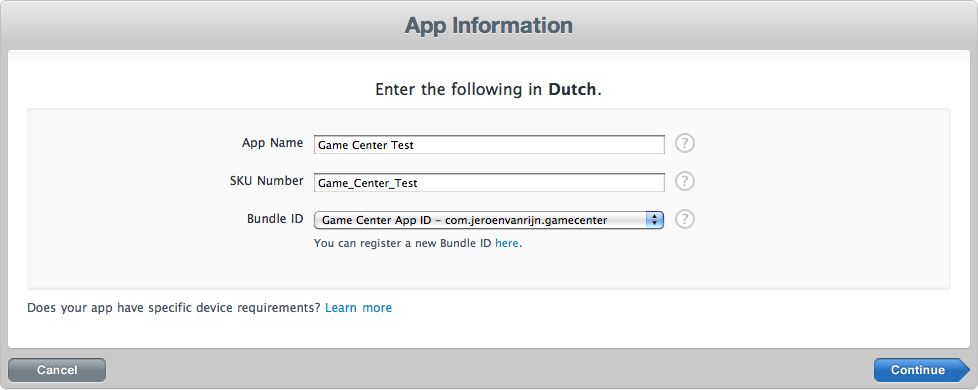
If this is your first app you will need to enter some information, but that is pretty straight forward. If you entered that information, you need to enter an App name, a SKU number and a Bundle ID. The App name is of course the name of your app. The SKU Number is a unique number to identify the app you are adding. For the Bundle ID you need to choose the App ID you just created in the iOS Provisioning Portal. If you are done, click “Continue”.
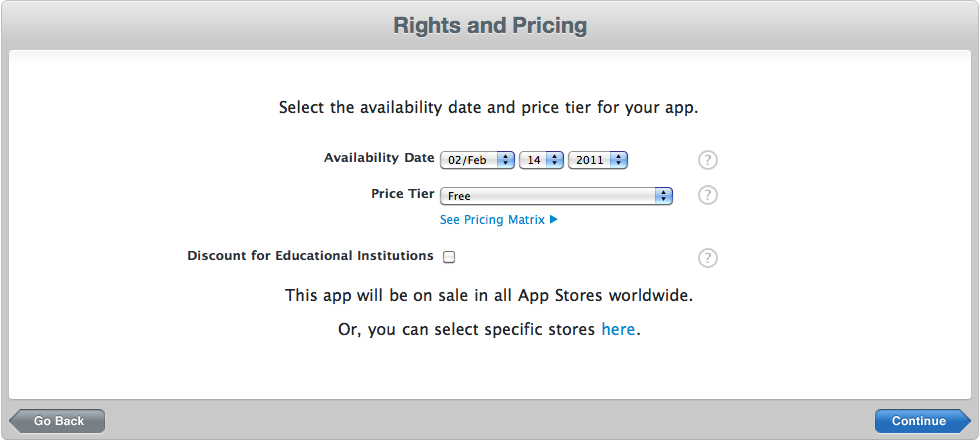
In the next window we will enter an availability date and the price of the app. I chose just a random date, because I’m not going to submit the app in the App Store. As Price Tier I chose “Free”, you can chose whatever you want. I deselected the “Discount for Educational Institutions”. This means that educational institutions can’t buy your app once and install it on different devices. If you are done, click “Continue”.
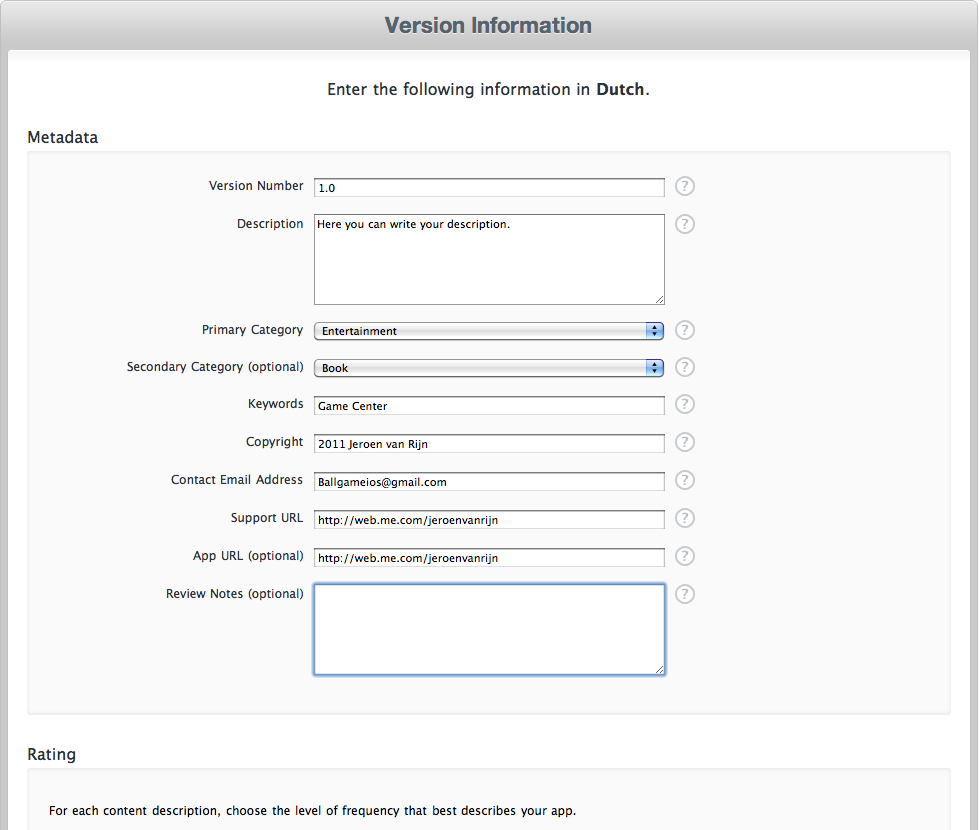
In the third window we will enter our Version information. My screen says that I need to enter the following in Dutch, but yours will say the language you chose for your first application. The Metadata and rating are pretty straight forward. For the Images you need to choose an icon and an iPhone / iPod touch Screenshot. The iPad Screenshot is optional. You can choose your own images or use mine.
If you are done, click “Save”.

Congratulations, you have created a new app in iTunes Connect.
Step 5: Creating a Leaderboard
Now go to “Manage Game Center”, here we will enable our app for Game Center and later create a leaderboard and some achievements.
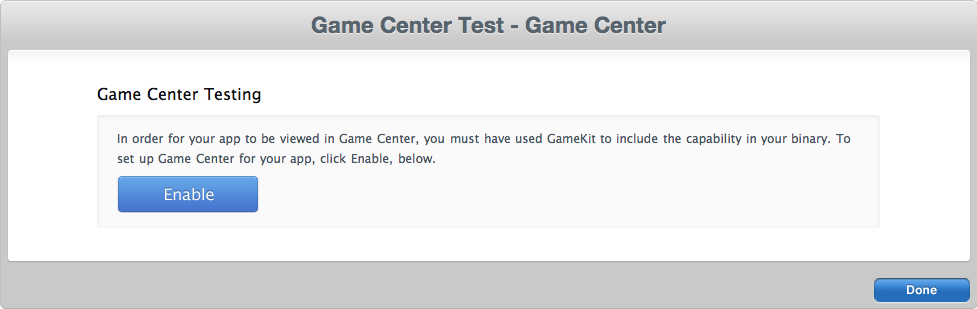
Click “Enable”, after you clicked, the button on your screen will chance and you can setup a leaderboard and achievements. First we will setup a leaderboard. In the “Leaderboards” section, click “Set up” and in the next window click “Add Leaderboard”.
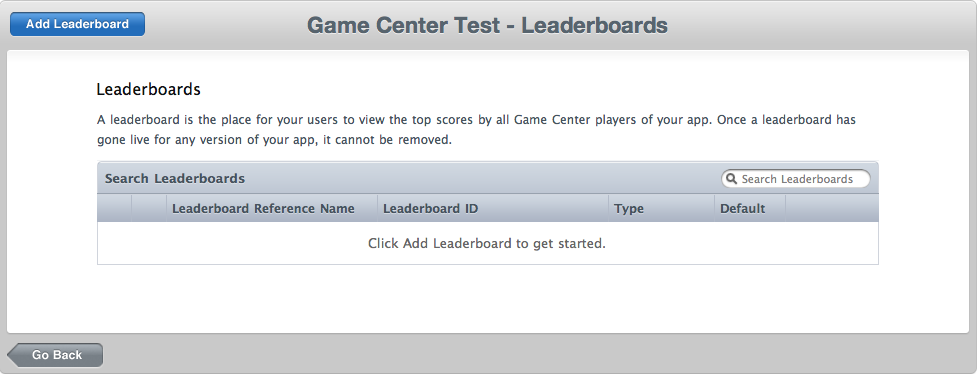
We want to create a single leaderboard, so under “Single Leaderboard” click “Choose”.
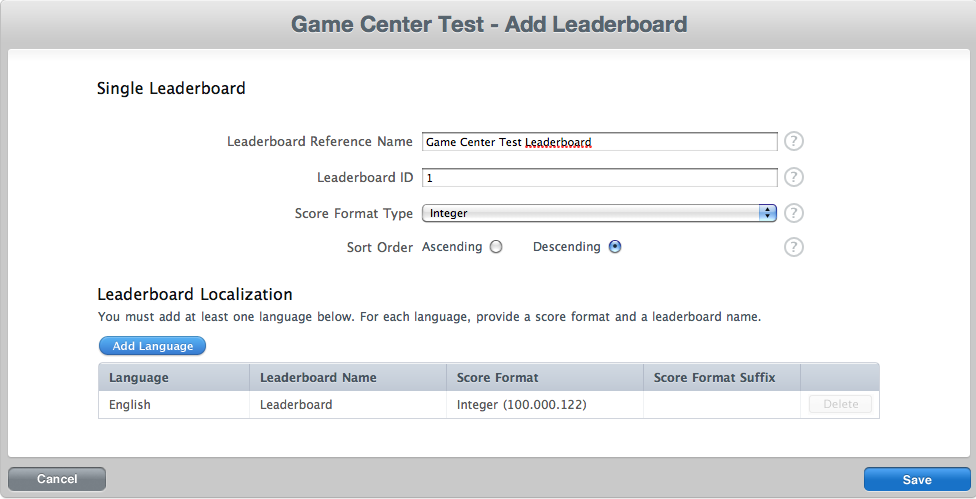
In this window, we will enter our leaderboard information. The “Leaderboard Reference Name” is an internal name that you must provide for each leaderboard. I Named mine “Game Center Test Leaderboard”. The “Leaderboard ID” is a unique alphanumeric identifier that you create for this leaderboard. I chose “1”, because this will be the first leaderboard for this app. We will use this leaderboard ID later in Xcode to identity our leaderboard. The “score Format Type” is the type of format in which the score for your app will be expressed on the leaderboard in Game Center. Choose “Integer” as format type. For “Sort Order” choose “Descending”. This means that the highest score will be displayed first. If you want the lowest score to be displayed first, choose “Ascending”
There is still one thing left to do for finishing our leaderboard, and that is adding a language, so click “Add Language”.
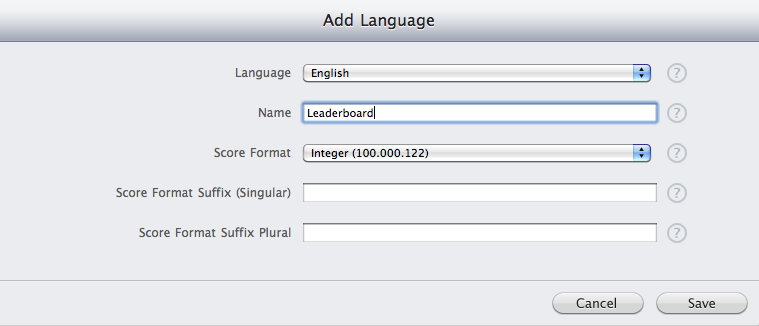
For “Language” I chose “English” Feel free to choose a language you prefer. The “Name”, is the name of the leaderboard displayed in Game Center. I named mine “Leaderboard”. The “score Format” is the format which will displayed on your leaderboard for each specified language. I chose “Integer (100.000.122)” The “Score Format Suffix (Singular)” and “Score Format Suffix (Plural) are optional. The score format suffix will be added to the end of scores displayed on your leaderboard. You can use this for clarifying the type of score your app uses. When you are done entering the language information, click “Save”. Feel free to add more languages, but I leave it at one for this tutorial. To finish the leaderboard click “Save”.
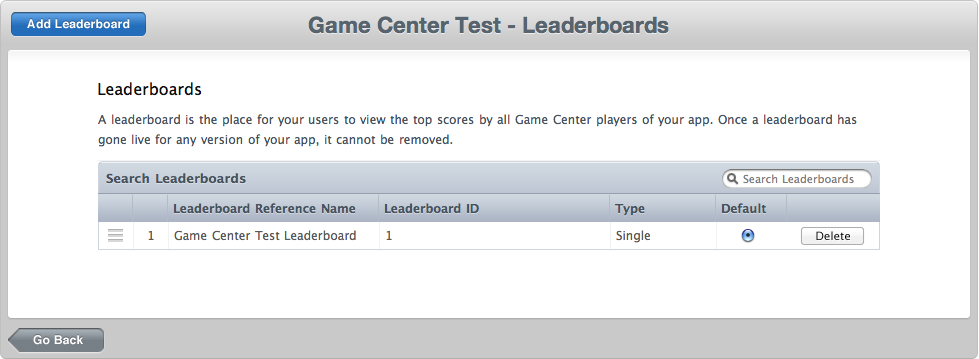
Now, we have created a Game Center leaderboard. As you can see, this leaderboard is selected as the default leaderboard, because it’s the only leaderboard we have for this app. Click “Go Back”, so we can add some achievements.
Step 6: Creating the Achievements
Now we are going to create the achievements. For this tutorial I am going to make 2 achievements. In the “Achievements” section click “Set up”. In the next window click “Add New Achievement”, to create the first achievement for this tutorial.
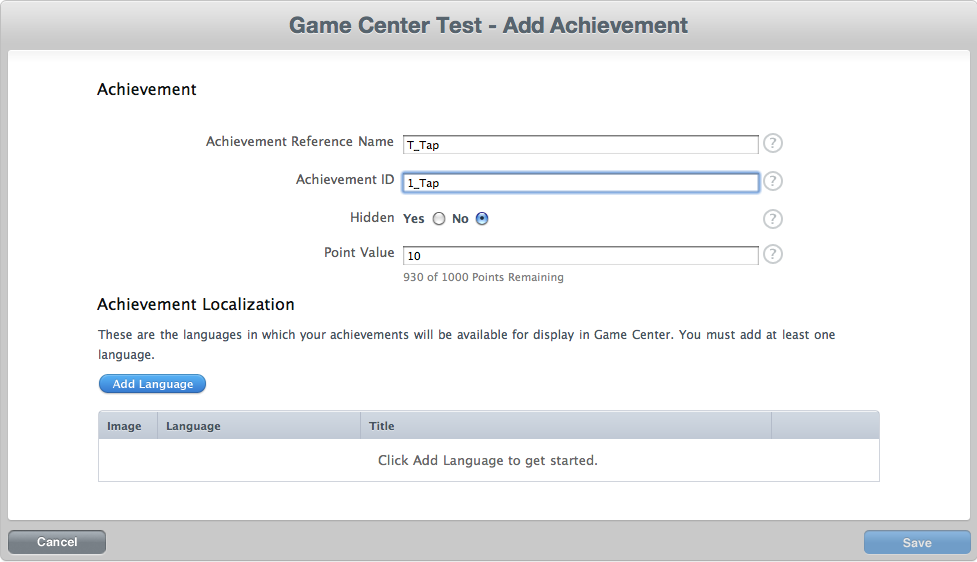
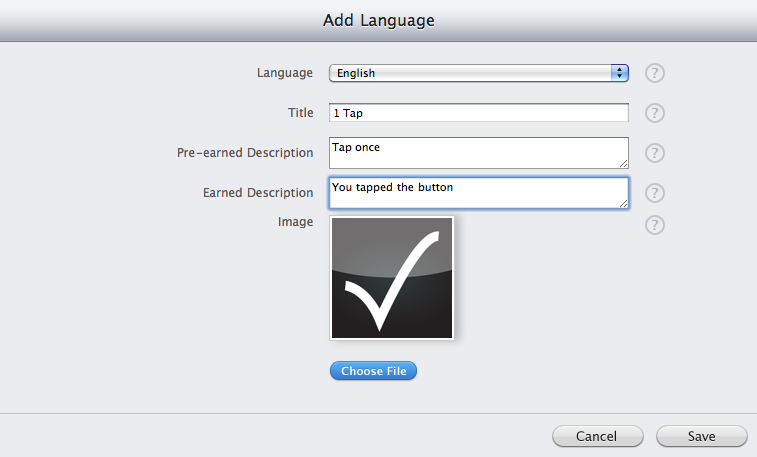
The “Achievement Reference Name” and “Achievement ID” are the same as the ones for the leaderboard, we just created. As “Achievement Reference Name” I chose “1 Tap” and as “Achievement ID” I chose “1_tap”. For “Hidden” I chose “No”, because we don’t want that a achievement will remain hidden on Game Center until a player has achieved it. “Point Value” means the points that your achievement is worth. I chose 10 for this achievement. There is a maximum of 100 points per achievement and a maximum of 1000 point total for all achievements. Again we have to add a language. Click “Add language”. For “Language” I chose “English” again and for “Title”, “1 Tap”. The “Pre-earned Description” is the description of your achievement before they have earned it. I chose “Tap Once”, because that is what they need to do to earn this achievement. The “Earned Description” is of course the description of your achievement when they have earned it. I chose “You tapped the button”. You must provide a 512x512 pixels image. If you click the question mark at “Image” you can see the supported formats. You can choose your own image or use mine.

If you are done, click “Save”. You can add more languages, but I leave it at one. Click “Save” to finish this achievement.
In the next window you can add a new achievement. Click “Add New Achievement. This time I entered the following information:
- Achievement Reference Name: 20 Taps
- Achievement ID: 20_Taps
- Hidden: No
- Point Value: 50
Click “Add Language” to enter a language. This time I entered the following information:
- Language: English
- Title: 20 Taps
- Pre-earned Description: Tap 20 Times
- Earned Description: You tapped the button 20 times
- Image: (the same as the first achievement)
If you are done, click “Save”. Click “Save” again to finish the second, and last achievement for this tutorial.
Step 7: Enabling Game Center
Click “Go Back” and in the next window click “Done”. In the “Versions” click “View Details”. In the next window scroll down to the “Game Center” section.

Click “Enable for This Version”. The “Game Center” section should change in this one:

Now we are done in iTunes Connect. You can close your browser and go back to the Game Center project in Xcode we created at the beginning of this tutorial.
Step 8: Download GKTapper
We will use some files from the GKTapper Sample Code from Apple. You can download the GKTapper Sample Code here.
When the download completed, open the project and drag the following files to the “Project Navigator” in our Game Center project:
- GameCenterManager.h
- GameCenterManager.m
- AppSpecificValues.h
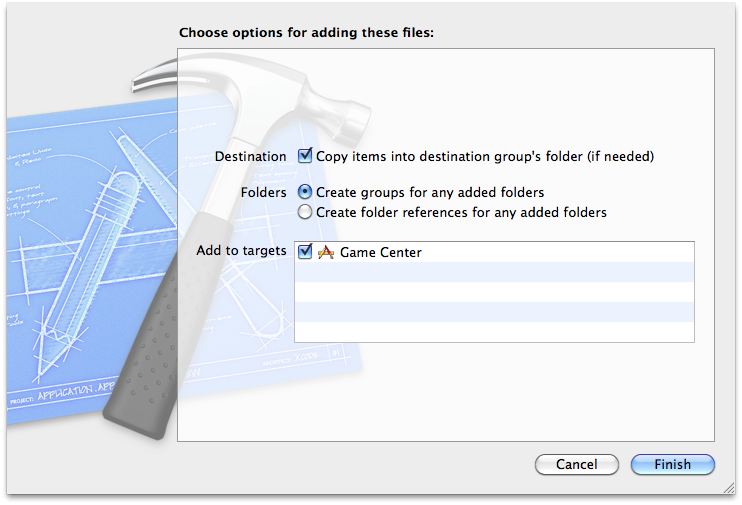
Make sure “Copy Items into destination group’s folder (if needed) is checked, and click “Add”. Now you can close the GKTapper project. You can also delete it, if you want, because we won’t need it anymore for this tutorial. We use those files, because the GameCenterManger classes will do the heavy lifting for us.
Step 9: Change the Bundle identifier
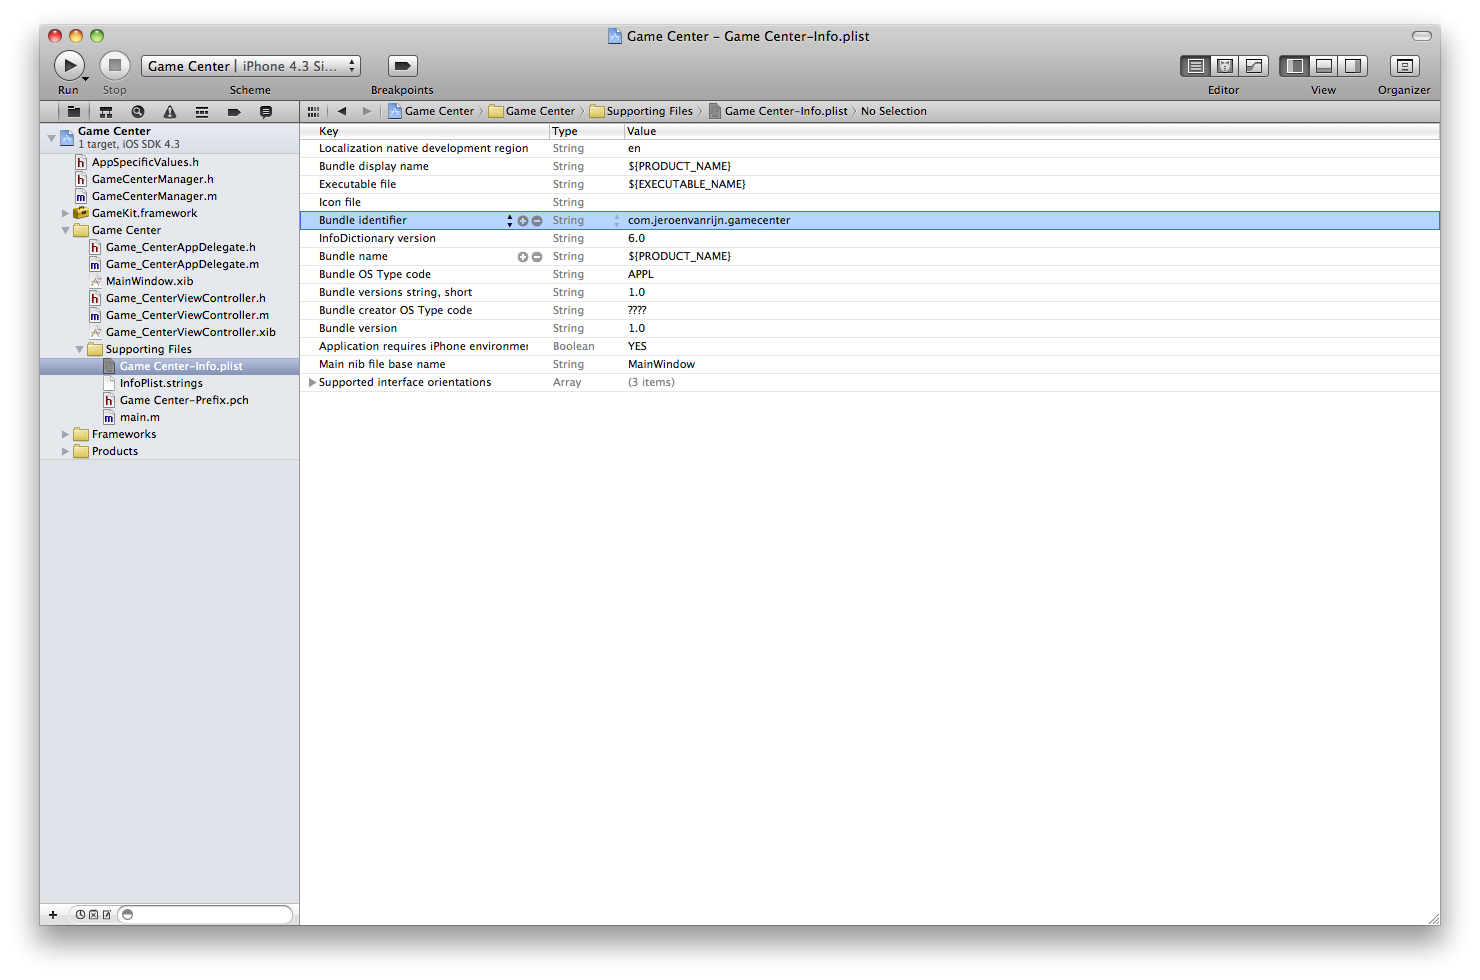
In your Xcode project, open the Game-Ceter-Info.plist file from the “Supporting Files” folder in the “Project Navigator”. Fill in the “Bundle Identifier” value with the one created earlier and associated with the App ID. I named my Bundle Identifier "com.jeroenvanrijn.gamecenter”.
Conclusion
In this part of the tutorial we have covered how to create a new app with achievement and a leaderboard in iTunes Connect. In the second part we will finish the tutorial, so we can use the leaderboard and achievements.

Comments