Engage your users with stunning carousels. We'll look at how easy and clean it can be to implement scrollable, interactive carousels in your iOS applications. With high configurability, you can have 3D, flat, rotating, and endless scrolling arrays for data, images, or buttons.
Certain aspects of applications or techniques used in this tutorial have changed since it was originally published. This might make it a little difficult to follow along. We'd recommend looking at these more recent tutorials on the same topic:
On January 9th, 2007, Steve Jobs unveiled the iPhone to an eager audience. In his presentation he demonstrated many of the features that would go on to create an entirely new way of interacting with technology and information. One of those many features was presented by a simple and powerful message- "touch your music". As he stood up there, with Bob Dylan playing over the speakers, Steve Jobs "thumbed through" is music albums effortlessly, and that message was clear.
Now, nearly five years later, that same message is true. There is magic in the way we are able to browse our music today, and as developers, we are able to bring that same experience to our users for all kinds of data, not just songs and albums.
For those who are already familiar with developing for iOS, it might be intimidating to consider the number of factors involved to implement something as seemingly simple as Cover Flow: animation and smooth scrolling, optimizing image handling, intercepting touch interactions, etc.
Fortunately though, Nick Lockwood of Charcoal Design has created a class called "iCarousel” that handles all of the heavy lifting for us, and he has released it as an open source project. This means that we can quickly and efficiently get down to the rest of our development, while still enjoying highly interactive, touch-friendly Cover Flow.
One of the great features of iCarousel is the selection of ready-to-use display types:
- iCarouselTypeLinear
- iCarouselTypeRotary
- iCarouselTypeInvertedRotary
- iCarouselTypeCylinder
- iCarouselTypeInvertedCylinder
- iCarouselTypeCoverFlow
- iCarouselTypeCoverflow2
It is also possible to customize these styles to suit your needs, but that might be a separate tutorial or Quick Tip in itself (let us know in the comments if you’re interested).
Step 1: Getting iCarousel and Setting Up
iCarousel is hosted on github, which means that you can get it either as a git clone, or as a .zip download. You can find it at https://github.com/nicklockwood/iCarousel, so go ahead and, following your preferred method, get yourself a local copy of iCarousel.
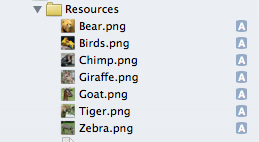
This project involves the use of a few images also, so you’ll want to download the "Source Files” at the top of this page if you haven’t already. In that .zip file, there is a directory called "Animals”, which has seven different animal images. (These images come from Joy Tek on Flickr (http://www.flickr.com/photos/joytek/collections/72157627168953450/), and have been resized for this tutorial.)
Now, with all of the requisite files downloaded, we’re ready to create an awesome carousel!
We’ll start by adding the iCarousel class files, then the image files and finally, we’ll make sure to limit the app to landscape mode without a visible status bar. (iCarousel will work in portrait mode, but we’ll keep it simple by just working with landscape for now.) But before all that, let’s get a new project started.
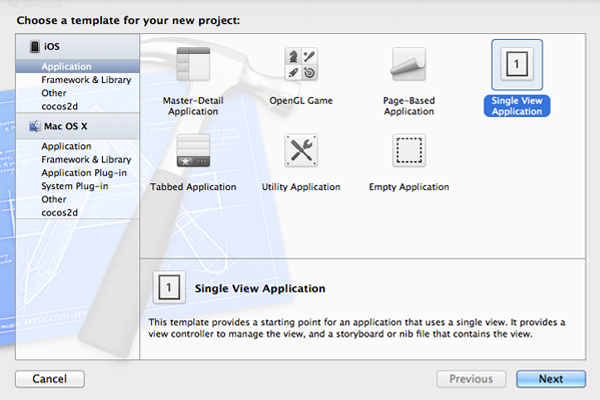
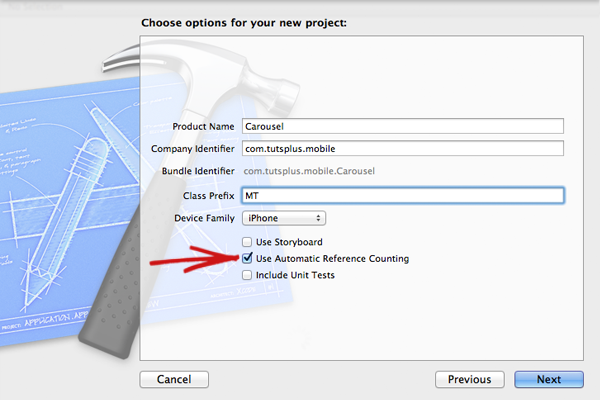
We just need a single window for this project, so a "Single View Application” will be just fine. I’ll call my project "Carousel” and I’ll be using Automatic Reference Counting, so it’s important not to forget that option.
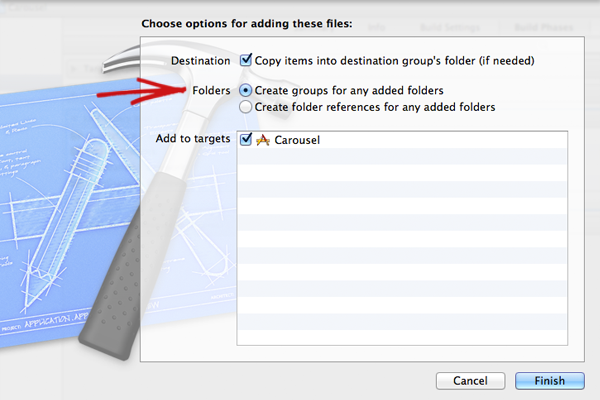
Once our project has been created, we can add the iCarousel class files, by grabbing the "iCarousel” directory and dragging it into the project. (There are only two files in the iCarousel directory: "iCarousel.h” and "iCarousel.m”.) Note: If you’re dragging the whole directory into your project, make sure that you "Create groups for any added folders”.
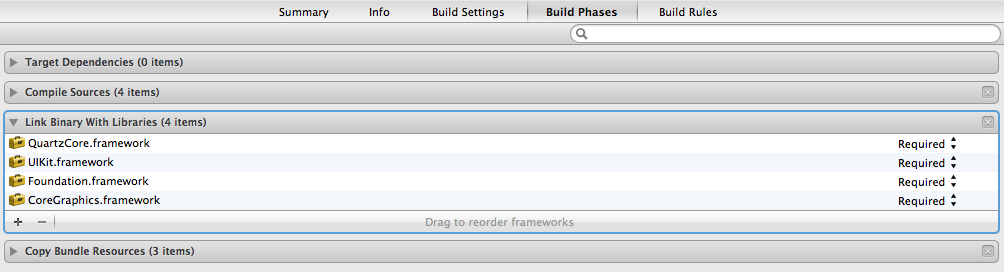
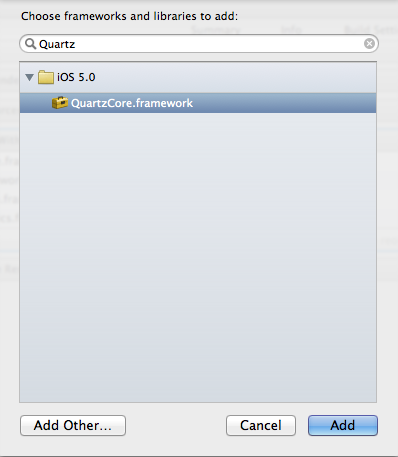
iCarousel depends on the "QuartzCore” framework, and does not currently support ARC, so we have a few simple tasks to do to make sure that our newly added class will work with our project.
To add the QuartzCore framework, click on the project file in the left-side navigator (it will be your project name; mine says "iCarousel 1target, iPhone OS...”). At the top of the screen you’ll now have some target build settings. Click on "Build Phases”, and then expand the "Link Binary With Libraries” and click on the "+” button at the lower left-hand corner. A window will pop up and you can find our framework by typing "QuartzCore” in the search box. Click "Add” and you’re done.
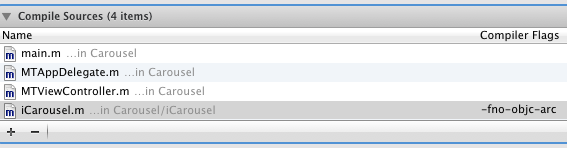
Then, we’ll set a compile flag that will make an exception for the LLVM compiler for iCarousel. Go to the "Compile Sources” section on the same page, and we’ll go to the "iCarousel” entry. Double click on that row, and put "-fno-objc-arc” (without quotes) in the popover that comes up.
We’re going to disable the status bar for this app, so go on over to the "Info” tab for our target and under "Custom iOS Target Properties”, we’ll add a new row (Right-click ->; Add Row), and set the text in the "Key” field to "Status bar is initially hidden”. Then, set the "Value” to "YES”.
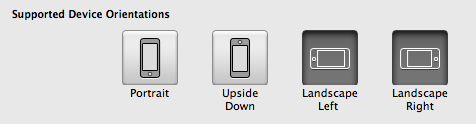
Now, before getting into the actual implementation, we want to set the orientation of our App to landscape, and make sure that it doesn’t go into portrait mode (at least for now). We’ll just go to the "Summary” tab for our target, and make sure that the "Landscape Left” and "Landscape Right” options are the only ones selected under the "Supported Device Orientations” section.
Then, we can to go into our main view controller implementation file ("MTViewController.m” for me), and change the method:
- (BOOL)shouldAutorotateToInterfaceOrientation:(UIInterfaceOrientation)interfaceOrientation
{
    // Return YES for supported orientations
    return (interfaceOrientation == UIInterfaceOrientationLandscapeLeft || interfaceOrientation == UIInterfaceOrientationLandscapeRight);
}
The last thing we’ll need to do now is to get our images of the zoo animals into our project. I have included seven such images in the source files for you to use. Just grab them from wherever you unzipped the source files directory, and drag them into our project. (You could also just drag the entire "Animals” directory, which will include all of the images.) And now we’re ready to roll!
Step 2: Setting Up Our Data and Carousel
Our Carousel is going to display some images of different zoo animals, and underneath the current image, we’ll show the animal name and what kind of food they like to eat. In a production environment, you should have some real data to work with, but for our example, we’re just going to set up a few NSArrays with dummy data.
Our first array will be a list of the image names so that we can find and load them into our carousel. We’ll call this list "images”.
The second array will have a list of names that correspond to our images, as well as a small sentence that follows this format: [animal name] Eat: [food]. For example, with bears, we will say: "Bears Eat: Honey”. We’ll call this array "descriptions”.
We will set up these NSArrays in our main view controller header file ("MTViewController.h” for me).
@property (strong, nonatomic) NSMutableArray *animals;
@property (strong, nonatomic) NSMutableArray *descriptions;
And, of course, synthesize them in our implementation file:
@synthesize animals, descriptions;
Since we’re using a .xib in this example, we’ll want to do our set up in the "initWithNibName” method. Let’s put the image names and food descriptions in their arrays now.
- (id)initWithNibName:(NSString *)nibNameOrNil bundle:(NSBundle *)nibBundleOrNil
{
    self = [super initWithNibName:nibNameOrNil bundle:nibBundleOrNil];
    if (self) {

        //set up carousel data
        wrap = NO;

        self.animals = [NSMutableArray arrayWithObjects:@"Bear.png",
        @"Zebra.png",
        @"Tiger.png",
        @"Goat.png",
        @"Birds.png",
        @"Giraffe.png",
        @"Chimp.png",
        nil];

        self.descriptions = [NSMutableArray arrayWithObjects:@"Bears Eat: Honey",
       @"Zebras Eat: Grass",
       @"Tigers Eat: Meat",
       @"Goats Eat: Weeds",
       @"Birds Eat: Seeds",
       @"Giraffes Eat: Trees",
       @"Chimps Eat: Bananas",
       nil];
    }

return self;
}
You’ll notice that there’s also a property "wrap”, which we have set to "NO”. This is an iCarousel property, and it will ensure that our carousel doesn’t scroll in an infinite loop through our images, but instead, it stops scrolling after the first and last elements with a nice rubber-banding animation. We’ll look into that more later on.
Now that we have some data in our app, we’ll need to implement the actual iCarousel class. iCarousel works like UITables, with "data source” and "delegate” protocols. We’ll implement these by first importing the iCarousel class into our header.
#import "iCarousel.h”
Next, we’ll add the following bit of code after the "UIViewController” part of the header interface declaration:
<CarouselDataSource, iCarouselDelegate>;
While we’re here, we can also add our "wrap” property, which we set in our "initWithNibName” method.
@property (nonatomic) BOOL wrap;
Now, with our header all ready, we need to hook up the UIView and UILabel that we’ll need to display our carousel and description text. So, we’ll open up our .xib file ("MTViewController.xib” for me), and add our new elements.
For iCarousel, we’ll need a UIView. I’m setting the background of mine to "Lead”, so that it will be nice and dark behind the images.
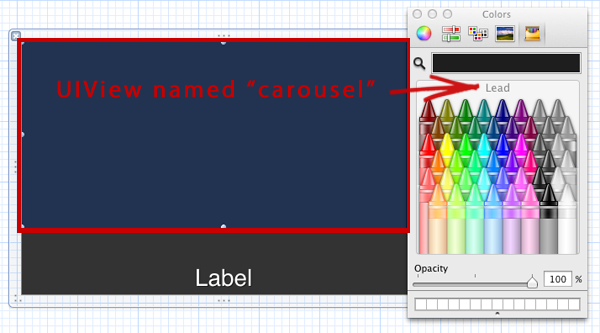
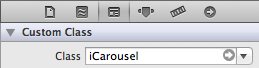
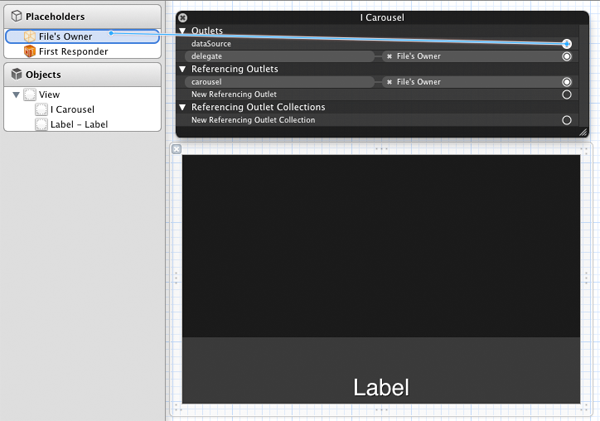
Now, for iCarousel to recognize this UIView as an "iCarousel” subclass, we’ll go to the "identity inspector” and change the "Class” to "iCarousel” under the "Custom Class” section. Then, if we right-click on our new UIView, we can drag our "dataSource” and "delegate” options over to the "File’s Owner”. We’ll also need to set the "Referencing Outlet” for our carousel view to the "carousel” property in our "File’s Owner”. We’re almost done with our iCarousel view, but first we’ll work on our label and then we’ll hook both new views up to our "MTViewController” class.
So, I’m going to set the background for the main view to "Tungsten”, which will provide a lighter gray area for the background of the label that will show the description text of the selected animal. And then, of course, I’ll drag over a UILabel and center it beneath my iCarousel UIView.
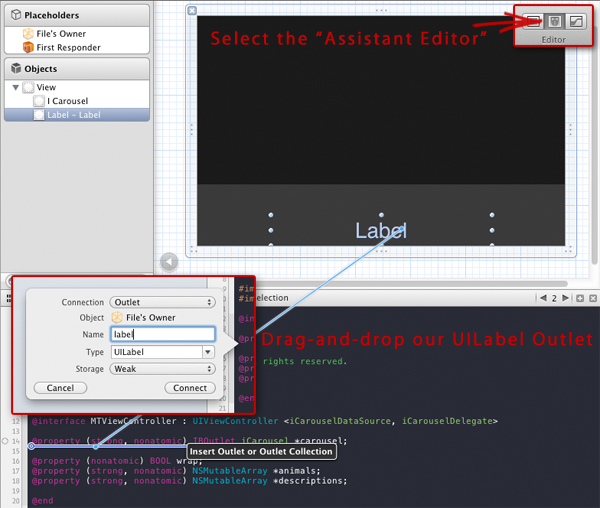
With everything in place, I can now open my "Assistant Editor”, and easily right-click and drag my new views; first the iCarousel view just beneath the "descriptions” array in my main view header file, and then I’ll do the same with my UILabel. I named my carousel view "carousel”, and my UILabel "label”.
And that finishes up our work with the header file, as well as the .xib file. In summary, we imported the iCarousel class, added the iCarousel dataSource and delegate protocols, and we created our properties for the carousel, the label, and the arrays.
Step 3: Making It All Work
The iCarousel protocol supports a number of methods that deal with all of the visual and interactive elements of the carousel. You can find a complete reference of the available methods, properties, etc... on the iCarousel github page here: https://github.com/nicklockwood/iCarousel. For now though, we just need to get our arrays set up as the data for our carousel, as well as getting the behavior for the carousel configured how we want it.
For this example, these are the iCarousel methods that we’ll be using:
- (NSUInteger)numberOfItemsInCarousel:(iCarousel *)carousel
{
     return [animals count];
}
We’ll set the total number of elements to be the count of items in our "animals” array.
- (NSUInteger)numberOfVisibleItemsInCarousel:(iCarousel *)carousel
{
    //limit the number of items views loaded concurrently (for performance reasons)
    return 7;
}
For the iPhone, we only want to display up to 7 items at a time. This isn’t an absolute number, but will be good for performance.
- (UIView *)carousel:(iCarousel *)carousel viewForItemAtIndex:(NSUInteger)index
{
    //create a numbered view
    UIView *view = [[UIImageView alloc] initWithImage:[UIImage imageNamed:[animals objectAtIndex:index]]];
    return view;
}
This is a lot like working with the current cell in a UITableView. Here, we’re setting the contents of each carousel item to be a UIView with a UIImage. The UIImage will load the .png for the corresponding animal in the "animals” array.
- (NSUInteger)numberOfPlaceholdersInCarousel:(iCarousel *)carousel
{
    //note: placeholder views are only displayed on some carousels if wrapping is disabled
    return 0;
}
Placeholders are bookend items at the beginning and end of our group of images. We don’t want these, so we’ll return 0. For curiosity's sake, feel free to change that to return 1, but for our example we want to leave it as it is.
- (CGFloat)carouselItemWidth:(iCarousel *)carousel
{
    //usually this should be slightly wider than the item views
    return 240;
}
Pretty self-explanatory, this is how much space the carousel will give to each item. Our images are 220px wide, so I’ve set this to 240 to provide some spacing.
- (BOOL)carouselShouldWrap:(iCarousel *)carousel
{
    //wrap all carousels
    return wrap;
}
This is set to "no” in our "initiWithNibName” method, and will prevent our items from scrolling infinitely.
- (void)carouselDidEndScrollingAnimation:(iCarousel *)aCarousel
{
    [label setText:[NSString stringWithFormat:@"%@", [descriptions objectAtIndex:aCarousel.currentItemIndex]]];
}
And finally, this is the method that will run when we stop on a given item. We’re setting the text of our UILable to the contents of our "descriptions” array at the corresponding index for our current item. And that’s it for the iCarousel methods.
The last thing we want to do now, before running our app, is to set the type of carousel view style that we want. We can do this in the "(void)viewDidLoad” method by setting the carousel.type to our desired style.
- (void)viewDidLoad
{
    carousel.type = iCarouselTypeCoverFlow2;
    [super viewDidLoad];
}
You can see a complete list of styles at the beginning of this article, or at the iCarousel github page.
And now, go ahead and build and run your app and you should see a scrollable list of animal pictures with descriptions underneath. I greatly encourage you to play around with the various styles and properties of the carousel, and perhaps we can even look at interactivity with carousel items in the future.

Comments