This tutorial will teach you how to use the Sprite Kit framework to create a question-based Facts game. It is designed for both novice and advanced users. Along the way, you will apply the Sprite Kit core. The Facts Game tutorials are divided into three parts in order to completely cover each section. After this three part tutorial, the readers will be able to create a simple question-and-answer tap game featuring sounds, animations, menus, rules, timers, and UIKit interaction.
Introduction
This series is divided into three parts: Project Setup, Interface Creation, and Game Logic. Each part will produce a practical result, and the sum of all parts will produce the final game. Despite the fact that each part can be read independently, for a better understanding and guidance, we suggest that the tutorial be followed step by step. We also included the source code for each part separately. Thus, providing a way to start the tutorial in any part of the series.
This is the second part of our Facts Game with Sprite Kit tutorial series. In this tutorial, you will program the level selection and main game scene interface. This tutorial focuses on several aspects such as, custom UITableView, custom class initializers, property lists, and SKActions. We will explain everything further below. If you haven't completed the first part of the series yet, you can download the project and pickup exactly where we left off.
This is what our end result will look like:
1. Level Select
Step 1
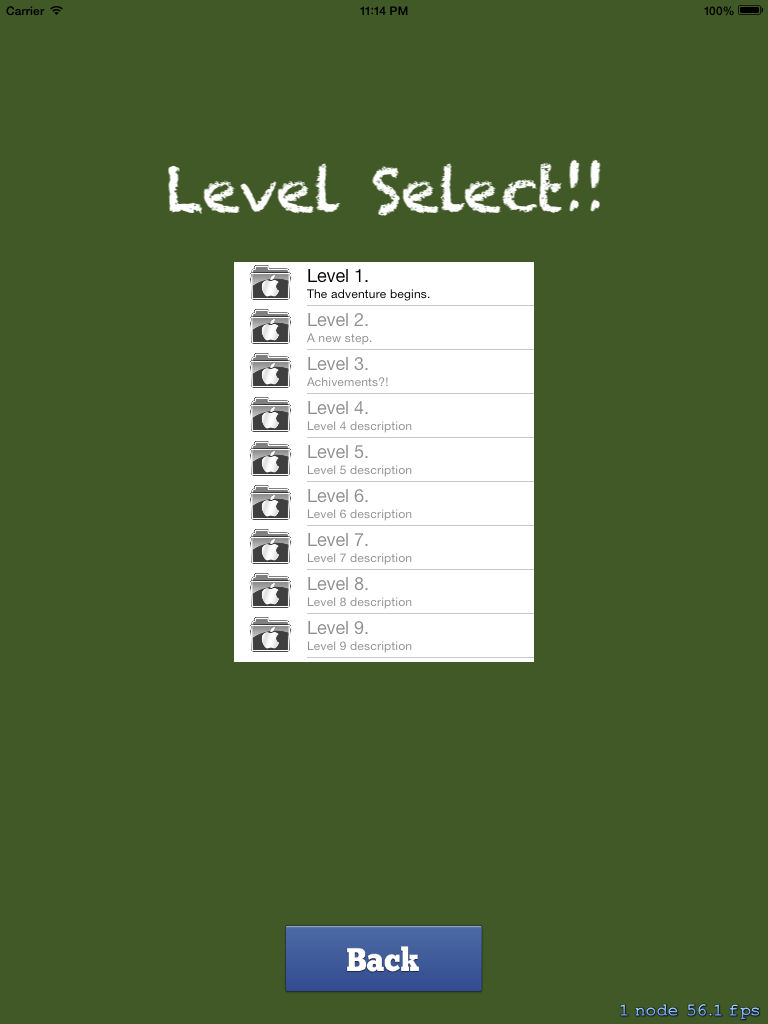
The main objective of this game is to create multiple questions divided by several levels. This way, you need to form a customized interface to choose the level you want to play. In order to achieve this, you need to add another Objective-C class (File -> New -> File). Name it LevelSelect and choose the SKScene as the superclass. You will see two new files in your project.
For the level selection, you will use the UITableView view and configure it with several properties. Additionally, you also need to name the levels and their descriptions. In the LevelSelect.h you should add those properties. The following snippet will help you:
@property (nonatomic, retain) UIButton* backButton;
@property (retain, nonatomic) IBOutlet UITableView *tableView;
@property (strong, nonatomic) NSArray *levelsArray;
@property (strong, nonatomic) NSArray *levelsDescriptionArray;
The snippet also contains a UIButton called backButton. At this moment, the button is self-explanatory; it helps the user go back from the level select interface to the main interface.
Step 2
Next, focus on the LevelSelect.m. The first step is to add the -(id)initWithSize:(CGSize)size method. In this class, you will only configure the background color. You can choose the color that you like the most.
-(id)initWithSize:(CGSize)size{
    if (self = [super initWithSize:size]) {
        self.backgroundColor = [SKColor colorWithRed:0.25 green:0.35 blue:0.15 alpha:1.0];
    }
    return self;
}
Since you are using UIKit views, you need to add the -(void) didMoveToView:(SKView *)view method. This method defines and configures the backButton and tableView, places a title label for the view, allocates and initializes the levelsArray and the levelsDescriptionArray, and adds the tableView to the main view. The backButton can be configured as following:
  _backButton = [UIButton buttonWithType:UIButtonTypeRoundedRect];
  _backButton.frame = CGRectMake(CGRectGetMidX(self.frame)-100, CGRectGetMaxY(self.frame)-100, 200, 70.0);
  _backButton.backgroundColor = [UIColor clearColor];
  [_backButton setTitleColor:[UIColor whiteColor] forState:UIControlStateNormal ];
  UIImage *buttonExitImageNormal = [UIImage imageNamed:@"back.png"];
  UIImage *strechableButtonExitImageNormal = [buttonExitImageNormal stretchableImageWithLeftCapWidth:12 topCapHeight:0];
  [_backButton setBackgroundImage:strechableButtonExitImageNormal forState:UIControlStateNormal];
  [_backButton addTarget:self action:@selector(moveToHome) forControlEvents:UIControlEventTouchUpInside];
  [self.view addSubview:_backButton];
Additionally, you must create the moveToHomemethod and import the MyScene.h.
-(void) moveToHome{
    MyScene* myScene = [[MyScene alloc] initWithSize:CGSizeMake(CGRectGetMaxX(self.frame), CGRectGetMaxY(self.frame))];
    [self removeUIViews];
    [self.scene.view presentScene:myScene];
}
Since you need to remove UIKIt views in more than one place, let's create a method that does exactly that. The method is called removeUIViews and is shown below:
-(void)removeUIViews{
    [_backButton removeFromSuperview];
    [_tableView removeFromSuperview];
}
The label to this interface is very simple. Try to program it yourself. If you have any problems, the following snippet will help you.
  SKLabelNode *titleLabel = [SKLabelNode labelNodeWithFontNamed:@"Chalkduster"];
  titleLabel.text = @"Level Select!!";
  titleLabel.fontSize = 60;
  titleLabel.position = CGPointMake(CGRectGetMidX(self.frame), CGRectGetMidY(self.frame)+300);
  [self addChild:titleLabel];
Step 3
The tableView configuration is a bit tricky since we need to configure several properties, like frame size and location, dataSource, and a delegate.
  _tableView = [[UITableView alloc] initWithFrame:CGRectMake(CGRectGetMidX(self.frame)-150, CGRectGetMidY(self.frame)-250, 300, 400)];
  _tableView.dataSource = self;
  _tableView.delegate = self;
The second and third line of the aforementioned snippet requires an additional step since you are defining simultaneously two views. The data source of the UITableView is self-defined and the UITableView has an action delegate. In LevelSelect.h you should extend your class with UITableViewDataSource and UITableViewDelegate. Your LevelSelect.h should look like:
@interface LevelSelect : SKScene < UITableViewDataSource, UITableViewDelegate >
Since you are extending the UITableViewDataSource and UITableViewDelegate, additional methods need to be implemented, namely:
-(NSInteger)tableView:(UITableView *)tableView numberOfRowsInSection:(NSInteger)section-(UITableViewCell *)tableView:(UITableView *)tableView cellForRowAtIndexPath:(NSIndexPath *)indexPath
The first is only used to know in real time the number of rows existing in the table view. The second method is complex, since it's used to populate and configure the table view. The table view configuration covers the title, description, and a row image. To use the description in every row, we must initialize each cell with the UITableViewCellStyleSubtitle cell style.
This method is responsible for an additional step: it verifies the current player's level and disables the levels ahead of the actualPlayerLevel. The full methods declaration can be seen below:
  -(UITableViewCell *)tableView:(UITableView *)tableView cellForRowAtIndexPath:(NSIndexPath *)indexPath {

    NSString *levels = [_levelsArray objectAtIndex:indexPath.row];
    NSString *descriptions = [_levelsDescriptionArray objectAtIndex:indexPath.row];

    UITableViewCell *cell = [tableView dequeueReusableCellWithIdentifier:@"Identifier"];

    if (cell == nil) {
        cell = [[UITableViewCell alloc] initWithStyle:UITableViewCellStyleSubtitle reuseIdentifier:@"Identifier"];
    }

    if (indexPath.row >= actualPlayerLevel)
        [cell setUserInteractionEnabled:FALSE];

    [cell.textLabel setText:levels];
    cell.imageView.image = [UIImage imageNamed:@"appleLogo.png"];
    [cell.detailTextLabel setText:descriptions];
    return cell;
}
-(NSInteger)tableView:(UITableView *)tableView numberOfRowsInSection:(NSInteger)section {
  return [_levelsArray count];
}
Here are two notes regarding the -(UITableViewCell *)tableView:(UITableView *)tableView cellForRowAtIndexPath:(NSIndexPath *)indexPath method. You have not yet initialized the levelsArray, levelsDescriptionArray, and actualPlayerLevel properties. All will be defined in the -(void) didMoveToView:(SKView *)view method. Do not forget to add the actualPlayerLevel property to your class:
@implementation LevelSelect{
  long actualPlayerLevel;
}
Step 4
The levelsArray is defined with the names of the levels. You can call it "Level 1", "Level 2", or any other name of your choice. The levelsDescriptionArray follows the same principle, it is a description for each level and can be defined with names of your choice. A possible implementation is:
_levelsArray = [[NSArray alloc] initWithObjects:
                    @"Level 1.",
                    @"Level 2.",
                    @"Level 3.",
                    @"Level 4.",
                    @"Level 5.",
                    @"Level 6.",
                    @"Level 7.",
                    @"Level 8.",
                    @"Level 9.",
                    nil];

  _levelsDescriptionArray = [[NSArray alloc] initWithObjects:
                               @"The adventure begins.",
                               @"A new step.",
                               @"Achivements?!",
                               @"Level 4 description",
                               @"Level 5 description",
                               @"Level 6 description",
                               @"Level 7 description",
                               @"Level 8 description",
                               @"Level 9 description",
                               nil];
Finally, the actualPlayerLevel is a long value type that represents the level of the player. For now, say that the current level is 1.
actualPlayerLevel = 1;
The -(void) didMoveToView:(SKView *)view method ends when you add the table view to the screen:
[self.view addSubview:_tableView];
Lastly, you need an additional change in the MyScene.m -(void) moveToGame method. You must call this new class instead of the old one. It can be easily achieved through:
  -(void) moveToGame{
    LevelSelect* factsScene = [[LevelSelect alloc] initWithSize:CGSizeMake(CGRectGetMaxX(self.frame), CGRectGetMaxY(self.frame))];
    // Same code
    // ...
}
At this point you should Run the project and test the new interface. You should see something similar to the next image:
2. Facts Interface
Step 1
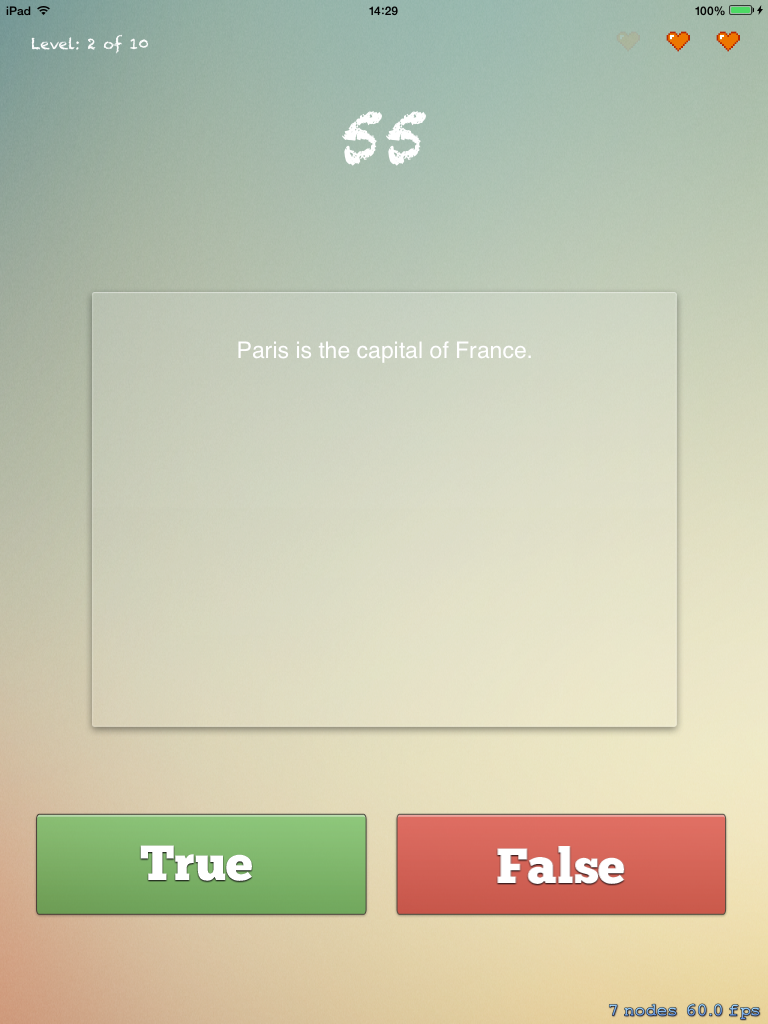
The facts interface is where the real action occurs. The interface has several views that directly translates to properties, such as the number of lives remaining, current level, a timer, and true and false buttons. Moreover, for this class you will create a custom initializer. The advantage of this custom initializer is that we can progress through the game and values regarding the level. Also, lives are passed to the class and the class reacts (parses data) accordingly.
Once again, we will use SKLabelNode, UIButtons, and a NSMutableArray. The complete FactsScene.h is the following:
@interface FactsScene : SKScene{
    NSMutableArray* heartArray;
}

@property (nonatomic,weak) SKLabelNode* currentLevelLabel;
@property (nonatomic,weak) SKLabelNode* timerLevel;
@property (nonatomic, retain) UIButton* trueButton;
@property (nonatomic, retain) UIButton* falseButton;

-(id) initWithSize:(CGSize)size inLevel:(NSInteger)level withPlayerLives:(int)lives;
It is now time to move to the FactsScene.m and implement a few objects. You need additional objects to retrieve and store the data received by the initializer. Plus, you need to store the maximum time that a player has to answer each question. Modify the implementation file accordingly.
@implementation FactsScene{
    NSUserDefaults* defaults;
    NSString* musicPath;

    NSInteger playerLives;
    NSInteger playerLevel;
    int maximumTime;
}
Now, you must write the initializer and store its values. The custom initializer is defined as a normal initializer and has the same structure. However, it has more properties as parameters. It should look like this:
-(id) initWithSize:(CGSize)size inLevel:(NSInteger)level withPlayerLives:(int)lives{
    if (self = [super initWithSize:size]) {
        self.backgroundColor = [SKColor colorWithRed:0.35 green:0.25 blue:0.5 alpha:1.0];
        defaults = [NSUserDefaults standardUserDefaults];

        playerLives = lives;
        playerLevel = level;

        maximumTime = 30;
    }
    return self;
}
Step 2
For now, the maximumTime is 30 seconds, but in the future the value will change to 60 seconds (or any other time of your choice). Now in the -(void) didMoveToView:(SKView *)view add a background image, front image, the player's lives, a timer, true and false buttons, and the current and total level's questions. For the background and front image the code is simple and you should be able to do it easily (using SKSpriteNode).
    SKSpriteNode *background = [SKSpriteNode spriteNodeWithImageNamed:@"background.png"];
    background.position = CGPointMake(CGRectGetMidX(self.frame),CGRectGetMidY(self.frame));
    background.size = CGSizeMake(768, 1024);
    [self addChild:background];

    SKSpriteNode *frontImage = [SKSpriteNode spriteNodeWithImageNamed:@"transparentCenterBorder.png"];
    frontImage.position = CGPointMake(CGRectGetMidX(self.frame),CGRectGetMidY(self.frame));
    frontImage.size = CGSizeMake(600, 450);
    [self addChild:frontImage];
The player's lives are represented with a heart image. Since you will declare three lives, you must put three hearts in the screen. You will also use a NSMutableArray since we need to alter its size dynamically. The following snippet will help you:
  heartArray = [[NSMutableArray alloc] init];
  for(NSInteger i = 0; i < playerLives; i++){
    SKSpriteNode* liveImage = [SKSpriteNode spriteNodeWithImageNamed:@"hearth.png"];
        liveImage.scale = .6;
        liveImage.position = CGPointMake(CGRectGetMaxX(self.frame)-40-(i*50),CGRectGetMaxY(self.frame)-40);
        [heartArray insertObject:liveImage atIndex:i];
        [self addChild:liveImage];
  }
The true and false buttons are configured as:
_trueButton = [UIButton buttonWithType:UIButtonTypeRoundedRect];
    _trueButton.frame = CGRectMake(CGRectGetMidX(self.frame)-350, CGRectGetMidY(self.frame)+300, 335, 106);
    _trueButton.backgroundColor = [UIColor clearColor];
    [_trueButton setTitleColor:[UIColor whiteColor] forState:UIControlStateNormal ];
    UIImage *buttonTrueImageNormal = [UIImage imageNamed:@"trueBtn.png"];
    UIImage *strechableButtonTrueImageNormal = [buttonTrueImageNormal stretchableImageWithLeftCapWidth:12 topCapHeight:0];
    [_trueButton setBackgroundImage:strechableButtonTrueImageNormal forState:UIControlStateNormal];
    [_trueButton addTarget:self action:@selector(touchWillProduceASound) forControlEvents:UIControlEventTouchUpInside];
    [self.view addSubview:_trueButton];

    _falseButton = [UIButton buttonWithType:UIButtonTypeRoundedRect];
    _falseButton.frame = CGRectMake(CGRectGetMidX(self.frame)+10, CGRectGetMidY(self.frame)+300, 335, 106);
    _falseButton.backgroundColor = [UIColor clearColor];
    [_falseButton setTitleColor:[UIColor whiteColor] forState:UIControlStateNormal ];
    UIImage *buttonFalseImageNormal = [UIImage imageNamed:@"falseBtn.png"];
    UIImage *strechableButtonFalseImageNormal = [buttonFalseImageNormal stretchableImageWithLeftCapWidth:12 topCapHeight:0];
    [_falseButton setBackgroundImage:strechableButtonFalseImageNormal forState:UIControlStateNormal];
    [_falseButton addTarget:self action:@selector(touchWillProduceASound) forControlEvents:UIControlEventTouchUpInside];
    [self.view addSubview:_falseButton];
Note that both buttons call the touchWillProduceASound method. That method tests if a given answer is correct or incorrect. In this part, we only use one sound event (the false one).
-(void) touchWillProduceASound{
    long soundFlag = [defaults integerForKey:@"sound"];
    NSString* answer = @"False";
    if (soundFlag == 1){
        SKAction* sound;
        if ([answer isEqualToString:@"False"]) {
            sound = [SKAction playSoundFileNamed:@"wrong.mp3" waitForCompletion:YES];
            NSLog(@"inside");
        }
        [self runAction:sound];
    }
}
Step 3
The game timer is a SKLabelNode that changes at every second. However, its initialization is done as a simple SKLabelNode:
_timerLevel = [SKLabelNode labelNodeWithFontNamed:@"Chalkduster"];
    _timerLevel.text = @"30";
    _timerLevel.fontSize = 70;
    _timerLevel.position = CGPointMake(CGRectGetMidX(self.frame), CGRectGetMidY(self.frame)+350);
    [self addChild:_timerLevel];
To update the label, you need to create a SKAction that defines a custom timer to call a custom method. Then we must create a SKAction sequence:
  SKAction *wait = [SKAction waitForDuration:1];
  SKAction *updateTimer = [SKAction runBlock:^{
    [self updateTimer];
  }];

  SKAction *updateTimerS = [SKAction sequence:@[wait,updateTimer]];
  [self runAction:[SKAction repeatActionForever:updateTimerS]];
You will see a warning regarding the - (void)updateTimer method because you haven't created it yet. That method does several actions simultaneously taking in consideration several properties:
- Checks if the sound is on
- Updates the
maximumTimeproperty and Label, decreasing by one value each second - Checks the
maximumTime, and if the value is zero, it will either end the game or change to another question (more on this topic in the next tutorial)
We advise you to try to write the method using the aforementioned pseudo-code. But if you have trouble, the full method is presented below:
- (void)updateTimer{
    maximumTime--;
    if (maximumTime == 0){
        long soundFlag = [defaults integerForKey:@"sound"];
        if (soundFlag == 1){
            SKAction* sound;
            sound = [SKAction playSoundFileNamed:@"beep.mp3" waitForCompletion:YES];
            [self runAction:sound];
        }
        if (playerLives < 1){
            SKTransition* transition = [SKTransition fadeWithDuration:2];
            MyScene* myscene = [[MyScene alloc] initWithSize:CGSizeMake(CGRectGetMaxX(self.frame), CGRectGetMaxY(self.frame))];
            [self removeUIViews];
            [self.scene.view presentScene:myscene transition:transition];
        } else{
            // other
        }
    }
    [_timerLevel setText:[[NSNumber numberWithInt:maximumTime] stringValue]];
}
Step 4
One more method is missing, the removeUIViews. It removes the UIKit views from the view when a transition occurs.
-(void)removeUIViews{
    [_trueButton removeFromSuperview];
    [_falseButton removeFromSuperview];
}
It is now time to Run the project and see the Facts screen!

3. Property Lists
Now it is time to add some data to the app. Go to File -> New -> File and choose the Property List (plist) file. Name it "LevelDescription" and configure it as follows:
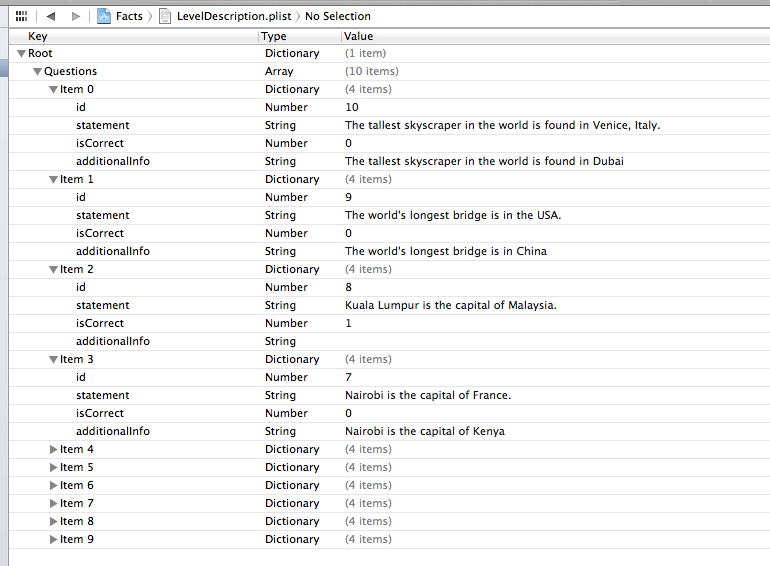
In order to avoid putting all the data in the plist file, you can download the file directly on the zip file (beginning of the page). This tutorial does not cover in depth the data parsing, so in order to parse that file, the following snippet is used. If you have any doubt, use the comment box at the bottom of the page.
NSString* plistPath = [[NSBundle mainBundle] pathForResource:@"LevelDescription" ofType:@"plist"];
NSMutableDictionary* dictionary = [[NSMutableDictionary alloc] initWithContentsOfFile:plistPath];

  if ([dictionary objectForKey:@"Questions" ] != nil ){
    NSMutableArray *array = [dictionary objectForKey:@"Questions"];

    for(int i = 0; i < [array count]; i++){
      NSMutableDictionary *questions = [array objectAtIndex:i];
      NSLog(@"ID %@", [questions objectForKey:@"id"]);
      NSLog(@"%@", [questions objectForKey:@"statement"]);
      NSLog(@"%@", [questions objectForKey:@"isCorrect"]);
      NSLog(@"%@", [questions objectForKey:@"additionalInfo"]);
      }
    }
Now, Run the project and watch the console logs as you enter the Facts view. Note that the plist file can be configured in several different ways. If you want, you can change the Dictionary, Array types, and configurations. Note that changes must be declared in the parsing cycle. We strongly advise you to play a bit with plists file and the inherent data parsing.
Conclusion
At this point you should be able to use and configure a UITableView, interact between SpriteKit and UIKit frameworks, create SKTransitions and SKActions, and create and parse Property files. In the final section of this series, you will learn about Game Logic.

Comments