This is the third installment in a series on creating an iPad PDF reader for the book The War of the Worlds. In today's tutorial, I will demonstrate how to add a Table of Contents to the project. In doing so, I'll cover working with plist files, layering subviews, basic UIView animations, and manually creating interface components.
Where We Left Off
In last week's tutorial, I demonstrated how to add a UISlider to the project that would allow the user to quickly "scrub" forward or backward in the War of the Worlds PDF. This is an essential feature for any PDF reader, but it still leaves a lot of burden on the user if they want to navigate to a specific chapter or section. Consequently, adding a Table of Contents (referred to hereafter as simply "TOC") seemed like the next logical step, and, in a poll attached to the last tutorial, 68% of our readers voted in favor of doing so. In the steps covered today, I'll show you how to do just that.
It's important to note that the War of the Worlds text that this tutorial uses does not already have a TOC page within the PDF document. Consequently, we'll focus on creating our own TOC UIView.
One final note before we begin: so far this tutorial has primarily relied upon Interface Builder for UI setup and creation. In this lesson, I'll be moving away from Interface Builder and creating a few new UIKit interface components programmatically within our main view controller. I sometimes prefer to manage UI creation this way, so I thought I would show it as an alternative approach for educational purposes. Just realize that all the UIKit components I create in code could have been made in Interface Builder and unpackaged from a NIB.
Step 1: Create the TOC Button
The best iPad reading applications provide users with a consistent button that will skip directly to the book's table of contents. We'll do the same thing here by adding a UIButton to the top right of the book display. We could easily make this button an icon or paint it with a simple gradient, but instead we'll keep things simple. The button will have a transparent background, blue text, and the text "Contents" as the title.
To begin, open WOTWViewController.h and add the following data member:
@interface WOTWViewController : LeavesViewController {
    CGPDFDocumentRef bookPDF;
    UIButton *contentsButton;
    UISlider *pageSlider;
}
While you're in the interface file, go ahead and declare a method to be responsible for manually creating the button:
}

@property (nonatomic, retain) IBOutlet UISlider *pageSlider;

- (void) loadPDF;
- (void) addContentsUIButton;
Next, switch to the WOTWViewController.m file and code the addContentsUIButton method:
- (void)addContentsUIButton
{
    if(!contentsButton)
    {
        // Basic Initialization
        contentsButton = [[UIButton alloc] initWithFrame:CGRectMake(460.0f, 5.0f, 100.0f, 45.0f)];
        [contentsButton setTitle:@"Contents" forState:UIControlStateNormal];
        [contentsButton setTitleColor:[UIColor blueColor] forState:UIControlStateNormal];
        [contentsButton setTitleColor:[UIColor redColor] forState:UIControlStateHighlighted];
        contentsButton.backgroundColor = [UIColor clearColor];

        // When the button is tapped, trigger the "displayTableOfContents" method
        [contentsButton addTarget:self action:@selector(displayTableOfContents) forControlEvents:UIControlEventTouchUpInside];

        // Hide the button by default as it shouldn't show on the book cover
        contentsButton.hidden = YES;

        // Add the button as a subview of LeavesView
        [self->leavesView addSubview:contentsButton];
    }
}
Because only one contents button should exist at a time, we begin this method on line 3 by checking to make sure we haven't already created and added this button to the Leaves view. If we have, the method call will simply not execute any of the button creation code.
Lines 5 - 10 are several standard button creation statements. It's worth noting that line 6 calls the -initWithFrame: method, which is the designated initializer for UIButton, and configures the button to have an x-axis value of 460, a y-axis value of 5, a width of 100, and a height of 45. It's also worth noting that both the title and the titleColor properties of UIButton are state dependent. This allows you to visually respond to events like the button being pressed or becoming disabled.
If you've only created buttons with Interface Builder before, things get a bit more interesting on line 12. This line demonstrates how to manually set which selector should be called for one of the various button control events. If you were wondering how Interface Builder achieved this, it should be a bit more clear now.
Next, the hidden property of the button is set to "YES". This is because the reader initially loads with the book cover displayed, and it doesn't seem appropriate to show the link to the TOC until at least the next page.
On line 19, we add our newly created UIButton directly to the LeavesView object as a subview. It seems logically consistent to make this button a part of the LeavesView, and doing so will prevent us from remembering to toggle both the LeavesView and the contents button when the TOC is displayed. It's also possible to integrate the contents button with the TOC animation by taking this approach (more on this later).
Of course, we aren't quite finished yet. We still need to call this method from somewhere within the program lifecycle and we also need to release the button we allocated.
Jump to the -viewDidLoad method in order to add the button with this line of code:
- (void) viewDidLoad
[self addContentsUIButton];
This seems like a good place to add the TOC button, but are you wondering why I bother using a method call instead of simply writing the code in this method initially? When I was first building this feature, I did. However, by initially adding all of the code directly within viewDidLoad, things got really messy, and it was more difficult to get a general idea of what was happening during the application lifecycle. Splitting larger chunks of code into independent methods solved that problem and made the project both more comprehensible and maintainable.
Because we allocated the contents button from viewDidLoad, we should also release it in both -viewDidUnload and -dealloc.
- (void) viewDidUnload
[contentsButton release], contentsButton = nil;
- (void) dealloc
[contentsButton release];
Recall from above that we set the contentsButton to be hidden initially. We need to add a few lines of code to the LeavesView delegate method -leavesView:didTurnToPageAtIndex: in order to show the contents button after the user is no longer on the cover page. Doing so is simple enough:
- (void) leavesView:(LeavesView *)leavesView didTurnToPageAtIndex:(NSUInteger)pageIndex
{
    if((int) self.pageSlider.value != pageIndex)
    {
        self.pageSlider.value = (float) pageIndex;
    }

    if(pageIndex > 0)
    {
        contentsButton.hidden = NO;
    }
    else
    {
        contentsButton.hidden = YES;
    }
}
If you build and run the project at this point, you should see the contents button overlaid at the top right corner of the book view. However, if you actually tap the button, the app will crash because we haven't yet implemented the displayTableOfContents selector the button action will try to call.
Step 2: Create the TOC UIView
With the contents button in place, it's time to focus on building the table of contents view. We'll take the same approach used above, so go back to the WOTWViewController.h file and add the following data member:
UIView *tableOfContentsView;
Next, declare a method to handle adding the TOC to the LeavesView:
- (void) addTableOfContentsUIView;
Now go to WOTWViewController.m and add the code necessary to create the TOC UIView:
- (void) addTableOfContentsUIView
{
    if(!tableOfContentsView)
    {
        // Create the TOC UIView. Will hold all TOC objects as subviews.
        tableOfContentsView = [[UIView alloc] initWithFrame:CGRectMake(0.0f, 0.0, 563.0f, 845.0f)];
        tableOfContentsView.backgroundColor = [UIColor whiteColor];

        // Create the Book Title. Center on TOC at top.
        UILabel *bookHeading = [[UILabel alloc] initWithFrame:CGRectMake(170.0f, 30.0f, 300.0f, 40.0f)];
        bookHeading.font = [UIFont fontWithName:@"Arial" size:24.0f];
        bookHeading.text = @"WAR OF THE WORLDS";
        bookHeading.textColor = [UIColor blackColor];
        bookHeading.backgroundColor = [UIColor whiteColor];
        [bookHeading sizeToFit];
        [tableOfContentsView addSubview:bookHeading];
        [bookHeading release];

        // Add "BOOK I" subheader as left column header
        UILabel *bookOneSubtitle = [[UILabel alloc] initWithFrame:CGRectMake(105.0f, 70.0f, 150.0f, 40.0f)];
        bookOneSubtitle.font = [UIFont fontWithName:@"Arial" size:22.0f];
        bookOneSubtitle.text = @"BOOK I";
        bookOneSubtitle.textColor = [UIColor blackColor];
        bookOneSubtitle.backgroundColor = [UIColor whiteColor];
        [bookOneSubtitle sizeToFit];
        [tableOfContentsView addSubview:bookOneSubtitle];
        [bookOneSubtitle release];

        // Add "BOOK II" subheader as right column header
        UILabel *bookTwoSubtitle = [[UILabel alloc] initWithFrame:CGRectMake(375.0f, 70.0f, 150.0f, 40.0f)];
        bookTwoSubtitle.font = [UIFont fontWithName:@"Arial" size:22.0f];
        bookTwoSubtitle.text = @"BOOK II";
        bookTwoSubtitle.textColor = [UIColor blackColor];
        bookTwoSubtitle.backgroundColor = [UIColor whiteColor];
        [bookTwoSubtitle sizeToFit];
        [tableOfContentsView addSubview:bookTwoSubtitle];
        [bookTwoSubtitle release];

        // Add the TOC directly to the Leaves view, but hide it at "layer" 0
        [self->leavesView insertSubview:tableOfContentsView atIndex:0];
    }
}
The above method creates a basic template for the TOC view. The dimensions of the view are the same as the book/PDF display, and I've added three labels: a book title, a sub header for "Book 1" and a sub header for "Book 2". This may seem a bit strange: isn't War of the Worlds one book? It's published as one volume today, but it was initially printed as a magazine series and took the format of "Book 1" and "Book 2". Because that is the format the PDF uses, it's what I've built into the TOC as well.
If you understand how we handled the creation of the contents button in the previous step, then most of the code above should make sense to you also. The only additional note worth making is that I've again inserted the TOC into the LeavesView hierarchy, only this time I've "buried" the TOC view by using insertSubview:atIndex: to place it beneath all other subviews in leavesView. By hiding the view at index 0 it will be easy to reveal the TOC when the user presses the button, and it will also allow us to easily create a flip view animation.
Step 3: Animate the TOC Transition
Before we continue with adding plist files to store the table of contents information, let's go ahead and create the transition that will be triggered when the contents button is pressed. This will make it easier to test our work as we go along.
In WOTWViewController.m, add the following lines of code:
- (void)displayTableOfContents
{
    // Hide the page slider
    self.pageSlider.hidden = YES;

    // Animate the transition with a horizontal flip from right to left
    [UIView beginAnimations:nil context:nil];
    [UIView setAnimationDuration:0.5f];
    [UIView setAnimationTransition:UIViewAnimationTransitionFlipFromRight forView:self->leavesView cache:YES];
    [self->leavesView bringSubviewToFront:tableOfContentsView];
    [UIView commitAnimations];
}
On line 4, we set the pageSlider to hidden. This prevents the user from attempting to scrub to a different spot in the PDF while the TOC is covering the book display.
Lines 6 - 11 handle the page flip animation. Line 8 sets the duration for this animation to half a second, and line 9 specifies the type of animation (UIViewAnimationTransitionFlipFromRight) as well as the view that the transition should be applied to.
Of course, none of the above code will do us any good if it isn't executed. Add another line to -viewDidLoad to create the TOC view:
[self addTableOfContentsUIView];
If you build and run the project now, you should have a functioning contents button that displays a simple TOC view.
Step 4: Store the TOC Data in Plist Files
The next step is to add the chapter titles to the TOC view. However, because we're going to create the chapter listing dynamically, we need to store the chapter and page information somewhere first. One choice would be to use an NSDictionary and create the chapter/page information statically in the WOTWViewController implementation file. This would certainly work, but when dealing with this type of information, I often find it easier to work with property list (plist) files. We'll create two plist files for this project: one to store the information for the left column ("Book 1"), and a second to store the information for the second column ("Book 2").
CTRL+Click (or right click) on the "Supporting Files" group in the Xcode Project Navigator. Select "Add files to WOTW". In the window that appears, select the "Resources" category and then choose "Property List". Click "Next" and then enter the name "BookOne" for the file.
Open the newly added BookOne.plist file and add the key/value pairs displayed below:
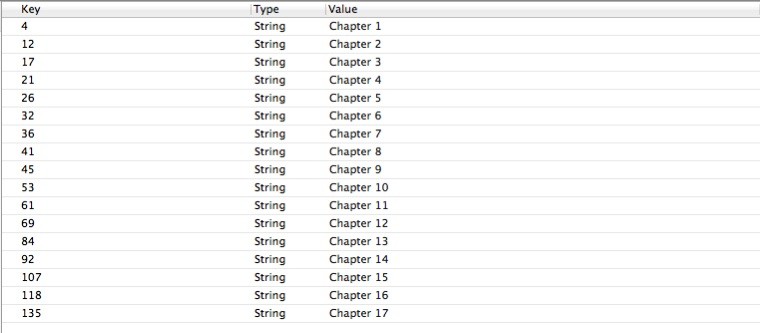
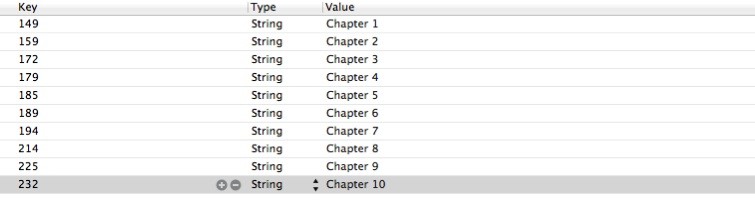
Use the same method to create BookTwo.plist and change the key/value pairs as shown:
Step 5: Add the TOC Chapter Listing
Now that we've stored the chapter/page information for the PDF, we're ready to programmatically create the chapter listing. Of course, in addition to just listing the content, we also need to allow users to tap on any of the chapters to jump to that portion of the PDF. For this reason, each chapter will actually be a UIButton.
The appropriate place to add the chapter listing is when we first create the TOC view, so go to - (void) addTableOfContentsUIView and add the following lines of code:
- (void) addTableOfContentsUIView
{
    if(!tableOfContentsView)
    {

        // Create the TOC UIView. Will hold all TOC objects as subvies.
        tableOfContentsView = [[UIView alloc] initWithFrame:CGRectMake(0.0f, 0.0, 563.0f, 845.0f)];
        tableOfContentsView.backgroundColor = [UIColor whiteColor];

        // Create the Book Title. Center on TOC at top.
        UILabel *bookHeading = [[UILabel alloc] initWithFrame:CGRectMake(170.0f, 30.0f, 300.0f, 40.0f)];
        bookHeading.font = [UIFont fontWithName:@"Arial" size:24.0f];
        bookHeading.text = @"WAR OF THE WORLDS";
        bookHeading.textColor = [UIColor blackColor];
        bookHeading.backgroundColor = [UIColor whiteColor];
        [bookHeading sizeToFit];
        [tableOfContentsView addSubview:bookHeading];
        [bookHeading release];

        // Add "BOOK I" subheader as left column header
        UILabel *bookOneSubtitle = [[UILabel alloc] initWithFrame:CGRectMake(105.0f, 70.0f, 150.0f, 40.0f)];
        bookOneSubtitle.font = [UIFont fontWithName:@"Arial" size:22.0f];
        bookOneSubtitle.text = @"BOOK I";
        bookOneSubtitle.textColor = [UIColor blackColor];
        bookOneSubtitle.backgroundColor = [UIColor whiteColor];
        [bookOneSubtitle sizeToFit];
        [tableOfContentsView addSubview:bookOneSubtitle];
        [bookOneSubtitle release];

        // Add "BOOK II" subheader as right column header
        UILabel *bookTwoSubtitle = [[UILabel alloc] initWithFrame:CGRectMake(375.0f, 70.0f, 150.0f, 40.0f)];
        bookTwoSubtitle.font = [UIFont fontWithName:@"Arial" size:22.0f];
        bookTwoSubtitle.text = @"BOOK II";
        bookTwoSubtitle.textColor = [UIColor blackColor];
        bookTwoSubtitle.backgroundColor = [UIColor whiteColor];
        [bookTwoSubtitle sizeToFit];
        [tableOfContentsView addSubview:bookTwoSubtitle];
        [bookTwoSubtitle release];


        // Create NSDictionary objects from column plist files
        NSString *bookOneFilepath = [[NSBundle mainBundle]
                                 pathForResource:@"BookOne" ofType:@"plist"];
        NSDictionary *bookOneTOC = [[NSDictionary alloc] initWithContentsOfFile:bookOneFilepath];

        NSString *bookTwoFilepath = [[NSBundle mainBundle]
                                 pathForResource:@"BookTwo" ofType:@"plist"];
        NSDictionary *bookTwoTOC = [[NSDictionary alloc] initWithContentsOfFile:bookTwoFilepath];

        // Iterate over reach NSDictionary object and add UIButtons
        float colXOffset  = 20.0f;
        float colYOffset = 100.0f;

        NSArray *sortedKeys1 = [[bookOneTOC allKeys] sortedArrayUsingComparator:^(id obj1, id obj2) {

            if ([obj1 integerValue]  < [obj2 integerValue] ) {
                return (NSComparisonResult)NSOrderedAscending;
            }

            if ([obj1 integerValue]  > [obj2 integerValue] ) {
                return (NSComparisonResult)NSOrderedDescending;
            }
            return (NSComparisonResult)NSOrderedSame;
        }];

        for(NSString *key in sortedKeys1)
        {
            int pageIndex = [key intValue];
            NSString *sectionTitle = [bookOneTOC objectForKey:key];

            UIButton *sectionButton = [[UIButton alloc] initWithFrame:CGRectMake(colXOffset, colYOffset, 250.0f, 35.0f)];
            [sectionButton setTitle:sectionTitle forState:UIControlStateNormal];
            sectionButton.tag = pageIndex;
            [sectionButton addTarget:self action:@selector(contentsButtonPressed:) forControlEvents:UIControlEventTouchUpInside];
            sectionButton.enabled = NO;

            [sectionButton setBackgroundColor:[UIColor lightGrayColor]];

            [sectionButton setTitleColor:[UIColor whiteColor] forState:UIControlStateNormal];
            [tableOfContentsView addSubview:sectionButton];
            [sectionButton release];

            colYOffset += 40.0f;
        }
        [bookOneTOC release];

        colXOffset  = 293.0f;
        colYOffset = 100.0f;

        NSArray *sortedKeys2 = [[bookTwoTOC allKeys] sortedArrayUsingComparator:^(id obj1, id obj2) {

            if ([obj1 integerValue]  < [obj2 integerValue] ) {
                return (NSComparisonResult)NSOrderedAscending;
            }

            if ([obj1 integerValue]  > [obj2 integerValue] ) {
                return (NSComparisonResult)NSOrderedDescending;
            }
            return (NSComparisonResult)NSOrderedSame;
        }];


        for(NSString *key in sortedKeys2)
        {
            int pageIndex = [key intValue];
            NSString *sectionTitle = [bookTwoTOC objectForKey:key];

            UIButton *sectionButton = [[UIButton alloc] initWithFrame:CGRectMake(colXOffset, colYOffset, 250.0f, 35.0f)];
            [sectionButton setTitle:sectionTitle forState:UIControlStateNormal];
            [sectionButton setTitleColor:[UIColor whiteColor] forState:UIControlStateNormal];
            sectionButton.tag = pageIndex;
            sectionButton.enabled = NO;
            [sectionButton addTarget:self action:@selector(contentsButtonPressed:) forControlEvents:UIControlEventTouchUpInside];

            [sectionButton setBackgroundColor:[UIColor lightGrayColor]];
                [tableOfContentsView addSubview:sectionButton];
                [sectionButton release];

                colYOffset += 40.0f;
        }
        [bookTwoTOC release];

        // Add the TOC directly to the Leaves view, but hide it at "layer" 0
        [self->leavesView insertSubview:tableOfContentsView atIndex:0];
    }

}
Most of this code should be relatively self-explanatory to an intermediate developer. However, there are several pieces that are worth further discussion.
The syntax used in the sortedArrayUsingComparator: section will look strange if you haven't programmed with Objective-C "Blocks" before. A full discussion of Blocks is beyond the scope of this tutorial, but the important thing to know for this application is that the block code is simply responsible for sorting the array of plist keys by the page number in ascending order. This ensures that the chapters will be displayed in the correct order. If you'd like to learn more about blocks, check out the official documentation.
Another important consideration is that I'm disabling each of the UIButton objects created before adding them to the TOC view. This is to prevent taps on the leavesView from passing-through and triggering the buttons when the TOC isn't displayed. We'll need to enable them again in the -displayTableOfContents method. Let's go ahead and do this now.
Modify the -displayTableOfContents method to read like so:
- (void)displayTableOfContents
{
    // Hide the page slider
    self.pageSlider.hidden = YES;

    // Traverse subviews looking for buttons
    for (UIView *subview in tableOfContentsView.subviews)
    {
        if([subview isKindOfClass:[UIButton class]])
        {
            UIButton *button = (UIButton *) subview;
            button.enabled = YES;
        }
    }

    // Animate the transition with a horizontal flip from right to left
    [UIView beginAnimations:nil context:nil];
    [UIView setAnimationDuration:0.5f];
    [UIView setAnimationTransition:UIViewAnimationTransitionFlipFromRight forView:self->leavesView cache:YES];
    [self->leavesView bringSubviewToFront:tableOfContentsView];
    [UIView commitAnimations];
}
The lines of code highlighted above will traverse the subviews in tableOfContentsView looking for those that match the UIButton class. When it finds one, it switches it from disabled to enabled.
Step 6: Respond to Chapter Selection
If you carefully reviewed the code in step 5, you probably noticed that all of the UIButton objects added were given the selector contentsButtonPressed: for the touch up inside event. This step will create that method.
In WOTWViewController.m, add the following lines of code:
- (void)contentsButtonPressed:(UIButton *)sender
{

    // Update the PDF display position
    self->leavesView.currentPageIndex = sender.tag;

    // Display the UISlider
    self.pageSlider.hidden = NO;
    self.pageSlider.value = (float) sender.tag;

    // Animate the PDF back to the top of the leavesView subviews
    [UIView beginAnimations:nil context:nil];
    [UIView setAnimationDuration:0.5f];
    [UIView setAnimationTransition:UIViewAnimationTransitionFlipFromLeft forView:self->leavesView cache:YES];
    [self->leavesView sendSubviewToBack:tableOfContentsView];
    [UIView commitAnimations];

    // Disable the UIButtons added to the TOC when not in view
    for (UIView *subview in tableOfContentsView.subviews)
    {
        if([subview isKindOfClass:[UIButton class]])
        {
            UIButton *button = (UIButton *) subview;
            button.enabled = NO;
        }
    }
}
At this point in our series, nothing in the above code should be new to you, so I won't discuss what's happening in detail. The general steps are summarized in the code comments.
Wrap Up
If you've followed the steps above, you should now have a functioning table of contents for the War of the Worlds reader! The user will begin to see the contents button when they move to any page other than the cover, and tapping the contents button will flip the book display vertically to reveal the TOC screen. Selecting any of the chapters listed will skip directly to that chapter and flip the display back to the book.
Should I Continue This Series?
For the past two tutorials in this series, I've ended with a poll asking if I should continue the series and, if so, what I should write about next. This time, please "vote" by leaving a comment below. If you'd like me to continue writing about the PDF reader with leaves, let me know what feature or refinement you think should be the topic of the next tutorial. A few good options include: adapting the display for different device orientations, adding bookmarks, or maintaining page state.
On the other hand, if you'd prefer that we cover a different iOS SDK topic entirely, leave a comment letting me know what aspect of iOS SDK development or related open-source projects you'd like to see me write about.
In order for the iPad Reader series to continue, at least 10 readers will need to comment in favor of continuing the series by September 23rd, 2011.
UPDATE 9/17/2011: We've had some great feedback in the comments section, and it seems like everyone who posted is interested in at least one more tutorial. Votes for the following features were received: device orientation support (7 votes), bookmark support (2 votes), two-page display in landscape (2 votes), maintaining page state (1 vote), annotation (1 vote), left-to-right page flip (1 vote), and dynamic PDF links (1 vote). Device orientation was the clear winner, so I'll be doing at least one more post in this series in the next 2 weeks to show you how it can be done!
Thanks for reading!

Comments