Have you ever felt the need to be able to quickly and easily switch between configurations without messing with compiler flags or manually modifying variables in your project? In this quick tip, I'd like to show you a clever solution to this problem by leveraging Xcode schemes and custom project configurations.
The Problem
For some iOS projects, you need the ability to quickly switch between different configurations or environments. A common scenario is when an iOS application communicates with an API or a web service. During development, you need to work in a development or staging environment. Before releasing an update, however, you most likely want to test your application in a staging or production environment. Switching between configurations or environments can be cumbersome especially if you need make this switch frequently.
The Solution
The easiest approach is to manually modify the configuration each time you switch environments. This means modifying a compiler flag or manually modifying values in your project. This approach is error prone, tedious, and far from ideal. A better solution is to create a custom configuration for each environment. This involves creating a configuration file that centralizes environment variables and custom Xcode schemes. Let me show you how this works by creating a sample project.
1. Project Setup
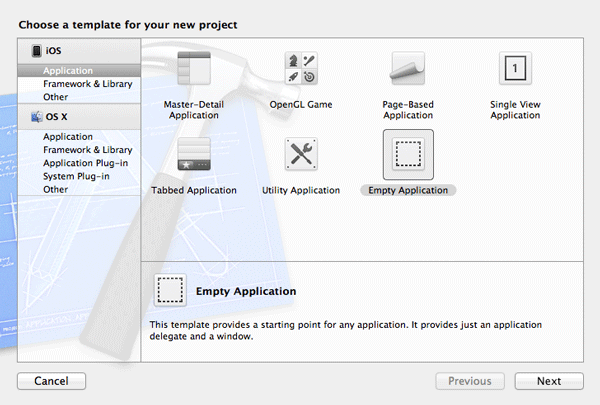
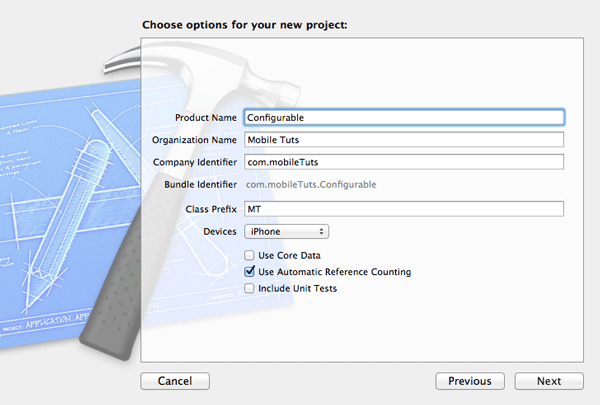
Create a new project in Xcode by selecting the Empty Application template from the list of templates (figure 1). Name your application Configurable, enter a company identifier, set iPhone for the device family, and check Use Automatic Reference Counting. The rest of the checkboxes can be left unchecked for this project (figure 2). Tell Xcode where you want to save the project and click Create.
2. Edit Info.plist
Step 1: Add Custom Configurations
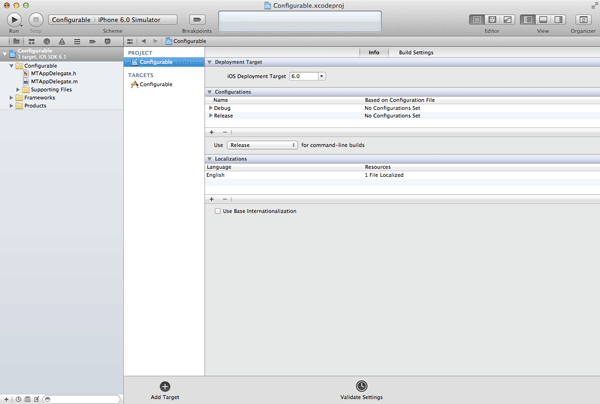
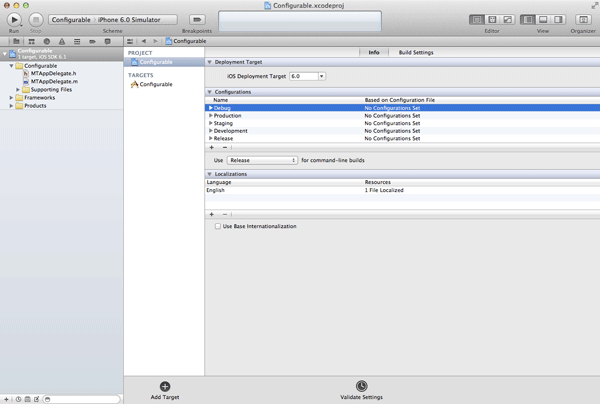
The key idea of this approach is to know what the current configuration is. What is a configuration and where are they defined? You can see a list of all the project's configurations by selecting your project in the Project Navigator and opening the Info tab at the top. Make sure that you have selected your project in the left sidebar and not a target from the list of targets (figure 3).
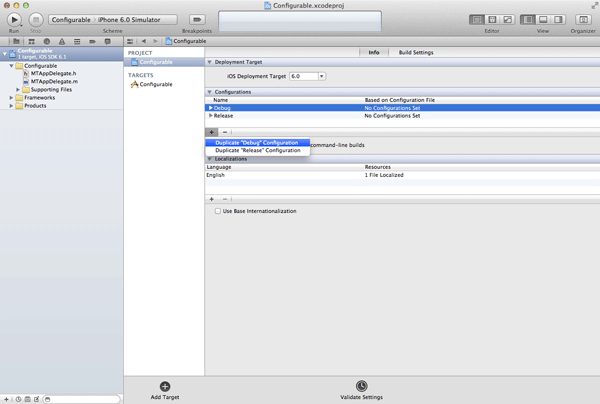
In this tutorial, we're going to assume that we have a development, a staging, and a production environment that we need to work with. Start by creating a new configuration for each environment by clicking the plus button below the list of configurations. Select the Duplicate "Debug" Configuration option for each new configuration (figure 4) and give the configuration an appropriate name (figure 5).
Step 2: Edit Info.plist
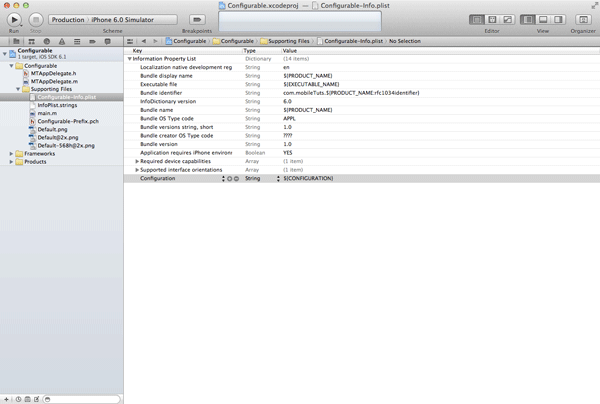
When the application is running, we need to be able to find out what the current configuration is. We can do this by adding a new entry to the target's Info.plist file. Select the target's Info.plist file and create a new key-value pair. Set the key to Configuration and the value to ${CONFIGURATION} (figure 6). The CONFIGURATION identifier identifies the build configuration (e.g., Development or Staging) that the target uses to generate the product.
Step 3: Fetch Current Configuration
With these changes made, we can now fetch the current configuration in our application. To try this out, open MTAppDelegate.m and update application:didFinishLaunchingWithOptions: as shown below. To access the information in Info.plist, we ask the main application bundle for its infoDictionary. From the info dictionary, we grab the value of the Configuration key that we added and log it to the Xcode console. Build and run your application to see what is logged to the Xcode console.
- (BOOL)application:(UIApplication *)application didFinishLaunchingWithOptions:(NSDictionary *)launchOptions {
    NSString *configuration = [[[NSBundle mainBundle] infoDictionary] objectForKey:@"Configuration"];

    NSLog(@"Current Configuration > %@", configuration);

    // Initialize Window
    self.window = [[UIWindow alloc] initWithFrame:[[UIScreen mainScreen] bounds]];

    // Configure Window
    self.window.backgroundColor = [UIColor whiteColor];
    [self.window makeKeyAndVisible];
    return YES;
}
Despite the fact that we created three custom configurations, the current configuration is still set to Debug. Let's remedy that in the next section.
2. Custom Xcode Schemes
When building an application, an Xcode scheme is used. An Xcode scheme defines a number of variables to use when building the product. One of those variables is the configuration that should be used.
The current Xcode scheme is displayed in the top left of Xcode's toolbar. To easily switch between the configurations (Development, Staging, etc.) that we created earlier, I recommend creating an Xcode scheme for each configuration. Click the current scheme, select New Scheme from the menu that appears, and name the new scheme Development. With the new scheme selected, click the scheme and select Edit Scheme from the menu. Select Run Configurable from the left pane, open the Info tab at the top, and set the Build Configuration to Development (figure 7). Create an Xcode scheme for the Staging and Production configurations by repeating the above steps.

3. Create a Configuration File
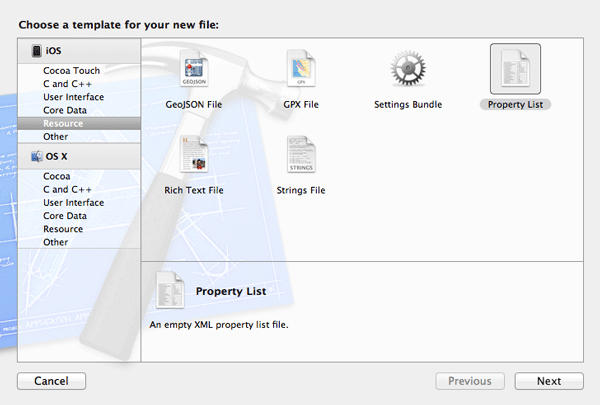
To make managing configuration settings easy, we will create a custom property list that groups the various configuration settings. Create a new property list and name it Configurations.plist (figure 8). The property list is a dictionary with an entry for each configuration. Each entry in the property list holds another dictionary with information specific for that configuration (figure 9).
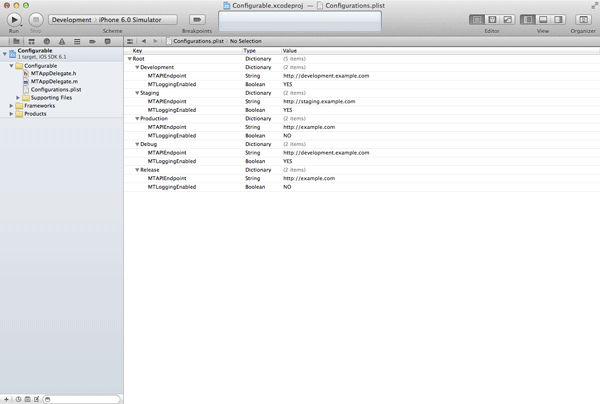
As you can see, you can add whatever variables to Configurations.plist that you like. You only need to make sure that each entry in the property list contains the same variables (keys).
4. Configuration Class
You now have all the necessary elements to quickly switch between configurations. However, our work isn't done yet. The current implementation isn't very user (or developer) friendly. When adopting this approach, I always create a configuration class that gives me easy access to the variables defined in Configurations.plist. The configuration class fetches the current configuration, loads Configurations.plist, and provides easy access to the variables. Take a look at the MTConfiguration class below to see what I mean.
#import <Foundation/Foundation.h>

@interface MTConfiguration : NSObject

#pragma mark -
+ (NSString *)configuration;

#pragma mark -
+ (NSString *)APIEndpoint;
+ (BOOL)isLoggingEnabled;

@end
#import "MTConfiguration.h"

#define MTConfigurationAPIEndpoint @"MTAPIEndpoint"
#define MTConfigurationLoggingEnabled @"MTLoggingEnabled"

@interface MTConfiguration ()

@property (copy, nonatomic) NSString *configuration;
@property (nonatomic, strong) NSDictionary *variables;

@end

@implementation MTConfiguration

#pragma mark -
#pragma mark Shared Configuration
+ (MTConfiguration *)sharedConfiguration {
    static MTConfiguration *_sharedConfiguration = nil;
    static dispatch_once_t onceToken;
    dispatch_once(&onceToken, ^{
        _sharedConfiguration = [[self alloc] init];
    });

    return _sharedConfiguration;
}

#pragma mark -
#pragma mark Private Initialization
- (id)init {
    self = [super init];

    if (self) {
        // Fetch Current Configuration
        NSBundle *mainBundle = [NSBundle mainBundle];
        self.configuration = [[mainBundle infoDictionary] objectForKey:@"Configuration"];

        // Load Configurations
        NSString *path = [mainBundle pathForResource:@"Configurations" ofType:@"plist"];
        NSDictionary *configurations = [NSDictionary dictionaryWithContentsOfFile:path];

        // Load Variables for Current Configuration
        self.variables = [configurations objectForKey:self.configuration];
    }

    return self;
}

#pragma mark -
+ (NSString *)configuration {
    return [[MTConfiguration sharedConfiguration] configuration];
}

#pragma mark -
+ (NSString *)APIEndpoint {
    MTConfiguration *sharedConfiguration = [MTConfiguration sharedConfiguration];

    if (sharedConfiguration.variables) {
        return [sharedConfiguration.variables objectForKey:MTConfigurationAPIEndpoint];
    }

    return nil;
}

+ (BOOL)isLoggingEnabled {
    MTConfiguration *sharedConfiguration = [MTConfiguration sharedConfiguration];

    if (sharedConfiguration.variables) {
        return [[sharedConfiguration.variables objectForKey:MTConfigurationLoggingEnabled] boolValue];
    }

    return NO;
}

@end
The MTConfiguration class provides easy access to the variables stored in Configurations.plist. Switching between configurations is now as easy as selecting the correct Xcode scheme. Even though it may look like quite a bit of work up front, I can assure you that it will save you a tremendous amount of time - and frustration - down the road.
To test our solution, import the header file of the MTConfiguration class in MTAppDelegate.m and update the application:didFinishLaunchingWithOptions: method as shown below.
#import "MTAppDelegate.h"

#import "MTConfiguration.h"
- (BOOL)application:(UIApplication *)application didFinishLaunchingWithOptions:(NSDictionary *)launchOptions {
    NSLog(@"Configuration > %@", [MTConfiguration configuration]);

    NSLog(@"API Endpoint > %@", [MTConfiguration APIEndpoint]);
    NSLog(@"Is Logging Enabled > %i", [MTConfiguration isLoggingEnabled]);

    // Initialize Window
    self.window = [[UIWindow alloc] initWithFrame:[[UIScreen mainScreen] bounds]];

    // Configure Window
    self.window.backgroundColor = [UIColor whiteColor];
    [self.window makeKeyAndVisible];
    return YES;
}
Conclusion
Custom configurations and Xcode schemes can really help organize a project and streamline your development workflow. I hope I've been able to convince you of the value of this solution especially for complex projects with multiple environments.

Comments