ShareKit is an open-source library that will quickly add content sharing capabilities to any iOS app. The project supports sharing links, images, plaintext, and files. Integration is a snap and the project is well-documented on the official ShareKit homepage.
ShareKit Overview
For a quick overview of the capabilities that ShareKit can bring to your project, just watch the official project overview video:
The ShareKit project currently supports sharing via the following services:
- Delicious
- Google Reader
- Instapaper
- Pinboard
- Read It Later
- Tumblr
Integration Instructions
ShareKit integration is well documented in a five step tutorial on the official site. However, at the time of this writing, the instructions on the official site are not accurate for Xcode 4. What follows is a modified version for Xcode 4 users.
Step 1: Download
You can download the ShareKit code either directly from the project site or on GitHub.
Step 2: Add ShareKit to Your Xcode 4 Project
After opening the ShareKit download, expand the "classes" folder and find the folder titled "ShareKit". Drag this folder into your own project. You can place the ShareKit folder anywhere within your destination project, but I would suggest placing it as a subgroup named "ShareKit" within your main project group.
Step 3: Add the Frameworks Necessary for ShareKit
Select your project in the project navigator pane, and then highlight the main target. Next select the "Build Phases" tab, and then expand the "Link Binary With Libraries" section.
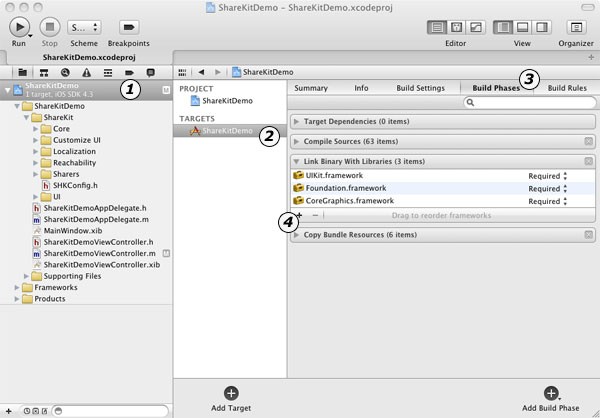
Now click the "+" symbol to open a dialogue with a list of frameworks available. In order for ShareKit to work, add the following frameworks to your project:
- SystemConfiguration.framework
- Security.framework
- MessageUI.framework
Step 4: Add Web Service API Keys
Most of the methods ShareKit provides for content sharing will require you to provide an API key for your application. This key will be used to identify your application to the third-party service. In order to obtain an API key, you'll need to walk through the signup process for each service. App registration links for various ShareKit supported services are listed below:
*Note that if you want to be able to share content via Twitter, you'll also need to register with Bit.ly (http://bit.ly/account/register). ShareKit will automatically use your Bit.ly account to shorten links posted to Twitter.
After you've obtained the necessary API keys for your app, open the file SHKConfig.h in Xcode (It's in the ShareKit group). If you peruse the comments in this file, you should quickly be able to find out how to configure each service. As an example, this is what a sample Twitter configuration might look like when using OAuth:
#define SHKTwitterConsumerKey @"wUf7eXia2pMl1QUvkaL4"
#define SHKTwitterSecret @"kHudJVKjM6m5DRKYCutSxkBHHUwiTrRNMvGNhL1LMk3G"
#define SHKTwitterCallbackUrl @"http://mobile.tutsplus.com"

#define SHKBitLyLogin @"username"
#define SHKBitLyKey @"kHudJVKjM6m5DRKYCutSxkBHHUwiTrRNMvGNhL1LMk3G"
Step 5: Import the ShareKit Header & Launch ShareKit
Before you can use ShareKit in your own classes, you'll need to import the proper ShareKit header file, like so:
#import "SHK.h"
As listed on the official ShareKit site, the code necessary to launch ShareKit will look something like this:
	// Create the item to share (in this example, a url)
	NSURL *url = [NSURL URLWithString:@"http://getsharekit.com"];
	SHKItem *item = [SHKItem URL:url title:@"ShareKit is Awesome!"];

	// Get the ShareKit action sheet
	SHKActionSheet *actionSheet = [SHKActionSheet actionSheetForItem:item];

	// Display the action sheet
	[actionSheet showFromToolbar:navigationController.toolbar];
(Reference: http://www.getsharekit.com/install/)
The above example would be used when launching ShareKit from a UINavigationController toolbar button, but the general logic can be customized and placed anywhere in your app code. For example, you could execute it in response to a normal UIButton action or in viewDidLoad:.
Sharing Code Snippets
After successfully integrating ShareKit with your app, sharing links, text, images, or files is a snap and the remainder of this article will demonstrate the code snippets necessary to do so.
Sharing A Link
    // Create an NSURL. This could come from anywhere in your app.
    NSURL *url = [NSURL URLWithString:@"http://mobile.tutsplus.com"];

    // Wrap the URL within the SHKItem Class
    SHKItem *item = [SHKItem URL:url title:@"Mobiletuts!"];

    // Create a ShareKit ActionSheet and Assign the Sheet an SHKItem
    SHKActionSheet *actionSheet = [SHKActionSheet actionSheetForItem:item];

    // Display the ActionSheet in the current UIView
    [actionSheet showInView:self.view];
Sharing Plaintext
    // Create an NSString. This could be taken from a UITextField or anywhere else.
    NSString *textToShare = @"To iterate is human, to recurse divine. -L. Peter Deutsch";

    // Wrap the NSString within the SHKItem Class
    SHKItem *item = [SHKItem text:textToShare];

    // Create a ShareKit ActionSheet and Assign the Sheet an SHKItem
    SHKActionSheet *actionSheet = [SHKActionSheet actionSheetForItem:item];

    // Display the ActionSheet in the current UIView
    [actionSheet showInView:self.view];
Sharing An Image
    // Create a UIImage.
    UIImage *image = [UIImage imageNamed:@"ShareKit.jpg"];

    // Wrap the UIImage within the SHKItem class
    SHKItem *item = [SHKItem image:image title:@"This image was sent with ShareKit!"];

    // Create a ShareKit ActionSheet and Assign the Sheet an SHKItem
    SHKActionSheet *actionSheet = [SHKActionSheet actionSheetForItem:item];

    // Display the ActionSheet in the current UIView
    [actionSheet showInView:self.view];
Sharing A File
    // Get the path to the file we want to share. This example resuses the
    // the JPG file from above, but it could be anything.
    NSString *path = [[NSBundle mainBundle] pathForResource:@"ShareKit" ofType:@"jpg"];


    // Create an NSData object from the contents of a file.
    NSData *file = [NSData dataWithContentsOfFile:path];

    // Wrap the NSData object within an SHKItem
    SHKItem *item = [SHKItem file:file
                         filename:@"ShareKit.jpg"
                         mimeType:@"application/image"
                            title:@"A ShareKit Picture"];

    // Create a ShareKit ActionSheet and Assign the Sheet an SHKItem
    SHKActionSheet *actionSheet = [SHKActionSheet actionSheetForItem:item];

    // Display the ActionSheet in the current UIView
    [actionSheet showInView:self.view];
Learning More
In this article we've covered the main use cases you're likely to encounter when integrating ShareKit. However, there are still several significant features that we haven't covered, such as offline ShareKit support, sharing to a specific service, customizing the ShareKit interface, and creating custom ShareKit services. The official ShareKit documentation does an excellent job of explaining these features, and most of the code in this article was just a slight customization of what is already available there.
Conclusion
Next time you need to quickly enable sharing services in your app, keep this project in mind! If you do use ShareKit in your own work, be sure to thank ShareKit creator Nate Weiner (@IdeaShower) for all of his hard work in both creating the project and writing such excellent documentation on the official site.
Next Time. . .
What mobile project would you like to see explored with the Mobiletuts+ project spotlight next? Leave your answer in the comments section below!

Comments