This is a continuation of the iOS Multitasking series. Along with notifications (as discussed last week), iOS Multitasking also provides a feature called Background Audio. As the name suggests, this feature enables applications to play audio even when the application is in the background, similar to how the iPod or Music Application bundled with the device works.
In this tutorial we will be covering playing a sound in the background, not how to record audio in the background. To demonstrate we will be making a simple noise maker and give it the ability to play in the background.
Step 1: Setting Up the Project
First create a new project and call it NoiseMaker (or some other name) as a View-Based Application with the default settings.
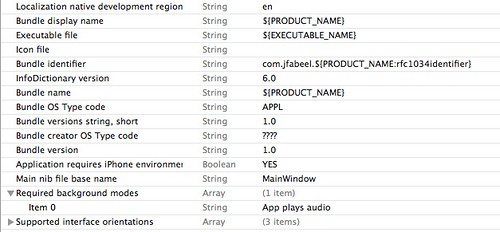
Once the project has been created go to NoiseMaker-Info.plist and add UIBackgroundModes as a new row. It should then create the array.
Open the array and to the right of Item 0 set it to audio. Your NoiseMaker-Info.plist should look like this:
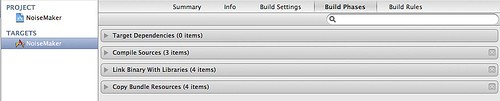
Now go to the target settings and go to the tab labeled Build Phases.
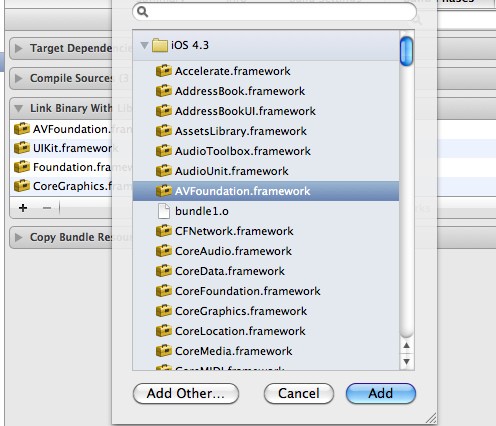
When you've finished the last sub-step go to Link Binary With Libraries and add the AVFoundation framework.
In the Spotlight Search on your Mac for the file HeadSpin Long.caf. Find the file and rename it so the space is deleted.
Drag the file into Xcode under the NoiseMaker Directory. Make sure Copy Resources into Destinations Folder is checked.
Step 2: Setting Up the User Interface
In the NoiseMaker Directory select the NoiseMakerViewController.h file and add the following code under the #import declaration.
#import <AVFoundation/AVFoundation.h>
Now add the following code under the @interface declaration.
	IBOutlet UIButton *playPauseButton; //Toggles the playback state
    IBOutlet UISlider *volumeControl; //Sets the volume for the audio player
    IBOutlet UILabel *alertLabel; //The alert label showing the status of the loading of the file

    AVAudioPlayer *audioPlayer; //Plays the audio
Then right under the closing bracket add the following code.
@property (nonatomic, retain) IBOutlet UIButton *playPauseButton;
@property (nonatomic, retain) IBOutlet UISlider *volumeControl;
@property (nonatomic, retain) IBOutlet UILabel *alertLabel;

@property (nonatomic, retain) AVAudioPlayer *audioPlayer;

- (IBAction)volumeDidChange:(id)slider; //handle the slider movement
- (IBAction)togglePlayingState:(id)button; //handle the button tapping

- (void)playAudio; //play the audio
- (void)pauseAudio; //pause the audio
- (void)togglePlayPause; //toggle the state of the audio
After all of this code your .h file should look like this.
#import <UIKit/UIKit.h>
#import <AVFoundation/AVFoundation.h>

@interface NoiseMakerViewController : UIViewController {
    IBOutlet UIButton *playPauseButton; //Toggles the playback state
    IBOutlet UISlider *volumeControl; //Sets the volume for the audio player
    IBOutlet UILabel *alertLabel; //The alert label showing the status of the loading of the file

    AVAudioPlayer *audioPlayer; //Plays the audio
}

@property (nonatomic, retain) IBOutlet UIButton *playPauseButton;
@property (nonatomic, retain) IBOutlet UISlider *volumeControl;
@property (nonatomic, retain) IBOutlet UILabel *alertLabel;

@property (nonatomic, retain) AVAudioPlayer *audioPlayer;

- (IBAction)volumeDidChange:(id)slider; //handle the slider movement
- (IBAction)togglePlayingState:(id)button; //handle the button tapping

- (void)playAudio; //play the audio
- (void)pauseAudio; //pause the audio
- (void)togglePlayPause; //toggle the state of the audio

@end
Step 3: Building the Interface
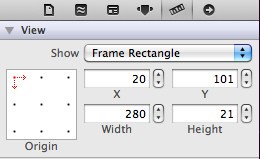
Now open the NoiseMakerViewController.xib. First add a UILabel somewhere in the view. In the Attributes Inspector select the option to make the UILabel's text centered and erase all of the UILabel's text. Now go to the Size Inspector and set the X position to 20, the Y position to 100, the width to 280, and the height to 21.
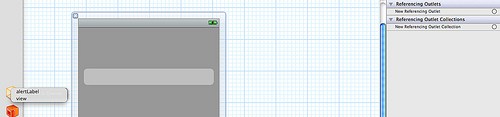
Next go to the Connections Inspector and drag the referencing outlet to the files owner and select the alertLabel option.
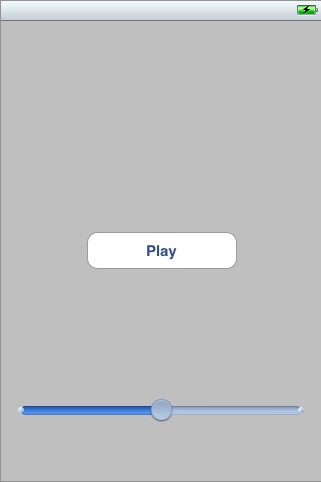
Now add a UIButton to the view and set the button's text to Play. Go to the Size Inspector and set the X Position to 86, the Y Position to 211, the width to 150, and the height to 37. Then in the Connections Inspector drag the TouchUpInside action to the file owners and select the togglePlayingState: option.
Drag the referencing outlet to the files owner and select the option playPauseButton. Now drag out a UISlider and put it onto the view.
Go the Size Inspector and set the X Position to 18, the Y Position to 378, the width to 284, and the height to 23 (default height). Go to the Connections Inspector and drag the referencing outlet to the files owner and select the option volumeControl. Next, drag the valueChanged action to the files owner and select the option volumeDidChange:. The finished interface should look like this.
Step 4: Implementing the Audio Player
Now open the NoiseMakerViewController.m file. Under the @implementation declaration add the following lines.
@synthesize playPauseButton;
@synthesize volumeControl;
@synthesize alertLabel;
@synthesize audioPlayer;

- (IBAction)volumeDidChange:(UISlider *)slider {
    //Handle the slider movement
    [audioPlayer setVolume:[slider value]];
}

- (IBAction)togglePlayingState:(id)button {
    //Handle the button pressing
    [self togglePlayPause];
}
Now in the dealloc: method add the following lines.
//Remove the objects from memory

    self.playPauseButton = nil;
    self.volumeControl = nil;
    self.alertLabel = nil;
    self.audioPlayer = nil;

    [playPauseButton release];
    [volumeControl release];
    [alertLabel release];
    [audioPlayer release];
Then add the following code under the dealloc: method.
- (void)viewDidAppear:(BOOL)animated {
    [super viewDidAppear:animated];


    //Once the view has loaded then we can register to begin recieving controls and we can become the first responder
    [[UIApplication sharedApplication] beginReceivingRemoteControlEvents];
    [self becomeFirstResponder];
}

- (void)viewWillDisappear:(BOOL)animated {
    [super viewWillDisappear:animated];

    //End recieving events
    [[UIApplication sharedApplication] endReceivingRemoteControlEvents];
    [self resignFirstResponder];
}

- (void)playAudio {
    //Play the audio and set the button to represent the audio is playing
    [audioPlayer play];
    [playPauseButton setTitle:@"Pause" forState:UIControlStateNormal];
}

- (void)pauseAudio {
    //Pause the audio and set the button to represent the audio is paused
    [audioPlayer pause];
    [playPauseButton setTitle:@"Play" forState:UIControlStateNormal];
}

- (void)togglePlayPause {
    //Toggle if the music is playing or paused
    if (!self.audioPlayer.playing) {
        [self playAudio];

    } else if (self.audioPlayer.playing) {
        [self pauseAudio];

    }
}

//Make sure we can recieve remote control events
- (BOOL)canBecomeFirstResponder {
    return YES;
}

- (void)remoteControlReceivedWithEvent:(UIEvent *)event {
    //if it is a remote control event handle it correctly
    if (event.type == UIEventTypeRemoteControl) {
        if (event.subtype == UIEventSubtypeRemoteControlPlay) {
            [self playAudio];
        } else if (event.subtype == UIEventSubtypeRemoteControlPause) {
            [self pauseAudio];
        } else if (event.subtype == UIEventSubtypeRemoteControlTogglePlayPause) {
            [self togglePlayPause];
        }
    }
}
Now in the viewDidLoad: method add the following lines of code under the [super viewDidLoad];
//Declare the audio file location and settup the player
    NSURL *audioFileLocationURL = [[NSBundle mainBundle] URLForResource:@"HeadspinLong" withExtension:@"caf"];

    NSError *error;
    audioPlayer = [[AVAudioPlayer alloc] initWithContentsOfURL:audioFileLocationURL error:&error];
    [audioPlayer setNumberOfLoops:-1];

    if (error) {
        NSLog(@"%@", [error localizedDescription]);

        [[self volumeControl] setEnabled:NO];
        [[self playPauseButton] setEnabled:NO];

        [[self alertLabel] setText:@"Unable to load file"];
        [[self alertLabel] setHidden:NO];
    } else {
        [[self alertLabel] setText:[NSString stringWithFormat:@"%@ has loaded", @"HeadspinLong.caf"]];
        [[self alertLabel] setHidden:NO];

        //Make sure the system follows our playback status
        [[AVAudioSession sharedInstance] setCategory:AVAudioSessionCategoryPlayback error:nil];
        [[AVAudioSession sharedInstance] setActive: YES error: nil];

        //Load the audio into memory
        [audioPlayer prepareToPlay];
    }
Final Thoughts
Thanks for reading this tutorial. Next in the series will be Task Completion. Feel free to comment if you encounter any problems or just want to add a tip.

Comments