Apple introduced the Swift programming language during its annual developer conference in 2014, much to he surprise of the developer community. The company is serious about Swift, it isn't an experiment. The goal for Swift is to power the next generation of applications for Apple's platforms.
Prerequisites
Programming
It isn't possible to cover the basics of programming and learn Swift in one or two articles. I am therefore assuming that you already have some programming experience. Ruby, PHP, or JavaScript are good starting points for learning Swift. If you come from a web development background, then you shouldn't have problems learning the basics of Swift by reading the next two articles.
Swift
In the next two articles, I show you the power of playgrounds, a feature introduced in Xcode 6. We also cover the basics of the Swift programming language, such as variables, constants, and data types, including sets, arrays, and dictionaries.
You also learn the basics of classes and structures. In the next article, we zoom in on closures, functions, protocols, and access control. That should give you enough understanding of the language to complete the rest of this series.
Objective-C
Strictly speaking, C and Objective-C aren't required if you are interested in developing for the iOS platform. That said, most of the frameworks we will use to develop iOS applications are written in C and Objective-C. This means that I'll occasionally talk about C and Objective-C. Don't worry, though, I'll make sure you understand whatever is essential to keep you on track to reach your goal, become an iOS developer.
Xcode and Swift
Throughout this series, I will be using Xcode 7.1 and Swift 2.1. If you are using an older version of Xcode, then keep in mind that you won't be working with Swift 2.1. Swift continues to change at a rapid pace and the syntax evolves with every iteration of the language. I therefore recommend using Xcode 7.1, which includes Swift 2.1.
1. Playgrounds
In 2014, Apple introduced playgrounds as part of Xcode 6. Playgrounds are great for learning the Swift programming language. With playgrounds, you can focus on the code you're writing instead of messing with project settings, files, and folders.
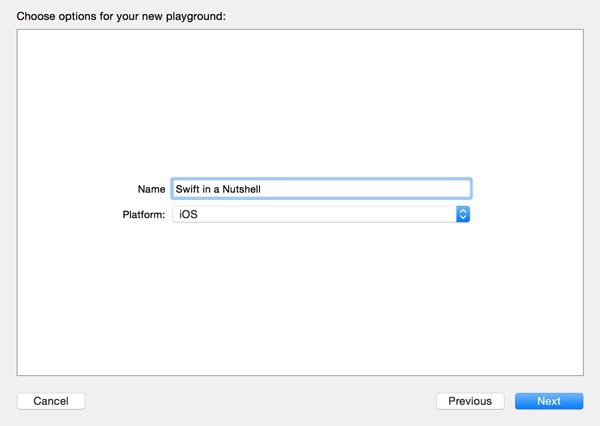
Let's create a playground to start learning the basics of Swift. Fire up Xcode 7.1 and choose New > Playground... from Xcode's File menu. Playgrounds support OS X, iOS, and tvOS. Set Platform to iOS and name the playground Swift in a Nutshell.
Tell Xcode where you want to save the playground and click Create. At first glance, a playground appears to be a simple file with a .playground extension, but it's actually a folder with a handful of files. Fortunately, that's not something we need to worry about. A playground is much easier to deal with than an Xcode project with dozens of files and folders.
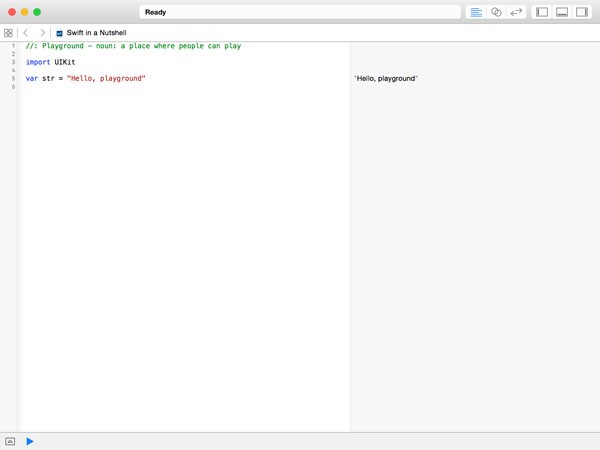
The user interface of a playground is clean and simple. You can see the code editor on the left and the output on the right. Xcode has already populated the playground with three lines of code. The first line should look familiar if you've read the previous tutorial.
//: Playground - noun: a place where people can play
The line starts with two forward slashes, //, indicating that this line is a comment and ignored by the compiler. Comments that span multiple lines start with /* and end with */.
/*
    This is a longer
    comment spanning
    multiple lines.
*/
Xcode also added an import statement for the UIKit framework. UIKit is the most important framework for iOS development. It defines the building blocks iOS applications are built with. In Swift, importing a framework is as simple as using the import keyword followed by the name of the framework, UIKit.
import UIKit
The last line may remind some of you of JavaScript. We use the var keyword to declare a variable, str, and assign a value to it, "Hello, playground". This example immediately shows a key feature of Swift, type inference.
var str = "Hello, playground"
The above example is a bit misleading. You may think that Swift is a weakly typed language, but nothing could be further from the truth. The str variable is of type String. Swift is smart enough to infer the type of str by looking at the value we assign to it.
The following example is equivalent. In this example, we explicitly specify the type of the str variable. The colon following the name of the variable could be read as is of type.
var str: String = "Hello, playground"
2. Variables and Constants
Swift also defines the let keyword. This keyword is used to declare a constant. The Swift programming language encourages the use of constants whenever possible. If the value of a variable doesn't change during its lifetime, it should be a constant. As the name implies, once a constant is given a value, it cannot be changed. This is illustrated in the following example.

In the above example, we declare a constant message and assign it a value. A few lines down, we assign a new value to the message constant. Because we attempt to change the value of message, the compiler throws an error. Fortunately, the compiler makes a suggestion to fix the issue, turning the message constant into a variable.
3. Data Types
Swift defines a wide range of data types, but let's take a look at some of the most common data types you'll come across.
Booleans
Let's start with a simple type, Bool. Booleans in Swift are just as simple and easy to use as they are in other languages. The following example is probably as simple as it gets in Swift.
let myBool = true
var notTrue = false
notTrue = true
Numbers
Numbers are represented by Int, UInt, Float, or Double. There are other data types for storing number values, but these are the most common ones. These data types are similar to the ones you find in other programming languages.
Because Swift is a strongly typed language, you need to deal with type conversions from time to time. For example, it's not possible to multiply an Int and a Float. Take a look at the following example to better understand the problem.

At first, this may seem like a major shortcoming of the Swift language. The truth is that this behavior is inherent to most strongly typed languages. Fortunately, the solution is simple as you can see below.

Even though it may seem as if we are casting a to a Float, that's not what's happening. We are creating or initializing a Float using the value stored in a.
There are two ways to create a variable or constant, literal syntax and initializer syntax. The constants a and b were created using literal syntax. The str variable we discussed earlier is another example of literal syntax.
To create a Float from the value stored in a, we use initializer syntax. We create the Float by using the type's name, Float, followed by two parentheses, passing in a as a parameter.
Strings
We've already encountered some strings in this tutorial. A string is nothing more than a sequence of characters. In fact, it's possible to access the collection of characters as shown in the example below.
let city = "Brussels"
let chars = city.characters
In the above example, we use a string literal. The next example illustrates how to use the initializer of the String type. The syntax is identical to what we saw in one of the previous examples about numbers and type conversion.
let country = String("Belgium")
Collections
The Swift standard library defines three common collection types, Array, Dictionary, and Set. These collection types require little explanation if you're familiar with Objective-C or any other programming language. In some languages, dictionaries are known as hashes and arrays are known as lists. The idea, however, is the same.
let myArray = [1, 2, 3, 4, 5]
let myDictionary = ["One": 1, "Two": 2, "Three": 3]
let mySet = Set(["One", "Two", "Three", "Four", "Five"])
The array and dictionary are initialized using literal syntax. Because the Set type doesn't have a literal syntax, we use the initializer syntax to create the mySet constant.
I already mentioned that Swift is a strongly typed language and this also has consequences for collection types. The following example illustrates this. We start by creating a variable arr1 of type [Int]. This means that arr1 can only contain values of type Int.

The second and third statement confirm this. Appending an integer works fine, but appending a string results in a compiler error. The compiler attempts to convert "Two" to an Int, but is unable to do so. The result is an error.
The following example will make things even more confusing. Why isn't the compiler complaining about the array containing values of different types? The reason may surprise you. The arr2 constant is of type [AnyObject].
let arr2 = [1, 2, 3, "Four", "Five"]
Any and AnyObject
The Swift standard library defines two special types, Any and AnyObject. The Any type can represent any type while the AnyObject type can represent any class or structure. If you're confused, then that's perfectly normal. Swift was designed to be strongly typed and it seems as if Any and AnyObject undermine Swift's type safety.
The reason for introducing Any and AnyObject is primarily for compatibility reasons. I already mentioned that most of the frameworks used for Cocoa development are written in C and Objective-C. Objective-C defines the id type, which represents any object. To make sure that Swift and the Cocoa frameworks can work together, the Swift standard library introduced the Any and AnyObject types. We'll learn more about this when we start working with the Cocoa frameworks.
4. Classes and Structures
Classes
If you're familiar with object-oriented programming, then you should already be familiar with classes. Classes are pretty ordinary in Swift. Take a look at the following example in which we define a class, Boat, with two properties, speed and lifeboats, and a method, deployLifeboats().
class Boat {

    var speed: Float = 0
    var lifeboats: Int = 2

    func deployLifeboats() {
        // ...
    }

}
Initializing and modifying an instance of the Boat class is straightforward as you can see below. Calling a method on an instance isn't magical either. The basics of Swift classes are easy to understand. Right?
var boat = Boat()

boat.speed = 10.5
boat.lifeboats++

boat.deployLifeboats()
Structures
Let's now create a structure that looks surprisingly similar to the Boat class and find out what sets classes and structures apart in Swift.
struct Ship {

    var speed: Float = 0
    var lifeboats: Int = 2

    func deployLifeboats() {
        // ...
    }

}
The following example reveals the most important difference between Swift classes and structures.
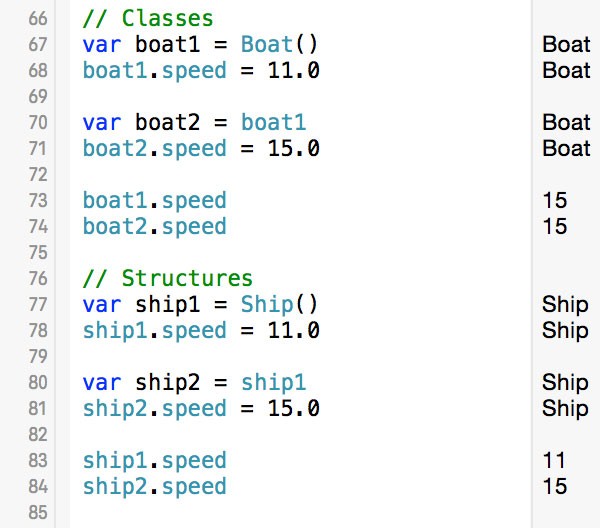
This example illustrates that classes are passed by reference while structures are passed by value. What does that mean? We initialized a Boat instance, assigned it to boat1, and set its speed property to 11.0. We assigned boat1 to boat2. This means that boat2 has a reference to boat1. Both boat1 and boat2 point to the same Boat instance. The result is that setting the speed property of boat2 also modifies the speed property of boat1.
This isn't true for structures. We repeat the same steps using the Ship structure. The end result is different though. By assigning ship1 to ship2, the value of ship1 is copied and stored in ship2. This means ship1 and ship2 point to different objects, different instances of the Ship structure. This is a very important concept to grasp so make sure you understand this before continueing.
Consequences
You've already been introduced to the common data types defined by the Swift standard library. What I didn't mention in that discussion is that every Swift data type we discussed so far is a structure.
Every collection type in Swift, for example, is a structure. Every number type is a structure. This is important to know and understand, especially if you come from a language that passes some of these types by reference, such as Ruby and Objective-C.
More Differences
There are a number of other differences that set classes and structures apart in Swift. Classes support inheritance while structures don't. In the following example, we define a class Speedboat that inherits from the Boat class. The Boat class is the parent class or superclass of Speedboat.
class Speedboat: Boat {

}

var speedboat = Speedboat()

speedboat.speed = 100.0
speedboat.lifeboats = 0
speedboat.deployLifeboats()
Because Boat is the parent class of Speedboat, Speedboat inherits the properties and methods defined in the Boat class. The example illustrates this. Even though the implementation of the Speedboat class is empty, the Speedboat instance, myBoat, has speed and lifeboats properties as well as a deployLifeboats() method.
A more subtle difference that sets classes and structures apart is type checking at runtime. You can check the type of a class instance at runtime while this isn't possible for structure instances.
5. Optionals
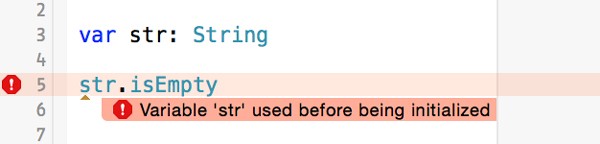
Optionals are an integral part of the Swift programming language. Let's find out what optionals are and why they are so important. A variable must be initialized before it can be used. Take a look at the following example to understand what this means.
var str: String

str.isEmpty
If you're used to working with strings in other programming languages, then you may be surprised that the compiler throws an error. Let's see what that error tells us.
In many programming languages, variables have an initial default value. In Objective-C, for example, the string in the following code snippet is equal to nil.
NSString *newString;
What Is an Optional?
Swift uses optionals to encapsulate an important concept, a variable or constant has a value or it hasn't. It's that simple in Swift. To declare a variable or constant as optional, we append a question mark to the type of the variable or constant.
var str: String?
The variable str is no longer of type String. It is now of type optional String. This is important to understand. The consequence is that we can no longer directly interact with the value of str. The value is safely stored in the optional and we need to ask the optional for the value it encapsulates.
Forced Unwrapping
One way to access the value of an optional is by forced unwrapping the optional. We can access the value of str by appending a ! to the variable's name.
var str: String?

str = "Test"

println(str!)
It's important that you are sure that the optional contains a value when you force unwrap it. If you force unwrap an optional that doesn't have a value, Swift throws an error and your application crashes.

Optional Binding
There is a safer way to access the value of an optional. The following example shows how we can safely access the value stored in str, which is of type String?.
var str: String?

if str != nil {
    println(str!)
} else {
    println("str has no value")
}
We first check if str is equal to nil before we print its contents. In this example, str doesn't have a value. This means it won't be forced unwrapped by accident.
There's a more elegant approach known as optional binding. In the following example, we assign the value stored in the optional to a temporary constant. The value of the optional str is bound to the constant strConst and made available in the if clause of the if statement. This approach also works for while statements.
var str: String?

str = "Test"

if let strConst = str {
    println(strConst)
} else {
    println("str has no value")
}
What Is nil?
If you're coming from a language like Objective-C, then you most certainly know what nil is. In Objective-C, nil is a pointer to an object that doesn't exist. Swift defines nil a bit differently and it's important that you understand the difference.
In Swift, nil means the absence of a value, any value. While nil is only applicable to objects in Objective-C, in Swift nil can be used for any type.
Did You Miss the Semicolon?
Have you noticed that we haven't used any semicolons in the examples of this tutorial? In Swift, there's no need to use semicolons, because the compiler is smart enough to understand when one statement ends and another one begins. If you really miss using semicolons, then it's fine to add them. Keep in mind, though, that the language guide recommends to omit semicolons.
Conclusion
Even though we've only scratched the surface in this tutorial, you now have a basic understanding of the Swift programming language. In the next tutorial, we'll explore another key component of the language, closures and functions. We'll also discuss protocols and access control.
If you have any questions or comments, you can leave them in the comments below or reach out to me on Twitter.

Comments