While this tutorial focuses primarily on functions and closures, we take a brief detour at the end to explore protocols and access control. We'll be working with protocols later in this series so it's important to become familiar with them early on.
A few months ago, I wrote a series on the Swift programming language in which I took a close look at functions and closures. This article summarizes what I wrote in these tutorials. If you want more information about functions and closures, I recommend reading the articles of that series:
Before we dive into the topic of functions and closures, it's time to fire up Xcode and create a new playground. Ready? Let's write some code.
1. Functions
What Is a Function?
A function is nothing more than a block of code that can be executed when it's needed. I'd like to start with an example to discuss the basic anatomy of a function in Swift. Add the following function definition to your playground.
func printHelloWorld() {
    print("Hello World!")
}
A function begins with the func keyword and is followed by the name of the function, printHelloWorld in the above example. As in many other languages, the name of the function is followed by a pair of parentheses that contain the function's parameters, the function's input.
The body of the function is wrapped in a pair of curly braces. The body of the printHelloWorld() function contains one statement in which we print the string "Hello World!" in the standard output. This is what a basic function looks like in Swift. To invoke the function, we type its name followed by a pair of parentheses.
printHelloWorld()
Parameters
Let's make the above example a bit more complex by adding parameters to the function definition. By adding parameters, we provide the function with input values it can use in its body. In the following example, we define the printMessage(_:) function, which accepts one parameter, message, of type String.
func printMessage(message: String) {
    print(message)
}
A function can accept multiple parameters or input values. The parameters are wrapped by the parentheses that follow the function's name. The name of the parameter is followed by a colon and its type. As you remember, this is very similar to declaring a variable or constant. It simply says that the message parameter is of type String.
Invoking the function is similar to what we saw earlier. The difference is that we pass in an argument.
printMessage("Hello World!")
The following example looks similar. The only difference is that the function defines two parameters, message of type String and times of type Int.
func printMessage(message: String, times: Int) {
    for i in 0..<times {
        print("\(i) \(message)")
    }
}
While the name of the function is identical to that of the original printMessage(_:) function, the function's type is different. It's important that you understand this difference. Each function has a type, consisting of the parameter types and the return type. We'll explore return types in a moment. Functions can have the same name as long as their type is different as shown by the previous two function definitions.
The type of the first function is (String) -> () while the type of the second function is(String, Int) -> (). The name of both functions is the same. Don't worry about the -> symbol. Its meaning will become clear in a few moments when we discuss return types.
The second printMessage(_:times:) function defines two parameters, message of type String and times of type Int. This function signature illustrates one of the features Swift has adopted from Objective-C, readable function and method names.
printMessage("Hello World!", times: 3)
Return Types
The functions we've seen so far don't return anything to us when we invoke them. Let's create a function that formats a date. The function takes two arguments, a date of type NSDate and a format string of type String. Because the NSDate and NSDateFormatter classes are defined in the Foundation framework, we need to import Foundation at the top of the playground.
import Foundation

func formatDate(date: NSDate, format: String = "YY/MM/dd") -> String {
    let dateFormatter = NSDateFormatter()
    dateFormatter.dateFormat = format
    return dateFormatter.stringFromDate(date)
}
There are a few things that require some explanation. The -> symbol indicates that the function returns a value. The type of the value is defined after the -> symbol, String.
The function accepts two arguments and the second argument has a default value. This is indicated by the assignment following the type of the second argument. The default value of format is "YY/MM/dd". This means that we can invoke the function with only one argument. Xcode's autocompletion illustrates this.

If a function doesn't have a return type, the -> symbol is omitted. That's why the printHelloWorld() function doesn't have a -> symbol in its method definition.
Local and External Parameter Names
Earlier in this tutorial, we defined the printMessage(_:) function. Even though we've given the parameter a name, message, we don't use that name when we call the function. Instead, we only pass in the value for the message parameter.
func printMessage(message: String) {
    print(message)
}

printMessage("Hello World!")
The name we define in the function's definition is a local parameter name. The value of the parameter can only be referenced by this name in the body of the function. But function parameters are a bit more flexible than that.
Objective-C is known for its long method names. While this may look clunky and inelegant to outsiders, it makes methods easy to understand and, if chosen well, very descriptive. If you think you lost this benefit when switching to Swift, then you're in for a surprise.
When a function accepts several parameters, it isn't always obvious which argument corresponds to which parameter. Take a look at the following example to better understand the problem.
func power(a: Int, b: Int) -> Int {
    var result = a

    for _ in 1..<b {
        result = result * a
    }

    return result
}

power(2, 3)
The power(_:b:) function raises the value of a by the exponent b. Both parameters are of type Int. While most people will intuitively pass the base value as the first argument and the exponent as the second argument, this isn't clear from the function's type, name, or signature.
To avoid confusion, we can give the parameters of a function external names. We can then use these external names when the function is called to unambiguously indicate which argument corresponds to which parameter. Take a look at the updated example below.
func power(base a: Int, exponent b: Int) -> Int {
    var result = a

    for _ in 1..<b {
        result = result * a
    }

    return result
}
Note that the function's body hasn't changed, because the local names haven't been changed. However, when we invoke the updated function, the difference is clear and the result much less confusing.
power(base: 2, exponent: 3)
Even though the types of both functions are the same, (Int, Int) -> Int, the functions are different. In other words, the second function isn't a redeclaration of the first function. The syntax to invoke the second function may remind some of you of Objective-C. Not only are the arguments clearly described, the combination of function and parameter names describe the purpose of the function.
In Swift, the first parameter has, by default, no external parameter name. That's why the signature of the printMessage(_:) function includes a _ for the first parameter. If we want to define an external parameter name for the first parameter, then the method definition would look a bit different.
func printMessage(message message: String) {
    print(message)
}

printMessage(message: "Hello World!")
Global and Nested Functions
The examples we've seen so far are known as global functions, because they're defined at a global scope. Functions can also be nested. Nested functions can only be called from the scope in which they're defined. This means that a nested function can only be called from the function in which it is defined. The next example clarifies this.
func printMessage(message: String) {
    let a = "hello world"

    func printHelloWorld() {
        print(a)
    }
}
2. Closures
What Is a Closure?
If you've worked with blocks in C and Objective-C or closures in JavaScript, then you won't have a hard time wrapping your head around the concept of closures. We've already worked with closures in this article, because functions are closures too. Let's start with the basics and inspect the anatomy of a closure.
A closure is a block of functionality that you can pass around in your code. You can pass a closure as an argument of a function or you can store it as a property of an object. Closures have many use cases.
The name closure hints at one of the key characteristics of closures. A closure captures the variables and constants of the context in which it is defined. This is sometimes referred to as closing over those variables and constants.
Syntax
The basic syntax of a closure isn't difficult. Take a look at the following example.
let a = {(a: Int) -> Int in
    return a + 1
}
The first thing you'll notice is that the entire closure is wrapped in a pair of curly braces. The parameters of the closure are wrapped in a pair of parentheses, separated from the return type by the -> symbol. The above closure accepts one argument, a, of type Int and returns an Int. The body of the closure starts after the in keyword.
Named closures, that is, global and nested functions, look a bit different. The following example illustrates these differences.
func increment(a: Int) -> Int {
    return a + 1
}
The most prominent differences are the use of the func keyword and the position of the parameters and return type. A closure starts and ends with a curly brace, wrapping the parameters, return type, and body. Despite these differences, remember that every function is a closure. Not every closure is a function, though.
Closures as Parameters
Closures are powerful and the following example illustrates how useful they can be. In the example, we create an array of states. We invoke the map() function on the array to create a new array that only contains the first two letters of each state as a capitalized string.
var states = ["California", "New York", "Texas", "Alaska"]

let abbreviatedStates = states.map({ (state: String) -> String in
    let index = state.startIndex.advancedBy(2)
    return state.substringToIndex(index).uppercaseString
})

print(abbreviatedStates)
In the above example, the map() function is invoked on the states array, transforms its contents, and returns a new array that contains the transformed values. The example also shows the power of Swift's type inference. Because we invoke the map() function on an array of strings, Swift knows that the state argument is of type String. This means that we can omit the type as shown in the updated example below.
let abbreviations = states.map({ (state) -> String in
    return state.substringToIndex(advance(state.startIndex, 2)).uppercaseString
})
There are a few more things we can omit from the above example, resulting in the following one-liner.
let abbreviations = states.map({ state in state.substringToIndex(state.startIndex.advancedBy(2)).uppercaseString })
Let me explain what's happening. The compiler can infer that we return a string from the closure that we pass to the map() function, which means there's no reason to include the return type in the closure expression definition. We can only do this if the closure's body includes a single statement, though. In that case, we can put that statement on the same line as the closure's definition, as shown in the above example. Because there's no return type in the definition and no -> symbol preceding the return type, we can omit the parentheses enclosing the closure's parameters.
Shorthand Argument Names
It doesn't stop here, though. We can make use of shorthand argument names to simplify the above closure expression even more. When using an inline closure expression, as in the above example, we can omit the list of parameters, including the in keyword that separates the parameters from the closure body.
In the closure body, we reference the arguments using shorthand argument names Swift provides us with. The first argument is referenced by $0, the second by $1, etc.
In the updated example below, I have omitted the list of parameters and the in keyword, and replaced the state argument in the closure's body with the shorthand argument name $0. The resulting statement is more concise without compromising readability.
let abbreviations = states.map({ $0.substringToIndex($0.startIndex.advancedBy(2)).uppercaseString })
Trailing Closures
The Swift programming language also defines a concept known as trailing closures. If you pass a closure as the last argument of a function, you can place that closure outside the parentheses of the function call. The following example demonstrates how this works.
let abbreviations = states.map() { $0.substringToIndex($0.startIndex.advancedBy(2)).uppercaseString }
If the only argument of the function call is the closure, then it's even possible to omit the parentheses of the function call.
let abbreviations = states.map { $0.substringToIndex($0.startIndex.advancedBy(2)).uppercaseString }
Note that this also works for closures that contain multiple statements. In fact, that is the main reason trailing closures are available in Swift. If a closure is long or complex and it's the last argument of a function, it is often better to use the trailing closure syntax.
let abbreviations = states.map { (state: String) -> String in
    let toIndex = state.startIndex.advancedBy(2)
    let newState = state.substringToIndex(toIndex)
    return newState.uppercaseString
}
3. Protocols
Protocols are an important component of the Swift programming language. The concept isn't difficult to understand if you're familiar with protocols in Objective-C or interfaces in Java. A protocol defines a design or interface focused on a particular task. It does this by defining properties and methods necessary to perform that task.
Defining a protocol looks similar to defining a class or structure. In the following example, we define the Repairable protocol. The protocol defines two properties, time and cost, and a method repair(). The time property is readonly while the cost property is readwrite.
protocol Repairable {
    var time: Float { get }
    var cost: Float { get set }

    func repair()
}
A class or structure can adopt a protocol by conforming to it. This means that it is required to implement the properties and methods defined by the protocol. Let's update the Boat class we implemented in the previous tutorial.
class Boat: Repairable {

    var speed: Float = 0
    var lifeboats: Int = 2

    var time: Float = 10.0
    var cost: Float = 100.0

    func deployLifeboats() {
        // ...
    }

    func repair() {
        // ...
    }

}
That's how easy it is to conform a type to a protocol. Even though a protocol cannot be instantiated like a class or structure, a protocol is a valid type. Take a look at the following example in which the Repairable protocol is used as the type of a function argument.
func bringInForRepairs(toBeRepaired: Repairable) {
    // ...
}

let myDamagedBoat = Boat()

bringInForRepairs(myDamagedBoat)
Davis Allie recently wrote a great article about protocol-oriented programming in Swift. If you're interested in learning more about protocols and their potential in Swift, then I encourage you to read Davis' article.
4. Access Control
I'd like to conclude this introduction to Swift by talking about access control. As the name implies, access control defines which code has access to which code. Access control levels apply to methods, functions, types, etc. Apple simply refers to entities. There are three access control levels, public, internal, and private.
- Public: Entities marked as public are accessible by entities defined in the same module as well as other modules, such as a project, framework, or library. This access control level is ideal for exposing the interface of a framework.
- Internal: This is the default access control level. In other words, if no access control level is specified, the internal access control level applies. An entity with an access level of internal is only accessible by entities defined in the same module.
- Private: An entity declared as private is only accessible by entities defined in the same source file.
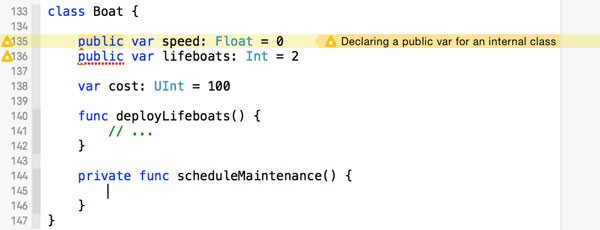
Take a look at the following example in which I've updated the Boat class. The class itself is marked as public, which means it's accessible from anywhere. The cost property is implicitly marked as internal, because we haven't specified an access control level. The same is true for the deployLifeboats() method.
public class Boat {

    public var speed: Float = 0
    public var lifeboats: Int = 2

    var cost: UInt = 100

    func deployLifeboats() {
        // ...
    }

    private func scheduleMaintenance() {

    }
}
The scheduleMaintenance() method is marked as private, which means that it can only be invoked by entities defined in the source file in which the Boat class is defined. It's important to understand this, because it's slightly different from what other programming languages consider a private method or property.
If we mark the Boat class as internal by removing the public keyword, the compiler will show us a warning. It tells us that we cannot mark speed and lifeboats as public as long as Boat is marked as internal. The compiler is right of course. It doesn't make sense to mark the properties of an internal class as public.
Conclusion
The Swift programming language is easy to pick up, but there's so much more to it than what we've covered in the past two tutorials. You'll learn more about Swift once we start building applications. In the next article, we take a closer look at the iOS SDK.
If you have any questions or comments, you can leave them in the comments below or reach out to me on Twitter.

Comments