Even though storyboards have been around since iOS 5, many developers are reluctant to use them in their projects. A typical remark is that storyboards are great for small projects, but fall short for larger projects.
Apple has taken this feedback to heart and resolved many common problems by introducing storyboard references. In this tutorial, I will show you what storyboard references are and how they can help you break down your project's user interfaces into manageable pieces.
1. The Problem
From a designer's perspective, storyboards are great. They are a visual representation of a project's user interface. Interface Builder makes adding and connecting scenes a breeze. Unfortunately, storyboards also have a number of drawbacks.
Complexity
Most projects have one storyboard that contains the application's user interface. That's the goal of storyboards. Right? Yes and no. It's true that the goal of storyboards is to visually lay out the user interface. The problem is that storyboards can quickly become unwieldy and complex for larger projects.
Source Control
Another hurdle when working with storyboards is collaboration. Storyboards can make collaborating with team members a true challenge. A storyboard is stored as one file. This means that every change you or a team member makes to a storyboard affects the same file. At some point, this will inevitably lead to merge conflicts. This is less of a problem when working with XIB files since each XIB file represents one scene of the user interface.
2. The Solution
Before iOS 9
The solution is simple, breaking up storyboards into a set of smaller storyboards. But how do you connect the storyboards? Before iOS 9, developers would connect storyboards in code by loading the storyboard and invoking instantiateInitialViewController() on the storyboard. The following code snippet shows how this works.
let storyboard = UIStoryboard(name: "DetailView", bundle: NSBundle.mainBundle())
let viewController = storyboard.instantiateInitialViewController()

if let viewController = viewController {
    self.presentViewController(viewController, animated: true, completion: nil)
}
It forces developers to make the connection in code, making it unclear how multiple storyboards are connected. It's not obvious how one storyboard is connected to another storyboard. Let's see how storyboard references solve these problems in iOS 9.
iOS 9
Storyboard references are a great addition to the storyboard toolchain. In Interface Builder, the destination of a segue can now also be another storyboard. What's more, a storyboard can be referenced multiple times, making it easy to reuse storyboards in multiple places. Let's create a simple project to show you how easy it is to get started with storyboard references.
3. Project Setup
Instead of starting with a sample project, I'm going to show you how to use storyboard references from scratch. Before you continue, make sure that you have Xcode 7 installed. Storyboard references are only available in iOS 9, which requires Xcode 7.
Open Xcode 7 and create a new project by choosing New > Project... from Xcode's File menu. Select the Tabbed Application template from the iOS > Application section on the left.
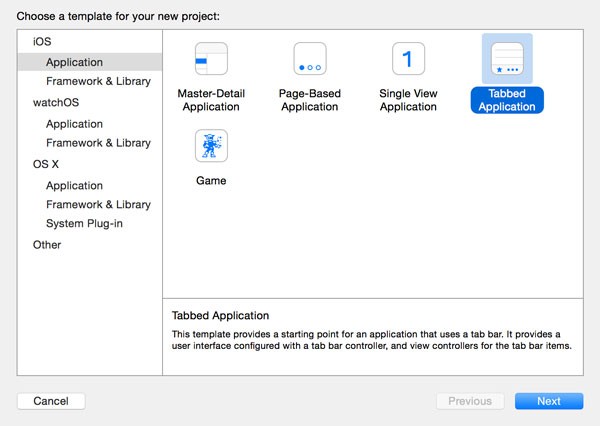
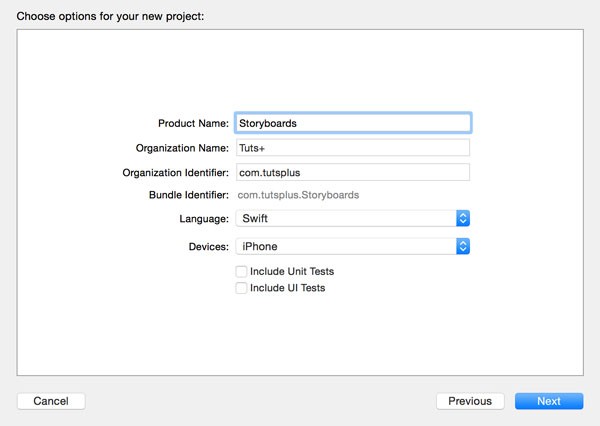
Configure the project by giving it a name and setting Devices to iPhone. For this tutorial, it doesn't matter whether you set Language to Swift or Objective-C. Tell Xcode where it should store the project and hit Create.
If you're new to storyboards, then you may be surprised that Xcode has created two storyboards for us. Main.storyboard is the project's main storyboard and contains the application's user interface. LaunchScreen.storyboard is a storyboard that Xcode uses to dynamically create a launch screen for the application. We won't be using LaunchScreen.storyboard in this tutorial.
4. Creating the User Interface
Our storyboard currently contains a tab bar controller and two view controllers. Let's make it a bit more interesting by embedding the view controllers in a navigation controller. Select the top view controller and select Embed In > Navigation Controller from Xcode's Editor menu. Do the same for the second view controller. This is what your storyboard should now look like.
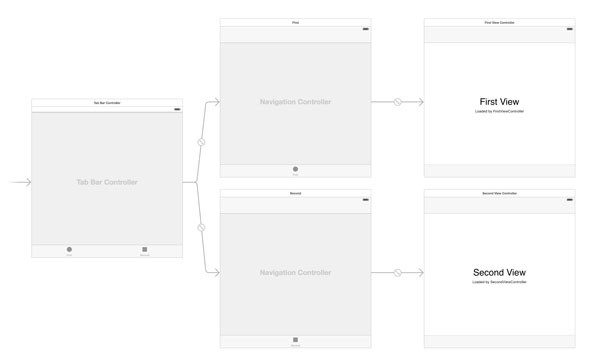
Even though the storyboard isn't complicated, it contains enough complexity to show you how storyboard references work and how they can benefit your projects. It's time for some refactoring.
5. Refactoring Storyboards
When a project's code base becomes unwieldy or too complex to maintain, it is time for refactoring. Refactoring simply means reorganizing or restructuring the code base to make it easier to maintain. This often includes breaking up large chunks of code into smaller bits, modularizing the code base.
While storyboards are a great tool to create user interfaces, storyboards can also become too complex or too large to maintain. In iOS 9, a storyboard can be split up into multiple smaller storyboards. Apple refers to this process as refactoring.
Because each view controller of the tab bar controller can be seen as a separate user interface, it makes sense to put each tab of the tab bar controller into a separate storyboard. This is very easy in Xcode 7.
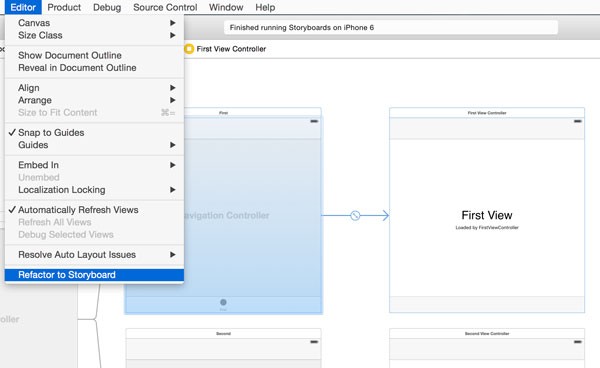
Start by selecting the top view controller and its navigation controller. From Xcode's Editor menu, choose Refactor to Storyboard. Xcode will ask you to name the storyboard it's about to create for the selection you've made. Name the storyboard FirstTab.storyboard and click Save.
Xcode will create a new storyboard that includes the navigation controller and its root view controller. In this storyboard, the navigation controller automatically becomes the initial view controller of the storyboard as you can see in the below screenshot.
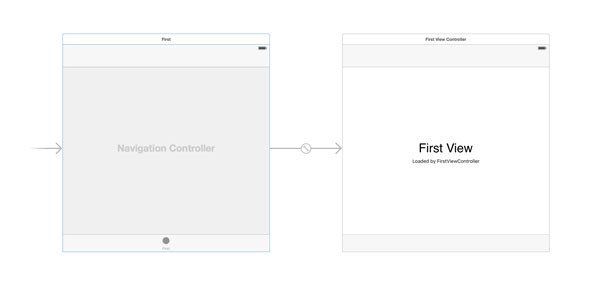
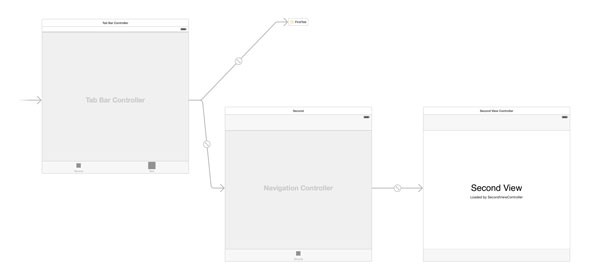
Note that Main.storyboard has become much simpler. The navigation controller and its root view controller have been replaced by a storyboard reference named FirstTab. If you double-click the storyboard reference, Xcode will automatically open FirstTab.storyboard, the storyboard it references.
6. Exploring Storyboard References
Storyboard references are quite powerful. A storyboard reference will by default instantiate the initial view controller of the referenced storyboard, but it is possible to link to any scene in the storyboard that has a Storyboard ID.
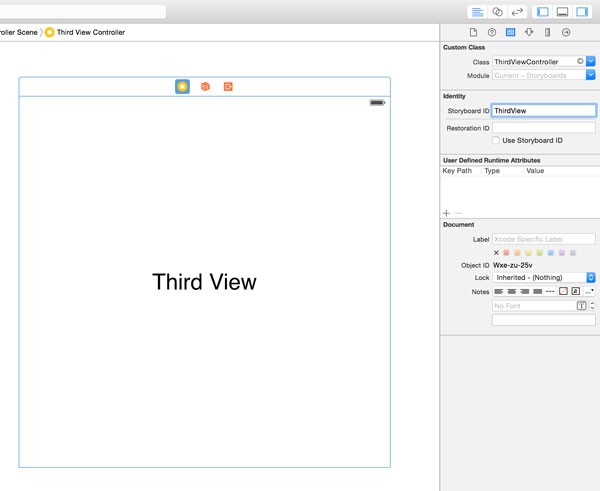
Create a new UIViewController subclass and name it ThirdViewController. Open FirstTab.storyboard and drag a new view controller from the Object Library on the right. From the Object Library, add a label to the view of the new view controller and set its text to Third View. With the new view controller selected in the storyboard, set Class to ThirdViewController and Storyboard ID to ThirdView in the Identity Inspector on the right.
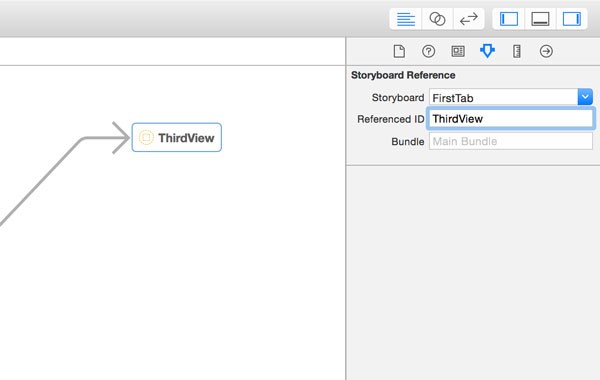
Head back to Main.storyboard and select the storyboard reference you created earlier. Open the Attributes Inspector on the right to see the attributes of the storyboard reference. The Attributes Inspector shows us that the storyboard reference references the FirstTab storyboard. The Referenced ID is empty at the moment.
Set Referenced ID to ThirdView and you'll see that the storyboard reference updates its label to reflect the change. Run the application in the iOS Simulator to see the result. This illustrates that you can use storyboard references to link to any scene in a storyboard, even if the scene isn't connected by a segue with other scenes in the storyboard.
Note that we can also specify the bundle of the referenced storyboard. This is especially useful if you need to link to a scene in a storyboard of an external framework.
Before we continue our exploration of storyboard references, I'd like to point out that the storyboard of a storyboard reference can be the same storyboard to which the reference belongs. This may sound strange, but it can be very useful if you want to reuse certain scenes in a storyboard or if you're working with a very complex storyboard.
7. Adding Storyboard References
We've created FirstTab.storyboard by choosing Refactor to Storyboard from Xcode's Editor menu. Storyboard references are also available from the Object Library. Open the Object Library on the right and add a storyboard reference to Main.storyboard.
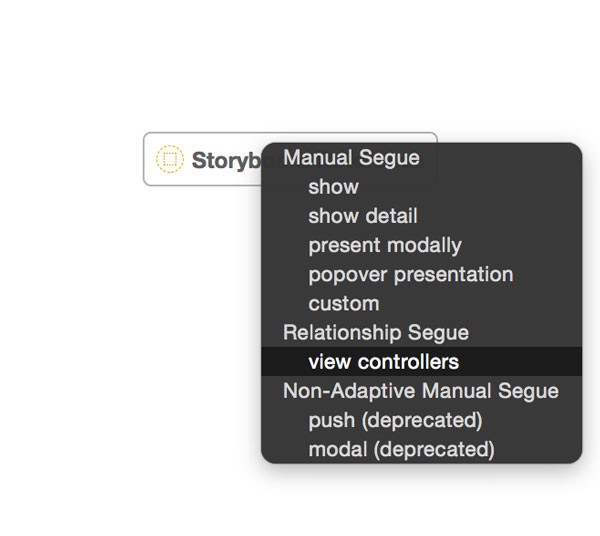
Select the tab bar controller in the storyboard and create a segue to the storyboard reference by holding Control and dragging to the new storyboard reference.
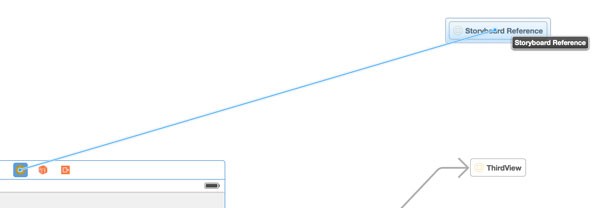
From the menu that appears, choose view controllers from the Relationship Segue section.
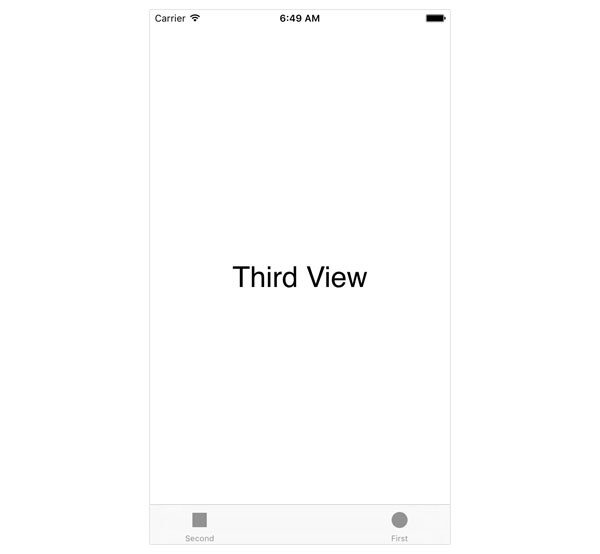
Select the new storyboard reference and set Storyboard ID to FirstTab. Run the application in the iOS Simulator to see the result. Note that the second tab of the tab bar controller shows the third view controller while the third tab shows the first view controller embedded in a navigation controller.
Conclusion
Storyboard references are powerful. Not only do they make storyboards manageable and modular, they make it very easy to reuse storyboards and even hook into storyboards at arbitrary places.
I strongly believe that storyboard references will result in a much higher adoption rate of storyboards by developers. Storyboard references are exactly what developers have been asking for.

Comments