Introduction
With iOS 9, Apple introduced a number of multitasking capabilities for iPad. These include Slide Over, Split View, and Picture in Picture. If you are not familiar with these new features, here's a brief overview.
Slide Over
Slide Over is available on iPad Mini 2 and later, all iPad Air models, and iPad Pro. It allows for apps to slide in from the right side of the screen with the full height of the screen (in both orientations) and the approximate width of an iPhone screen.
Picture in Picture
Picture in Picture is available on all iPad models that support Slide Over. It allows for a video to continue being played in a small view while you work with other apps on iPad. This small view contains three buttons to control playback, return to full screen, play/pause, and close. The view can be resized or temporarily pushed off to the side of the screen.
Split View
Split View is available on iPad Mini 4, iPad Air 2, and iPad Pro. It allows iPad to run two fully functional apps side by side. The user can move the divider between the two apps to resize them.
Note that the app on the left is referred to as the primary application and the app on the right the secondary app. The primary application owns the status bar of the device and always takes up at least half of the screen. The primary app can be dismissed by the user, however, if they move the divider all the way to the left.

Prerequisites
This tutorial requires that you are running Xcode 7 or later on OS X Yosemite or later. It also assumes that you have learned about size classes and Auto Layout. If you are new to adaptive design, then I recommend reading Jordan Morgan's tutorial on adaptive design. You will also need to download the starter project from GitHub.
1. Slide Over and Split View
Configuration
By default, all apps that are created from any Xcode 7 template automatically support Slide Over and Split View. This is because your app is created with a LaunchScreen.storyboard file and a size class enabled Main.storyboard file.
For projects that were created with an earlier version of Xcode, you can enable Slide Over and Split View for your app by taking the following two steps.
Step 1
Create a LaunchScreen.storyboard file by selecting the iOS > User Interface > Launch Screen template. The launch screen will be displayed once your app has been launched from the home screen and while it's still loading.

Note that this storyboard replaces the static launch images that you would already have configured for your application.
Step 2
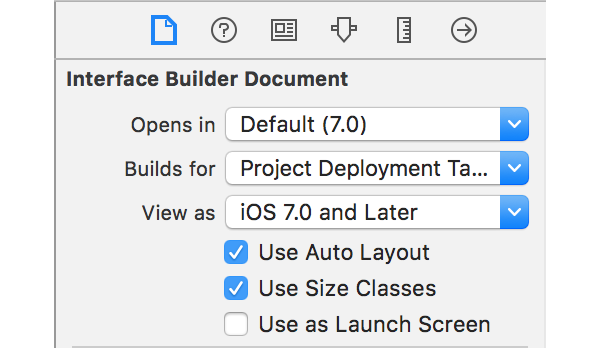
Ensure that your user interface is using size classes and Auto Layout. You can verify this by selecting the storyboard of your project, opening the File Inspector, and ticking the Use Auto Layout and Use Size Classes checkboxes in the Interface Builder Document section.
Note that you need to do this for every storyboard in your project. Now that you know how to configure an app correctly for Slide Over and Split View, it's time to learn about how to ensure your app works well alongside other apps.
Size Classes
For Slide Over, the current size class for your app when running will always be the same. When your app is the primary app it will have access to the full screen (regular width and height size class) and nothing will be different. When your app is opened via the Slide Over feature, your app will have a compact width and regular height size class regardless of orientation.
On an iPad that supports Split View, however, your app window can be resized at any moment and needs to be designed to fit these sizes. The following diagram shows the different configurations for Split View app sizes and the size classes associated with these.:
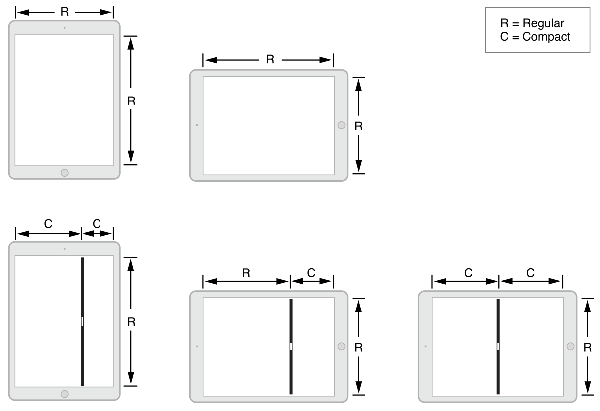
As you can see, unless your app is the primary application and the device is in landscape orientation, as soon as your have to share the screen with another app your app will be forced into a compact width size class. Because this change in size is dependent on the user and can happen at any time, you app needs to be able to smoothly transition between different view sizes.
Note that on iPad Pro, when in landscape and 50/50 Split View mode, both apps are given a regular width horizontal size class as shown below.
Callback Methods
In order to account for these changes in size, the UIViewController class conforms to the two protocols, UITraitEnvironment and UIContentContainer.
UITraitEnvironment
This protocol contains a UITraitCollection property called traitCollection and a method for when this trait collection changes, traitCollectionDidChange(_:). This trait collection object allows you to find out specific details about the running state of your app, such as the display scale, current horizontal and vertical size classes, 3D touch (referred to as Force Touch by the API) capability, and current device type (iPhone/iPod Touch, iPad, Apple TV or Unspecified).
UIContentContainer
This protocol contains a preferredContentSize property as well as numerous methods for when the size or trait collection changes for the current container. We will take a closer look at two of the methods defined by the UIContentContainer protocol.
Open the starter project you downloaded from GitHub and navigate to ViewController.swift. Next, add the following methods to the class definition:
override func viewWillTransitionToSize(size: CGSize, withTransitionCoordinator coordinator: UIViewControllerTransitionCoordinator) {
super.viewWillTransitionToSize(size, withTransitionCoordinator: coordinator)
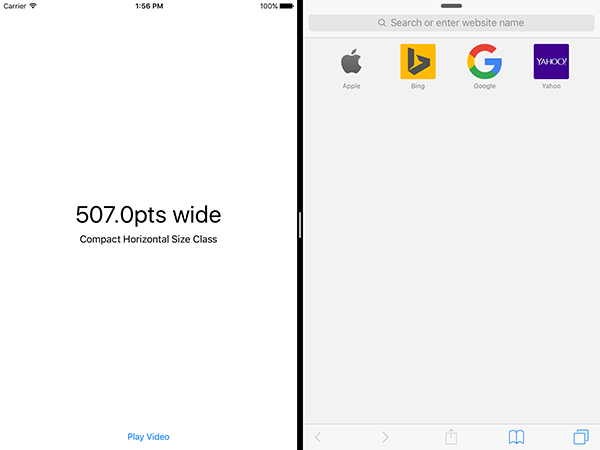
self.viewWidth.text = "\(size.width)pts wide"
}
override func willTransitionToTraitCollection(newCollection: UITraitCollection, withTransitionCoordinator coordinator: UIViewControllerTransitionCoordinator) {
super.willTransitionToTraitCollection(newCollection, withTransitionCoordinator: coordinator)
switch newCollection.horizontalSizeClass {
case .Compact:
self.sizeClass.text = "Compact Horizontal Size Class"
case .Regular:
self.sizeClass.text = "Regular Horizontal Size Class"
case .Unspecified:
self.sizeClass.text = "Unspecified Horizontal Size Class"
}
}
In the viewWillTransitionToSize(_:withTransitionCoordinator:) method, we update the viewWidth label to display the new width of the screen.
In the willTransitionToTraitCollection(_:withTransitionCoordinator:) method, we check to see which horizontal size class is being transitioned to and update the sizeClass label accordingly.
You may have noticed that both methods provide a UIViewControllerTransitionCoordinator parameter. This object is mainly used to work with animations between view controllers and it doesn't really relate to Split View multitasking as the system handles the animations. The UIViewControllerTransitionCoordinator parameter exists because these UIContentContainer protocol methods are not exclusive to Split View multitasking and can also be executed in other scenarios.
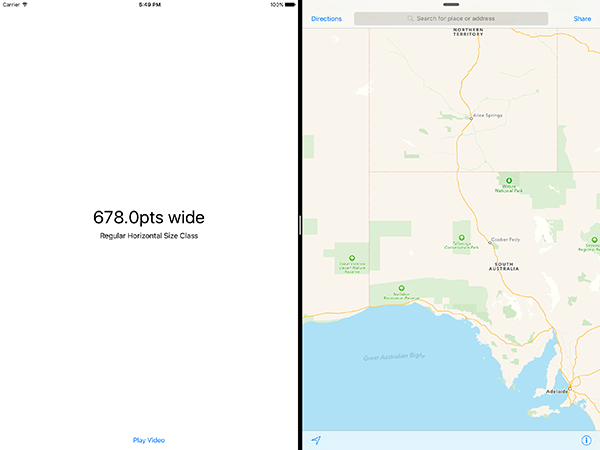
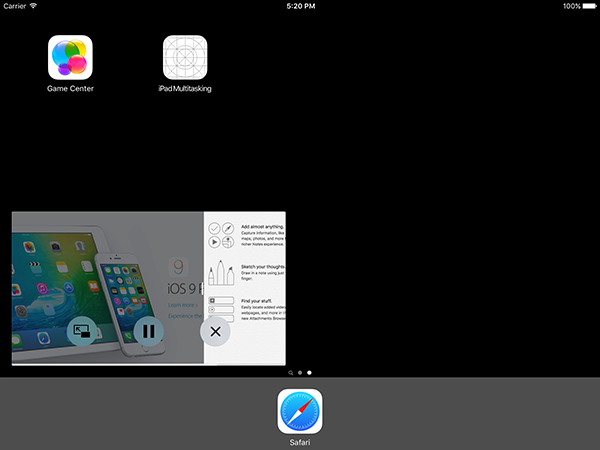
Run your app on a physical device or in the iPad Air 2 or iPad Pro simulator. Once the app has launched, drag in from the right side of the screen and select any of the apps in the list.
Once the app has opened, press and hold on the small bar to the left of the just opened app as shown below.
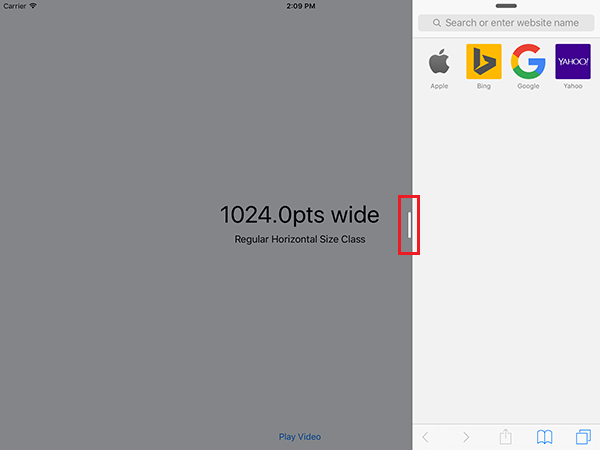
Drag the divider that appears to the middle of the screen as shown in the following screenshot and release it.
When your app fades back in, the two labels should update with the correct view width and horizontal size class.
2. Picture in Picture Video
As with Slide Over and Split View, if you are using Xcode 7 or later, then your app will automatically support Picture in Picture. For audiovisual content, this is done by using the AVPlayerViewController class.
Before you can start using Picture in Picture, however, you need to enable a capability for your target. Select your target, open the Capabilities tab in the Project Navigator, enable Background Modes, and tick the checkbox labeled Audio, AirPlay and Picture in Picture.

Run your app again and tap the Play Video button. The video I've included in the starter project will start playing. With the video playing, go to the home screen by pressing the home button on your device or Command-Shift-H if you're using the simulator.
Alternatively, you can press the small button in the bottom left corner to enter Picture in Picture mode. You will see that the video view minimizes and remains on the screen, complete with buttons to reopen, play/pause and close.
At this stage, you will notice that if you press on the button to begin viewing the video in full screen again, the app will open but the video playback view controller does not appear at all. You can change this behavior by conforming the view controller to the AVPlayerViewControllerDelegate protocol.
Start by making the ViewController class conform to the AVPlayerViewControllerDelegate protocol.
class ViewController: UIViewController, AVPlayerViewControllerDelegate
Next, replace prepareForSegue(_:sender:) with the following implementation:
override func prepareForSegue(segue: UIStoryboardSegue, sender: AnyObject?) {
    let destination = segue.destinationViewController as!
    AVPlayerViewController
    destination.delegate = self
    let url = NSBundle.mainBundle().URLForResource("Video", withExtension: "mp4")!
    destination.player = AVPlayer(URL: url)
    destination.player?.play()
}
Lastly, add the playerViewControllerShouldAutomaticallyDismissAtPictureInPictureStart(_: AVPlayerViewController) method of the AVPlayerViewControllerDelegate protocol to the ViewController class.
func playerViewControllerShouldAutomaticallyDismissAtPictureInPictureStart(playerViewController: AVPlayerViewController) -> Bool {
    return false
}
By implementing this method, we ensure that the video player view controller does not close when Picture in Picture mode is entered. Build and run your app again and you will see that, when reopening from Picture in Picture, the video will continue to play.
If you are not using an AVPlayerViewController to play your content, there are other ways in which you can support Picture in Picture video. If you are using an AVPlayerLayer to allow for a custom user interface around your video, you can create an AVPictureInPictureController object to support Picture in Picture. This is what such an implementation could look like:
self.pictureinPictureController = AVPictureInPictureController(playerLayer: layer)
self.pictureinPictureController.delegate = // Any object conforming to the AVPictureInPictureViewControllerDelegate protocol
if AVPictureInPictureController.isPictureInPictureSupported() {
    // Display button to enter Picture in Picture
}

...

func pictureinPictureButtonPressed() {
    self.pictureInPictureController.startPictureInPicture()
}
3. Disabling iPad Multitasking
If, for some reason, you don't want your application to support Slide Over, Split View, or Picture in Picture, you can override the default behavior provided by Xcode and iOS.
Slide Over and Split View
For Slide Over and Split View, all you need to do is add the UIRequiresFullScreen key to your app's Info.plist file and set it to YES.
Picture in Picture
With the AVPlayerViewController class, you just need to set the allowsPictureInPicturePlayback property to false.
For Picture in Picture with an AVPlayerLayer object, you don't create an AVPictureInPictureController.
Lastly, for videos displayed through the web via a WKWebView, you need to set the allowsPictureInPicturePlayback property of the view's configuration to false.
Conclusion
You should now be confident in creating applications that support the new Slide Over, Split View, and Picture in Picture multitasking capabilities added to iPad on iOS 9. As you can see, these new features make the iPad a much more productive tool and they are very easy for developers to implement in their own applications.
As always, you can leave your comments and feedback in the comments below.

Comments