This tutorial gives an overview of the new features of the SpriteKit framework that were introduced in iOS 8. The new features are designed to make it easier to support advanced game effects and include support for custom OpenGL ES fragment shaders, lighting, shadows, advanced new physics effects and animations, and integration with SceneKit. In this tutorial, you'll learn how to implement these new features.
Series Format
This series is split up into two tutorials and covers the most important new features of the SpriteKit framework. In the first part, we take a look at shaders, lighting, and shadows. In the second part, I'll talk about physics and SceneKit integration.
While each part of this series stands on its own, I recommend following along step-by-step to properly understand the new features of the SpriteKit framework. After reading both parts, you'll be able to create both simple and more advanced games using the new features of the SpriteKit framework.
Download the Xcode project we created in the previous article from GitHub if you'd like to follow along.
1. Physics
In iOS 8, SpriteKit introduced new physics features, such as per-pixel physics, constraints, inverse kinematics, and physics fields.
Kinematics is the process of calculating the 3D position of the end of a linked structure, given the angles of all the joints. Inverse Kinematics (IK) does the opposite. Given the end point of the structure, what angles do the joints need to make in order to achieve that end point? The following image clarifies these concepts.
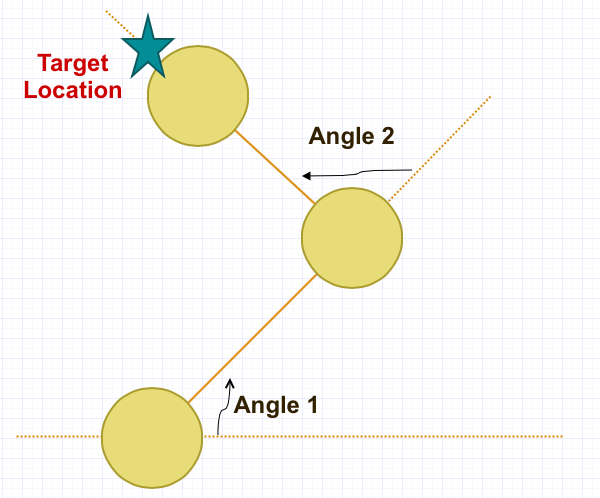
With SpriteKit, you use sprites to represent joints that use the parent-child relationship to create a joint hierarchy. For each relationship, you define the inverse kinematics constraints on each joint and control the minimum and maximum rotation angle between them. Note that each joint rotates around its anchor point.
Step 1: Inverse Kinematics (IK)
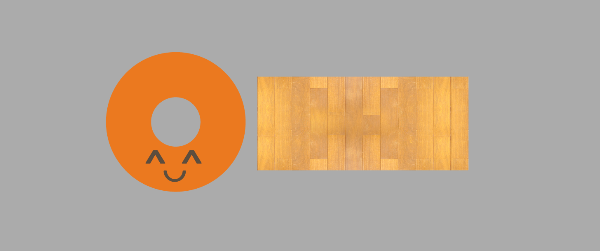
Open the PhysicsSceneEditor and add the croquette-o.png sprite to the yellow rectangle. Select the sprite and change Name in the SKNode Inspector to Root. Set the Physics Definition Body Type to None.
Add a second sprite, wood.png and change its Name to FirstNode. Change the Parent field to Root. Move FirstNode by putting it on the right of Root and resize it to create a rectangle as shown below. Set the Physics Definition Body Type to None.
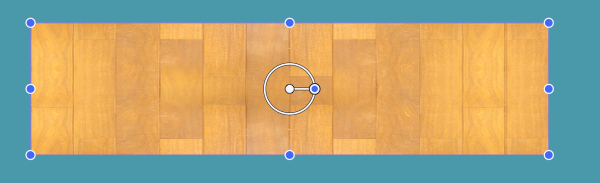
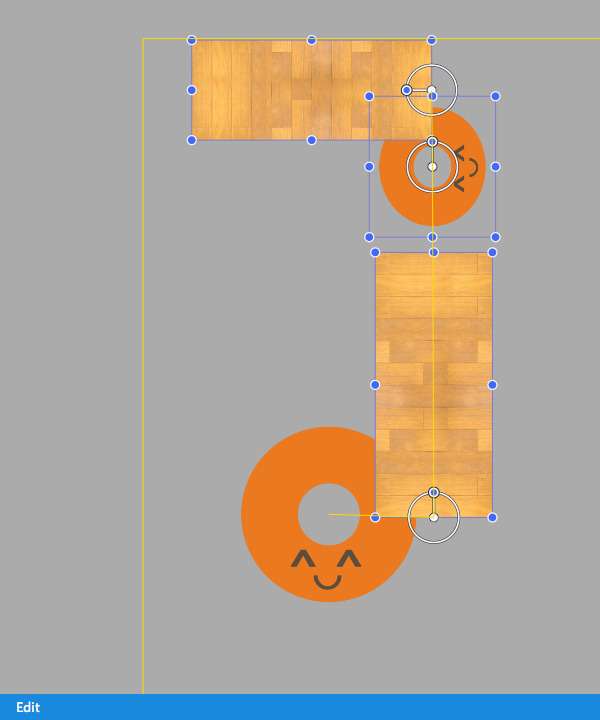
The result should look similar to the following scene.
Note that, when you select a sprite node, a white circle appears at its center. That circle represents the sprite node's anchor point around which every rotation is performed.
Step 2: Add More Sprites
Follow the previous steps and add two more sprites.
First Sprite
- Add another croquette-o.png sprite.
- Change its Name SecondNode.
- Change its Parent to FirstNode.
- Position it on the right of FirstNode.
- Change its Physics Definition Body Type to None.
Second Sprite
- Add another wood.png sprite.
- Change its Name field to ThirdNode.
- Change its Parent to SecondNode.
- Position it on the right of SecondNode.
- Resize it to create a rectangle.
- Change its Physics Definition Body Type to None.
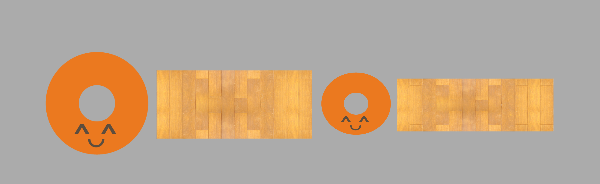
The result should look similar to the following scene.
Step 3: Edit and Simulate
To test the joint connections, interactions, and constraints, you don't need to build and run your project. Xcode provides two modes, edit and simulate.
The simulate mode provides a real time testing environment while the edit mode is used to create and edit your scene. So far, we've been working in the edit mode. Note that any changes you make in simulate mode are not saved.
At the bottom of the scene editor, you can see which mode you are currently working in. If the bottom bar of the scene editor is white, then you're in edit mode. A blue background indicates you're in simulate mode. Click the label in the bottom bar to switch between the two modes.


Change the mode to simulate and select the FirstNode, SecondNode, and ThirdNode sprites. You can select multiple sprites by pressing Command.
Next, press Shift-Control-Click and move the sprites around in the scene. The result is that the sprite nodes animate and rotate. However, the rotation is weird and needs to be corrected.
Step 4: IK Constraints
Switch back to edit mode and add a few constraints to the sprite nodes. Select each sprite node and change its properties as follows.
Select the Root and SecondNode sprite nodes and set the IK Constraints Max Angle to 0. Select the FirstNode and ThirdNode sprite nodes and set Anchor Point X to 0 and IK Constraints Max Angle to 90.
By modifying these properties, the position and size of the sprite nodes will change. After adding the constraints, manually adjust their size and position, and switch to simulate mode to test the new constraints we added.
The below screenshot illustrates the correct constraints configuration.
Step 5: Magnetic Field Node
Magnetic fields are also new in SpriteKit. Let's see how this works by adding a magnetic field to the physics scene. Open PhysicsScene.m and an instance variable named magneticFieldNode of type SKFieldNode.
@implementation PhysicsScene {
    SKFieldNode *magneticFieldNode;
}
In the didMoveToView: method, we first configure the scene by creating a SKPhysicsBody instance for the scene and adding a gravitational force. This means that any nodes in the scene will be pulled downwards.
SKPhysicsBody *physicsBody = [SKPhysicsBody bodyWithEdgeLoopFromRect:self.frame];
[self.physicsWorld setGravity:CGVectorMake(0, -9)];
[self setPhysicsBody:physicsBody];
To configure the magneticFieldNode object, you need to configure its physics body as well as its position and strength. Note that each SKFieldNode has its own properties. The following code snippet shows how to configure the magnetic field node. We add the new node as a child node to the scene.
magneticFieldNode = [SKFieldNode magneticField];
[magneticFieldNode setPhysicsBody:[SKPhysicsBody bodyWithCircleOfRadius:80]];
[magneticFieldNode setPosition:CGPointMake(100, 100)];
[magneticFieldNode setStrength:3];
[self addChild:magneticFieldNode];
Step 6: Interactions
To see the magnetic field in action, we need to add a few nodes with which the magnetic field note can interact. In the following code snippet, we create three hundred sprites. Note that each sprite node has its own physics body and we set the affectedByGravity property to YES.
for (int i = 0; i < 300; i++) {

    SKSpriteNode *node4 = [SKSpriteNode spriteNodeWithTexture:[SKTexture textureWithImageNamed:@"wood.png"] size:CGSizeMake(25, 25)];
    [node4 setPhysicsBody:[SKPhysicsBody bodyWithRectangleOfSize:CGSizeMake(25, 25)]];
    [node4 setPosition:CGPointMake(arc4random()%640, arc4random()%950)];
    [node4.physicsBody setDynamic:YES];
    [node4.physicsBody setAffectedByGravity:YES];
    [node4.physicsBody setAllowsRotation:true];
    [node4.physicsBody setMass:0.9];

    [self addChild:node4];
}
The completed didMoveToView: method should look as follows:
-(void)didMoveToView:(SKView *)view {
    SKPhysicsBody *physicsBody = [SKPhysicsBody bodyWithEdgeLoopFromRect:self.frame];
    [self.physicsWorld setGravity:CGVectorMake(0, -9)];
    [self setPhysicsBody:physicsBody];

    magneticFieldNode = [SKFieldNode magneticField];
    [magneticFieldNode setPhysicsBody:[SKPhysicsBody bodyWithCircleOfRadius:80]];
    [magneticFieldNode setPosition:CGPointMake(100, 100)];
    [magneticFieldNode setStrength:3];
    [self addChild:magneticFieldNode];

    for (int i = 0; i < 300; i++) {
        SKSpriteNode *node4 = [SKSpriteNode spriteNodeWithTexture:[SKTexture textureWithImageNamed:@"wood.png"] size:CGSizeMake(25, 25)];
        [node4 setPhysicsBody:[SKPhysicsBody bodyWithRectangleOfSize:CGSizeMake(25, 25)]];
        [node4 setPosition:CGPointMake(arc4random()%640, arc4random()%950)];
        [node4.physicsBody setDynamic:YES];
        [node4.physicsBody setAffectedByGravity:YES];
        [node4.physicsBody setAllowsRotation:true];
        [node4.physicsBody setMass:0.9];

        [self addChild:node4];
    }
}
Before we build and run the application, we override the touchesMoved:withEvent: method so you can move the magnetic field node by tapping your finger.
-(void)touchesMoved:(NSSet *)touches withEvent:(UIEvent *)event {
    for (UITouch *touch in touches) {
        [magneticFieldNode setPosition:[touch locationInNode:self]];
    }
}
Build and run the application to test the magnetic field node's effect on the scene. For additional information about simulating physics using the SpriteKit framework, I recommend reading Apple's documentation about this topic.
2. SceneKit Integration
SceneKit is a high-level Objective-C framework for building applications and games that use 3D graphics. It supports the import, manipulation, and rendering of 3D assets. The rendering algorithm only requires the description of your scene's contents, animations, and actions you want it to perform.
Through SceneKit, you are now able to create and deliver 3D content using SpriteKit. SceneKit has a tree structure and can be used in two ways:
- standalone SceneKit environment
- integrated into SpriteKit
SceneKit has a tree hierarchy composition. In a standalone SceneKit environment, the base class for the tree structure is an SCNNode instance as shown in the diagram below. An SCNNode object by itself has no visible content when the scene containing it is rendered. It simply defines a position in space that represents the position, rotation, and scale of a node relative to its parent node.
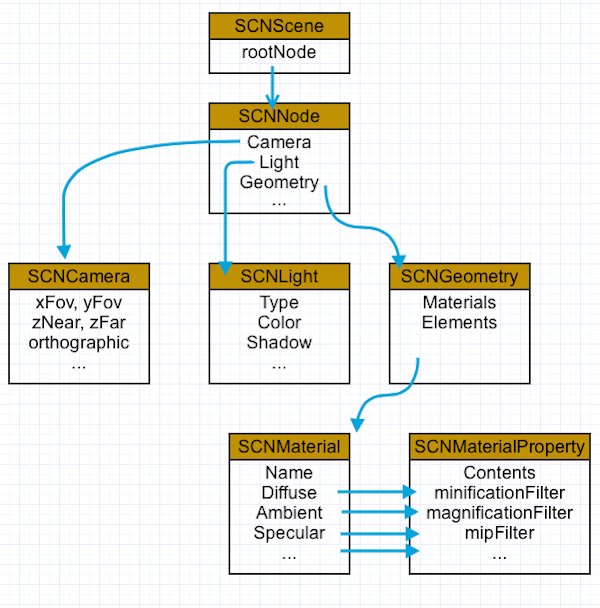 t
tWhen you integrate SceneKit into a SpriteKit-based app, you need to define a SK3DNode object as the root object for your scene. This means that the core SceneKit hierarchy changes to the following:
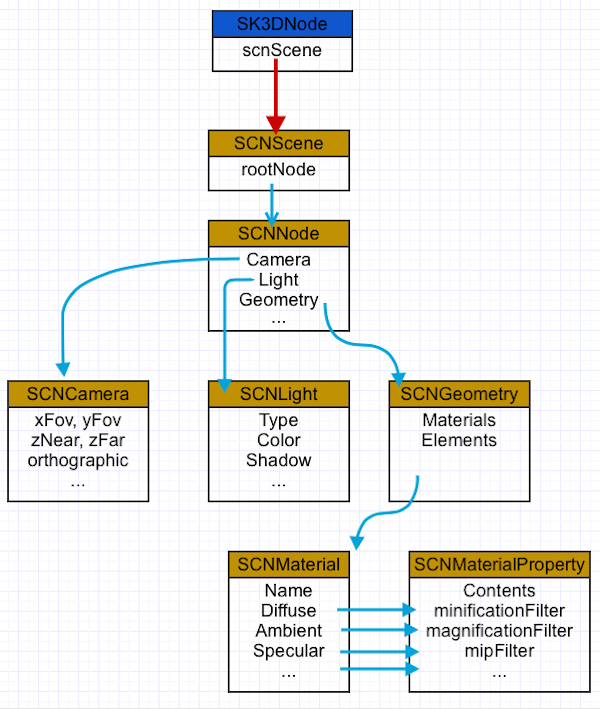
Note that not every child node in the above diagram is required. You only define and configure the nodes that fit your needs. For instance, you can add an SCNLight node to illuminate the scene even if you don't include an SCNCamera node in the scene.
Step 1: Live Preview of Models
SpriteKit and SceneKit support a number of file formats for importing models. You can preview these models in real-time in Xcode. Inside the Textures folder in your project (Resources > Textures), there's a file named ship.dae. When you select this file, you're presented with a new user interface as shown below.
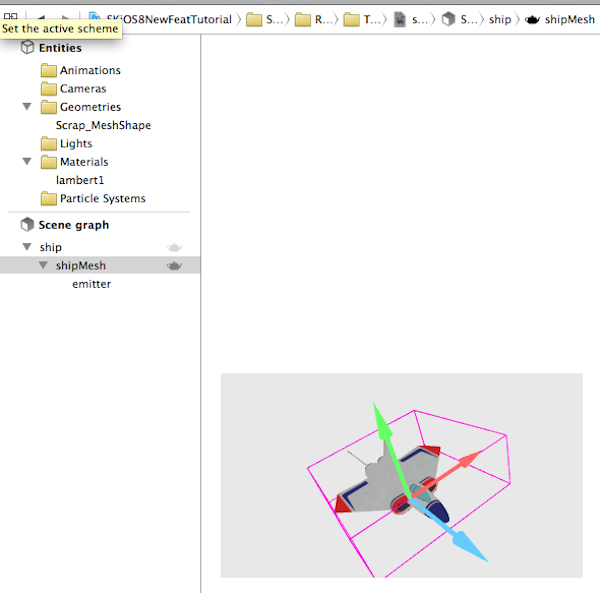
On the left of the editor, you can see two groups:
- Entities: This group contains information about the predefined animations, camera position, lights, and materials defined by the model file. The file we've opened only contains information about the model's geometry and its material.
- Scene graph: This group contains information about the original object mesh. In this case, the object was created as a whole and you only see a single mesh.
Step 2: Importing an External Model
To use SceneKit in combination with SpriteKit, you need to import the SceneKit library from the SceneKit framework. Open SceneKitScene.m and include it as shown below.
#include <SceneKit/SceneKit.h>
We're going to use the model stored in ship.dae as the 3D scene. Inside the didMoveToView: method, create the SCNScene object that loads a scene from that file.
SCNScene *shipScene = [SCNScene sceneNamed:@"ship.dae"];
Remember the tree hierarchy I mentioned earlier? To add the shipScene object to the SKScene object, two steps are required:
- create a
SK3DNodeobject - define a SceneKit scene to render
In this case, the scene to render is the shipScene. Note that you also define the node's position and its size.
SK3DNode *sk3DNodeFist = [[SK3DNode alloc] initWithViewportSize:CGSizeMake(300, 300)];
[sk3DNodeFist setPosition:CGPointMake(200,300)];
[sk3DNodeFist setScnScene:shipScene];
Finally, add the SK3DNode object as a child node to the SKScene object.
[self addChild:sk3DNodeFist];
To make the final result a bit more appealing, set the scene's background color to green as shown below.
[self setBackgroundColor:[SKColor greenColor]];
This is what the complete didMoveToView: method should look like. Build and run the application to see the result.
-(void)didMoveToView:(SKView *)view {
    [self setBackgroundColor:[SKColor greenColor]];

    SCNScene *shipScene = [SCNScene sceneNamed:@"ship.dae"];

    SK3DNode *sk3DNodeFist = [[SK3DNode alloc] initWithViewportSize:CGSizeMake(300, 300)];
    [sk3DNodeFist setPosition:CGPointMake(200,300)];
    [sk3DNodeFist setScnScene:shipScene];
    [self addChild:sk3DNodeFist];
}
Step 3: Creating a Custom Scene
Let's create a more complex scene that contains several SCNNode objects. For this second scene, we need to create another SK3DNode object.
SK3DNode *sk3DNode = [[SK3DNode alloc] initWithViewportSize:CGSizeMake(400, 400)];
[sk3DNode setPosition:CGPointMake(150,200)];
Next, we create the SCNScene object, the one that will contain the scene child nodes.
SCNScene *sceneObject = [SCNScene scene];
This sceneObject will have three nodes:
- Camera: This node is used to view the scene through a given position.
- Light: This node enables you to see different material properties of the 3D object. You normally define the light type and color.
- 3D object: This is the imported or defined object within your code. By default, SceneKit enables you to define several parametric 3D objects, that is, torus, box, pyramid, sphere, cylinder, cone, tube, capsule, floor, 3D Text, or a custom shape.
For each individual node, you always perform three actions. Let's take the camera node as an example.
- Create an
SCNCameraobject and define its properties. - Create an
SCNNodeto which theSCNCamerawill be assigned. - Add the
SCNNodeas a child node to theSCNSceneobject.
Let's now create the three nodes I mentioned earlier. This is what we need to implement to create the camera node.
SCNCamera *camera = [SCNCamera camera];
SCNNode *cameraNode = [SCNNode node];
[cameraNode setCamera:camera];
[cameraNode setPosition:SCNVector3Make(0, 0, 40)];
[sceneObject.rootNode addChildNode:cameraNode];
By default, the camera location and 3D scene are located at the origin, (0,0,0). Using the position property, you can adjust the camera along the three x, y, and z axes to change its position.
The light node requires a little bit more work, but the following code snippet should be easy to understand.
SCNLight *spotLight = [SCNLight light];
[spotLight setType:SCNLightTypeDirectional];
[spotLight setColor:[SKColor redColor]];

SCNNode *spotLightNode = [SCNNode node];
[spotLightNode setLight:spotLight];
[spotLightNode setPosition:SCNVector3Make(0, 0, 5)];
[cameraNode addChildNode:spotLightNode];
[sceneObject.rootNode addChildNode:spotLightNode];
We'll also create a torus object as shown in the following code snippet.
SCNTorus *torus= [SCNTorus torusWithRingRadius:13 pipeRadius:1.5];
SCNNode *torusNode = [SCNNode nodeWithGeometry:torus];
[torusNode setTransform:SCNMatrix4MakeRotation(M_PI / 3, 0, 1, 0)];
[sceneObject.rootNode addChildNode:torusNode];
Finally, we set the scene that we want to render and add the sk3DNode as a child node of the SKScene instance.
[sk3DNode setScnScene:sceneObject];
[self addChild:sk3DNode];
This is what the final didMoveToView: method should look like.
-(void)didMoveToView:(SKView *)view {
    [self setBackgroundColor:[SKColor greenColor]];

    SCNScene *shipScene = [SCNScene sceneNamed:@"ship.dae"];

    SK3DNode *sk3DNodeFist = [[SK3DNode alloc] initWithViewportSize:CGSizeMake(300, 300)];
    [sk3DNodeFist setPosition:CGPointMake(200,300)];
    [sk3DNodeFist setScnScene:shipScene];
    [self addChild:sk3DNodeFist];

    SK3DNode *sk3DNode = [[SK3DNode alloc] initWithViewportSize:CGSizeMake(400, 400)];
    [sk3DNode setPosition:CGPointMake(150,200)];

    SCNScene *sceneObject = [SCNScene scene];

    SCNCamera *camera = [SCNCamera camera];
    SCNNode *cameraNode = [SCNNode node];
    [cameraNode setCamera:camera];
    [cameraNode setPosition:SCNVector3Make(0, 0, 40)];
    [sceneObject.rootNode addChildNode:cameraNode];

    SCNLight *spotLight = [SCNLight light];
    [spotLight setType:SCNLightTypeDirectional];
    [spotLight setColor:[SKColor redColor]];

    SCNNode *spotLightNode = [SCNNode node];
    [spotLightNode setLight:spotLight];
    [spotLightNode setPosition:SCNVector3Make(0, 0, 5)];
    [cameraNode addChildNode:spotLightNode];
    [sceneObject.rootNode addChildNode:spotLightNode];

    SCNTorus *torus= [SCNTorus torusWithRingRadius:13 pipeRadius:1.5];
    SCNNode *torusNode = [SCNNode nodeWithGeometry:torus];
    [torusNode setTransform:SCNMatrix4MakeRotation(M_PI / 3, 0, 1, 0)];
    [sceneObject.rootNode addChildNode:torusNode];

    [sk3DNode setScnScene:sceneObject];
    [self addChild:sk3DNode];
}
Build and run the application. You should see something similar to the following screenshot.
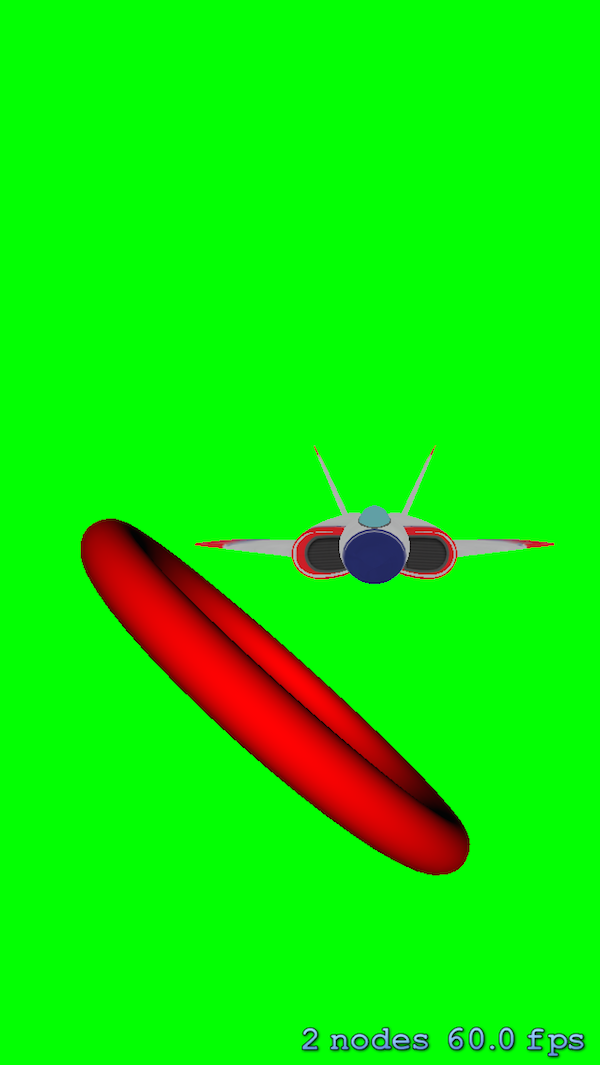
Step 4: Animating the Scene
You can animate the scene using the CABasicAnimation class. You just need to create an instance of CABasicAnimation by invoking animationWithKeyPath:. The animation we create in the following code snippet will loop indefinitely and has a duration of five seconds. Add the following code snippet to the didMoveToView: method.
CABasicAnimation *torusRotation = [CABasicAnimation animationWithKeyPath:@"rotation"];
torusRotation.byValue = [NSValue valueWithSCNVector4:SCNVector4Make(1, 1, 0, 4.0*M_PI)];
[torusRotation setTimingFunction:[CAMediaTimingFunction functionWithName:kCAMediaTimingFunctionLinear]];
[torusRotation setRepeatCount:INFINITY];
[torusRotation setDuration:5.0];

[torusNode addAnimation:torusRotation forKey:nil];
Build and run the application to test the animation.
3. More SpriteKit
If you want to learn more about SpriteKit, then I encourage you to read the following SpriteKit tutorials:
- Build an Airplane Game with Sprite Kit
- Build Missile Command with Sprite Kit
- iOS SDK: Build a Facts Game
If you'd like to read more about the SpriteKit framework, then I recommend reading Apple's SpriteKit Programming Guide or browsing the framework reference.
Conclusion
This concludes the second tutorial of this two-part series on the new features of the SpriteKit framework introduced in iOS 8. In this part, you learned how to use physics simulation and integrate SceneKit. If you have any questions or comments, feel free to drop a line in the comments.

Comments