Starting with iOS 8, your applications can extend custom functionality and content beyond your app, and make it available to users while they're using other apps or the operating system. One way of extending the operating system is by creating a custom keyboard.
In this tutorial I'm going to show you how to make your own custom keyboard using Swift and the new app extension APIs. Before we do that, we are going to go over what a keyboard extension can do, what it can't do, and what it should to get approved for the App Store.
1. Overview
A custom keyboard replaces the system keyboard for users who want capabilities, such as a novel text input method or the ability to enter text in a language not otherwise supported by the operating system.
The essential function of a custom keyboard is simple, respond to taps, gestures, or other input events, and provide text in the form of an unattributed NSString object at the text insertion point of the current text input object.
After a user chooses a keyboard, it remains as the default one whenever they open an app. For this reason the keyboard must allow the user to switch to another keyboard.
There are two development essentials for every custom keyboard:
Trust. Your custom keyboard gives you access to what a user types, so trust between you and your user is essential.
A “next keyboard” key. The affordance that lets a user switch to another keyboard is part of a keyboard’s user interface; you must provide one in your keyboard. - App Extension Programming Guide
If you only need to add a few buttons to the system keyboard, then you should look into custom views for data input.
2. Requirements & Limitations
What a Custom Keyboard Can't Do
There are certain text input objects that your custom keyboard is not eligible to type into. These include secure text fields for entering passwords and phone pad objects, such as the phone number fields in the Contacts application.
Your custom keyboard does not have access to the view hierarchy of the input, it cannot control the cursor, and is unable to select text. Also, the custom keyboard cannot display anything above the top row. The system keyboard isn't limited by these constraints. For example, it shows an extension when you tap a key to show the user what key was tapped.
Sandboxing
By default, a keyboard has no network access and cannot share files with its containing app. To enable these capabilities, set the value of the RequestsOpenAccess key in the Info.plist file to YES. Doing so expands the keyboard's sandbox as described in Apple's App Extension Programming Guide.
If you do request open access, your keyboard gains the following capabilities, each with a concomitant responsibility:
- access to location services and the address book database, each requiring the user's permission on first access
- option to use a shared container with the keyboard's containing app, which enables features, such as providing a custom lexicon management user interface in the containing app
- ability to send keystrokes and other input events for server-side processing
- access to iCloud, which you can use, for example, to ensure that keyboard settings and your custom autocorrect lexicon are up to date on all devices owned by the user
- access to Game Center and in-app purchase through the containing app
- ability to work with managed apps if you design your keyboard to support mobile device management (MDM)
Be sure to read Apple's Designing for User Trust document, which describes your responsibilities for respecting and protecting user data in case you request open access.
3. How It Works
In the most basic form we have an application that contains a keyboard extension and a UIInputViewController that controls the keyboard and responds to user events.
The Custom Keyboard template contains a subclass of UIInputViewController, which is the primary view controller of your keyboard. Let's look at the interface to get a feel of how it works.
class UIInputViewController : UIViewController, UITextInputDelegate, NSObjectProtocol {

    var inputView: UIInputView!

    var textDocumentProxy: NSObject! { get }

    func dismissKeyboard()
    func advanceToNextInputMode()

    // This will not provide a complete repository of a language's vocabulary.
    // It is solely intended to supplement existing lexicons.
    func requestSupplementaryLexiconWithCompletion(completionHandler: ((UILexicon!) -> Void)!)
}
-
inputViewis the view used for the keyboard, it is the same as theviewproperty -
dismissKeyboardmethod can be called to dismiss the keyboard -
advanceToNextInputModeis used to change between keyboards -
textDocumentProxyis the object that you'll use to interact with the current text input
self.textDocumentProxy.insertText("Tuts+") // inserts the string "Tuts+" at the insertion point

self.textDocumentProxy.deleteBackward() // Deletes the character to the left of the insertion point
-
UIInputViewControllerconforms to theUITextInputDelegateprotocol, notifying you when the text or text selection changes through the theselectionWillChange,selectionDidChange,textWillChangeandtextDidChangeevents
4. Making a Calculator Keyboard
Let's create a custom keyboard to make all this a little bit more tangible. We'll make a simple keyboard that can handle numeric input and simple operations. We're going to use a XIB file for the keyboard's user interface.
Step 1: Create a New Project
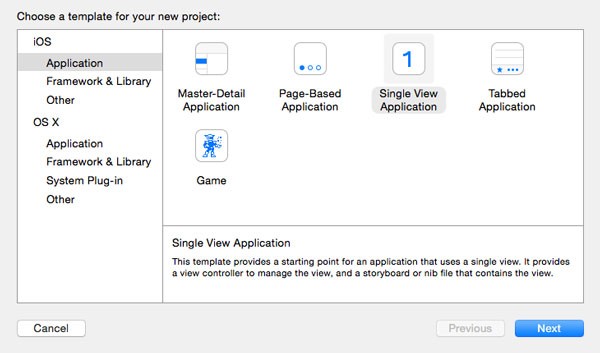
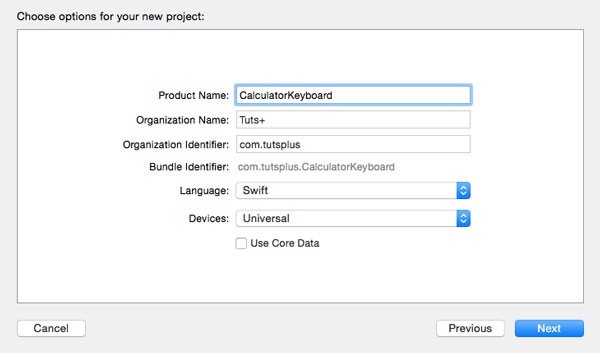
Open Xcode 6, create a new Single View Application and select Swift as the programming language. Name it CalculatorKeyboard.
Step 2: Add a Text Field
Open Main.storyboard and drag a text field from the Objects Library. We'll use this to test the keyboard later. Center the text field and add the necessary layout constraints as shown below.

If you call textField.becomeFirstResponder() in viewDidLoad the keyboard will open when you start the app.
Step 3: Add the Keyboard Extension
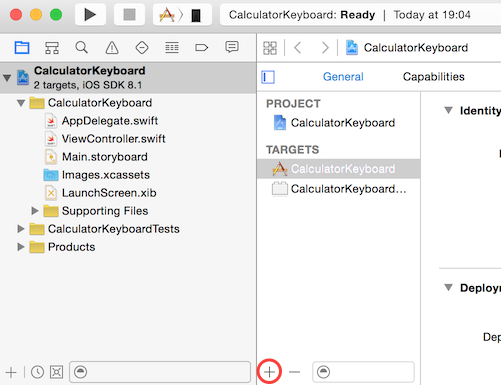
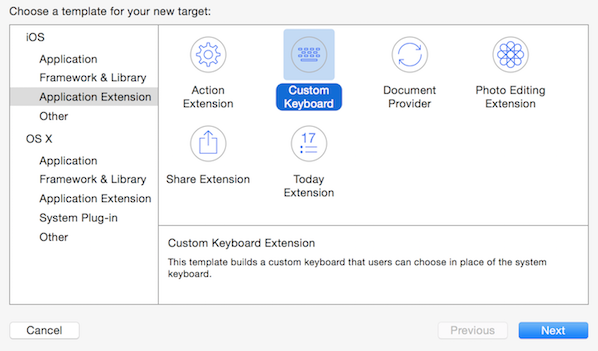
Select the project file in the Project Navigator and add a new target by clicking the plus button at the bottom.
Select Application Extension on the left, choose the Custom Keyboard template, and name it Calculator.

This will create a new group named Calculator, containing two files KeyboardViewController.swift and Info.plist.
Step 4: Cleaning Up
Open KeyboardViewController.swift. The template keyboard has one button, letting the user switch between keyboards. Remove the code in the viewDidLoad method.
Step 5: Creating the User Interface
Right click the Calculator group and select New File.... Select the User Interface section on the left, choose the View template, and name it Calculator. This should create a file named Calculator.xib.
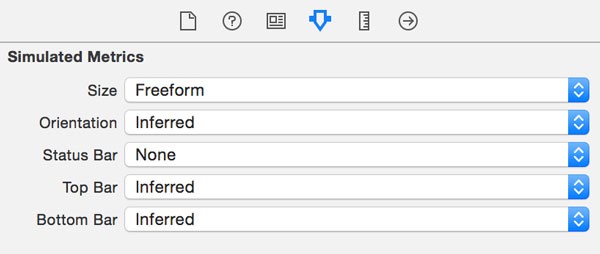
Open the XIB file and, in the Attributes Inspector on the right, set the size to Freeform and the status bar to None.
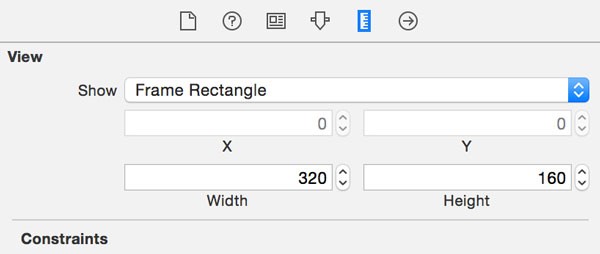
In the Size Inspector set the width of the view to 320 and the height to 160.
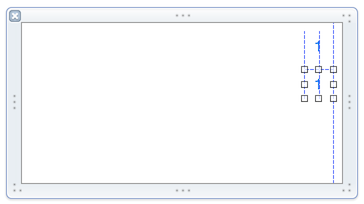
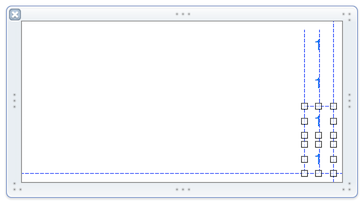
Drag a button from the Objects Library to the view. In the Attributes Inspector, set the title to 1. In the Size Inspector, set the button's width and height to 30. Move the button to the top right corner of the view until it aligns with the margins.

Copy the button by clicking and dragging the button while pressing the Option key. Position the second button below the first one.
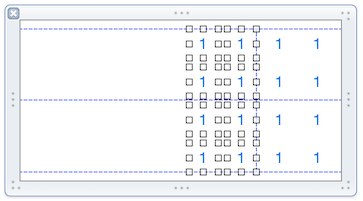
Select the buttons by pressing Command-A and copy the buttons. Position the new buttons below the first and second button.
Repeat the process to create another column of buttons until you have four columns of buttons.
Next, select the column on the left and make a copy that aligns with the left border of the view.
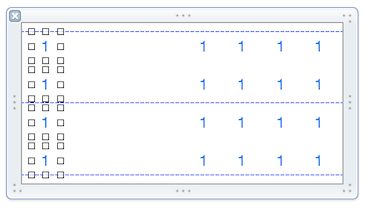
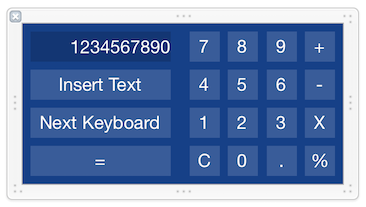
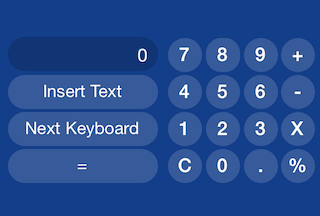
Set the width of the buttons to 140 points. Replace the top left button with a label that has the same size as the button. Rename the buttons like in the screenshot bellow.
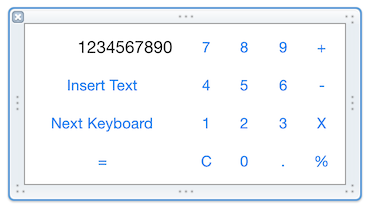
Give the view a blueish background color and set the background color for the buttons to white with an opacity of 15%. And for the display label, make it black with an opacity of 15%. Set the text size to 18 points for every user interface object and set the text color to white. The user interface should now look like this:
Step 6: Loading the User Interface
We first need to create a property in which to store the user interface.
class KeyboardViewController: UIInputViewController {
    var calculatorView: UIView!

    ...
}
Create a method named loadInterface and call it in the viewDidLoad method of the KeyboardViewController.
class KeyboardViewController: UIInputViewController {
    ...

    override func viewDidLoad() {
        super.viewDidLoad()

        loadInterface()
    }

    func loadInterface() {
        // load the nib file
        var calculatorNib = UINib(nibName: "Calculator", bundle: nil)
        // instantiate the view
        calculatorView = calculatorNib.instantiateWithOwner(self, options: nil)[0] as UIView

        // add the interface to the main view
        view.addSubview(calculatorView)

        // copy the background color
        view.backgroundColor = calculatorView.backgroundColor
    }

    ...
}
Step 7: Testing the Keyboard
At this point you should be able to test your new keyboard. With the CalculatorKeyboard scheme selected, build and run the application on your device. This will add a new keyboard to your device. However, before you can use it you first need to install it.
Go to Settings > General > Keyboard > Keyboards and select Add new Keyboard. There you'll find the Calculator keyboard in the list of third-party keyboards. Select and install the keyboard. The next time you open the keyboard you should be able to see your new keyboard by pressing the next keyboard button.
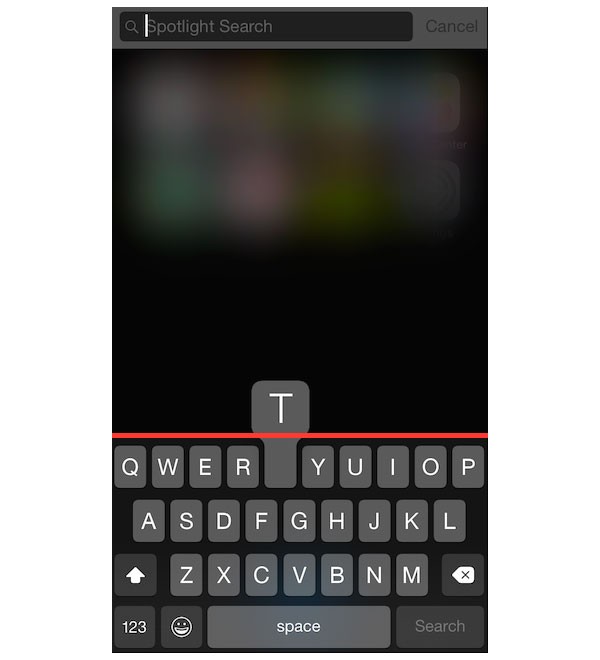
If you are using the iOS Simulator, the custom keyboard might not work inside your app. To see the keyboard press home and open Spotlight.
Step 8: Next Keyboard
Create a property for the next keyboard button in the KeyboardViewController class.
class KeyboardViewController: UIInputViewController {

    @IBOutlet var nextKeyboardButton: UIButton!

    ...
}
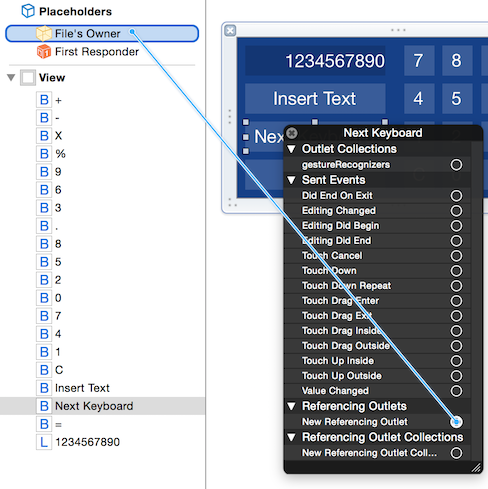
Open Calculator.xib , Select File's Owner, and in the Identity Inspector change its class to KeyboardViewController.
Right click on the Next Keyboard button and connect a referencing outlet to the File's Owner.
In the loadInterface method, we add an action to the nextKeyboard button as shown below.
class KeyboardViewController: UIInputViewController {
    ...

    func loadInterface() {
        ...

        // This will make the button call advanceToNextInputMode() when tapped
        nextKeyboardButton.addTarget(self, action: "advanceToNextInputMode", forControlEvents: .TouchUpInside)
    }

}
Step 9: Number Display
Create a property for the display and connect the referencing outlet in Interface Builder.
class KeyboardViewController: UIInputViewController {

    @IBOutlet var display: UILabel!

    ...
}
Create a method named clearDisplay and call it in the viewDidLoad method, after invoking loadInterface. The display should now show 0 when you open the keyboard.
class KeyboardViewController: UIInputViewController {
    ...

    override func viewDidLoad() {
        super.viewDidLoad()

        loadInterface()
        clearDisplay()
    }

    ...

    @IBAction func clearDisplay() {
        display.text = "0"
    }
}
Connect the C button's touch up inside event to the clearDisplay method in Interface Builder.
Step 10: Number Input
Time to handle numeric input. When you open the keyboard it shows 0 on the display. If you tap a number key, it should replace the display to that number. Create a property named shouldClearDisplayBeforeInserting to implement this behavior.
Create a method named didTapNumber and connect it in Interface Builder to all the number buttons for the touch up inside event. The method uses the titleLabel of the button to determine which number was tapped.
class KeyboardViewController: UIInputViewController {
    var shouldClearDisplayBeforeInserting = true

    ...

    @IBAction func didTapNumber(number: UIButton) {
        if shouldClearDisplayBeforeInserting {
            display.text = ""
            shouldClearDisplayBeforeInserting = false
        }

        if var numberAsString = number.titleLabel?.text {
            var numberAsNSString = numberAsString as NSString
            if var oldDisplay = display?.text! {
                display.text = "\(oldDisplay)\(numberAsNSString.intValue)"
            } else {
                display.text = "\(numberAsNSString.intValue)"
            }
        }
    }
}
Update the clearDisplay method as shown below.
class KeyboardViewController: UIInputViewController {
    ...

    @IBAction func clearDisplay() {
        display.text = "0"
        shouldClearDisplayBeforeInserting = true
    }
}
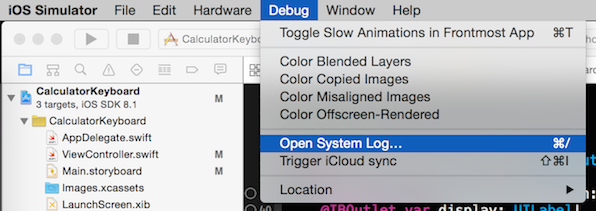
The keyboard code is in a different target than your app. Because of this the debug logs aren't visible. To see the logs for the Calculator target, open the system log from the iOS Simulator.
Step 11: Dot Input
The button to insert a dot should add a dot to the display, but only if there isn't a dot present yet.
class KeyboardViewController: UIInputViewController {
    ...

    @IBAction func didTapDot() {
        if let input = display?.text {
            var hasDot = false
            for ch in input.unicodeScalars {
                if ch == "." {
                    hasDot = true
                    break
                }
            }
            if hasDot == false {
                display.text = "\(input)."
            }
        }
    }
}
Step 12: Inserting Text
The button to insert text should add the calculator display text to the insertion point. To do this, we use the textDocumentProxy property as shown below.
class KeyboardViewController: UIInputViewController {
    ...

    @IBAction func didTapInsert() {
        var proxy = textDocumentProxy as UITextDocumentProxy

        if let input = display?.text as String? {
            proxy.insertText(input)
        }
    }
}
Step 13: Handling Operations
Because we're implementing a simple keyboard that doesn't support expression trees, 1 + 2 * 3 will equal 9. We're going to use a simpler model in which the calculator has an internal memory slot on which it can apply operations.
Let's take a simple input in order to understand how the calculator algorithm works:
- user taps
1, the display should change from0to1 - user taps
+, the calculator should remember to add the next inputted number to1 - user taps
2, the display should change from1to2 - user taps
*, the display and the internal memory of the calculator should change to3, the calculator should remember to multiply the internal memory with the next inputted number - user taps
3, the display should remain3 - user taps
=, the calculator should apply the last operation and the display should change to9
Observations:
- the calculator should remember the next operation to apply
- after inputting a number if an operation or equal is pressed, the calculator should apply the last remembered operation
- if the user presses two or more operations without inputting a number, the calculator should remember the last one
- after an operation is applied, the display should update with the result
- after a result is displayed, the display should clear before writing another number
In order to implement the calculator, we are going to need:
- an
internalMemoryproperty that stores the temporary result - a property that stores the
nextOperation - another one that to remember if it should apply the
nextOperationafter an operation is pressed
enum Operation {
    case Addition
    case Multiplication
    case Subtraction
    case Division
    case None
}

class KeyboardViewController: UIInputViewController {
    var internalMemory = 0.0
    var nextOperation = Operation.None
    var shouldCompute = false

    ...
}
Create a method named didTapOperation and connect it to the operation buttons touch up inside event in Interface Builder. The method will use the button title to determine which operation was pressed.
class KeyboardViewController: UIInputViewController {
    ...

    @IBAction func didTapOperation(operation: UIButton) {
        if shouldCompute {
            computeLastOperation()
        }

        if var op = operation.titleLabel?.text {
            switch op {
                case "+":
                    nextOperation = Operation.Addition
                case "-":
                    nextOperation = Operation.Subtraction
                case "X":
                    nextOperation = Operation.Multiplication
                case "%":
                    nextOperation = Operation.Division
                default:
                    nextOperation = Operation.None
            }
        }
    }
}
Create and implement the computeLastOperation method.
class KeyboardViewController: UIInputViewController {
    ...

    @IBAction func computeLastOperation() {
        // remember not to compute if another operation is pressed without inputing another number first
        shouldCompute = false

        if var input = display?.text {
            var inputAsDouble = (input as NSString).doubleValue
            var result = 0.0

            // apply the operation
            switch nextOperation {
            case .Addition:
                result = internalMemory + inputAsDouble
            case .Subtraction:
                result = internalMemory - inputAsDouble
            case .Multiplication:
                result = internalMemory * inputAsDouble
            case .Division:
                result = internalMemory / inputAsDouble
            default:
                result = 0.0
            }

            nextOperation = Operation.None

            var output = "\(result)"

            // if the result is an integer don't show the decimal point
            if output.hasSuffix(".0") {
                output = "\(Int(result))"
            }

            // truncatingg to last five digits
            var components = output.componentsSeparatedByString(".")
            if components.count >= 2 {
                var beforePoint = components[0]
                var afterPoint = components[1]
                if afterPoint.lengthOfBytesUsingEncoding(NSUTF8StringEncoding) > 5 {
                    let index: String.Index = advance(afterPoint.startIndex, 5)
                    afterPoint = afterPoint.substringToIndex(index)
                }
                output = beforePoint + "." + afterPoint
            }


            // update the display
            display.text = output

            // save the result
            internalMemory = result

            // remember to clear the display before inserting a new number
            shouldClearDisplayBeforeInserting = true
        }
    }
}
Update the clearDisplayMethod as shown below. When the user starts to write the first number, the internal memory should be set to 0 and nextOperation should be addition. That way, after the user inputs the first number and presses an operation, the calculator will remember the inputted number.
class KeyboardViewController: UIInputViewController {
    ...

    @IBAction func clearDisplay() {
        display.text = "0"
        internalMemory = 0
        nextOperation = Operation.Addition
        shouldClearDisplayBeforeInserting = true
    }
}
Step 14: Finishing Touches
Let's use the IBInspectable declaration attribute to add a corner radius to the buttons and display. First, create a subclass of UIButton and UILabel.
class RoundButton: UIButton {
    @IBInspectable var cornerRadius: CGFloat = 0 {
        didSet {
            layer.cornerRadius = cornerRadius
        }
    }
}

class RoundLabel: UILabel {
    @IBInspectable var cornerRadius: CGFloat = 0 {
        didSet {
            layer.cornerRadius = cornerRadius
        }
    }
}
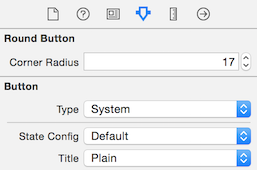
In Interface Builder, select the buttons and change their class to RoundButton in the Identity Inspector. In the Attributes inspector, you should see the new corner radius attribute.
Do the same for the display label. Your keyboard should now look like this.
Conclusion
You should now be able to make a custom keyboard in iOS using the app extension APIs. Remember that every custom keyboard must have a way to switch to the next keyboard and that your keyboard cannot connect to the internet, access location services, or talk with its containing app by default, but you can request these capabilities.
The system will use the default keyboard for secure fields, such as password and phone number fields. Don't forget that the code for the custom keyboard lives in a separate target. Because of this the debug logs aren't visible. To see them, open the system log from the iOS Simulator.

Comments