This tutorial will guide you through the new iBeacons technology. In order to explain this technology in an interesting manner, you will create a "hot and cold" app in this tutorial. The app will analyze the beacon region and inform you accordingly.
Introduction
iBeacon is a technology introduced in iOS 7 that permits you to add precise location region monitoring to your application. Despite the fact that iBeacon is classified as a Core Location technology, iBeacon uses Bluetooth Low Energy technology.
iBeacons supports three types of distance profiles between the iBeacon and the device: immediate, near, and far. Through these distances, it is possible to track the device's movement within the range of the iBeacon. iBeacons work in concert with specific region monitoring. An iOS application can be configured to verify a specific iBeacon signature, and when the iOS device comes within a proximity of that iBeacon, the application notifies the user.
In order to turn an iOS 7 device into an iBeacon, you must create an instance of CLBeaconRegion. It must be created with the UUID and Identifier properties. However, you can also declare and define two more (non-required) properties: Major Value and Minor Value.
Note that, the UUID is a unique iBeacon identifier. Thus, the UUID parameter should be unique to your application. If your application uses multiple devices as iBeacons they should all share the same UUID. In this case, you should configure the iBeacons by the proximity value, using the major and minor value, thus creating singular groups identifying each iBeacon.
Since you now know what a iBeacon is and its basic properties, we can implement an iBeacon. To successfully complete this tutorial, you need two iOS devices with Bluetooth 4.0 support (iPhone 4 or superior). One of devices creates and notifies the iBeacon, while the other receives the signal and presents information regarding the distance of that device to the iBeacon.
This is what our end result will look like:
1. Code Download
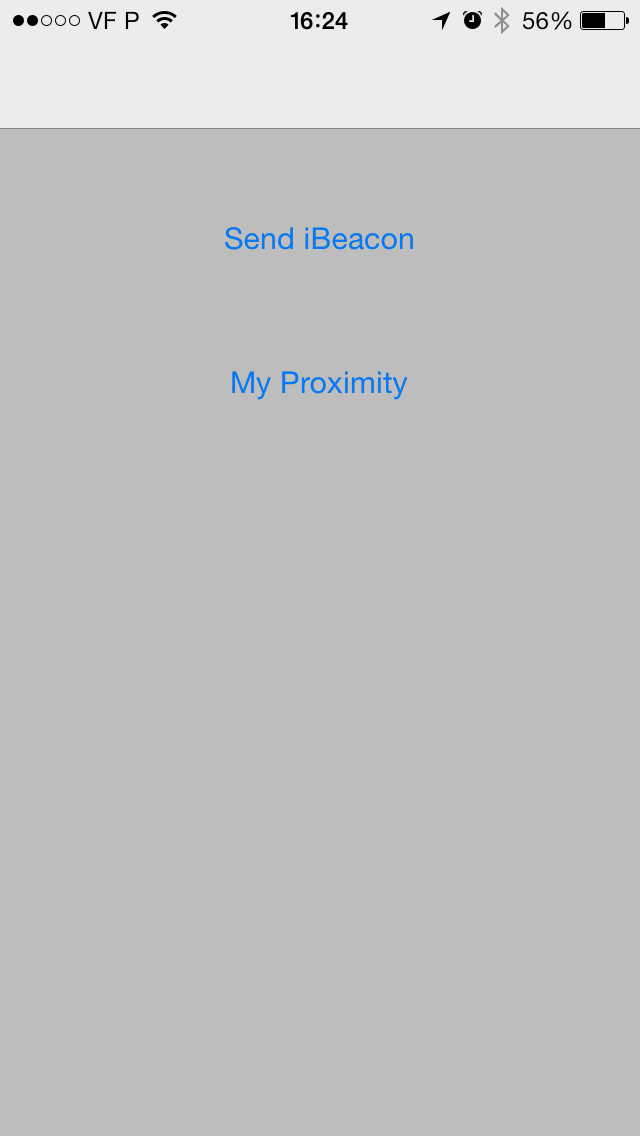
Since the objective of this tutorial is to teach you how to create and implement an iBeacon, we will provide you a sample code with several views and objects that are already defined. You can download the sample code at the beginning of this page.
Nevertheless, the sample code contains the following:
- An application that uses the navigation controller and three views and controllers.
- The initial view controller
ViewControllerwith two buttons (Send iBeacon and receive iBeaconMy Proximity). - A
SendViewControllerthat creates a custom iBeacon. - A
GetViewControllerthat receives the iBeacon and presents the information regarding the distance to that iBeacon.
All views are already placed and properly defined. You just need to add the code for the iBeacon process. Open the project, run it, and play with the objects in order to familiarize yourself with the code. The following picture presents the image that you will see when you run the project the first time.
Note that as aforementioned, two frameworks are included:
#import <CoreLocation/CoreLocation.h>
#import <CoreBluetooth/CoreBluetooth.h>
If you want (or need) to, you can consult the official framework documentation of both CoreLocation and CoreBluetooth.
2. Create an iBeacon
Let's get to work! Our first step is to focus on the SendViewController.h file. Here you will define the properties inherent to the iBeacon definition and the proper delegate.
You need three properties to create the iBeacon: a CLBeaconRegion, a CBPeripheralManager, and a NSDictionary. The CLBeaconRegion object defines a type of region that is based on the device’s proximity to a Bluetooth beacon. It looks for devices whose identifying information matches the information you provide. When that device comes in range, the region triggers the delivery of an appropriate notification. The CBPeripheralManager object manages published services within the local peripheral device’s Generic Attribute Profile (GATT) database and advertises these services to central devices. Finally, the NSDictionary stores the information that will later be advertised. That said, the following snippet will help you to create those properties:
@property (strong, nonatomic) CLBeaconRegion *beaconRegion;
@property (strong, nonatomic) NSDictionary *beaconPeripheralData;
@property (strong, nonatomic) CBPeripheralManager *peripheralManager;
In terms of the delegate, you will use the CBPeripheralManagerDelegate. This protocol is used by the delegate to verify publishing and advertising, and to monitor read, write, and subscription requests from remote central devices.
@interface SendViewController : ViewController < CBPeripheralManagerDelegate>
Save your project and change to the SendViewController.m file. One warning will be there waiting for you. Before you fix that problem, initialize and allocate resources for the previous properties. In the - (void)viewDidLoad method you should first start to initialize the beaconRegion using a unique UUID. The UUID can be generated using the Terminal.app and the command uuidgen.
Here, the _beaconRegion object is initialized using four properties (two required and two optional). Note that you can initialize it with three different methods (check the documentation). The first property is the unique UUID, the second and third are optional and are related with specifications inside the app (group and beacon inside group). The last property is the iBeacon identifier. The snippet is:
NSUUID *uuid = [[NSUUID alloc] initWithUUIDString:@"F2037E44-13BF-4083-A3A6-514A17BBBA10"];
_beaconRegion = [[CLBeaconRegion alloc] initWithProximityUUID:uuid major:1 minor:1 identifier:@"com.MobileTuts.iBeacons"];
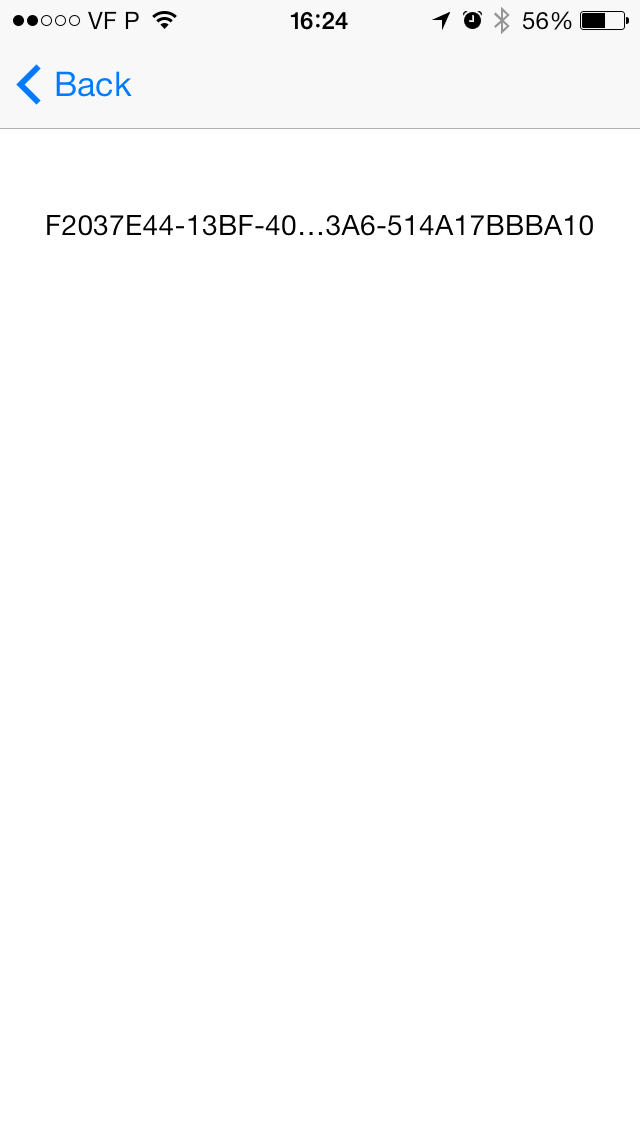
In order to give some feedback to the user, update the label with the UUID generated before:
_uuidLabel.text = _beaconRegion.proximityUUID.UUIDString;
Now you need to initialize the two remaining class properties. The _beaconPeripheralData calls the _beaconregion peripheralDataWithMeasuredPower method that retrieves data that can be used to advertise the current device as a beacon. The _peripheralManager is initialized with the delegate to receive the peripheral role events, the dispatch queue for dispatching the peripheral role events, and an optional dictionary containing initialization options for a peripheral manager. Here's the complete snippet:
_beaconPeripheralData = [_beaconRegion peripheralDataWithMeasuredPower:nil];
_peripheralManager = [[CBPeripheralManager alloc] initWithDelegate:self queue:nil options:nil];
At this point, you allocated the necessary resources, so you only need to fix the warning. Add the -(void)peripheralManagerDidUpdateState:(CBPeripheralManager *)peripheral delegate method. This method is used to check the device state, and taking into consideration the state, the app acts accordingly. In this case if the state is CBPeripheralManagerStatePoweredOn, the app will begin the advertisement. There are several available states. In a real application you should test them all. The states are:
- CBCentralManagerStateUnknown
- CBCentralManagerStateResetting
- CBCentralManagerStateUnsupported
- CBCentralManagerStateUnauthorized
- CBCentralManagerStatePoweredOff
- CBCentralManagerStatePoweredOn
Here is the complete method to implement:
-(void)peripheralManagerDidUpdateState:(CBPeripheralManager *)peripheral {
if (peripheral.state == CBPeripheralManagerStatePoweredOn) {
NSLog(@"On");
[_peripheralManager startAdvertising:_beaconPeripheralData];
} else if (peripheral.state == CBPeripheralManagerStatePoweredOff) {
NSLog(@"Off");
[_peripheralManager stopAdvertising];
}
}
At this time you have the iBeacon created and configured. You can now start the iBeacon advertisement. However, you need to implement a client app in order to try it out. The next step will guide you to achieve that. The following image presents the UI that you should see when you run the app.
3. Receive an iBeacon
To change your view to the GetViewController.h class define two objects, one CLBeaconRegion and the other CLLocationManager. The CLBeaconRegion is similar to the aforementioned definition, and you should not have any difficulty in the creation process. The CLLocationManager defines the interface for configuring the delivery of location related events to your application.
@property (strong, nonatomic) CLBeaconRegion *beaconRegion;
@property (strong, nonatomic) CLLocationManager *locationManager;
Additionally, you need to define a protocol delegate, this time the CLLocationManagerDelegate.
@interface GetViewController : ViewController <CLLocationManagerDelegate>
Now move to the GetViewController.m and let's allow and initialize the objects. The _locationManager is simple and you should set the delegate to self. Then you need to create a UUID and define the _beaconRegion. Additionally, you need to define a region for the monitoring. In this case you will monitor the _beaconRegion region.
_locationManager = [[CLLocationManager alloc] init];
_locationManager.delegate = self;

NSUUID *uuid = [[NSUUID alloc] initWithUUIDString:@"F2037E44-13BF-4083-A3A6-514A17BBBA10"];
_beaconRegion = [[CLBeaconRegion alloc] initWithProximityUUID:uuid identifier:@"com.MobileTuts.iBeacons"];
[_locationManager startMonitoringForRegion:_beaconRegion];
Now you must define the following three methods:
- - (void)locationManager:(CLLocationManager *)manager didEnterRegion:(CLRegion *)region
- -(void)locationManager:(CLLocationManager *)manager didExitRegion:(CLRegion *)region
- -(void)locationManager:(CLLocationManager *)manager didRangeBeacons:(NSArray *)beacons inRegion:(CLBeaconRegion *)region
The names are self explanatory, however the first tells the delegate that the user entered the specified region. The second tells the delegate that the user left the specified region, and the last one tells the delegate that one or more beacons are in range. This last method is mandatory.
The first method only starts to deliver notifications for beacons in the specified region, while the second does the contrary. It stops the delivery of notifications for beacons in the specified region. The complete methods are:
- (void)locationManager:(CLLocationManager *)manager didEnterRegion:(CLRegion *)region {
NSLog(@"Beacon Found");
[_locationManager startRangingBeaconsInRegion:_beaconRegion];
}

-(void)locationManager:(CLLocationManager *)manager didExitRegion:(CLRegion *)region {
NSLog(@"Left Region");
[_locationManager stopRangingBeaconsInRegion:_beaconRegion];
}
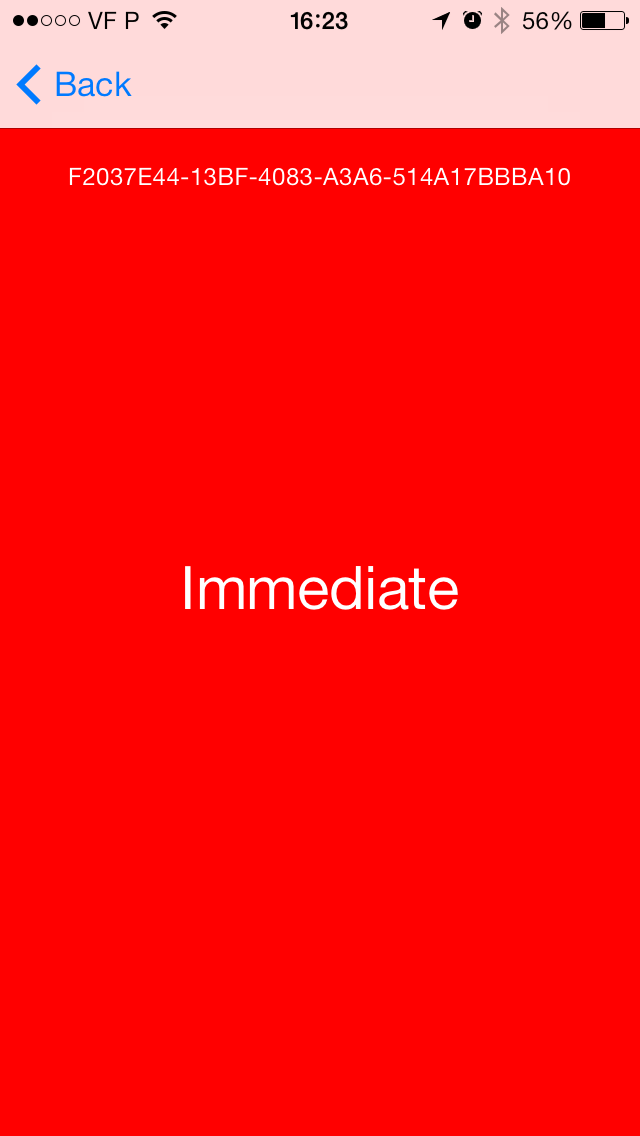
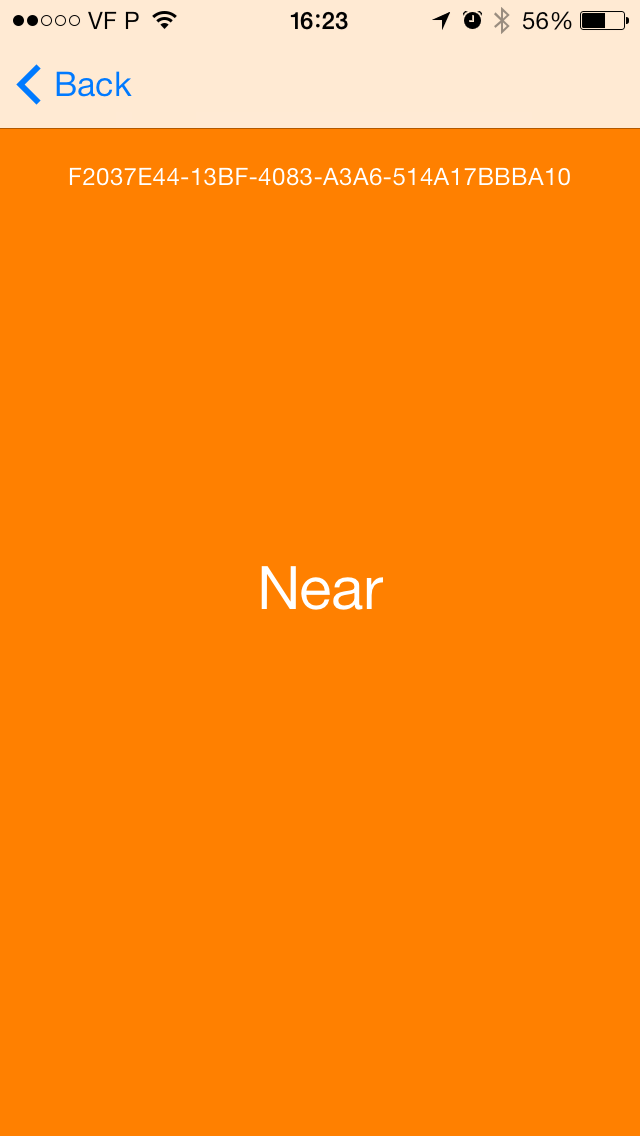
Finally, the last method acquires the data of the available beacons and transforms that data in whatever form the user wants. To correctly receive data, create a CLBeacon object. It updates the label and changes the color of the background, taking into consideration the distance of the iBeacon. The complete method source code is the following:
-(void)locationManager:(CLLocationManager *)manager didRangeBeacons:(NSArray *)beacons inRegion:(CLBeaconRegion *)region {
CLBeacon *beacon = [[CLBeacon alloc] init];
beacon = [beacons lastObject];

self.UUID.text = beacon.proximityUUID.UUIDString;
if (beacon.proximity == CLProximityUnknown) {
_distanceLabel.text = @"Unknown Proximity";
[_view setBackgroundColor:[UIColor blackColor]];
} else if (beacon.proximity == CLProximityImmediate) {
_distanceLabel.text = @"Immediate";
[_view setBackgroundColor:[UIColor redColor]];
} else if (beacon.proximity == CLProximityNear) {
_distanceLabel.text = @"Near";
[_view setBackgroundColor:[UIColor orangeColor]];
} else if (beacon.proximity == CLProximityFar) {
_distanceLabel.text = @"Far";
[_view setBackgroundColor:[UIColor blueColor]];
}
}
You can now Run the app (in two separate devices) and test the beacons. Note that you must depart both devices between five and fifteen meters to leave and re-enter the predefined zone. However, there is a simple solution that you can apply in order to test the app without the need to move that space. You should declare an additional method (- (void)locationManager:(CLLocationManager *)manager didStartMonitoringForRegion:(CLRegion *)region) that states that the region is directly tied to the region of that beacon.
- (void)locationManager:(CLLocationManager *)manager didStartMonitoringForRegion:(CLRegion *)region {
[_locationManager startRangingBeaconsInRegion:_beaconRegion];
}
Additionally, you need to manually call this method in the receiveiBeacon:(id)sender.
[self locationManager:_locationManager didStartMonitoringForRegion:_beaconRegion];
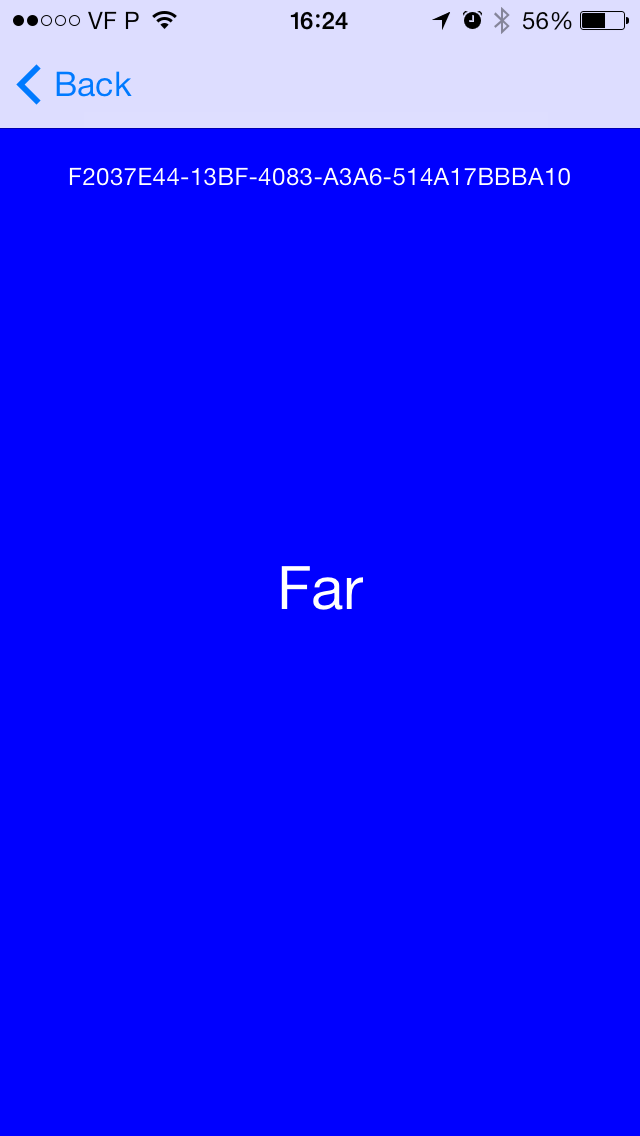
Run the project and test the features! Move away from your iBeacon device and check your interface. You should get screens like the following images when you are within a near distance:
Or this one when you are far way from your iBeacon device:
Conclusion
At the end of this tutorial you should be able to define, configure, and use iBeacons. If you have any questions or comments, feel free to leave them below!

Comments