In the first part of this two-part tutorial about the Twitter framework, I talked about TWTweetComposeViewController. I showed you how to use this class to compose and send tweets with very little effort from your part. In this tutorial, I talk about the more advanced TWRequest class. With this class, you can talk directly to Twitter's API and this gives you much more control and flexibility!
This tutorial will also discuss the benefits of using TWRequest instead of creating and executing your own HTTP request and why you are encouraged to use TWRequest if you decide to interact with the Twitter API on iOS 5.
Project Summary
In the first tutorial, I showed you how to add the Twitter framework to your project and how to use the TWTweetComposeViewController class to compose and send tweets. In this article, we will move a little faster as I'd like to cover quite a bit of ground.
Before We Start
Before we start, I want to repeat that it is necessary that you have one or more Twitter accounts installed on the device that you will use for this tutorial. You can also use the iOS Simulator if you don't have a physical device to test with. The TWRequest class takes care of authentication by asking the operating system if it can access the Twitter accounts installed on the user's device. To complete this tutorial, make sure that you have at least one Twitter account installed on your device or the iOS Simulator. You can verify this by opening the Settings application and choosing Twitter from the list. Take a look at the first installment of this two-part series for more information.
Step 1: Project Setup
To show you how easy it is to get up to speed with the Twitter framework and Twitter's API, we will build an application from the ground up. Of course, we won't be building a fully fledged Twitter client, but you will be surprised at how easy it is to get up and running with very little time and effort. This is all thanks to the tight integration of Twitter with iOS.
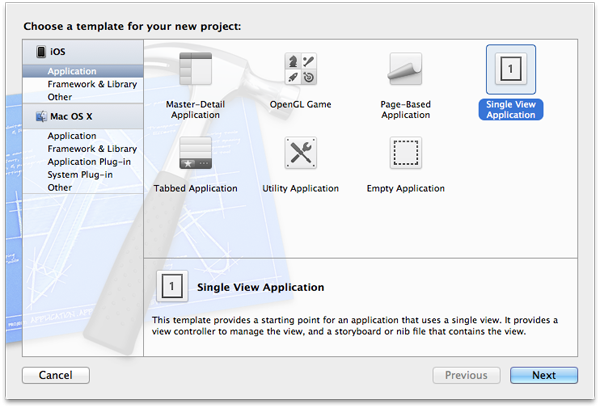
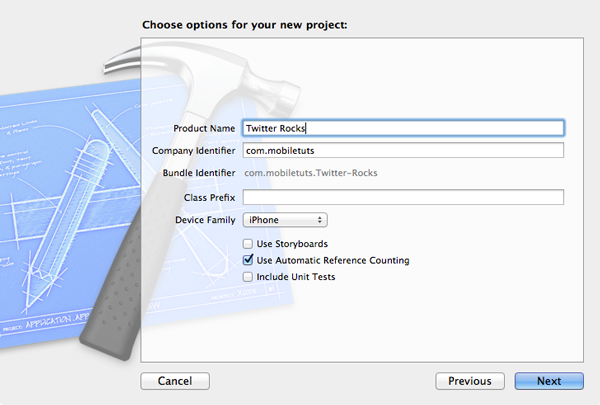
Create a new Xcode project by choosing the Single View Application template from the templates list. Name your application Twitter Rocks, enter a company identifier, set iPhone for the device family, and check Use Automatic Reference Counting. You can leave the remaining checkboxes unchecked for this project. Tell Xcode where you want to save your project and hit Create.
Step 2: Setting Up the User Interface
Before we start working with the TWRequest class, I want to take care of the user interface first. For this tutorial, we will use a table view to display the data we get back from Twitter, that is, tweets. Select your view controller's header file and create two outlets, one for the table view and another one for an instance of UIActivityIndicatorView. The activity indicator view will be visible while we wait for our request to return a response. We also declare an instance variable named dataSource that will hold the results (tweets) of our request. It will serve as the data source of our table view. An instance of NSArray is perfect for our needs. Make sure that your view controller conforms to the table view data source and delegate protocols.
Before creating our user interface, we also need to add two actions to our view controller's header file. The first action requestTimeline: initiates the request that fetches the public timeline of the Mobiletuts+ Twitter account. The second action, requestMentions:, initiates the request that fetches the mentions of the Twitter account that is installed on your device. Don't worry about these actions just yet. I will explain everything in more detail once we start implementing them.
Don't forget to synthesize accessors for our outlets in our view controller's implementation file and add an empty implementation for each action to prevent any compiler warnings.
#import <UIKit/UIKit.h>

@interface ViewController : UIViewController <UITableViewDataSource, UITableViewDelegate> {
    __weak UITableView *_tableView;
    __weak UIActivityIndicatorView *_activityIndicatorView;

    NSArray *_dataSource;
}

@property (nonatomic, weak) IBOutlet UITableView *tableView;
@property (nonatomic, weak) IBOutlet UIActivityIndicatorView *activityIndicatorView;

@property (nonatomic, strong) NSArray *dataSource;

- (IBAction)requestTimeline:(id)sender;
- (IBAction)requestMentions:(id)sender;

@end
@synthesize tableView = _tableView, activityIndicatorView = _activityIndicatorView;
@synthesize dataSource = _dataSource;
- (IBAction)requestTimeline:(id)sender {

}

- (IBAction)requestMentions:(id)sender {

}
Head over to our view controller's XIB file and start by dragging a tool bar to the bottom of the view controller's view. By default, the toolbar has one button, so let's drag one more instance of UIBarButtonItem to the toolbar. Keep it organized by dragging a flexible space instance between the two bar buttons to push the buttons to opposite sides. Select the left button and, in the Attributes Inspector (third tab from the right), enter Timeline in the Title field. Give the right button a title of Mentions. Control drag from the left bar button item to the File's Owner and select the requestTimeLine: action from the menu that pops up. Do the same for the right bar button item, but select the requestMentions: action from the same menu.
The user interface is almost finished. Drag a table view and activity indicator view to our view controller's view. Position the activity indicator view at the center of the view controller's view and check the checkbox next to Hides When Stopped in the Attributes Inspector. Connect both views with the outlets we declared a minute ago by control dragging from the File's Owner to the table view and activity indicator view. Finally, select the table view, open the Connections Inspector, and point the dataSource and delegate outlets of the table view to the File's Owner object.
User Interface? Done.
Step 3: Implementing the Table View
We have to do a little more work before we can start playing with the Twitter framework. Aside from implementing our actions, which we will do in a minute, we need to make sure that the required methods of the table view data source protocol are implemented. Even though we assigned our view controller as the table view's delegate, we won't be implementing any of the table view delegate methods in this tutorial. The first method we will implement is numberOfSectionsInTableView:. The implementation is simple. We make sure that our data source is set and return 1 if it is or 0 if it is not. Easy. Right?
- (NSInteger)numberOfSectionsInTableView:(UITableView *)tableView {
    if (self.dataSource) {
        return 1;
    } else {
        return 0;
    }
}
The second data source method is almost identical. In tableView:numberOfRowsInSection:, we verify that the data source is set and if it is we return the number of elements in the data source. If our data source is not set, we return 0.
- (NSInteger)tableView:(UITableView *)tableView numberOfRowsInSection:(NSInteger)section {
    if (self.dataSource) {
        return self.dataSource.count;
    } else {
        return 0;
    }
}
In tableView:cellForRowAtIndexPath:, we declare a static reuse identifier (for table view cell reuse) and ask the table view for a cell we can reuse. If the table view doesn't return a reusable cell, we initialize a new cell. We won't configure the cell just yet. We first need to know what the data we get back from Twitter looks like.
- (UITableViewCell *)tableView:(UITableView *)aTableView cellForRowAtIndexPath:(NSIndexPath *)indexPath {
    static NSString *CellIdentifier = @"Cell Identifier";

    UITableViewCell *cell = [aTableView dequeueReusableCellWithIdentifier:CellIdentifier];

    if (cell == nil) {
        cell = [[UITableViewCell alloc] initWithStyle:UITableViewCellStyleSubtitle reuseIdentifier:CellIdentifier];
    }

    // To Be Continued

    return cell;
}
Step 4: Adding the Twitter Framework
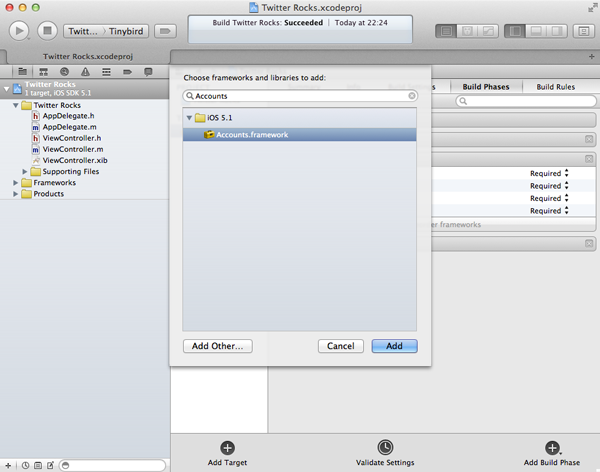
Before we can start using the Twitter framework, we need to link our project against it. If we want to make authenticated requests as well, we also need to link our project against the Accounts framework. Let's do that right now.
Select your project in the Project Navigator and select our target from the targets list. Choose Build Phases at the top, open the Link Binary With Libraries drawer, and add the Twitter and Accounts frameworks to the project.
If you have read the first part of this tutorial, you may remember that we also need to import the framework headers in our view controller's header file to be able to use these frameworks in our view controller. Insert them immediately after the UIKit import statement.
#import <UIKit/UIKit.h>
#import <Twitter/Twitter.h>
#import <Accounts/Accounts.h>
Step 5: Earth To Twitter
There are two things that I want to show you, (1) how to send tweets unauthenticated, and (2) how to send authenticated requests to the Twitter API. The difference is obvious, but there is an important difference in terms of user experience. If an iOS application wants to send an authenticated request to Twitter's API, the user has to explicitly give the application permission to access the Twitter accounts installed on the device. In other words, authentication is done for you when you use the Twitter framework, but the user stays in control in terms of granting or denying access to their Twitter account(s).
Step 6: Unauthenticated Twitter Requests
To illustrate how unauthenticated Twitter requests work, we will request the timeline of the Mobiletuts+ Twitter account. The magic will happen in our requestTimeline: method. As always, I will walk you through the implementation step-by-step. Before sending our request to Twitter, we hide our table view and show our activity indicator view by sending it a startAnimating message. Next, we then create the URL for our Twitter request. I will not talk about the specifics of the Twitter API in this tutorial as I want to focus on the iOS aspect of querying the API. For more information about Twitter's API, head over to the documentation.
Our TWRequest instance, which we will create shortly, accepts a dictionary of parameters. These parameters let you fine-tune your request. In our example, we specify whose timeline we want to see, how many tweets we want to fetch, and we also set the flag for include_entities to 1. Entities are incredibly useful. Instead of just receiving the text of a tweet, entities represent the interesting parts of a tweet, such as images, URLs, or mentions of other Twitter users in the tweet.
[self.tableView setHidden:YES];
[self.activityIndicatorView startAnimating];

NSURL *url = [NSURL URLWithString:@"http://api.twitter.com/1/statuses/user_timeline.json"];

NSMutableDictionary *parameters = [[NSMutableDictionary alloc] init];
[parameters setObject:@"envatomobile" forKey:@"screen_name"];
[parameters setObject:@"50" forKey:@"count"];
[parameters setObject:@"1" forKey:@"include_entities"];
It is time to create our TWRequest instance. We initialize it with (1) our URL, (2) our dictionary of parameters, and (3) a request method (TWRequestMethod). The latter is the HTTP verb. In our case, we use TWRequestMethodGET, which corresponds to a GET request. The other options are TWRequestMethodPOST and TWRequestMethodDELETE.
TWRequest *request = [[TWRequest alloc] initWithURL:url parameters:parameters requestMethod:TWRequestMethodGET];
We can now perform our request by calling performRequestWithHandler: on our request instance. I love blocks and this method, like many iOS 5 methods, takes a block (TWRequestHandler) as its only parameter. The block is executed as soon as we receive the response the Twitter API sends us. The block takes three parameters, (1) the raw response data, (2) the HTTP response of our request, and (3) an error in case something went wrong.
Before taking a look at the request handler itself, it is important to know that we expect a JSON response (take a look at the last component of our request URL). The request handler, however, gives us an instance of NSData. This means that we first have to serialize this data object using NSJSONSerialization, which will give us an array containing the tweets that we requested.
In the request handler, we first check whether the response data object is not nil. If this is the case, we serialize the response data object and assign the return value to our data source object. It is always important to check for errors when making requests to a web service as you never know what you are going to get back. In our example, we check whether our data source object is not nil. If this is the case, we reload and show the table view and hide the activity indicator view by sending it a stopAnimating message. If our request did not return what we expected, we log the appropriate error to the console.
[request performRequestWithHandler:^(NSData *responseData, NSHTTPURLResponse *urlResponse, NSError *error) {
    if (responseData != nil) {
        NSError *error = nil;
        self.dataSource = [NSJSONSerialization JSONObjectWithData:responseData options:NSJSONReadingMutableLeaves error:&error];

        if (self.dataSource != nil) {
            [self.tableView reloadData];
            [self.tableView setHidden:NO];
            [self.activityIndicatorView stopAnimating];

        } else {
            NSLog(@"Error serializing response data %@ with user info %@.", error, error.userInfo);
        }
    } else {
        NSLog(@"Error requesting timeline %@ with user info %@.", error, error.userInfo);
    }
}];
If you want to know how each tweet is structured, I encourage you to log the serialized response data object to the console. I won't go into much detail as I want to keep the focus of this tutorial on iOS development. Before we can display anything in our table view, we need to finalize our tableView:cellForRowAtIndexPath: method. Configuring the cell is both simple and not-so-simple. Take a look at the complete implementation below.
- (UITableViewCell *)tableView:(UITableView *)aTableView cellForRowAtIndexPath:(NSIndexPath *)indexPath {
    static NSString *CellIdentifier = @"Cell Identifier";

    UITableViewCell *cell = [aTableView dequeueReusableCellWithIdentifier:CellIdentifier];

    if (cell == nil) {
        cell = [[UITableViewCell alloc] initWithStyle:UITableViewCellStyleSubtitle reuseIdentifier:CellIdentifier];
    }

    NSDictionary *tweet = [self.dataSource objectAtIndex:indexPath.row];

    cell.textLabel.text = [tweet objectForKey:@"text"];
    cell.imageView.image = [UIImage imageNamed:@"placeholder"];

    dispatch_queue_t queue = dispatch_queue_create("com.mobiletuts.task", NULL);
    dispatch_queue_t main = dispatch_get_main_queue();

    dispatch_async(queue, ^{
        NSURL *imageURL = [NSURL URLWithString:[[tweet objectForKey:@"user"] objectForKey:@"profile_image_url"]];
        NSData *imageData = [NSData dataWithContentsOfURL:imageURL];

        dispatch_async(main, ^{
            cell.imageView.image = [UIImage imageWithData:imageData];
        });
    });

    dispatch_release(queue);

    return cell;
}
First, we fetch the correct tweet from our data source array. Each tweet is an instance of NSDictionary. In our cell's text label, we display the tweet itself by getting the value for the key text. Of course, a Twitter application wouldn't be complete without images. Each tweet gives us the URL of the profile image of the person that sent the tweeted. If you have read any of my previous tutorials, you might have an idea of what I am about to say next. If we were to request the profile image for each tweet on the main thread, the performance of our table view would be terrible. Our main thread would be blocked every time a request was made and scrolling would be anything but smooth. I like smooth, so we need to fix this.
A possible solution is to use Grand Central Dispatch or GCD. I won't go into the details of GCD in this tutorial, but the idea is simple. We make the request for each profile image on a separate thread. After having received the data, we create a UIImage from the data and set the cell's image view's image with that image. It is vital that the latter is done on the main thread for several reasons. Don't worry if you don't fully understand what is going on, because it isn't the focus of this tutorial.
Alternatively, you could use a library like AFNetworking to abstract away the nitty-gritty details. Have a look at one of my previous tutorials for more information about the AFNetworking library.
Note that, before requesting the profile image, I set the cell's image view's image with a placeholder image. This is necessary to prevent some visual quirks from showing up.
Build and run your application. Tap the timeline button in the lower left to fetch the tweets for the public timeline of the Mobile Tuts+ Twitter account. Didn't I tell you that I like smooth scrolling table views? As you can see, there is no form of caching in place at the moment. In other words, the profile image of the Mobiletuts+ Twitter account is fetched multiple times unnecessarily. Feel free to fix this with your own custom caching solution.
Step 7: Authenticated Twitter Requests
Authenticated Twitter requests are very similar to unauthenticated requests. We only need to do a little bit of extra work to perform an authenticated Twitter request. Let's take a look at the implementation of our requestMentions: method step-by-step.
[self.tableView setHidden:YES];
[self.activityIndicatorView startAnimating];

ACAccountStore *accountStore = [[ACAccountStore alloc] init];
ACAccountType *accountType = [accountStore accountTypeWithAccountTypeIdentifier:ACAccountTypeIdentifierTwitter];
First, we hide our table view and show our activity indicator view by sending it a message of startAnimating. We then initialize an account store (ACAccountStore). This object will allow us to get access to the Twitter accounts installed on the device. Next, we create an instance of ACAccountType by calling accountTypeWithAccountTypeIdentifier: on our account store instance. This method accepts one parameter, that is, the type of account we want to get access to. In our example, we want to access the Twitter account(s) on the device.
[accountStore requestAccessToAccountsWithType:accountType withCompletionHandler:^(BOOL granted, NSError *error) {
    if (granted) {

    } else {
        NSLog(@"The user does not grant us permission to access its Twitter account(s).");
    }
}];
With our account store and account type set, we ask the user to give us access to their Twitter account(s) by calling requestAccessToAccountsWithType:withCompletionHandler: on our account store instance. We pass two parameters, (1) the account type instance, and (2) another block. Why do we need to pass a block? When this method is called, the device presents the user with an alert view that informs the user that our application requests access to the device's Twitter account(s). The block or completion handler is executed when the user grants or denies the application access. The block accepts two parameters, (1) a boolean value indicating whether access has been granted and (2) an error object that tell us what went wrong if something did indeed go wrong.
Even though the completion handler looks simple and very similar to how we set up and handled the unauthenticated Twitter request earlier, there are a few important differences. If the user granted us permission to their Twitter account(s), we ask the account store for all the Twitter accounts installed on the device.
NSArray *accounts = [accountStore accountsWithAccountType:accountType];
If one or more accounts were returned, we grab a reference to the first account in the array. Of course, in a real application, this isn't the best approach as you would want to make sure that you get hold of a specific account. For our application, it doesn't matter. All that is left to do is create the Twitter request and send it to Twitter's API. The main difference with the unauthenticated request is that we set the account property of the Twitter request to the account we received from the account store. This tells the request (and Twitter for that matter) on whose behalf the request is being made, in other words, whose mentions we are requesting. Handling the response is identical to how we handled the response for the unauthenticated request.
if (accounts.count) {
    ACAccount *twitterAccount = [accounts objectAtIndex:0];

    [self.tableView setHidden:YES];
    [self.activityIndicatorView startAnimating];

    NSURL *url = [NSURL URLWithString:@"http://api.twitter.com/1/statuses/mentions.json"];

    NSMutableDictionary *parameters = [[NSMutableDictionary alloc] init];
    [parameters setObject:@"20" forKey:@"count"];
    [parameters setObject:@"1" forKey:@"include_entities"];

    TWRequest *request = [[TWRequest alloc] initWithURL:url parameters:parameters requestMethod:TWRequestMethodGET];
    [request setAccount:twitterAccount];

    [request performRequestWithHandler:^(NSData *responseData, NSHTTPURLResponse *urlResponse, NSError *error) {
        if (responseData) {
            NSError *error = nil;
            self.dataSource = [NSJSONSerialization JSONObjectWithData:responseData options:NSJSONReadingMutableLeaves error:&error];

            if (self.dataSource) {
                [self.tableView reloadData];
                [self.tableView setHidden:NO];
                [self.activityIndicatorView stopAnimating];

            } else {
                NSLog(@"Error %@ with user info %@.", error, error.userInfo);
            }
        }
    }];
}
Don't forget to take a look at the complete implementation of our requestMentions: method below. Build and run your application and tap the right bar button item to request the mentions of your Twitter account.
- (IBAction)requestMentions:(id)sender {
    [self.tableView setHidden:YES];
    [self.activityIndicatorView startAnimating];

    ACAccountStore *accountStore = [[ACAccountStore alloc] init];
    ACAccountType *accountType = [accountStore accountTypeWithAccountTypeIdentifier:ACAccountTypeIdentifierTwitter];

    [accountStore requestAccessToAccountsWithType:accountType withCompletionHandler:^(BOOL granted, NSError *error) {
        if (granted) {
            NSArray *accounts = [accountStore accountsWithAccountType:accountType];

            if (accounts.count) {
                ACAccount *twitterAccount = [accounts objectAtIndex:0];

                NSURL *url = [NSURL URLWithString:@"http://api.twitter.com/1/statuses/mentions.json"];

                NSMutableDictionary *parameters = [[NSMutableDictionary alloc] init];
                [parameters setObject:@"20" forKey:@"count"];
                [parameters setObject:@"1" forKey:@"include_entities"];

                TWRequest *request = [[TWRequest alloc] initWithURL:url parameters:parameters requestMethod:TWRequestMethodGET];
                [request setAccount:twitterAccount];

                [request performRequestWithHandler:^(NSData *responseData, NSHTTPURLResponse *urlResponse, NSError *error) {
                    if (responseData) {
                        NSError *error = nil;
                        self.dataSource = [NSJSONSerialization JSONObjectWithData:responseData options:NSJSONReadingMutableLeaves error:&error];

                        if (self.dataSource) {
                            [self.tableView reloadData];
                            [self.tableView setHidden:NO];
                            [self.activityIndicatorView stopAnimating];

                        } else {
                            NSLog(@"Error %@ with user info %@.", error, error.userInfo);
                        }
                    }
                }];
            }

        } else {
            NSLog(@"The user does not grant us permission to access its Twitter account(s).");
        }
    }];
}
Conclusion
This wasn't the shortest tutorial, but you should now have a good grasp of how you can leverage the Twitter framework in your own applications. Thanks to the integration of Twitter in the operating system since iOS 5, it is amazingly easy and straightforward to talk to Twitter's API.
If you only want to let the user send a tweet from time-to-time, things are even easier. TWTweetComposeViewController provides all the necessary infrastructure to handle that job elegantly.

Comments