In this article, we're going to take look at Ionic 2, the newest version of the Ionic cross-platform mobile app framework. For starters, we'll recap what Ionic is and what it's used for. Then we're going to dive into Ionic 2. I'll tell you what's new and how it differs from Ionic 1, and I'll help you decide whether you should use it on your next project or not.
What Is Ionic?
Ionic is a framework for building hybrid apps using HTML, CSS, and JavaScript. It comes with a set of UI components and functions that you can use to create fully functional and attractive mobile apps.
Ionic is built on the Cordova stack. You cannot create mobile apps with Ionic alone because it only handles the UI part. It needs to work with Angular, which handles the application logic, and Cordova, the cross-platform app framework which allows you to compile your app into an installable file and run it inside the web view of the mobile device.
Apps built with Cordova and Ionic can run on both Android and iOS devices. You can also install Cordova plugins to provide native functionality such as accessing the camera and working with Bluetooth Low Energy devices.
For more on Cordova, check out some of our courses and tutorials here on Envato Tuts+.


Ionic is more than just a UI framework, though. The Ionic company also offers services that support the Ionic UI Framework, including the Ionic Creator, Ionic View, and Ionic Cloud.
What's New in Ionic 2?
In this section, we'll be taking a look at some of the significant changes to Ionic in version 2, and also the new features and tools that were introduced in Ionic 2.
Browser Support
Ionic 1 was built with only hybrid mobile apps in mind. But Ionic 2 is built to support progressive web apps and Electron apps as well. This means that you can now build not only Ionic apps that run inside the Cordova environment but also progressive web apps, which use modern web features to deliver an app-like experience to users.
You can also target Electron, a platform for building cross-platform desktop apps using HTML, CSS, and JavaScript. Electron is pretty much like Cordova but for desktop operating systems like Windows, Ubuntu, or macOS.
Angular 2 and TypeScript
Ionic 2 now uses Angular 2 for templating and application logic. This means that developers will have to learn the new Angular 2 syntax before they can become productive at creating Ionic 2 apps. Don't worry, though, because the concepts are still the same as they were in Angular 1. There are also resources such as ngMigrate which will help you convert your Angular 1 skills to Angular 2.
Aside from Angular 2, Ionic 2 also uses TypeScript. For those unfamiliar with it, TypeScript is a superset of JavaScript. This means that you can still use vanilla JavaScript syntax to write your apps. If you want to use the features that come with TypeScript, such as ES6 and ES7 syntax, static-typing, and intelligent code completion, then you can use the TypeScript-specific syntax. There are plugins that you can install on your favorite text-editor or IDE to reap the benefits of TypeScript's advanced code-completion features.
Syntax
As I mentioned, the template syntax in Ionic 2 has significantly changed, largely because of its transition to using Angular 2. You may even come to find that the new syntax is more simple and concise. Here are a few examples of Ionic 1 and Ionic 2 syntax side by side:
Listening to events:
<!--ionic 1-->
<button on-tap="onTap()" class="button">Test</button>

<!--ionic 2-->
<button (tap)="onTap($event)">Test</button>
Using a model:
<!--ionic 1-->
<input ng-model="email" />

<!--ionic 2-->
<input [(ng-model)]="email" />
Looping through an array and displaying each item:
<!--ionic 1-->
<li ng-repeat="item in list">
    {{ item.name }}
</li>

<!--ionic 2-->
<li *ngFor="let item of list">
    {{ item.name }}
</li>
Folder Structure
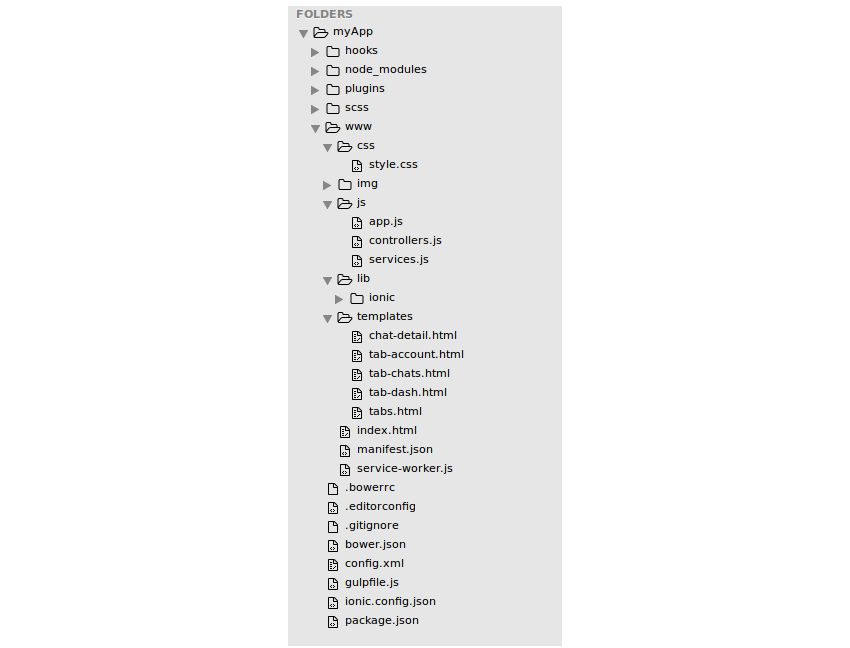
If you compare the folder structure of an Ionic 1 project and an Ionic 2 project, you'll notice that most of the folders that you're used to seeing in an Ionic 1 project are still there in Ionic 2. This is because the underlying platform hasn't really changed—Ionic 2 still uses Cordova. The only things that have changed are the parts that have to do with your source files. Here's a screenshot of the folder structure of an Ionic 1 app:
And here's an app built with Ionic 2:
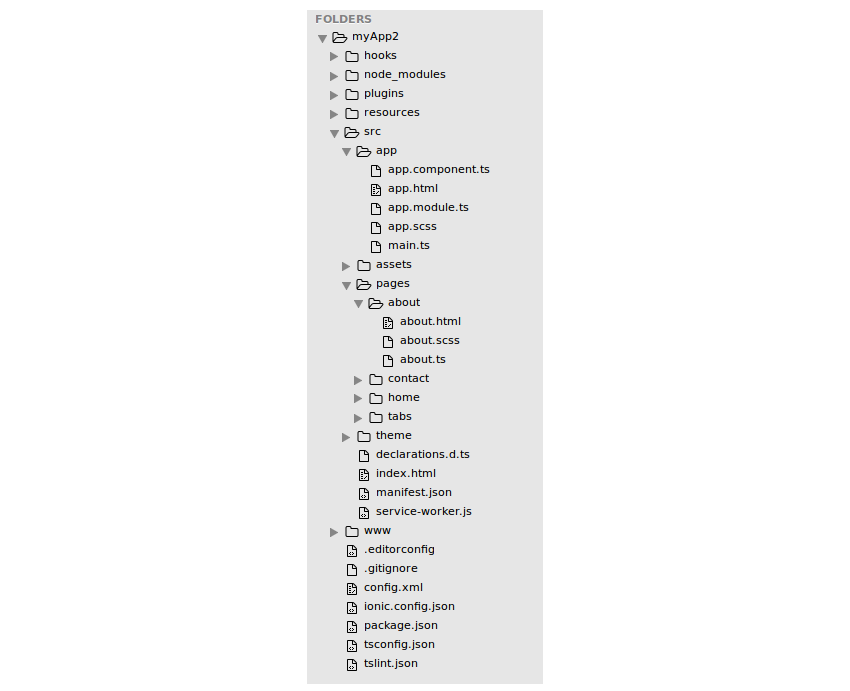
If you look closer, you'll notice that there is now a src folder. That's where all your project's source files are, and every time you make changes to a file in that directory, the changed file gets compiled and copied over to the www/build directory. Previously, the source files were all in the www directory, and you didn't require an extra compilation step.
The directory structure is also more organized. If you check the src/pages directory, you can see that every page has its own folder, and inside each one are the HTML, CSS and JavaScript files for that specific page.
Previously, in Ionic 1, you were just given an empty directory and had the freedom to structure your project however you wanted. But this came with the downside of not forcing you to do things the best way. You could get lazy and stick with a structure that lumped all the files together, which could make things difficult for larger teams working on complex apps.
Theming
Unlike the previous version of Ionic, which only had a single look and feel for all platforms, Ionic 2 now supports three modes: Material Design, iOS, and Windows. Now Ionic matches the look and feel of the platform it's deployed on. So if your app is installed on Android, for example, it will use a styling and behavior similar to that of native Android apps.
There is support for theming in Ionic, though at the time of writing of this article, it only ships with the default Light theme. If you want to tweak the theme, you can edit the src/theme/variables.scss file.
Tooling
Ionic 2 also comes with new tools that will make it a joy to create mobile apps. I'll show you a few in this section.
Generators
Ionic 2 now provides a generator that allows you to create pages and services for your app:
ionic g page contactPage
This will create the following files in your app/pages folder:
contact-page/contact-page.html
contact-page/contact-page.ts
contact-page/contact-page.scss
Each file also has some boilerplate code in it:
<!--contact-page.html-->
<ion-header>

  <ion-navbar>
    <ion-title>contactPage</ion-title>
  </ion-navbar>

</ion-header>


<ion-content padding>

</ion-content>
This also serves as a guide for new developers so that they know the best practice for structuring their code. Here's the generated TypeScript code which handles the logic for the page above:
//contact-page.js
import { Component } from '@angular/core';
import { NavController, NavParams } from 'ionic-angular';

/*
  Generated class for the ContactPage page.

  See http://ionicframework.com/docs/v2/components/#navigation for more info on
  Ionic pages and navigation.
*/
@Component({
  selector: 'page-contact-page',
  templateUrl: 'contact-page.html'
})
export class ContactPagePage {

  constructor(public navCtrl: NavController, public navParams: NavParams) {}

  ionViewDidLoad() {
    console.log('ionViewDidLoad ContactPagePage');
  }

}
Error Reporting
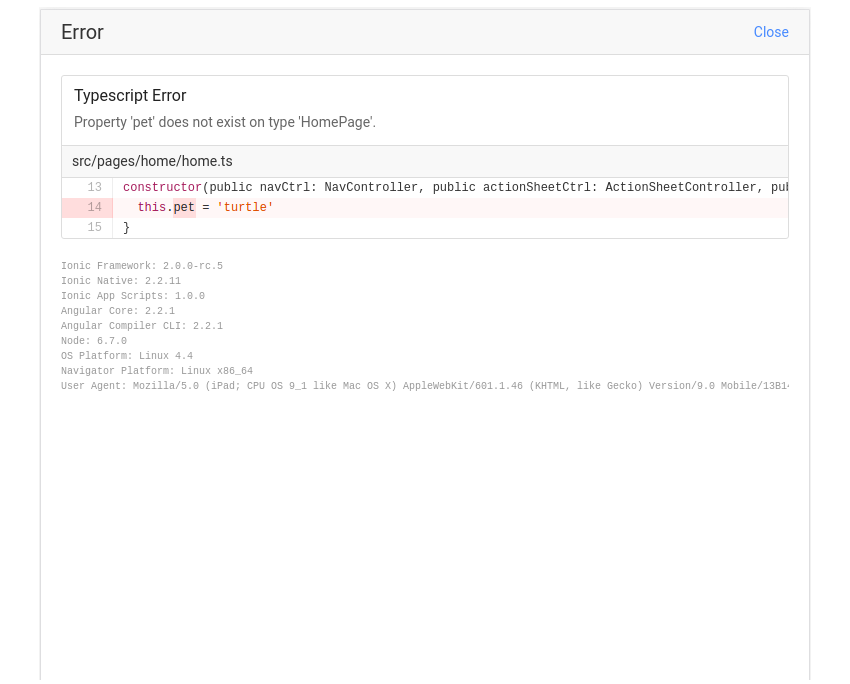
Ionic 2 now comes with an error reporting tool for the front-end. This means that any time there's an error with your code, Ionic will open a modal window right in the app preview itself. This makes it really easy for developers to find out about errors as they happen within the app.
Ionic App Scripts
Ionic App Scripts are a collection of build scripts for Ionic projects. Previously, Ionic used Gulp for handling its build process.
Ionic 2 comes with a few of these scripts to make it easier to complete common development tasks. This includes things like transpiling the TypeScript code to ES5, serving the app for testing in the browser, or running it on a specific device.
You can find the default scripts in the project's package.json file:
"scripts": {
    "clean": "ionic-app-scripts clean",
    "build": "ionic-app-scripts build",
    "ionic:build": "ionic-app-scripts build",
    "ionic:serve": "ionic-app-scripts serve"
},
New Components
Components are the UI building blocks in Ionic. Examples include buttons, cards, lists, and input fields. Lots of new components have been added to Ionic 2, and in this section we'll take a look at some of those.
Slides
If you want your app to have a walk-through for first-time users, the Slides component makes it easy to create one. This component allows you to create page-based layouts which the user can swipe through to read all about your app.
Action Sheet
Action sheets are menus that slide up from the bottom of the screen. An action sheet is shown on the top layer of the screen, so you either have to dismiss it by tapping on whitespace or to select an option from the menu. This is commonly used for confirmations such as when you delete a file on your iOS device.
Segments
Segments are like tabs. They're used for grouping related content together in such a way that the user can only see the contents of the currently selected segment. Segments are commonly used with lists to filter for related items.
Toast
Toasts are the subtle version of alerts. They're commonly used to inform the user that something has happened which doesn't require any user action. They're often shown at the top or bottom of the page so as not to interfere with the content currently being shown. They also disappear after a specified number of seconds.
Toolbar
A Toolbar is used as a container for information and actions that are located in the header or footer of the app. For example, the title of the current screen, buttons, search fields and segments are often contained in a toolbar.
DateTime
The DateTime component is used to display a UI for picking dates and times. The UI is similar to the one generated when using the datetime-local element, the only difference being that this component comes with an easy-to-use JavaScript API. Previously, Ionic didn't have a component for working with dates and times. You either had to use the browser's native date picker or to install a plugin.
Floating Action Buttons
Floating Action Buttons (FABs) are buttons that are fixed in a specific area of the screen. If you've ever used the Gmail app, the button for composing a new message is a floating action button. They're not limited to a single action because they can expand to show other floating buttons when tapped.
For more info regarding the new components, check out the documentation on components.
New Features and Improvements
Ionic 2 is also packed with new features and improvements. These are mostly due to its transition to Angular 2 and TypeScript.
Web Animations API
One benefit from switching to Angular 2 is Angular's new animation system, built on top of the Web Animations API. Note that the Web Animations API isn't supported in all browsers—that's why you need to use Crosswalk to install a supported browser along with your app. The only downside of this is that it will make the install size bigger. Another option is to use a polyfill.
Performance
Apps created with Ionic 2 are snappier than those created with Ionic 1. Here's why:
- Angular 2: DOM manipulation and JavaScript performance have improved a lot in Angular 2. You can check this table if you want to learn about the specifics. Another benefit that comes with Angular 2 is ahead-of-time compilation—templates are pre-compiled using a build tool instead of being compiled as the app runs in the browser. This makes the app initialize faster because there's no more need to compile the templates on the fly.
- Native Scrolling: Ionic no longer uses JavaScript scrolling. Instead, it now uses native scrolling for supported WebViews. It is also now enabled on all platforms (as opposed to it being only supported on Android in Ionic 1). Aside from native scrolling, there's also the Virtual Scroll, which allows scrolling on a very large list of items with very little performance hit. These two changes add up to smoother scrolling performance.
-
Web Workers: Web Workers allow you to run scripts in the background, isolated from the thread that runs the web page. Ionic 2 implements web workers through their
ion-imgcomponent. Using this component instead of the standardimgelement allows you to delegate the HTTP requests for fetching the images to a Web Worker. This makes the loading of images snappier, especially inside large lists. Theion-imgcomponent also handles lazy loading, which will only request and render the image as it becomes visible in the user's viewport.
Ionic Native
Ionic Native is the equivalent of ngCordova for Ionic 2. They both act as wrappers for the Cordova plugins to implement native functionality (e.g. Camera, GeoLocation). You can even use Ionic Native in your Ionic 1 app if you want. The main difference is that Ionic Native allows you to write your code using ES6 features and TypeScript syntax. This makes it easier to work with in Ionic 2 since it already uses TypeScript by default. Here's an example of how to implement the Cordova Camera plugin in ngCordova:
$cordovaCamera.getPicture({ quality: 50 }).then(function(imageData) {

  var image = "data:image/jpeg;base64," + imageData;
}, function(err) {

});
And here's how it's done using Ionic Native:
import { Camera } from 'ionic-native';

Camera.getPicture(options).then((imageData) => {

 let base64Image = 'data:image/jpeg;base64,' + imageData;
}, (err) => {

});
Documentation
The documentation has improved a lot. I especially like the fact that there are now different previews for each component on each platform. This gives developers a really good idea of how their app would look. All this without the developer writing a single line of code!
Should You Use Ionic 2?
As of the time of writing of this article, Ionic 2 has been released. This means that it's ready to be used for production apps. Considering all the new features, tools and benefits that come with Angular 2 and TypeScript, the only thing that will stop you from using Ionic 2 is the status of your project.
If you're only just starting a new project, you can still use Ionic 1 if you and your teammates are only familiar with Angular 1 and your project needs to be completed as soon as possible. But if you've been given ample time for the project, you should consider using Ionic 2. There will be a bit of a learning curve, and you will also encounter some issues because it's not as battle-tested as Ionic 1, but it's all worth the effort because of Ionic 2's cool new features and improvements.
If you've already started out your current project with Ionic 1, you'll probably want to stick with Ionic 1 and avoid a major rewrite. Don't worry too much about support, improvements, and bug fixes for Ionic 1—Ionic developers have committed to supporting Ionic 1 for a long time. How long exactly isn't clear. At the very least, it's going to be supported for a couple of years after Ionic 2 stable version is released. But we also need to keep in mind that Ionic is an open-source project with over 200 contributors. So as long as people continue using it, we can always expect some form of support from the community.
Conclusion
That's it! In this article you've learned all about Ionic 2. Specifically, you've learned about the significant differences between Ionic 2 and its predecessor. We've also taken a look at the new features added to Ionic 2, and whether you should use it for your future projects or not. In a future tutorial, we're going to put this knowledge into practice by creating an Ionic 2 app. Stay tuned!
If you want to learn more about Ionic 2, be sure to check out the following resources:
And of course, we've got an in-depth Ionic 2 course that you can follow, right here on Envato Tuts+!


Comments