In the red corner, weighing in at just 29Kb (uncompressed), is knockout.js; a pure JavaScript library that simplifies the creation of dynamic user interfaces. Knockout is library agnostic, so it can easily be used with any of the most popular JavaScript libraries already available, but it works particularly well with jQuery, and uses jQuery.tmpl as its default templating engine.
Knockout is not meant to be a replacement for jQuery.
Knockout is not meant to be a replacement for jQuery; jQuery is hugely popular, as you all know I'm a huge fan of it myself, and it's very good at what it does. But it's difficult to create complex user interfaces using jQuery alone; the bigger the application behind the interface, and the more the user can interact with it, the harder it gets to keep some semblance of order. Event handlers abound, and you quickly end up with literally hundreds of lines of code.
It's perfectly possible to build complex and highly dynamic UIs with jQuery alone, but does your project's budget have the time required to write and debug 800+ lines of code? What about in 6 months time when something needs to change, or be added? This is where knockout comes in.
Overview
In this tutorial we'll build a simple interface that displays a list of contacts and then allows the visitor to interact with the UI to change how the data is displayed, such as filtering the list, or sorting it. We'll use knockout as a layer between our data and the page to simplify the creation and management or our UI.
Round 1 - Getting Started
Knockout uses a View-model-view model architecture. The visible list of contacts we use in this example and the elements on the page that they consist of, can be thought of as a view. The data that is displayed on the page is the model. The view model is a representation of the current state of the UI, a combination of the data and the view which also contains the behavior used to interact with the model and update the view.
Let's get started by creating the folder structure we'll need and the basic page that we'll be working with. Create a new folder called knockout somewhere on your system, then within this folder create three new folders called css, img and js. The css folder will be used to hold the simple style sheet we'll use, and the img folder the single image. The js folder will contain the script file we create, as well as the libraries we're dependent on. Initially this folder will need to contain the following files:
- jquery.tmpl.js
- jquery-1.6.2.js
- knockout-1.2.1.js
Now, in your text editor, create the following basic page:
<!DOCTYPE html>
<html>
    <head>
        <title>Knockout</title>
        <link rel="stylesheet" href="css/styles.css" />
    </head>
    <body>
        <script src="js/jquery-1.6.2.min.js"></script>
        <script src="js/jquery.tmpl.js"></script>
        <script src="js/knockout-1.2.1.js"></script>
        <script src="js/behavior.js"></script>
    </body>
</html>
Save this page as index.html in the root knockout folder. So far, there's nothing note-worthy here other than the use of HTML5. Although knockout.js is compatible with earlier versions of HTML, the attributes we'll be adding to our elements are not part of the standard HTML 4.01 standard and the page will therefore be invalid. This is not the case with HTML5, which defines data-* attributes for embedding custom data.
We also use a basic style sheet for this example, but it's only used for this particular example and is completely arbitrary. As this isn't a CSS tutorial, I'll avoid showing it here, but if you're curious, take a look at the file in the demo.
The Behavior File
Next, we can create our behavior file; in a new page in your text editor add the following code:
(function ($) { var model = [{  name: "John",  address: "1, a road, a town, a county, a postcode",  tel: "1234567890",  site: "www.aurl.com", pic: "/img/john.jpg",  deleteMe: function () { viewModel.people.remove(this); }
    }, {  name: "Jane",  address: "2, a street, a city, a county, a postcode",  tel: "1234567890",  site: "www.aurl.com",  pic: "/img/jane.jpg",  deleteMe: function () { viewModel.people.remove(this); }
    }, {  name: "Fred",  address: "3, an avenue, a village, a county, a postcode",  tel: "1234567890",  site: "www.aurl.com",  pic: "/img/fred.jpg",  deleteMe: function () { viewModel.people.remove(this); }
    }, {  name: "Freda",  address: "4, a street, a suburb, a county, a postcode",  tel: "1234567890",  site: "www.aurl.com",  pic: "/img/jane.jpg",  deleteMe: function () { viewModel.people.remove(this); }
    }], viewModel = { people: ko.observableArray(model),
    }
  }; ko.applyBindings(viewModel);

})(jQuery);
Save this file as behavior.js in the js folder. We start out by defining a self-invoking function, which we pass jQuery into in order to alias the $ character.
We then define the model that we'll use. In this example it's a local array, but we could get exactly the same format of data from a web service easily enough. Our array contains a series of people objects, which correspond to individual entries in a contacts database. Mostly, our data consists of simple strings, but each object also contains a deleteMe method, which is used to remove the object from the viewModel.
Remember, the viewModel refers to the current state of the UI. It's an object, and the first item we add to it is our array containing the people objects. We use the knockout ko.observableArray() method to add our array to the viewModel object. Observables are a fundamental aspect of knockout.js; we are instructing knockout to allow other entities to observe these items and react when they change.
This is all our view Model contains at the moment, although we've left a hanging comma after the people property's value for when we add more properties.
After the object object, we use the ko.applyBindings() method to apply any bindings we've created and begin managing the viewModel. At this point in the example, we haven't yet added any bindings. To create bindings between our view and viewModel, we need to add some more HTML.
Round 2 - Creating a View
Knockout works brilliantly with jQuery templating.
We now have our model and a simple viewModel in place. The next thing we should do is display the data from the viewModel on the page. Knockout works brilliantly with jQuery templating. This allows us to use the tmpl plugin to build the required HTML. Add the following code to the <body> element of the page, directly before the <script> elements:
<div id="people" data-bind="template: { name: 'personTemplate', foreach: people }">
</div>
<script id="personTemplate" type="text/x-jquery-tmpl">
    <section class="person">
        <img src="../img/person.png" alt="${ name }" />
        <h1>${ name }</h1>
        <address>${ address }</address>
        <span class="tel">${ tel }</span>
        <a href="http://${ site }" title="Visit site">${ site }</a>
        <div class="tools">
            <button data-bind="click: deleteMe">Delete</button>
        </div>
    </section>
</script>
We first add an empty <div> element with an id - mostly for styling purposes. This element also has a special attribute - data-bind. This attribute tells knockout that the element stores its data in the viewModel. When we called ko.applyBindings() in our JS, this is a binding that is applied. In this case, we use the template binding which allows us to specify the name of a template that we'd like to use in a configuration object passed to the binding.
We also use the foreach property in this configuration object and specify the name of our people observableArray as the source of our data. We could use the standard tmpl syntax, {{each}}, to iterate over our people data, but it is more efficient to use knockout's syntax instead. Because our people data is contained within an observable array, knockout will monitor the array for changes, and, when any occur, it will automatically update any templates that are displaying the data. If we use tmpl syntax, our entire template will be re-rendered each time the data changes, but when we use knockout's foreach property, only the single instance corresponding to the item that has changed is re-rendered.
Following the container <div> we then define our template. This is done in the same way as a normal tmpl template. Within the template, we specify the elements that we would like repeated for each object in our data source. We have a <section> element as a container, followed by an appropriate element for each item within person object. One thing to note is that we can supply bindings in our template code. We add a data-bind attribute to a delete button; this time we use the click binding and specify the name of the person found within each person object.
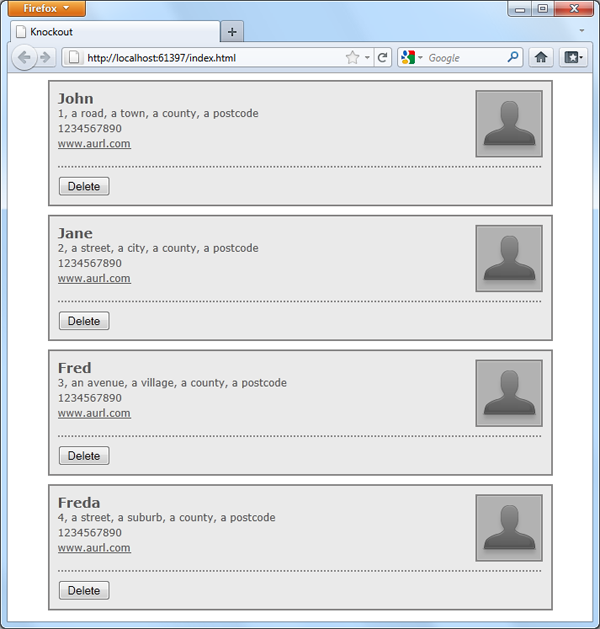
When we run the page in a browser, we should find that our page contains the data from our viewModel, nicely rendered using our template:
So that's pretty cool right? But it's not that dissimilar to using the tmpl plugin.
The really cool thing is that not only is the
viewupdated accordingly when theviewModelchanges, theviewModelis also updated when the view changes. So if we click one of the delete buttons on our page, thepeoplearraywill also have the correspondingpersonobjectremoved from it!
The original array which we passed into the ko.observable() method isn't actually updated, but normally, we'd probably get our data from an AJAX request instead of hard-coding it into the page, so all we'd need to do is resubmit the data, with the person removed.
Round 3 - Adding new Data
We've got the ability to remove a person object; next, we can add the ability to add a new person into our dataModel; Update the container <div> we added to the page earlier so that it contains the following new elements:
<a href="#" title="Add new person" data-bind="click: showForm, visible: displayButton">Add person</a>
<fieldset data-bind="visible: displayForm">
    <div class="details">
        <label>Name: <input id="name" /></label>
        <label>Address: <input id="address" /></label>
        <label>Tel: <input id="tel" /></label>
        <label>Site: <input id="site" /></label>
    <div>
    <div class="img">
        <label>Picture: <input id="pic" type="file" /></label>
    </div>
    <div class="tools">
        <button data-bind="click: addPerson">Add</button>
        <button data-bind="click: hideForm">Cancel</button>
    </div>
</fieldset>
The first new element we add is an <a> tag, which is used to open up the form that will accept the new data. This is similar to how we'd do it in a regular jQuery implementation, except that we'd also have to add an event handler to listen for clicks on the element, and do things such as stopping the event. With knockout, we don't have to worry about any of that. All we need to do is specify the name of a method within our viewModel, which we'd like to execute whenever the element is clicked. Knockout will attach the handler and stop the link being followed for us.
As you can see, we can specify multiple bindings on an element. Our <a> element also uses the visible binding. Again, we specify a property of our viewModel, except that this time, it isn't a function but a simple variable containing a boolean; you'll see how this works when we come to add the JS for our new functionality in a moment.
After the link, we also add a <fieldset> containing labels and inputs that we can use to add the relevant data to make a new object in our people array. At the end of our new HTML, we add two new <button> elements; both of these have click bindings added to them. The first links to the addPerson method, the second to the hideForm method. The image uploading doesn't actually work in this example, it's only there for show.
Now let's take a look at the new JavaScript we need; add the following code directly after the people property of our viewModel (we left a hanging comma ready to add these new properties and methods):
displayButton: ko.observable(true), displayForm: ko.observable(false), showForm: function () { viewModel.displayForm(true).displayButton(false);
}, hideForm: function () { viewModel.displayForm(false).displayButton(true);
}, addPerson: function () { viewModel.displayForm(false).displayButton(true).people.push({ name: $("#name").val(), address: $("#address").val(), tel: $("#tel").val(), site: $("#site").val(), pic: "", deleteMe: function () { viewModel.people.remove(this); }
    });
}
The first property is displayButton, which is an observable property (its value may be observed) by other entities. The entity that observes its value is our <a> element in the view. We initially set it to true, so when the page loads (or rather when the applyBindings() method is called), the link will be visible.
The next property is called displayForm, which is also an observable, except, this time, we set it to false, so the element in our view which is observing it (the fieldset) will initially be hidden.
We then add two methods: showForm() and hideForm(). These two simple methods are used to, obviously, show or hide the form respectively, and to do that, all they need to do is set the displayForm observable property to true or false. Because the value is being observed, any time their value changes, our view will be updated automatically.
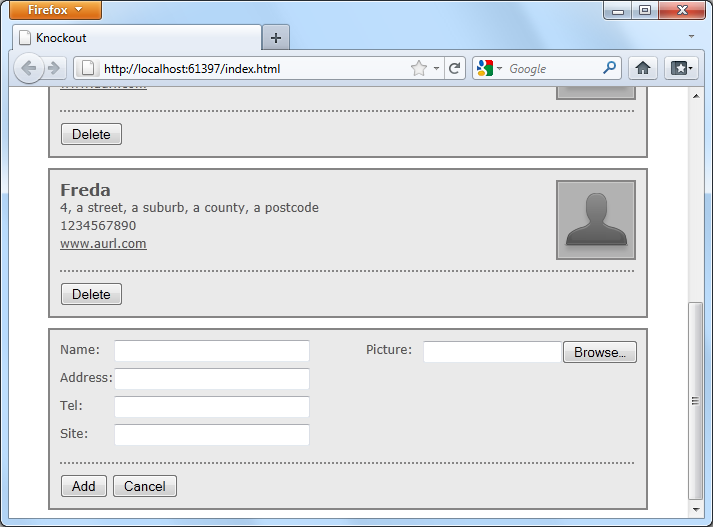
We also adjust the showButton property whenever the state of the form changes. If the fieldset is visible, we hide the link, and if we hide the fieldset, the button is made visible again. As you can see, knockout supports chaining, which makes updating multiple properties in our viewModel extremely easy. The view should appear like this when the form is visible:
The last method we add is the addPerson() method, which is used to update our viewModel with the details of the new person. All we do in this method is hide the form and show the button, and create an object literal containing the values entered into the text fields and then push this object into our people array.
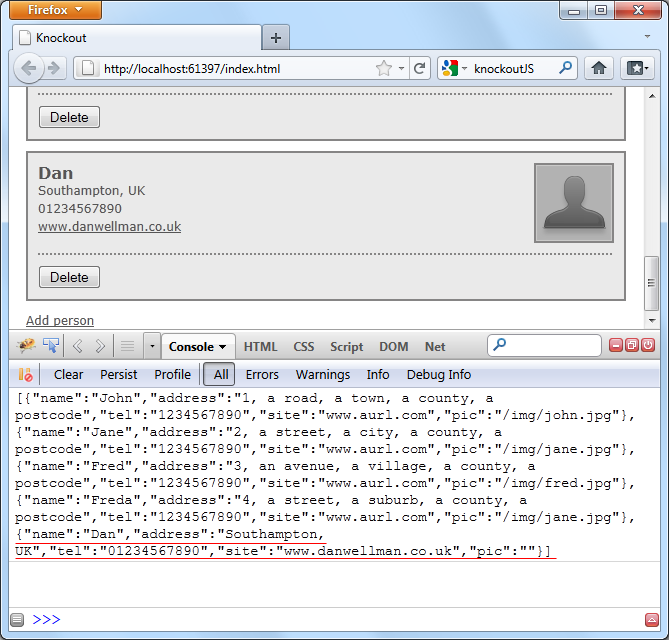
To retrieve the updated people array from our viewModel, we can use knockout's built in JSON serialiser to write the observable array to a JSON object. We would normally do this in order to pass the data back to the server, but, to test it out, we could add this line of code to the end of the addPerson() method:
console.log(ko.toJSON(viewModel.people));
The ko.toJSON() method helpfully generates a JSON object containing the current contents of the people array, which we can see in Firebug (other DOM explorers are available):
Post Fight Review
In this tutorial, we covered two major aspects of knockout.js - declarative bindings and observables.
The bindings are applied in our HTML and specify properties and arrays of data whose values should be observed for changes. When these values do change, the elements in the view that are observing them will be updated automatically, either by applying a new iteration of a template, or by showing or hiding an element, as in this example.
There are other bindings we can use as well to perform different actions when the view is interacted with, or the data in the viewModel is updated.
Knockout.js is an extremely helpful layer that sits between our UI's interface and its underlying data, and manages interactions and state changes for us. It does so much work for us, although we've really only scratched the surface of what it is capable of in this basic example. What are your thoughts on knockout.js?

Comments