I've been working with ASP and ASP.NET for about ten years now, starting with ASP classic and settling on .NET 2.0 as my favorite. My new year resolution this year (2013) was to upgrade my .NET work to .NET 4.0 using Visual Studio 2012 Express and really get to grips with MSBuild, so that I can concatenate and minify my JavaScript files as part of the normal build process of a .NET project, in Visual Studio.
My first love is to use Ant in NetBeans with a PHP or JSP platform for this kind of work, but my company's main website runs on a .NET platform and it's time to update it, so I decided to bite the bullet and dive back in to some serious study of creating a fully integrated build process using MSBuild.
This tutorial will show you how to edit your Visual Studio 2012 Express project file to include your own separate build file which will perform the now widely familiar process of concatenating and minifying a set of JavaScript modules into one file ready for deployment.
Software Requirements
I wanted a non-trivial project to demonstrate this process, because I find the devil is in the details. I have often faithfully followed an overly-simple tutorial or introduction to an unfamiliar subject, then discovered that the tutorial did not prepare me for when you want to do something even slightly difficult. So, in this tutorial we'll be attempting to marry Knockout.js and jQuery UI. We will also be using a JSON file with a hierarchy of data to define a menu. We will use a Knockout.js template with a foreach binding which loops through the JSON data to emit a hierarchy of ul elements to act as the HTML markup for a menubar compatible with jQuery UI.
Sadly, the menubar is not yet available (versions 1.9 or 1.10) bundled with jQuery UI, so you need to download the menubar files from the Menubar branch of jQuery UI. You also need the YUI Compressor for minifying your JavaScript source files. For this tutorial, you will need Visual Studio 2012 Express for Web installed. You will also need to download:
- Knockout.js.
- jQuery.
- jQuery UI.
- The Menubar branch of the jQuery UI project.
- The YUI Compressor. I'm using version 2.4.7.
If you're not used to JSON, it's a good idea to visit the JSON website.
Why MSBuild and Not NAnt?
If you read my last tutorial Using Ant to Build a JavaScript Library, you might be wondering why this tutorial is not about NAnt. Well, with my shiny new installation of Visual Studio 2012 Express, I would like to try to bring my development under one roof. My absolute favorite IDE for C# Assembly development, for many years, was SharpDevelop. They moved some years ago from NAnt to MSBuild for SharpDevelop version three. It's finally time for me to follow suit.
We are no longer using NAnt in our build process, we switched entirely to MSBuild / CruiseControl.NET. And we don't view the ability to depend on the dominant operating system as a step back: it helps reduce the number of moving parts, the different configurations, different user setups.
#D 3.0 - Dropping NAnt Support: Why?
Rationale: Why Integrate the JavaScript Build Into the .NET Build?
For years, for my .NET development, I've worked with three different IDEs simultaneously:
- Sharp Develop for my C# assembly development, but I also shoe-horned the JavaScript and CSS concatenate and minify build process into that environment with a specially installed copy of NAnt.
- Visual Studio (2005 etc) for the master pages, content pages.
- An external editor like Aptana to handle JavaScript development.
Using three IDEs like this was exhausting (and surprisingly taxing for my CPU and RAM), so another new year's resolution is to bring everything together into Visual Studio. Hence the need to understand how to integrate my JavaScript build process into the overall project build.
One of the major draws of MSBuild for me (on Windows platforms) is that it comes as part of .NET itself. That means that any Windows machine that is up-to-date with Windows Update will have MSBuild available.
Comparison of NAnt and MSBuild on StackOverflow.
Setting Up Your Environment
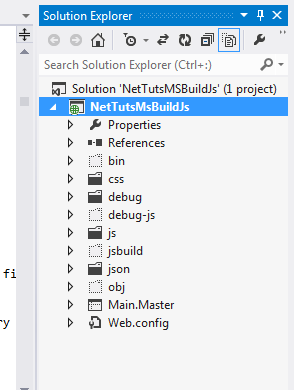
Open a new project in Visual Studio 2012 Express. I've called it NetTutsMSBuildJs and I've created it inside my NetTuts folder here: C:\NetTuts\MSBuildJs.
As you can see in the screenshot, I have created a number of folders as follows:
| Folder | Contents |
| css | Production release versions of jQuery UI CSS files. For this tutorial, we're using the smoothness theme. |
| debug |
Various versions of the Default.aspx web form page for debugging purposes.
|
| debug-js |
Three folders: concat, min and src.
|
| js | Production release versions of jQuery, jQuery UI and Knockout. |
| jsbuild | An XML build file with all the tasks needed for the JavaScript build and a copy of the YUI compressor. |
| json |
The key JSON file menubar-data.json which has the data needed to build the menubar. Also the JSON files used to populate the page according to the user's menu choices.
|
Notice some of the folders are greyed out. This is because I've excluded them from the project. You can toggle this setting from the context menu:
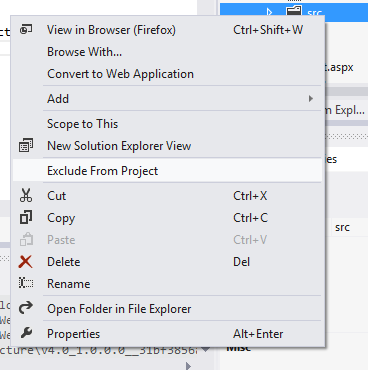
It's easy to delete and create directories during the build process, but there's no way to include or exclude items programmatically from the project. The concat and min folders in debug-js are disposable, generated automatically by the build process from whatever you've created in the src folder, so it's appropriate to exclude them from the project. Note, you can't exclude the debug folder from the project because it contains .NET web form pages that have code-behind files. If you exclude the folder, the web form pages throw errors saying that the classes defined in the code-behind files can't be found.
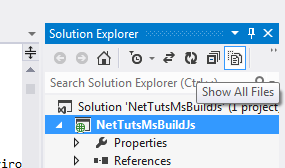
You can toggle whether these excluded objects should be shown by going to the Show All Files icon at the top of the Solution Explorer and clicking. I always want to be able to see them.
There's one more key piece of configuration we need for this project. IIS and the built-in IIS Express don't include a JSON mime type by default, and we will be using JSON files extensively to deliver content, so we have to add that to the Web.config file. Within the configuration element add a system.webServer element like this:
    <system.webServer>
        <staticContent>
            <mimeMap fileExtension=".json" mimeType="application/json" />
        </staticContent>
    </system.webServer>
The JavaScript Project: Building a Menubar Using JSON, Knockout and jQuery UI
The focus of this tutorial is on how to build a JavaScript project within a .NET project, but we can't go any further until we have something to build, so now let me explain the slightly ambitious project I have in mind.
Here's a UML component diagram showing all the pieces that the project will need. Please note this is a comprehensive component diagram from a developer's point of view showing all sorts of disposable artifacts that are only important, for instance, for debugging. It's not a component diagram of only the key artifacts needed for the target system.
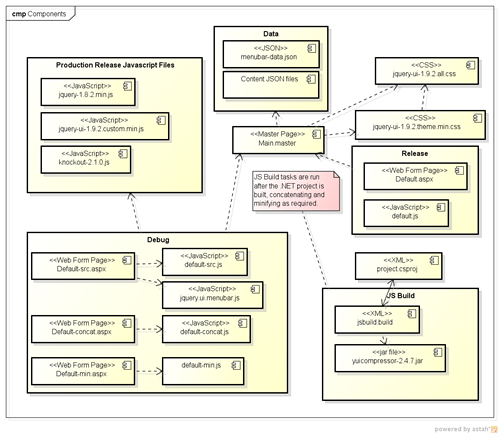
A component diagram defines the composition of components and artifacts in the system.
IBM: Component Diagrams
In UML 2.0, "component" is used to describe a more abstract idea: autonomous, encapsulated units; "artifact" is used to describe what I'm showing in this diagram: files and libraries. It's an ideal diagram to show how the various files depend on each other. For instance, all the web form pages depend on the Main master page. The js.build file won't work if the compressor jar file is not present. The project file and the js.build file are, annoyingly, mutually dependent. If the js.build file is not present, the project will not load; js.build can't run alone, the tasks defined there are triggered by the AfterBuild event in the overall project build.
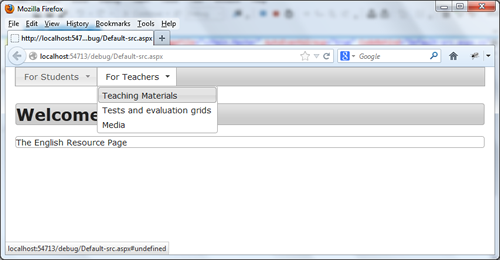
For this tutorial, I want to display a horizontal menubar using the menubar branch of jQuery UI. To do that, I have a JSON file with the hierarchical data for the menu and a Knockout.js template looping through this data to render the
HTML markup needed by jQuery menubar. I've added a callback function renderMenu which is fired by the afterRender event in the Knockout template. renderMenu then simply makes a call to menubar to finally render the menubar with all the lovely jQuery UI shiny features.
Step 1: The Production Release Files
CSS
Download the full bundle from jQuery UI including a theme of your choice. After unzipping your download, drill down to the folder called css where you'll find a folder with the name of your chosen theme. In my case, I've chosen smoothness. Open that folder and you should see the files you need:
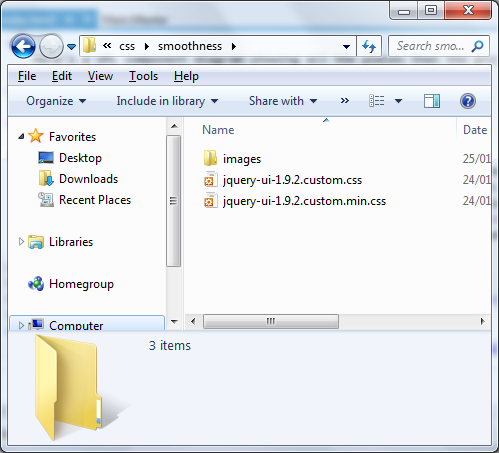
Copy the whole theme folder (smoothness) and paste it into your css folder in the project. Come back to Visual Studio, click the refresh icon at the top of the Solution Explorer and the smoothness folder should appear in the css folder. You should include the folder in the project as well.
In addition to jQuery UI and a specific theme, you also need the small CSS file specifically for the menubar. After downloading the menubar project from github, drill down to the jquery.ui.menubar.css file following this path: \jquery-ui-menubar\themes\base\jquery.ui.menubar.css. Copy that to the css folder of your project.
JavaScript
Download up-to-date versions of production releases of jQuery, jQuery UI and Knockout. I'm using 1.8.2 for jQuery, 1.9.2 for jQuery UI and 2.1.0 for Knockout. Copy them to the js folder in your project.
You'll also need the latest, uncompressed release of jquery.ui.menubar.js, downloaded from the Menubar branch of the jQuery UI project. Copy that to the debug-js\src folder in your project.
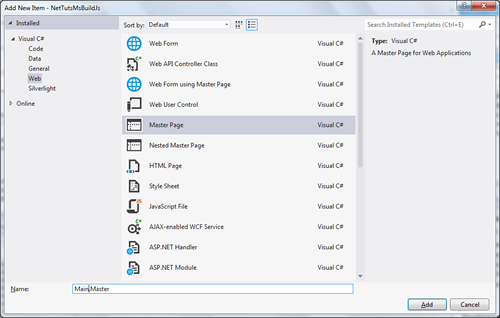
The Main Master Page
We're creating several versions of the same page to help debug and test our JavaScript. The master page can of course help to prevent duplication of code. Call this master page Main.Master.
Leave the title element blank (we'll define the title for each page that uses this master) and link to all the stylesheets we need for jQuery UI and the menubar:
<title></title>
<link rel="stylesheet" type="text/css" href="/css/smoothness/jquery-ui-1.9.2.custom.css">
<link rel="stylesheet" type="text/css" href="/css/smoothness/jquery-ui-1.9.2.custom.min.css">
<link rel="stylesheet" type="text/css" href="/css/jquery.ui.menubar.css">
Add a ContentPlaceHolder just before the end of the body where each page will link to the relevant JavaScript files
<asp:ContentPlaceHolder ID="JsScripts" runat="server"/>
Step 2: The JSON Definition of the Data Needed for the Menubar
Here is the JSON object defining a menubar that we might use for an English Instructors' website. Create a JSON file called menubar-data.json in the json folder and populate it with the following JSON.
{
    "nodes":[{
        "text": "For Students",
        "nodes": [

        {
            "text": "Listening Practice",
            "url":"listening-practice.json"
        },
        {
            "text": "Grammar",
            "url":"grammar.json",
            "nodes": [

            {
                "text": "Verb Forms",
                "url":"verb-forms.json",
                "nodes": [

                {
                    "text": "Verb Tense and Aspect",
                    "url":"verb-tense-and-aspect.json"
                },
                {
                    "text": "Modal Auxiliary Verbs",
                    "url":"modal-auxiliary-verbs.json"
                }
                ]
            },
            {
                "text": "Verb Patterns",
                "url":"verb-patterns.json"
            },
            {
                "text": "Noun phrases",
                "url":"noun-phrases.json"
            },
            {
                "text": "Complex sentences",
                "url":"complex-sentences.json"
            }
            ]
        }
        ]
    },
    {
        "text": "For Teachers",
        "nodes": [
        {
            "text": "Teaching Materials",
            "url":"teaching-materials.json"
        },
        {
            "text": "Tests and evaluation grids",
            "url":"tests-and-evaluation.json"
        },
        {
            "text": "Media",
            "url":"media.json"
        }
        ]
    }
    ]
}
Top-level nodes have no URL property defined, so when clicked, they will just display sub-menu items. The sub-menus contain nodes with the URL property defined. When you click one of these nodes, the system will retrieve the JSON data from the file at that URL.
Each JSON file linked to, in the menubar, contains some content in a simple structure defining a header and some text:
{
    "header": "Grammar",
    "text": "A series of exercises helping you to improve your grammar."
}
Step 3: The Knockout Template for the Menubar
We define this in Main.Master. There is no obvious way of minifying or improving on it for deployment so I want to re-use it with every version of the pages that link to the master page.
I wanted to have just one Knockout template to render the HTML markup (a set of nested ul elements) for the menubar, but not surprisingly the afterRender event associated with the foreach binding fires with every loop, not at the end of the whole rendering process. So, I needed to create an observableArray with only one ul element, bind that to a Menu template which renders the outermost ul element, and nest the menubar template inside it. I can then handle that single foreach event with my function renderMenu, which calls the jQuery menubar constructor and renders the menubar in all its glory. I got a lot of help on this from this thread: nested-templates-with-knockoutjs-and-mvc-3-0.
Here is the menu template:
        <script type="text/html" id="MenuTemplate">
            <ul class="ui-widget-header" id="menu" data-bind="template: { name: 'MenuNodeTemplate', foreach: $data.root.nodes}"></ul>
        </script>
And here's the node template for each node of the menubar:
        <script id="MenuNodeTemplate" type="text/html">
            <li data-bind="addData: $data.url">
                <a data-bind="attr: {href: ('#' + $data.url)}"><span data-bind="text: $data.text"></span></a>
                <!-- ko if: $data.nodes -->
                <ul data-bind="template: { name: 'MenuNodeTemplate', foreach: $data.nodes}"></ul>
                <!-- /ko -->
            </li>
        </script>
You then need a div element which you bind to MenuTemplate:
<div data-bind="template: {name: 'MenuTemplate' , foreach: masters, afterRender: renderMenu}"></div>
Notice that the node template uses containerless control flow syntax, which is based on comment tags. There are a few things going on here, so let me explain
In the fully rendered jQuery menubar, I want to attach a handler to the select event. The handler has the signature event, ui. When you click a menubar item, the handler is passed the event object and a jQuery object representing the item. To get the text from the ui object, we can call the text method ( ui.item.text() ). But how do we get the url property from the underlying JSON? That is a little bit trickier and I explain it later when we look at the select function triggered by the click event on each sub-menu item and the custom binding addData attached to the li element in the Knockout template.
Finally you just need a div element where we can display the content retrieved from the JSON data files:
        <div id="show-result" class="ui-widget">
            <h1 data-bind="text: header" class="ui-widget-header ui-corner-all"></h1>
            <div data-bind="html: text" class="ui-widget-content ui-corner-all"></div>
        </div>
Step 4: Creating the Web Form Pages That Depend on the Main.Master File
Default-src.aspx
Create a Web Form using Master Page in the debug folder called Default-src.aspx.
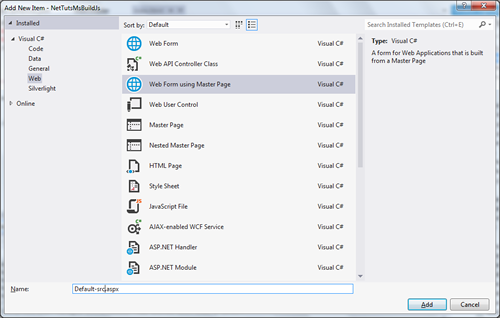
This turns out to be a mercifully short file. This is one of the great advantages of the .NET approach to Master pages. There are only two ContentPlaceHolders in the master page. Add the links to your JavaScript files as follows to the Content element linked to the JsScripts ContentPlaceHolder:
<%@ Page Title="Default src" Language="C#" MasterPageFile="~/Main.Master" AutoEventWireup="true" CodeBehind="Default-src.aspx.cs" Inherits="NetTutsMsBuildJs.debug.Default_src" %>
<asp:Content ID="Content1" ContentPlaceHolderID="head" runat="server">
</asp:Content>
<asp:Content ID="Content2" ContentPlaceHolderID="JsScripts" runat="server">
    <script src="/js/jquery-1.8.2.min.js"></script>
    <script src="/js/jquery-ui-1.9.2.custom.min.js"></script>
    <script src="/debug-js/src/jquery.ui.menubar.js"></script>
    <script src="/js/knockout-2.1.0.js"></script>
    <script src="/debug-js/src/default-src.js"></script>
</asp:Content>
Create a new JavaScript file called default-src.js in the debug-js\src folder.
We enclose everything in a call to the usual jQuery $ function that makes sure the page is fully loaded, before running anything.
        $(function () {

        });
As of jQuery 1.4, if the JSON file contains a syntax error, the request will usually fail silently. See: jQuery.getJSON().
We need three main pieces of functionality here:
-
A call to the jQuery
getJSONmethod to retrieve the JSON data for the menubar. If that succeeds, we create a Knockout view model and callko.applyBindings(viewModel)to activate it. -
A
renderMenufunction which will be called by the afterRender event of the MenuTemplate. This function calls themenubarconstructor to render the menubar. -
A
selectfunction which is called when the user clicks a menubar item. This function retrieves the JSON data from the relevant content file and displays it on the page.
Notice that the select function needs to be able to retrieve the URL from the underlying JSON data. This is the trickiest part of marrying the jQuery menubar functionality with the Knockout template. jQuery allows you to add data to and retrieve data from an HTML element. To add data from within our Knockout template, we need to use a custom binding, which has access to the HTML element it is bound to. The binding I have created is called addData and is simply attached to ko.bindingHandlers in the usual Knockout way with an init method and an update method.
    ko.bindingHandlers.addData = {
        init: function (element, valueAccessor) {
            var value = ko.utils.unwrapObservable(valueAccessor());
            if (value) {
                $.data(element, "url", value);
            }
        },
        update: function (element, valueAccessor) {
            var value = ko.utils.unwrapObservable(valueAccessor());
            if (value) {
                $.data(element, "url", value);
            }
        }
    };
Perhaps the node template makes more sense now. The jQuery object passed as ui in the select handler represents the topmost li element of each menubar item, so we add the custom binding to that list item element: data-bind="addData: $data.url". Now that each element has some data attached to it, we can retrieve it from the select handler with this syntax: ui.item.data("url"), using the jQuery data method.
The link element is more straightforward and just uses the standard attr and text bindings:
        <a data-bind="attr: {href: ('#' + $data.url)}">
            <span data-bind="text: $data.text"></span>
        </a>
Just note that I've prefixed the href with a hash symbol. That way when you click on the menubar item, you don't follow a link to another page. Instead, the select event is fired and the handler, sorry, handles it.
Here's the full select function using this approach to retrieve the data from the jQuery object representing the element rendered by Knockout:
    function select(event, ui) {
        var url = "/json/" + ui.item.data("url");
        $.getJSON(url, function (data) {
            viewModel.header(data.header);
            viewModel.text(data.text);
        })
        .error(function (errorData) {
            viewModel.header("Error");
            if (errorData.status === 404) {
                viewModel.text("Could not find " + ui.item.text() + " at " + url);
            } else {
                viewModel.text("There has been an error, probably a JSON syntax error. Check the JSON syntax in the file <code>" + url + "</code>");
                console.log(errorData);
            }
        });
    }
I added the extra error trap because jQuery now remains silent about JSON syntax errors. I don't want the user to be burdened with the details of JSON syntax errors, but I want to give some clue about what might have gone wrong.
Here's the Knockout view model defined in the function attached to the getJSON() method:
    $.getJSON('/json/menubar-data.json', function (data) {
        viewModel = {
            header: ko.observable(),
            text: ko.observable(),
            masters: ko.observableArray([
            {
                name: "Master1",
                root: data
            }
            ]),
            renderMenu: function () {
                $("#menu").menubar({
                    autoExpand: true,
                    menuIcon: true,
                    buttons: true,
                    select: select
                });
            }
        };
        ko.applyBindings(viewModel);
        viewModel.header("Welcome");
        viewModel.text("The English Resource Page");

    })
    .error(function (errorData) {
        console.log({ "errorData": errorData });
        console.log(errorData.error());
    });
Step 5: Run the Project in Debug Mode.
With Default-src.aspx open in the IDE window, click
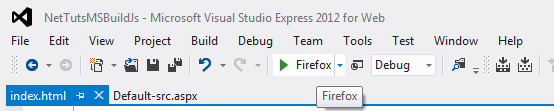
After the build process, the Default-src.aspx should appear in your browser's window. The IDE runs an Express version of the IIS web server in the background. In my case, the project uses port 54713 on localhost to run the page:
http://localhost:54713/debug/Default-src.aspx
We're now ready to work on the JavaScript build process.
Integrating the JavaScript Build Process Into MSBuild
This project will automate the two key steps we need to build a complex JavaScript project:
- Concatenate: Collect all the source files you need for a particular page and concatenate them together into one file. MSBuild doesn't have a built-in Concat task like Ant or NAnt so we'll have to roll our own based on this excellent blog How To: Concatenate files using MSBuild tasks.
- Minify: Minify our own source files and concatenate them with production release files, like the jQuery file, into one compressed file.
Step 1: Toggle Between the Project and Editing the Project Build File
The folder where you created your .NET project will include files that look like these:
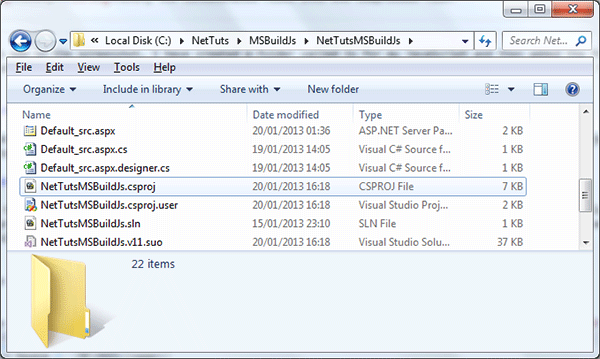
The NetTutsMSBuildJs.csproj file is just an XML file specially configured to handle the MSBuild process for this project. It is perfectly legitimate to create one of these manually or edit it to suit your project. Obviously, for purely .NET purposes it's much better to use the Visual Studio GUI to configure this file automatically for you, but the point of this tutorial is to show you how to add in a JavaScript build, which is not part of the standard .NET build.
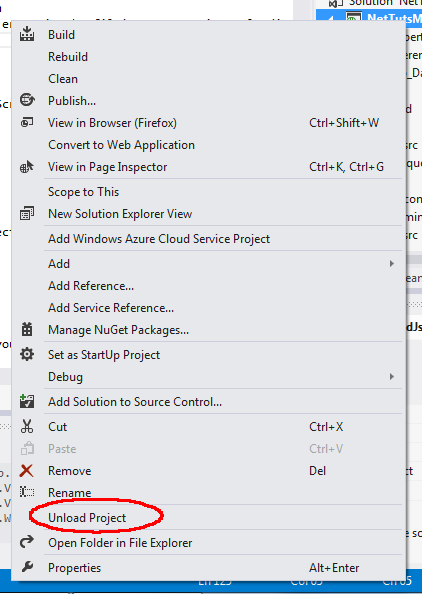
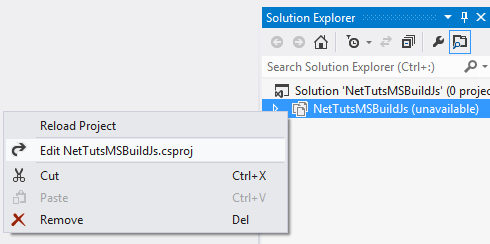
In Visual Studio, you can't edit this project file unless you unload the project, and you can't load the project if there is a syntax error in the file! So, practice unloading and loading the project so that you can edit this key file. To unload the project, right-click the project and click the Unload Project item.
After unloading the project, all the folders and files disappear and you're left with just the solutions and projects in the Solution Explorer. Right-click the project and this time the context menu is very short. Choose Edit NetTutsMSBuildJs.csproj and the project configuration file opens.
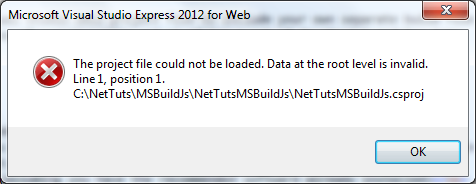
Now, just to build your confidence and get used to dealing with those times when you can't load the project because of a syntax error in the project files, type a deliberate mistake near the beginning of the project file: just type a letter before the first tag outside the XML document structure. Save and close the file. Try to load the project from the context menu and you will get an error message saying the project can't be loaded. Yes, Visual Studio is very strict like this.
Re-open the project file, correct the error, save and close again. When you re-load the project, it should load smoothly. Now it's time to edit for real. We will only manually change one thing in the project file, and that will be to add an Import element which will import a file to perform the JavaScript build.
Step 2: Create a Build File for the JavaScript Build and Import It Into the Project File.
If you add an Import element to the project file for a file which doesn't exist, you won't be able to load the project, so create a new text file called js.build in the jsbuild folder. After you enter the necessary XML code, the IDE will recognise this file as an XML file. There will be no need to actually associate the .build extension with the XML editor. Enter this starting code into jsbuild\js.build, save and close.
<Project ToolsVersion="4.0" xmlns="http://schemas.microsoft.com/developer/msbuild/2003">
</Project>
Now, unload the project and edit the project file by adding this line to the end of the file just before the closing tag.
<Import Project="jsbuild\js.build" />
You should now be able to re-load the project.
Step 3: Hello Discworld!!!!!
Five exclamation marks, the sure sign of an insane mind. - Terry Pratchett, Reaper Man
I am a bit bored with saying "Hello World" at the beginning of every new IT tutorial. So this time, I'm going to say hello to Terry Pratchett's amazing Discworld.
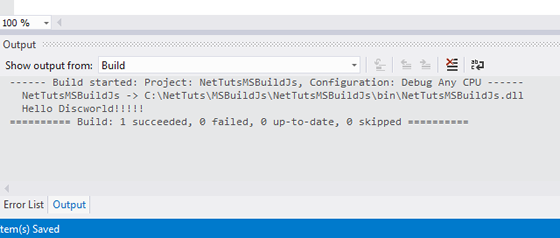
Open js.build. The IDE should automatically notice that it is an XML file. If not, perhaps you have invalid XML. After adding the following code to set up a Hello Discworld message, the IDE should finally realise this is XML. Make sure the js.build file now contains the following XML. Don't forget the five exclamation marks to get the right flavour of insanity for the Discworld!!!!!
<Project ToolsVersion="4.0" xmlns="http://schemas.microsoft.com/developer/msbuild/2003">
  <Target Name="HelloDiscworld">
    <Message Text="Hello Discworld!!!!!" Importance="high"></Message>
  </<Target>
  <Target Name="AfterBuild">
    <CallTarget Targets="HelloDiscworld"></CallTarget>
  <Target>
</Project>
When you right click on the project and run build, you should see the message in the output window.
Like Ant, MSBuild uses the idea of targets to perform groups of tasks. The AfterBuild target is run automatically by MSBuild after everything else has been successfully built. I'm tacking the JavaScript build onto the end of the .NET build so the AfterBuild extension point seems the best place to put this. Notice how AfterBuild is run automatically and within AfterBuild we call our Target HelloDiscworld. I've set the Importance of the message to high because otherwise it might not appear in the output window.
Step 4: Sort Out Paths
Right. We went a little bit mad in the Discworld with too many exclamation marks, but at least our JavaScript build file seems to be working! OK. Joking aside, we now have to get the most crucial thing in a build routine right: paths.
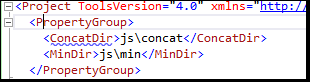
As with Ant, I have always had trouble understanding absolute and relative paths in these configuration files, so I want to tread carefully. Add a PropertyGroup element to the top of the js.build file, just below the Project tag and add two properties like this.
  <PropertyGroup>
    <ConcatDir>debug-js\concat</ConcatDir>
    <MinDir>debug-js\min</MinDir>
  </PropertyGroup>
Now, alter the message so we can see what these properties contain:
<Message Text="Hello Discworld!!!!! from $(ConcatDir)" Importance="high"></Message>
Now clean and build the project again or just choose rebuild. The message appears in the output like this:
Hello Discworld!!!!! from debug-js\concat
Step 5: Create Clean and Init Targets
Lovely. We've got our environment, our source files and we've got properties in the build file containing relative paths pointing to the directories we need to work with. Now we can add a CleanJs Target and an InitJs Target to Remove and Make the concat and min directories. I have a habit of putting little "hello" messages in to these targets when developing these files just to re-assure myself they're actually running or checking property values. I find increasing the output verbosity in MSBuild tends to give me a flood of information that I don't need, though it's great when I can't figure out where I've made a mistake.
MSBuild uses simple relative paths from the root folder of the whole project. If you have a folder called js in your project, you can use the value
jsin a named Property within a PropertyGroup without further complication.
  <Target Name="CleanJs">
    <Message Text="Hello from CleanJs" Importance="high"></Message>
    <RemoveDir Directories="$(ConcatDir)" Condition="Exists('$(ConcatDir)')">
      <Output PropertyName="ConcatDirRemoved" TaskParameter="RemovedDirectories"/>
    </RemoveDir>
    <RemoveDir Directories="$(MinDir)" Condition="Exists('$(MinDir)')"></RemoveDir>
    <Message Text="Hello from removed dirs $(ConcatDirRemoved)" Importance="high"></Message>
  </Target>
  <Target Name="InitJs">
    <MakeDir Directories="$(ConcatDir)" Condition="!Exists('$(ConcatDir)')"></MakeDir>
    <MakeDir Directories="$(MinDir)" Condition="!Exists('$(MinDir)')"></MakeDir>
  </Target>
To run these targets add CallTarget elements to the AfterBuild target.
    <CallTarget Targets="CleanJs"></CallTarget>
    <CallTarget Targets="InitJs"></CallTarget>
Step 6: Concatenating the Files
You're probably getting used to editing the js.build file by now. You may have noticed an annoying error message linked to text underlined with wiggly blue lines, like this:
This is an annoying bug in Visual Studio which has been there for quite a while. PropertyGroup elements and ItemGroup elements can be populated with any value you like. The problem is Visual Studio wrongly reports an error for the first Property or Item you define in one of these groups. As you've seen, ConcatDir works when you build the project, and there is no problem loading the project. Just ignore these distracting invalid child element errors.
At last, some real build work. We add a new target to concatenate the files we want. Unlike Ant and NAnt, there is no built-in Concat task, so we have to roll our own with the ReadLinesFromFile task
  <Target Name="ConcatenateJsFiles">
    <ItemGroup>
    <ConcatFiles Include="
                 js\jquery-1.8.2.min.js;
                 js\jquery-ui-1.9.2.custom.min.js;
                 debug-js\src\jquery.ui.menubar.js;
                 js\knockout-2.1.0.js;
                 debug-js\src\default-src.js
                 "/>
    </ItemGroup>
    <ReadLinesFromFile File="%(ConcatFiles.Identity)">
      <Output TaskParameter="Lines" ItemName="ConcatLines"/>
    </ReadLinesFromFile>
    <WriteLinesToFile File="debug-js\concat\default-concat.js" Lines="@(ConcatLines)" Overwrite="true" />
  </Target>
Add a new CallTarget element to the AfterBuild target in js.build calling ConcatenateJsFiles. Rebuild the project as usual and lo and behold, a file called default-concat.js magically gets created in the debug-js\concat directory. You will probably have to refresh the Solution Explorer to see it.
Now add a new Web form page called Default-concat.aspx to the debug folder, linking it to the Main.Master page. This is very short and slightly different from the Default-src.aspx page. This time, all the JavaScript we need has been concatenated into one file, so you only need one script tag link to default-concat.js.
<%@ Page Title="Default concat" Language="C#" MasterPageFile="~/Main.Master" AutoEventWireup="true" CodeBehind="Default-src.aspx.cs" Inherits="NetTutsMsBuildJs.debug.Default_src" %>
<asp:Content ID="Content1" ContentPlaceHolderID="head" runat="server">
</asp:Content>
<asp:Content ID="Content2" ContentPlaceHolderID="JsScripts" runat="server">
    <script src="/debug-js/concat/default-concat.js"></script>
</asp:Content>
To try this out, open the Default-concat.aspx page in the IDE window and run the project again in Debug mode. You should see the fully functioning menubar in your browser with the title Debug concat appearing in the title bar of the browser.
Step 7: Final Stage - Minifying
The final target, target!!!!!
Our menubar seems to be working and when we concatenate the files we seem to have got the right order and everything's going smoothly in the Debug-concat.aspx page. It's now finally time to minify the source files default-src.js and jquery.ui.menubar.js and concatenate them with the professional release files in the correct order. This is slightly more complicated because now we need to bring in an external dependency which, so far, we haven't needed: the YUI compressor. There is a .NET port of this being developed but I'm so used to the Java version, I prefer to use my old favorite. Create a new target called MinifyJsFiles like this:
  <Target Name="MinifyJsFiles">
    <ItemGroup>
      <MinFiles Include="
                 debug-js\src\jquery.ui.menubar.js;
                 debug-js\src\default-src.js
           "/>
      <Compressor Include="jsbuild\yuicompressor-2.4.7.jar"></Compressor>
    </ItemGroup>
    <Message Text="Hello Compressor.Fullpath: %(Compressor.Fullpath)" Importance="high"></Message>
    <Exec Command="java -jar %(Compressor.Fullpath) debug-js\src\default-src.js --type js -o debug-js\min\default-min.js"/>
    <Exec Command="java -jar %(Compressor.Fullpath) debug-js\src\jquery.ui.menubar.js --type js -o debug-js\min\jquery.ui.menubar-min.js"/>

  </Target>
Notice the property Compressor. Here you just have to define the relative path from the project folder, but the jar file, run by the Java process, will need the full path. Luckily, MSBuild provides an easy way to convert a relative path into a full path. You use the % syntax and invoke the Fullpath property. This is an example of MSBuild Well-known Item Metadata.
Add yet another CallTarget element to the AfterBuild element to call the MinifyJsFiles target.
Now our final target, target. We have to take all the professional release files and concatenate them with the minified version of our sources and concatenate them into one file.
  <Target Name="ConcatenateMinFiles">
    <ItemGroup>
    <ConcatMinFiles Include="
                      js\jquery-1.8.2.min.js;
                      js\jquery-ui-1.9.0.custom.min.js;
                      debug-js\min\jquery.ui.menubar-min.js;
                      js\knockout-2.1.0.js;
                      debug-js\min\default-min.js
                      "/>
    </ItemGroup>
    <ReadLinesFromFile File="%(ConcatMinFiles.Identity)" >
      <Output TaskParameter="Lines" ItemName="ConcatMinFilesLines"/>
    </ReadLinesFromFile>
    <Message Text="We are concatenating these minified files %(ConcatMinFiles.Identity)" Importance="high"></Message>
    <WriteLinesToFile File="debug-js\min\default.js" Lines="@(ConcatMinFilesLines)" Overwrite="true" />
   </Target>
You have to be careful with this ItemName property in the build files. Property and item instances are stored in a global context in MSBuild. If you use the same name for ItemName in two different concatenated targets, you end up concatenating all the files from both targets.
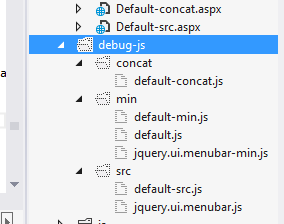
Rebuild the project and you should now see two new files in the debug-js\min folder: default-min.js and jquery.ui.menubar-min.js. The debug-js folder should now look like this after re-building and refreshing the Solution Explorer:
Create a new Web form page called Default-min.aspx linked to the Main.Master page and put it into the debug folder.
<%@ Page Title="Default min" Language="C#" MasterPageFile="~/Main.Master" AutoEventWireup="true" CodeBehind="Default-src.aspx.cs" Inherits="NetTutsMsBuildJs.debug.Default_src" %>
<asp:Content ID="Content1" ContentPlaceHolderID="head" runat="server">
</asp:Content>
<asp:Content ID="Content2" ContentPlaceHolderID="JsScripts" runat="server">
    <script src="/debug-js/min/default-min.js"></script>
</asp:Content>
Conclusion
We walked through the steps required in Visual Studio Express 2012 for Web, to create a JavaScript project that marries Knockout with jQuery UI to create a menubar and then integrate a JavaScript build into the overall project build in Visual Studio.
In this tutorial we walked through the steps required in Visual Studio Express 2012 for Web, to create a JavaScript project that marries Knockout with jQuery UI to create a menubar from a JSON definition file and then integrate a JavaScript build of the source files into the .NET MSBuild process. The final result was that we had a web page with only one script tag containing all the complex JavaScript needed to run the page.
I think you can see how easy it would be to adapt this example to a very large, complex JavaScript library running in a .NET project. It should also be reasonably straightforward to develop these ideas to include tasks suitable for a release version. The obvious next step is to copy the fully minified and concatenated default.js file to the js folder, then include that in a definitive Default.aspx file in the root directory. With this example as a starting point, you should be able to explore the MSBuild documentation and develop a fully working build file to automate every part of your build process.
I also use this kind of approach for CSS files. In this particular case, the jQuery UI CSS files are so well optimized it hardly seemed worth minifying them, but in other projects it might be important for performance. A more sophisticated next step for you grunters out there would be to create a js.build file that runs a grunt file with an MSBuild Exec task. That way, you could easily include linting and testing to the build process.
Further reading
For further reading about Visual Studio, this excellent Nettuts+ Visual Studio: Web Dev Bliss will guide you on how to integrate Web Essentials and add code checking to your build process, but unfortunately, Web Essentials is not available for the Express edition. See Mads Kristensen's answer here: "...unfortunately Express doesn't allow third party extensions to be installed". This tutorial is aimed at users of the Express edition and I hope it has given you a starting point for creating your own integrated JavaScript build, all within the Visual Studio Express environment.

Comments