The first post in this series laid the groundwork for understanding taxonomies, terms, and their relationship within the context of WordPress. If you haven't read it yet and you're brand new to WordPress development, then I highly recommend reading through it as this post is going to build on top of everything covered in that article.
Furthermore, as we proceed with talking about more types of metadata, it's important to review the previous series in which we covered:
The reason that it's worth reviewing those articles is because this article is going to resemble some of the techniques covered in those articles, and will also build on some of the strategies with working with similar APIs.
Above all else, this tutorial aims to provide a walkthrough of how to work with one of the newest metadata APIs available in WordPress.
A Disclaimer for Developers
As previously mentioned, this particular article is geared more towards those who are just getting into WordPress development or who are looking to grow their skills. So if you're an advanced developer, then the content covered in this article may not be of the most interest to you.
One of the key things to remember as we work through this tutorial is that the code is not to be used in a production environment. That is, it's meant to solely study the API and to understand how it works.
The code that we're writing is not meant to be used in a project that will be used for an audience or by a group of users. The main reason is because there are topics such as sanitization, validation, escaping, and so on that are beyond the scope of the previous series as well as this series.
After we've wrapped this article, we'll move on to more advanced topics such as those, but for now we're going to focus solely on the Term Metadata API.
A Refresher on Taxonomies and Terms
Before talking about the metadata API, let's make sure that we're all on the same page as it relates to the various terminology that we'll be using. Specifically, we need to make sure that we understand taxonomies, terms, and the relationship between the two.
First, the Codex defines taxonomies as:
In WordPress, a "taxonomy" is a grouping mechanism for some posts (or links or custom post types).
In a default WordPress installation, you can think of these as categories and tags. They can be hierarchical, like categories, or non-hierarchical like tags.
Terms, on the other hand, are defined as:
In WordPress, a term is a classification, group or subset of a Taxonomy, where the latter can be a Category, Tag or Custom Taxonomy. By default, terms have a title, a slug and a description. Hierarchical taxonomies like categories can define a parent term.
Finally, the relationship between taxonomies and terms is such that one can't really exist without the other (especially in hierarchical taxonomies). That is, a category taxonomy must have at least one term associated with it; however, non-hierarchical taxonomies don't necessarily have to follow that.
With that said, let's get started with working with the Term Metadata API.
Working With the API
As with the other metadata APIs that are available, we're going to be able to do things such as:
addupdateretrievedelete
And because this is a new API, it may not be immediately clear what some of the advantages of this API are. Though we're only going to explore some of the basics in this article, it's worth considering just some of the things that we can do.
For example:
- Associate colors or images with a term
- Restrict certain posts that belong to a term
- Add binary data, such as documents or PDFs, for a term that can be made available on the front-end
- ...and more.
Of course, there are many more possibilities. But, for now, let's see how we can incorporate this into our work.
Preparing the Theme
In order to get started, let's make sure we're on the same page on what we'll be using to get this work done. Specifically, here's what you need, and here's what I'm using.
- an IDE—I'll be using Atom
- a database front-end—I'll be using Sequel Pro
- a version of WordPress—I'll be using WordPress 4.4.2
- a basic theme—I'll be using twentysixteen
Once you have all of this set up, then we'll be ready to go. If you need help getting your development environment set up, then please see this series of articles.
Getting Started
The first thing that we need to do is to create a file that will contain all of the work that we're going to do in this tutorial.
First, we need to create tutsplus-term-metadata.php in the root of the twentysixteen theme directory.
Next, we need to add the following line of code to the theme's functions.php file. This will make sure that we're including our work into the theme.
<?php

/**
 * Add the code that allows us to work with the Term Meta API.
 */
include_once( 'tutsplus-term-metadata.php' );
When you reload your browser, you should see something like the following image:
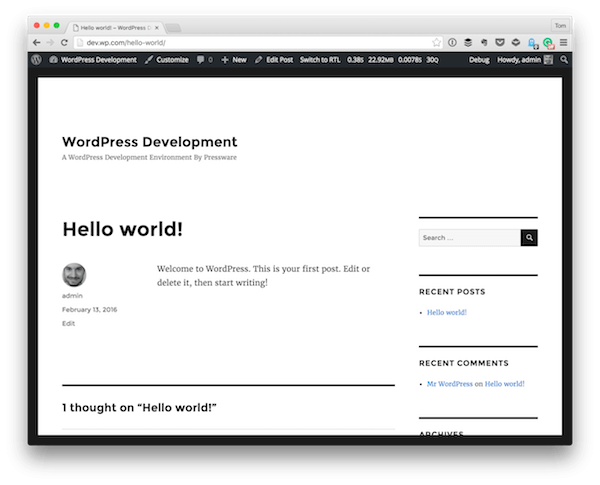
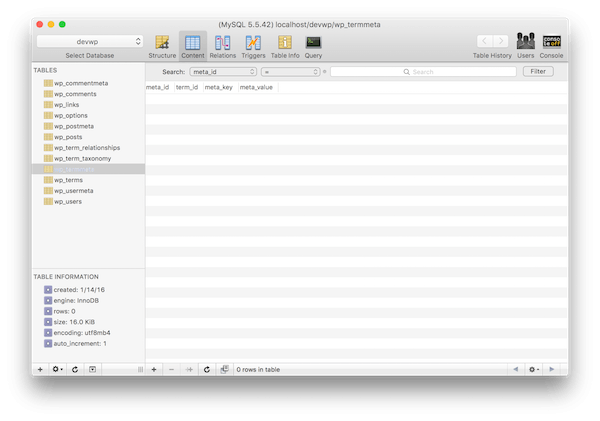
There should be no error output, and it should work as if nothing has changed. Finally, if you're working with a fresh installation of WordPress, the term metadata table should look completely empty:
Next, in order to make sure that we have a category with which we're working, go ahead and create a new category in your WordPress installation. I'm going to create one called Main and make sure that Hello World is stamped with this.
Once done, take a look at the terms table in the database in order to get the term_id. In my case, the term_id is 2. Yours may vary, but the point is that you know that ID of the term in question:
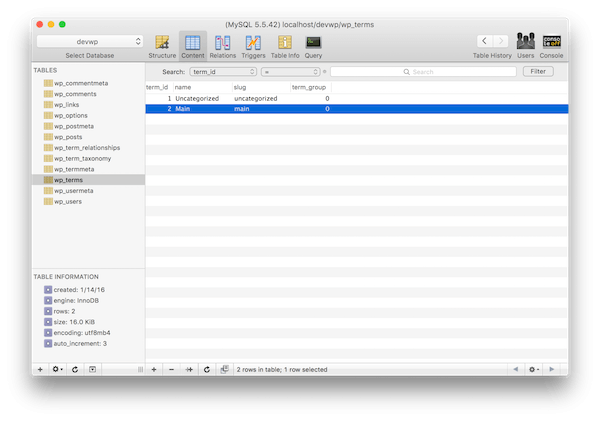
Take note as we'll be using this throughout the tutorial.
Adding Metadata
To get started, it's important to recognize that that add_term_meta function can serve two purposes:
- The function can create non-unique values associated with a single term ID and a single meta key.
- The function can create unique values associated with a single term ID and a single meta key.
The function accepts a term ID, a meta key, a meta value, and an optional boolean value that determines whether or not the value being stored is unique.
Unique Values
First, let's create a unique value in the database. Enter the following code in your editor, refresh Hello World, and then view the termmeta table.
<?php

add_filter( 'the_content', 'tutsplus_add_term_meta' );
function tutsplus_add_term_meta( $content ) {

    $category = get_the_category();
    $term_id  = $category[0]->term_id;

    if ( 1 === get_the_ID() && 2 === $term_id ) {
		add_term_meta( $term_id, 'my_meta_key', 'my_meta_value', true );
	}

	return $content;

}
You should see your information.
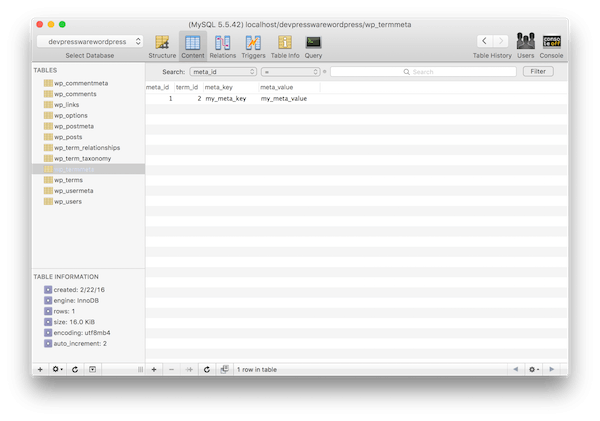
If you change the meta value and refresh the page, you should notice that the value in the database has not changed. This is because you've said that this should be a unique value and the first value that's written will be not be changed or overwritten.
This can be achieved with update_term_meta, but we'll look at that code momentarily.
Non-Unique Values
Before looking at how we can update term meta, though, let's look at how we can add multiple values to the same meta key and the same term ID. The code below looks similar to the code above except we aren't passing true into the function.
<?php

add_filter( 'the_content', 'tutsplus_add_term_metas' );
function tutsplus_add_term_metas( $content ) {

    $category = get_the_category();
    $term_id  = $category[0]->term_id;

    if ( 1 === get_the_ID() && 2 === $term_id ) {

		for ( $i = 0; $i < 3; $i++ ) {

			$meta_value = "my_meta_value_$i";
			add_term_meta( $term_id, 'non_unique_key', $meta_value );

		}

	}

	return $content;

}
Refresh Hello World a few times and then take a look at the database. You should see something like this:
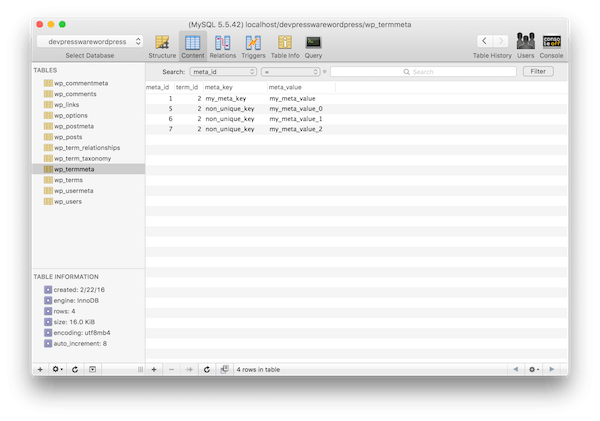
Make sense? Basically, when you say that you want to have a unique value, the first value that you enter will persist as the only value (unless you update or delete it).
If, on the other hand, you don't specify that you want it to be a unique value, then you can store as many values as you want with the term ID and the meta key.
This, however, leads the way to retrieving information and deleting information differently from the database; we'll take a look at this in more detail later in the article.
Updating Metadata
The API function update_term_meta affords us a couple of nice options. First, it gives us the ability to add a single, unique entry into the database without having to use the fourth parameter of add_post_meta.
Secondly, it allows us to update a specific piece of metadata as long as we know what the previous value was. Let's take a look at both of these cases given the current state of our database.
Adding Unique Data
To add unique metadata, we can make a call that's very similar to what we saw in the first example to add_term_meta. Instead, this time, we use update_term_meta. For example, review the following code:
<?php

add_filter( 'the_content', 'tutsplus_update_term_meta' );
function tutsplus_update_term_meta() {

    $category = get_the_category();
    $term_id  = $category[0]->term_id;

    if ( 1 === get_the_ID() && 2 === $term_id ) {
		update_term_meta( $term_id, 'update_key', 'my_unique_update_value' );
	}

	return $content;

}
Refresh Hello World a few times and no matter how many times you refresh it, you'll see a single value entered into the database. If you're following along with the code, then you should see something like this:
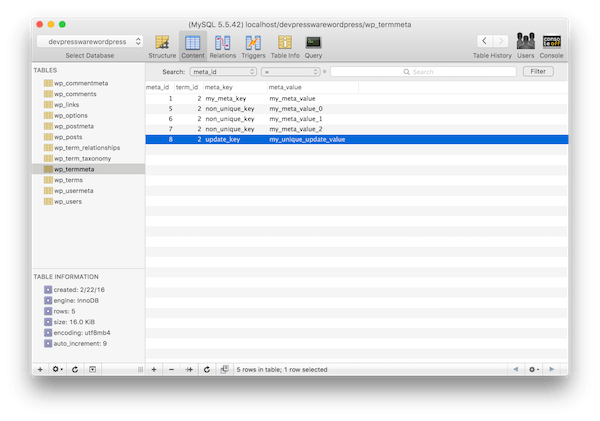
But what happens when there are multiple records with the same meta key and we want to update them?
Updating a Non-Unique Record
In order to update a record that has the same term ID and the same meta key, it's important to know the previous value. In our case, we know that we have a value called my_meta_value_1.
To that end, we can update this specific row by specified the new value and the old value in the update_term_meta function. To do this, take a look at the following code:
<?php

add_filter( 'the_content', 'tutsplus_update_term_metas' );
function tutsplus_update_term_metas() {

    $category = get_the_category();
    $term_id  = $category[0]->term_id;

    if ( 1 === get_the_ID() && 2 === $term_id ) {
		update_term_meta( $term_id, 'non_unique_key', 'my_meta_value_1_updated', 'my_meta_value_1' );
    }

	return $content;

}
And then refresh Hello World. Once done, the updated meta value should look like this:
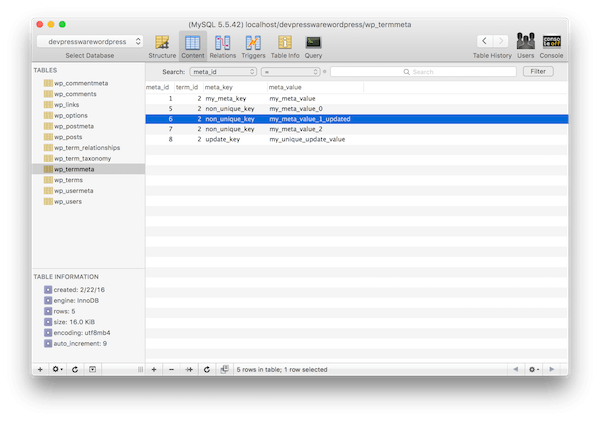
If you're not seeing the same result, make sure that you're properly specified the correct function name in your hook, the write term ID, the right meta key, and the right previous meta value.
Retrieving Metadata
In order to get the metadata that we've retrieved, we can use the get_term_meta function.
Note, however, that when we retrieve term metadata, we may be dealing with a meta key that has several values associated with it. Or we may be dealing with a meta key that has only a single value.
Depending on the situation, we'll need to specify different information to the function.
Retrieving All Metadata
Retrieving all of the metadata associated with a single term is easy, as the code below will demonstrate. The key thing to pay attention to is that the results are returned in an array.
In the example below, we're going to use the non_unique_key as our meta key since it has several values associated with it.
<?php

add_filter( 'the_content', 'tutsplus_get_term_metas' );
function tutsplus_get_term_metas() {

    $category = get_the_category();
    $term_id  = $category[0]->term_id;

    if ( 1 === get_the_ID() && 2 === $term_id ) {
        get_term_meta( $term_id, 'non_unique_key' );
    }

    return $content;

}
You can opt to echo the results out to the screen, you can choose to use var_dump, or you can choose to use a debugger to view the information. Whatever the case, you should see something like the following as your results:
array(3) { [0]=> string(15) "my_meta_value_0" [1]=> string(23) "my_meta_value_1_updated" [2]=> string(15) "my_meta_value_2" }
Given this output, you may opt to store it in a variable and then retrieve a certain value from a given index. Or maybe you'd opt to loop through the data and read or manipulate it.
Whatever your use case, this is how you can retrieve all of the information associated with a meta key.
Retrieving a Single Piece of Metadata
When we talk about retrieving a single piece of metadata, we normally mean that we're looking to retrieve one record from many (as in our example above); however, there may be cases in which we want to retrieve a single meta value associated with a single meta key.
We'll talk about the later case in just a moment. But first, let's cover the case where we want to retrieve a single value from a set of data that has the same term ID and same meta key.
Notice in the code below, we're passing a fourth value, true:
<?php

add_filter( 'the_content', 'tutsplus_get_term_meta' );
function tutsplus_get_term_meta( $content ) {

    $category = get_the_category();
    $term_id  = $category[0]->term_id;

    if ( 1 === get_the_ID() && 2 === $term_id ) {
        get_term_meta( $term_id, 'non_unique_key', true );
    }

    return $content;

}
And here's what is returned:
string(15) "my_meta_value_0"
Note that this returns the first value that it finds, and it does so in the form of a string.
What if There's Only One Record?
If there's only one record, then you have two options:
- You can retrieve the information without specifying
true. - You can retrieve the information by specifying
true.
If you opt for the first case, then you're going to get back an array with a single index and a single value. As such, you'll need to grab the value out of the result by doing something like $value = $result[ 0 ] assuming that you're storing the result of the function call in $result.
On the other hand, if you opt for the second option, then you can expect to have the result returned to you as a string.
Arguably, the most important thing to note about approaching the values this particular strategy is that the values are unique given their meta key.
Deleting Metadata
Finally, we need to take a look at removing the associated metadata. And, in keeping consistent with the rest of our examples, this depends on whether there are several pieces of metadata associated with a meta key or a single meta value associated with one meta key.
Deleting All Records
If you know that there is a single meta key that has several values associated with it, then you can use the following code:
<?php

add_filter( 'the_content', 'tutsplus_delete_term_metas' );
function tutsplus_delete_term_metas( $content ) {

    $category = get_the_category();
    $term_id  = $category[0]->term_id;

    if ( 1 === get_the_ID() && 2 === $term_id ) {
        delete_term_meta( $term_id, 'non_unique_key' );
    }

    return $content;

}
And that will update the database table such that it looks like this:
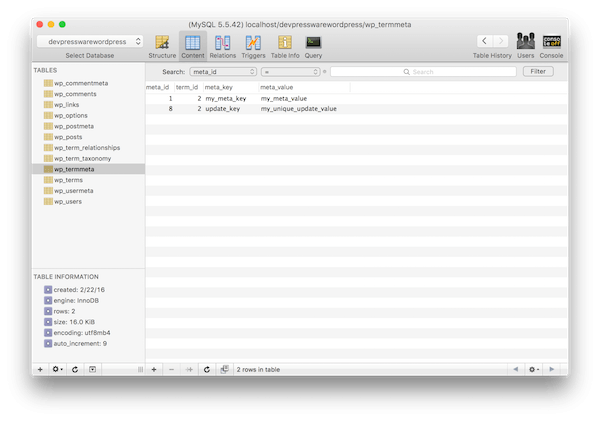
If you've been following along, then you know that this removed all of the data associated with the non_unique_key meta key.
Deleting a Single Record
If you want to delete a single record, then there are two ways to do this:
- You know the meta value associated with the meta key that you want to delete.
- The value associated with the specified meta key is unique in that the meta key and the meta value are unique.
To that end, we'll take a look at the first example in this section, and we'll take a look at the second example in this section.
To delete a single record in which we know the associated meta value, we can write code that specifies both the meta key and the meta value. For example:
<?php

add_filter( 'the_content', 'tutsplus_delete_term_meta' );
function tutsplus_delete_term_meta( $content ) {

    $category = get_the_category();
    $term_id  = $category[0]->term_id;

    if ( 1 === get_the_ID() && 2 === $term_id ) {
        delete_term_meta( $term_id, 'my_meta_key', 'my_meta_value' );
    }

    return $content;

}
This will remove the row associated with this information from the database.
Deleting a Unique Record
Finally, if there's a single unique record in which you know the meta key but you don't know the meta value, then you can still delete that record from the database.
All you'll need to specify in the source code is the meta key. See in the following function:
<?php

add_filter( 'the_content', 'tutsplus_delete_single_term_meta' );
function tutsplus_delete_single_term_meta( $content ) {

    $category = get_the_category();
    $term_id  = $category[0]->term_id;

    if ( 1 === get_the_ID() && 2 === $term_id ) {
        delete_term_meta( $term_id, 'update_key' );
    }

    return $content;

}
Astute readers will likely catch that the function above is the same function definition that we provided when deleting records that have all multiple values. And that's because they are the same.
The difference, though, is the intent of the function. A function's intent will often drive how we name the function. In the previous case, we wanted to delete all of the term metadata. In this case, we wanted to delete a single piece of term metadata.
This has implications when it comes to writing quality code and when it comes to writing unit tests.
The Full Source Code
Here, you're going to find all of the code that we've used throughout this post along with additional comments explaining what's happening in the code. Remember that all of these functions are hooked into the_content, which means that the functions will fire each time the post is loaded.
As such, the add_filter calls are commented out so that you can enable them as needed.
<?php

//add_filter( 'the_content', 'tutsplus_add_term_meta' );
/**
 * If we're on the first post and in the category having the
 * ID of '2', then we add a unique meta key and meta value to
 * the term metadata.
 *
 * @param    string $content    The post content.
 * @return   string              The post content.
 */
function tutsplus_add_term_meta( $content ) {

    $category = get_the_category();
    $term_id  = $category[0]->term_id;

    if ( 1 === get_the_ID() && 2 === $term_id ) {
		add_term_meta( $term_id, 'my_meta_key', 'my_meta_value_changed', true );
    }

    return $content;

}

//add_filter( 'the_content', 'tutsplus_add_term_metas' );
/**
 * If we're on the first post and in the category having the
 * ID of '2', then we add multiple meta values with the same
 * meta key to the term metadata.
 *
 * @param    string $content    The post content.
 * @return   string              The post content.
 */
function tutsplus_add_term_metas( $content ) {

    $category = get_the_category();
    $term_id  = $category[0]->term_id;

    if ( 1 === get_the_ID() && 2 === $term_id ) {

        for ( $i = 0; $i < 3; $i++ ) {

			$meta_value = "my_meta_value_$i";
			add_term_meta( $term_id, 'non_unique_key', $meta_value );
        }
    }

    return $content;

}

//add_filter( 'the_content', 'tutsplus_update_term_meta' );
/**
 * Updates the term meta value with the specified key. If the value
 * doesn't exist, then the record will be created. This will only
 * be added if the 'Hello World' page is loaded with the category
 * having the ID of '2'.
 *
 * @param    string $content    The post content.
 * @return   string              The post content.
 */
function tutsplus_update_term_meta( $content ) {

    $category = get_the_category();
    $term_id  = $category[0]->term_id;

    if ( 1 === get_the_ID() && 2 === $term_id ) {
		update_term_meta( $term_id, 'update_key', 'my_unique_update_value' );
    }

	return $content;

}

//add_filter( 'the_content', 'tutsplus_update_term_metas' );
/**
 * Updates the existing value for the metadata that has the 'non_unique_key'
 * meta key with the specified meta value. This only happens if we're on the
 * post with the ID of one and it has the category ID of '2'.
 *
 * @param    string $content    The post content.
 * @return   string              The post content.
 */
function tutsplus_update_term_metas( $content ) {

    $category = get_the_category();
    $term_id  = $category[0]->term_id;

    if ( 1 === get_the_ID() && 2 === $term_id ) {
		update_term_meta( $term_id, 'non_unique_key', 'my_meta_value_1_updated', 'my_meta_value_1' );
	}

    return $content;

}

//add_filter( 'the_content', 'tutsplus_get_term_metas' );
/**
 * If we're on the first post and the post has the category ID of '2' then
 * retrieve the term meta in the form of an array.
 *
 * @param    string $content    The post content.
 * @return   string              The post content.
 */
function tutsplus_get_term_metas( $content ) {

    $category = get_the_category();
    $term_id  = $category[0]->term_id;

    if ( 1 === get_the_ID() && 2 === $term_id ) {
        get_term_meta( $term_id, 'non_unique_key' );
	}

    return $content;

}

//add_filter( 'the_content', 'tutsplus_get_term_meta' );
/**
 * If we're on the first post and the post has the category ID of '2' then
 * retrieves the first value from the metadata as a string.
 *
 * @param    string $content    The post content.
 * @return   string              The post content.
 */
function tutsplus_get_term_meta( $content ) {

    $category = get_the_category();
    $term_id  = $category[0]->term_id;

    if ( 1 === get_the_ID() && 2 === $term_id ) {
        get_term_meta( $term_id, 'non_unique_key', true );
    }

	return $content;

}

//add_filter( 'the_content', 'tutsplus_delete_term_metas' );
/**
 * If we're on the first post and the post has the category ID of '2' then
 * deletes the meta values associated with the specified key.
 *
 * @param    string $content    The post content.
 * @return   string              The post content.
 */
function tutsplus_delete_term_metas( $content ) {

    $category = get_the_category();
    $term_id  = $category[0]->term_id;

    if ( 1 === get_the_ID() && 2 === $term_id ) {
        delete_term_meta( $term_id, 'non_unique_key' );
    }

	return $content;

}

//add_filter( 'the_content', 'tutsplus_delete_term_meta' );
/**
 * If we're on the first post and the post has the category ID of '2' then
 * deletes the specified meta value associated with the specified meta key.
 *
 * @param    string $content    The post content.
 * @return   string              The post content.
 */
function tutsplus_delete_term_meta( $content ) {

	$category = get_the_category();
    $term_id  = $category[0]->term_id;

    if ( 1 === get_the_ID() && 2 === $term_id ) {
        delete_term_meta( $term_id, 'my_meta_key', 'my_meta_value' );
    }

	return $content;

}

//add_filter( 'the_content', 'tutsplus_delete_single_term_meta' );
/**
 * If we're on the first post and the post has the category ID of '2' then
 * deletes the meta values associated with the specified key.
 *
 * @param    string $content    The post content.
 * @return   string              The post content.
 */
function tutsplus_delete_single_term_meta( $content ) {

    $category = get_the_category();
    $term_id  = $category[0]->term_id;

    if ( 1 === get_the_ID() && 2 === $term_id ) {
        delete_term_meta( $term_id, 'update_key' );
    }

    return $content;

}
It's not at all uncommon to find functions like this hooked into another hook like save_post or something similar. This is something that we'll cover in more detail in an advanced tutorial later in this year.
Conclusion
For those who have followed this series and the previous series working with the rest of the metadata API, much of the material covered in this series shouldn't be too hard to grasp.
Perhaps the hardest part of working with this API is exercising your creativity on the many ways in which can actually be used. But since we've covered how to work with the API, putting it to work shouldn't be terribly hard.
Remember that in the coming weeks, we are going to look at advanced and proper techniques for writing and reading information into the database so that we're in a position to work with them in a production environment.
In the meantime, if you're looking for other utilities to help you build out your growing set of tools for WordPress or for code to study and become more well-versed in WordPress, don't forget to see what we have available in Envato Market.
Remember, you can catch all of my courses and tutorials on my profile page, and you can follow me on my blog and/or Twitter at @tommcfarlin where I talk about various software development practices and how we can employ them in WordPress.
Please don't hesitate to leave any questions or comments in the feed below, and I'll aim to respond to each of them.


Comments