In this tutorial, our goal is to create an FTP class with PHP that is well written, useful, and expandable.
Outlining our Objective
It's always important to first outline exactly what functionality your class should include. In our case:
- connecting to a server
- create a folder on the server
- upload a file
- change directory
- retrieving the directory listing
- download a file
When Would I Use an FTP Class?
There are several instances when one might use this sort of class. A couple of scenarios could be:
- Automate uploading of images, such as a gallery, to a client's website (ideally, in conjunction with my image resizing tut)
- Perform off-site backups by transferring a database backup file from your server to another. (Note: This isn't recommended for sensitive information as FTP is not a very secure protocol.)
Note: It's easy to run into issues with FTP due to different server configurations. This code has been tested on a number of FTP servers successfully.
What is FTP?
FTP: "A standard network protocol used to copy a file from one host to another."
FTP, or File Transfer Protocol, is, as defined by Wikipedia: "A standard network protocol used to copy a file from one host to another over a TCP/IP-based network, such as the Internet."
Essentially, it allows you to copy a file(s) from one computer to another.
Step 1 - Preparation
We'll start off as easy as possible. In your new project's root, create two files: index.php and ftp_class.php.
The index.php file is our main page that creates the object and calls the necessary methods. The ftp_class.php is just that: our ftp class.
In the next step, we're going to create the skeleton for our class. Once this is in place, you'll be able to follow along and try each step.
Step 2 - Setting up the Class
The strength of Object-Oriented Programming (OOP) is to give complex code an easy to use interface. By creating a class -- think of a class as a pattern -- you can encapsulate the data, which is simply jargon for a term that refers to hiding the data. We can then reuse this class over and over without the need to rewrite any of the code. Instead, you only need to call the appropriate methods (the term "method" is the same as function).
Let's begin creating our ftp class. Open your ftp_class.php file, and add the following code. This is a basic class skeleton structure, which I've named 'FTPClient'.
The construct function, known as a constructor, is a special class method that is automatically called by the class when you create a new object, or instance of the class. This is typically a good place to add some initialization; but for today's purpose, we don't need it. Nonetheless, we'll keep it here for future use.
	Class FTPClient
	{
		// *** Class variables

		public function __construct() {	}
	}
Please note that we're using a double underscore for that construct method.
Step 3 - Class Variables
Next, we'll set set some class variables, or properties.
	private $connectionId;
	private $loginOk = false;
	private $messageArray = array();
The "private" prefix defines the scope of the variable. In this case, it means that the variable can't be accessed from anywhere outside of the class.
The $connectionId variable will store our connection stream. The other two store the status and any messages. $loginOk will be useful when determining if we're properly connected.
Step 4 - Simple Message Logging
In nearly every method, we're going to call a method, named 'logMessage. This is a very basic message handler, that will allow us to capture any messages created by our class so that we can provide the user with feedback.
Note that we don't
returnthe actual messages from within our methods. Instead, we returntrueorfalse, based upon whether or not a particular operation was successful. This has its advantages, but also doesn't detail to the user what's happening.
Add the following two methods, so we can determine what's successful.
This method accepts a variable, $message. The contents of this variable are then saved into our class array, thanks to the line: $this->messageArray[] = $message;
	private function logMessage($message)
	{
		$this->messageArray[] = $message;
	}
Because $messageArray is a class variable, we can access it, via the $this-> notation.
Within a class,
$thisrefers to the object itself.
To retrieve the message, we call getMessages.
	public function getMessages()
	{
		return $this->messageArray;
	}
This method is a public method. As mention previously, this private/public business simply refers to the scope of the variable, or in this case, the method. A private method (or variable) cannot be accessed outside of the class, while a public method (or variable) can.
Because our variable is private, we need a way to access it. We do this by giving our class a public method, which we can then access outside of the class. You might wonder why we can't simply make the messageArray variable public. We can; that said, it's just not a good practice.
Note: There are plenty examples around the web of full blown message handlers, or classes dedicated to them. We're working on a simple implementation for the purpose of this tutorial.
Step 5 - Connecting
In this step, we'll add the connect method. This will allow us to connect to an FTP server.
	public function connect ($server, $ftpUser, $ftpPassword, $isPassive = false)
	{

		// *** Set up basic connection
		$this->connectionId = ftp_connect($server);

		// *** Login with username and password
		$loginResult = ftp_login($this->connectionId, $ftpUser, $ftpPassword);

		// *** Sets passive mode on/off (default off)
		ftp_pasv($this->connectionId, $isPassive);

		// *** Check connection
		if ((!$this->connectionId) || (!$loginResult)) {
			$this->logMessage('FTP connection has failed!');
			$this->logMessage('Attempted to connect to ' . $server . ' for user ' . $ftpUser, true);
			return false;
		} else {
			$this->logMessage('Connected to ' . $server . ', for user ' . $ftpUser);
			$this->loginOk = true;
			return true;
		}
	}
We pass in our connection information: the server ($server), username ($ftpUser), and password ($ftpPassword) to allow us to establish a connection.
The first line of code opens an FTP connection, with ftp_connect, to the specified server. We save our connection to the class variable, $connectionId described above.
The code, ftp_login logs us in to the specified connection, passing in our connection id, our username, and password.
You might have noticed the ftp_pasv line of code. This, as the comment implies, turns on/off passive mode. I'd suggest you leave it off, however, if you have any issues connecting, try turning it on. Passive mode can cause a bit of a mare when connecting via FTP.
We determine if the connection was successful. We then log the results by calling our simple message handler method, logMessage(), and pass the string to log. Remember: we use $this-> to access logMessage(), as it is a class variable.
Step 6 - Calling the Object
Now that our class is working, we can test it out! Open your index.php file, and add the following code.
You'll need access to an FTP server to play along. If you wish to set your own server up, try Filezilla - it's free, too.
You'll notice I've added the FTP server details here. Ideally these would be stored within your config file. Change these to match the settings of your FTP server.
After defining our FTP server details, we include the class with include('ftp_class.php');. This means: make the class available from within this page. The next line creates an object of our FTP class, and stores it in the variable, $ftpObj. $ftpObj will now be used to access any public methods within our class. This is done by using the -> notation, just like the following line does by calling the $ftpObj -> connect method and passing it our server details.
		// *** Define your host, username, and password
		define('FTP_HOST', '192.168.1.88');
		define('FTP_USER', 'Blimpf');
		define('FTP_PASS', 'catfish');


		// *** Include the class
		include('ftp_class.php');

		// *** Create the FTP object
		$ftpObj = new FTPClient();

		// *** Connect
		$ftpObj -> connect(FTP_HOST, FTP_USER, FTP_PASS);
As you can see, once our class is in place, connecting to our FTP server is really quite easy!
Step 6b - Viewing the Output
In the last step we could wrap the connect call in an if statement, as demonstrated below. Then, if we fail to connect, the dependent code won't be executed. We can then output any messages to the user, such as "connected" or "failed".
		// *** Connect
		if ($ftpObj -> connect(FTP_HOST, FTP_USER, FTP_PASS)) {

			// *** Then add FTP code here

			echo 'connected';

		} else {
			echo 'Failed to connect';
		}
This is okay, though our code will quickly become rather bloated with IF/ELSE statements, if we add this to all our calls. Instead, I'd like to offer an alternative that will make things a bit cleaner and easier to follow.
Remember the message handler methods we added? If you wish to see the messages produced by the class - helpful for debugging/feedback - you can add the following code after any method that you call.
print_r($ftpObj -> getMessages());
This will display the class message.
Step 7 - Making our First Directory
Excellent, now it's time to do something useful. The first method we're going to create is the makeDir method. As expected, this method will create directories for us on the server. The only parameter we will pass is the directory path and folder name; we'll call it $directory. The magical line here is the ftp_mkdir built-in function. It uses our saved "connectionId" and the passed in $directory variable to create the folder.
Add the following code to your ftp_class.php file:
		public function makeDir($directory)
		{
			// *** If creating a directory is successful...
			if (ftp_mkdir($this->connectionId, $directory)) {

				$this->logMessage('Directory "' . $directory . '" created successfully');
				return true;

			} else {

				// *** ...Else, FAIL.
				$this->logMessage('Failed creating directory "' . $directory . '"');
				return false;
			}
		}
And, to call it from your index.php file, add:
		$dir = 'photos';

		// *** Make directory
		$ftpObj->makeDir($dir);
The variable, $dir is set to the name of the folder we want to create on the server. In this case: "photos".
The next line calls the method that will create the folder.
If you receive a "Permission denied" error, make sure that you can write in the folder specified. You might need to create the folder within a directory, such as
/httpdocs.
Step 8 - Uploading a File
Continuing on, let's upload a photo, called zoe.jpg. When uploading a file, we need to specify what type of file we're uploading - binary or ascii? Basically, if you're uploading a text file, we should use ascii; otherwise, it should be set to binary.
We begin by setting up an array with all the extensions that we should use for an ascii type upload.
$asciiArray = array('txt', 'csv');
Then, we retrieve the extension of our file, so we can test if it is one of the ascii types. We determine this by getting the extension of the file we're uploading. The quick and dirty method I have used here is
by "exploding" the file using the '.' as the delimiter. This will split the file into pieces, and store them as an array. Using another built-in PHP function, "end", we select the last array element that contains our extension. It's a tidy little bit of code.
$extension = end(explode('.', $fileFrom));
Next, we test if our extension appears in the list (with in_array) of file extensions that should be uploaded as type ascii. If it appears in the list, we set the variable $mode to FTP_ASCII; otherwise, we assume it's of binary type, and assign $mode the value FTP_BINARY.
in_array($extension, $asciiArray)
ftp_put uploads a file from your local location to a remote file on the ftp server. We pass it our "connectionId", the path to the file we want to upload to ($fileTo), the path
of the file we want to upload ($fileFrom), and the mode ($mode) which we've just determined.

Next, add the following method to your ftp_class.php file:
	public function uploadFile ($fileFrom, $fileTo)
	{
		// *** Set the transfer mode
		$asciiArray = array('txt', 'csv');
		$extension = end(explode('.', $fileFrom));
		if (in_array($extension, $asciiArray)) {
			$mode = FTP_ASCII;
		} else {
			$mode = FTP_BINARY;
		}

		// *** Upload the file
		$upload = ftp_put($this->connectionId, $fileTo, $fileFrom, $mode);

		// *** Check upload status
		if (!$upload) {

				$this->logMessage('FTP upload has failed!');
				return false;

			} else {
				$this->logMessage('Uploaded "' . $fileFrom . '" as "' . $fileTo);
				return true;
			}
	}
Certainly, you can create or upload any folder name you wish! Add this next snippet of code to your index.php file, and adjust accordingly.
		$fileFrom = 'zoe.jpg';
		$fileTo = $dir . '/' . $fileFrom;

		// *** Upload local file to new directory on server
		$ftpObj -> uploadFile($fileFrom, $fileTo);
By now, you should be coming to terms with just how easy this class is to use! We're merely making single calls to perform our tasks -- all thanks to object orientated programming!
Step 9 - Viewing the Files
Let's now confirm that our file is in the photo folder. We can do so by navigating to the 'photo' folder on our server, and then display the contents.
The changeDir method uses "ftp_chdir" to changes the current directory on the ftp server. Simply pass in the directory to change to. Simple and sweet.
ftp_class.php:
	public function changeDir($directory)
	{
		if (ftp_chdir($this->connectionId, $directory)) {
			$this->logMessage('Current directory is now: ' . ftp_pwd($this->connectionId));
			return true;
		} else {
			$this->logMessage('Couldn\'t change directory');
			return false;
		}
	}
getDirListing will display the contents of the directory you're in by using the function "ftp_nlist". This function returns a list of files in a given directory. The current directory is set by default, so you don't need to provide any parameters.
If you wish, you can override this by passing in the $directory path you wish to view the contents of. The $parameters variable defaults to '-la'. This is a Linux command to display more information about the directory. Feel free to remove it or pass in an empty string.
ftp_class.php:
	public function getDirListing($directory = '.', $parameters = '-la')
	{
		// get contents of the current directory
		$contentsArray = ftp_nlist($this->connectionId, $parameters . '  ' . $directory);

		return $contentsArray;
	}
The getDirListing method returns an array which contains our directory listing.
index.php
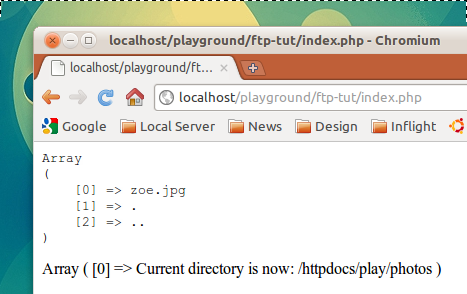
		// *** Change to folder
		$ftpObj->changeDir($dir);

		// *** Get folder contents
		$contentsArray = $ftpObj->getDirListing();

		// *** Output our array of folder contents
		echo '<pre>';
		print_r($contentsArray);
		echo '
';
Your result should look like so:
Step 10 - Downloading a File
As we push toward the conclusion of this tutorial, we next move on to downloading the file. The method starts with the same code as uploadFile, in that it determines if the file we want to download is ascii or binary.
For this method, you simply pass in the filename (and possibly the path, depending on if you're in the same folder as the file you wish to download) of the file to download, and the name you wish that file to have on your client machine.
In order to download a file, you need to call ftp_get.
ftp_get($this->connectionId, $fileTo, $fileFrom, $mode, 0)
This downloads a file from a remote server to our local machine. It accepts the following parameter: our connection id, the path and filename to save as locally (will be overwritten if it
already exists) ($fileTo), the location and name of the file on the remote server ($fileFrom), and the mode ($mode).
ftp_class.php
	public function downloadFile ($fileFrom, $fileTo)
	{

		// *** Set the transfer mode
		$asciiArray = array('txt', 'csv');
		$extension = end(explode('.', $fileFrom));
		if (in_array($extension, $asciiArray)) {
			$mode = FTP_ASCII;
		} else {
			$mode = FTP_BINARY;
		}

		// try to download $remote_file and save it to $handle
		if (ftp_get($this->connectionId, $fileTo, $fileFrom, $mode, 0)) {

			return true;
			$this->logMessage(' file "' . $fileTo . '" successfully downloaded');
		} else {

			return false;
			$this->logMessage('There was an error downloading file "' . $fileFrom . '" to "' . $fileTo . '"');
		}

	}
We're going to download the same file we uploaded by saving it with a different name on our client machine.
Note: Again, make sure that your permissions are set correctly!
Because we should now be inside our photo folder, we don't add a path to the $fileFrom variable - only the file name.
index.php
		$fileFrom = 'zoe.jpg';		# The location on the server
		$fileTo = 'zoe-new.jpg';			# Local dir to save to

		// *** Download file
		$ftpObj->downloadFile($fileFrom, $fileTo);
Step 11 - Finishing Up
To complete our class, let's add the class magic method, __deconstruct. This method closes our connection when the reference to our object no longer exists - maybe the page was closed. In any event, this code is run and the connection is closed. It's always a good practice to include this, though it's not entirely necessary.
	public function __deconstruct()
	{
		if ($this->connectionId) {
			ftp_close($this->connectionId);
		}
	}
Conclusion
Well that does it! I hope you now have a better understanding of how to use FTP with PHP. You should now have the necessary skills to further expand this class to support other common tasks, such as renaming or deleting files and folders.
Be sure to let us know if you create any cool PHP FTP clients!

Comments