If you're asking, "what's Yii?" check out my earlier tutorial: Introduction to the Yii Framework, which reviews the benefits of Yii and includes an overview of what's new in Yii 2.0, released October 12th, 2014.
This tutorial will walk you through installing Yii 2.0, setting up your local development environment, building a simple Hello World application, setting up your remote production environment for hosting and deploying your code from a GitHub repository.
Installing Yii 2.0
Documentation
You can find detailed installation instructions here; I'll walk you through the basics for a typical Mac OS X development environment. Yii 2.0 has a Definitive Guide (PDF) and a Class Reference which cover every detail of Yii. ca
Installing Composer
Yii2 requires Composer, a popular dependency manager for PHP. If you don't already have Composer installed, do the following:
curl -s http://getcomposer.org/installer | php
mv composer.phar /usr/local/bin/composer
Installing Yii2
Then, use Composer to install Yii2. The installation request requires that you use your own Github account credentials; sign up if you don't have an account.
Let's call this first project, "hello":
cd ~/Sites
composer global require "fxp/composer-asset-plugin:1.0.0-beta2"
composer create-project --prefer-dist yiisoft/yii2-app-basic hello
Yii2 provides two different installation templates depending on the type of application you're developing: basic and advanced. For this tutorial, we'll use the basic application which is installed by default. The advanced application template provides a front-end, back end and console access points for a more advanced web application, like a WordPress blog, it's administrative dashboard and background cron tasks.
Setting Up Your Local Development Environment
I'm using free, open source MAMP for OS X for my LAMP development. Make sure MAMP is running and its web and database servers are active. Then, create a symlink for MAMP to your Sites app directory:
 cd /Applications/MAMP/htdocs
 ln -s ~/Sites/hello/ /Applications/MAMP/htdocs/hello
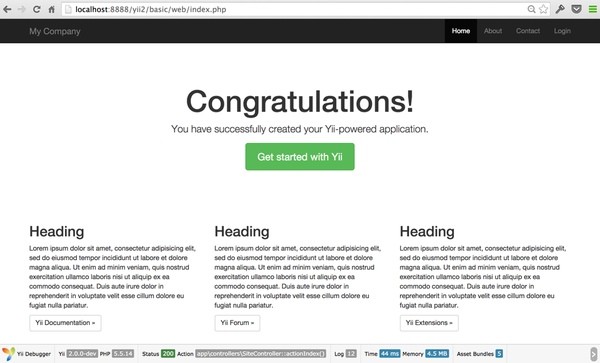
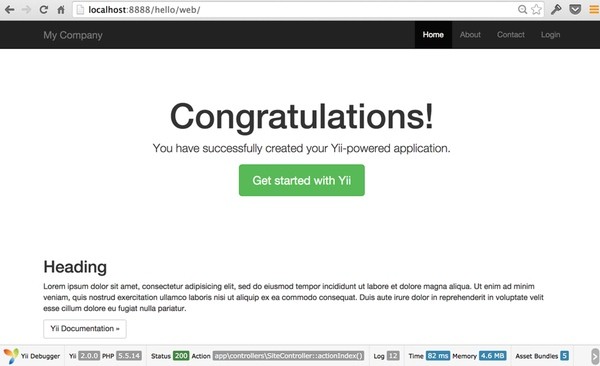
Then, visit http://localhost:8888/hello/web. You should see the Yii2 basic application template running with Bootstrap 3.x.
That page will likely excite Yii 1.1 developers who've not had pre-configured support for the latest version of Bootstrap, the outstanding open source responsive CSS framework that's taken over quite a bit of the web.
Yii Application Architecture
One of the most important features of the Yii Framework is that it provides a Model View Controller for PHP. Not only does this provide a more structured programming environment and easier to understand code, it simplifies a number of things that are difficult to do in PHP, like security and automated code generation. It also makes our code easier to extend and more reusable.
With a Yii application, we direct all traffic to a single file: /web/index.php file. This built-in file loads Yii, any dependencies, and then runs your application.
<?php

// comment out the following two lines when deployed to production
defined('YII_DEBUG') or define('YII_DEBUG', true);
defined('YII_ENV') or define('YII_ENV', 'dev');

require(__DIR__ . '/../vendor/autoload.php');
require(__DIR__ . '/../vendor/yiisoft/yii2/Yii.php');

$config = require(__DIR__ . '/../config/web.php');

(new yii\web\Application($config))->run();
By default, this is the Index method in /controllers/SiteController.php:
public function actionIndex()
    {
        return $this->render('index');
    }
Generally, controllers are full of methods, but with minimal code like above. Controllers manage access, leverage models and render views. The bulk of intelligence should be built into your models and the views should generally produce relatively simple template operations.
By default, Yii will render /views/layouts/main.php around your index view in /views/site/index.php. The main.php layout provides the HTML and CSS structure to the page, e.g. the toolbar and content area. Inside main.php, you'll see a brief call out to the content:
<div class="container">
            <?= Breadcrumbs::widget([
                'links' => isset($this->params['breadcrumbs']) ? $this->params['breadcrumbs'] : [],
            ]) ?>
            <?= $content ?>
        </div>
That $content variable will be replaced with the generated code from /views/site/index.php, which currently is static HTML code that generates the Congratulations! page shown above.
Building Hello World!
Turning on Pretty URLs
First, let's enable Yii2's pretty URLs with mod_rewrite. On the Yii home page, if you click on the About menu option, the URL will be something like http://localhost:8888/hello/web/index.php?r=site%2Fabout. We'd like to change that to http://localhost:8888/hello/web/site/about.
The config subdirectory includes environment configurations for your web and console applications as well as the future database settings. Edit /config/web.php to add urlManagement to the current web application. Add the following urlManager section within the components array:
    'components' => [
    //...
      'urlManager' => [
              'showScriptName' => false,
              'enablePrettyUrl' => true
                      ],
    //...
    'request' => [
Then, create an .htaccess file within /web where the primary index.php file exists:
RewriteEngine on

# If a directory or a file exists, use it directly
RewriteCond %{REQUEST_FILENAME} !-f
RewriteCond %{REQUEST_FILENAME} !-d
# Otherwise forward it to index.php
RewriteRule . index.php
Make sure mod_rewrite is running locally on MAMP; if not, check out this Stack Overflow guide.
In your browser, visit this URL: http://localhost:8888/hello/web/site/about. You should see the Yii application About page and clicking on other menu options should bring up pretty URLs.
Building the Say Hello World! Action
Next, we'll add a controller action called Say to repeat a target message of our choosing. In /controllers/SiteController.php, add the following action:
public function actionSay($target = 'World')
{
    return $this->render('say', ['target' => $target]);
}
This will look for a URL parameter called target to echo to the screen. If there is no target parameter, it will say repeat "World". In Yii, actions are defined as a method named with the prefix "action" followed by the action name. In this SiteController class, we use public function actionSay. Yii uses the prefix "action" to differentiate action methods from other methods.
The default behavior of the render method will look for a file in views/ControllerID/ViewName.php. So, in /views/site/, create a say.php view file:
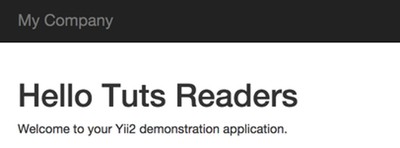
<?php
use yii\helpers\Html;
?>
<h1>Hello <?= Html::encode($target) ?></h1>
<p>Welcome to your Yii2 demonstration application.</p>
This is the template view file to repeat static HTML tag h1 with Hello followed by the target variable. Note: We encode the target variable to secure the URL parameter argument from malicious code.
If you visit the url, http://localhost:8888/hello/web/site/say?target=Tuts%20Readers, you should see this:
That's a very basic example of the Yii2 Model View Controller. You can read through a more thorough description of the Hello World demonstration and Yii2 MVC here.
Now, let's set up our application with GitHub and deploy it to a production server.
Setting Up Your Remote Hosting Environment
The basic Yii application should run fine out of the box with Apache or an Nginx, I'll provide instructions for Apache and you can find instructions for Nginx here.
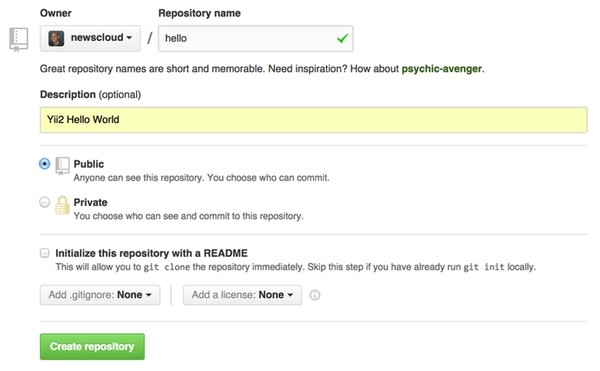
Create a Repository at GitHub
Once I set up a Yii application template, I create a repository at Github:
Note: It's a bit simpler initially to copy and paste the Yii2 .gitignore from GitHub to your local ~/Sites/hello/.gitignore file rather than create the site with it remotely and have to merge it locally, but either approach is fine.
I've been using the Mac OS X GitHub app more frequently but you can also use the command line to initialize the repository. Below, I'm following the instructions for adding an existing project to GitHub using the command line (replace "youraccount" with your GitHub account name):
cd ~/Sites/hello
git init
git commit -m "first commit of hello world for yii2"
git remote add origin [email protected]:youraccount/hello.git
git push -u origin master
Configure an Apache Site on Your Server
If you don't already have a LAMP server or cloud instance, follow my generic Ubuntu installation instructions to get started. Once you have your IP address, modify your DNS records to have an A record point to your server.
yourdomain.com A 192.161.234.17
Then, log in to your server either via IP address or domain name:
ssh [email protected]
Update the configuration, install Git, enable mod_rewrite for Apache and mcrypt for PHP:
sudo apt-get update
sudo apt-get upgrade
sudo a2enmod rewrite
php5enmod mcrypt
Configure GitHub Access on the Remote Server
Now, we'll set up a user for pulling code from Github that can be served by Apache. First, install git on your server.
sudo apt-get install git
Then, we'll create a group for www, add www-data and GitHub users to it and grant it ownership of our web directories.
adduser github
addgroup www
adduser github www
adduser www-data www
chown -R :www /var/www
chmod +s -R /var/www
chmod -vR g+w /var/www/
Next, we create a key for the user that we share with GitHub for keeping code in sync:
su github
ssh-keygen -t rsa -C "[email protected]"
exit
cat /home/github/.ssh/id_rsa.pub
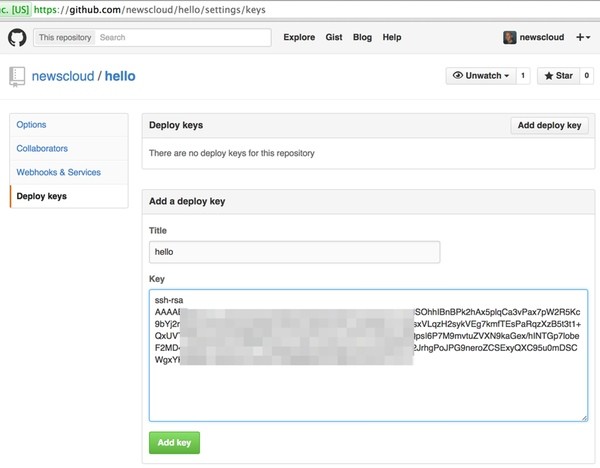
You'll see something like this, which you need to copy and paste to GitHub.com:

Visit the Settings page for your GitH soundub repository under keys, and add this key to your repository:
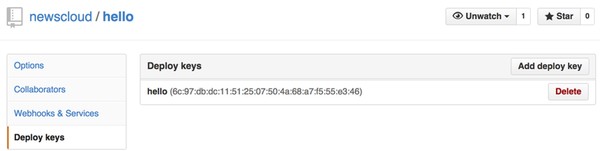
Once you add it, you'll see it listed here:
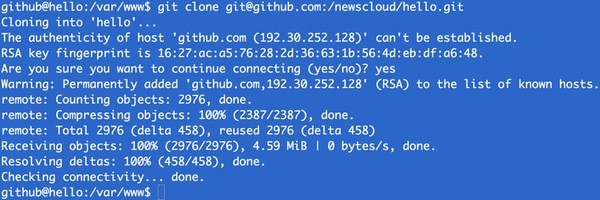
Finally, you can clone the tree to your production server:
git clone [email protected]:youraccount/hello.git /var/www/hello
If you're GitHub access is properly configured, it should look like this (if not, review this):
As you extend the codebase with this tutorial series and push updates from your local machine, you'll be able to sync them on your remote production server with git pull. This is simpler than pulling down a tarball or syncing code manually - and will become more useful as this tutorial series continues with later modules.
Create the Apache Site Configuration
Create an Apache site configuration file:
nano /etc/apache2/sites-available/hello.conf
Customize this configuration for your domain name:
<VirtualHost *:80>
 ServerName yourdomain.com
# Set document root to be "basic/web"
DocumentRoot "/var/www/hello/web"
<Directory "/var/www/hello/web">
    # use mod_rewrite for pretty URL support
    RewriteEngine on
    # If a directory or a file exists, use the request directly
    RewriteCond %{REQUEST_FILENAME} !-f
    RewriteCond %{REQUEST_FILENAME} !-d
    # Otherwise forward the request to index.php
    RewriteRule . index.php
</Directory>
</VirtualHost>
Enable your site:
a2ensite hello.conf
a2dissite 000-default.conf
service apache2 reload
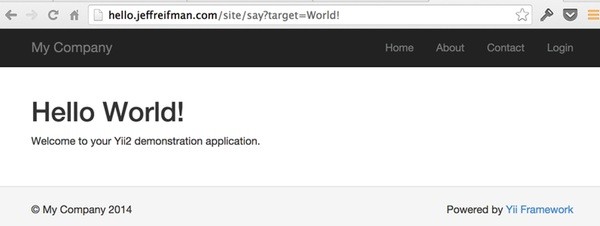
Visit http://yourdomain.com/site/say?target=World! and you should see your application running on your domain without the Yii2 debug toolbar at the bottom like this:
Congratulations! We're now ready to explore more sophisticated features in Yii2. If you'd like to know when the next Yii2 tutorial arrives, follow @tutspluscode or @reifman on Twitter or check my author page. My author page will include all the articles from this series as soon immediately after they are published.
If you have any questions or corrections on this tutorial, please post them in the comments.

Comments