In Programming with Yii2: Getting Started, we set up Yii2 locally, built a Hello World application, set up a remote server, and used Github to deploy our code. This tutorial will cover some of Yii's more basic concepts related to its implementation of the MVC framework: Models, Views and Controllers. We'll also explore layouts and customization of navigation menus and Bootstrap elements.
For these examples, we'll imagine we're building a framework for posting simple status updates, e.g. our own mini-Twitter. However, we won't go so far as to store the data in a database. I'll save that for the next tutorial, which will explore Yii's scaffolding capability, called Gii.
Gii automates and simplifies everything we'll do in this tutorial, but it's important to walk through the basic concepts and perform these tasks manually at least once.
Models
What's a model? Wikipedia says, "A model notifies its associated views and controllers when there has been a change in its state. This notification allows the views to produce updated output, and the controllers to change the available set of commands."
For me, models often represent the concepts of whatever I'm building in the "external" world. So, if we think of status updates, the Status model will contain all the properties of a status update and all the functions or methods related to querying or changing a status or statuses.
Best practice is to build as much functionality and intelligence into your models as you can. In MVC practice, you build models "heavy" and controllers and views light. Yii provides some excellent features that are specific to the kinds of things you do in web and application development that simplify model building—especially when it comes to forms and databases; most of this we'll explore in later tutorials.
Let's create our Status model. For our coding examples, you can use the Git repository. I'm building on what we created in the Getting Started tutorial—I've tagged it here for reference. The Github repository for the finished tutorial is here.
We'll create Status.php in /hello/models/Status.php. To post a status message, we need to collect the text of the message from the user. We'll also create a permissions field for posting publicly or privately.
<?php
namespace app\models;
use yii\base\Model;
class Status extends Model
{
const PERMISSIONS_PRIVATE = 10;
const PERMISSIONS_PUBLIC = 20;
public $text;
public $permissions;
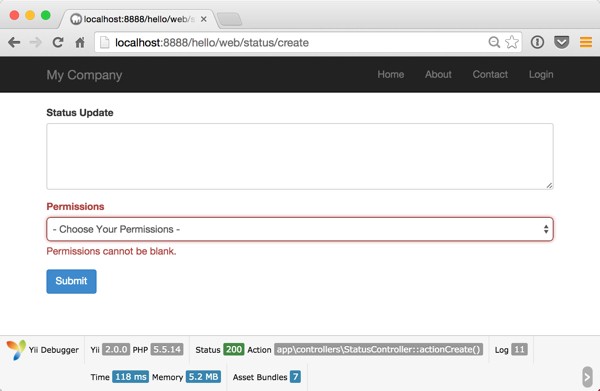
public function rules()
{
return [
[['text','permissions'], 'required'],
];
}
public function getPermissions() {
return array (self::PERMISSIONS_PRIVATE=>'Private',self::PERMISSIONS_PUBLIC=>'Public');
}
public function getPermissionsLabel($permissions) {
if ($permissions==self::PERMISSIONS_PUBLIC) {
return 'Public';
} else {
return 'Private';
}
}
}
?>
Notice the rules function—it's used by Yii's form validation to ensure that users enter the appropriate information into each field. Yii uses JavaScript to validate forms as the user types.
The getPermissions() function I created will be used for the form's drop-down list elements.
Now, let's move on to create a controller to let the user create and view the text updates.
Controllers
What's a controller? Wikipedia says, "A controller can send commands to the model to update the model's state (e.g., editing a document). It can also send commands to its associated view to change the view's presentation of the model." In a typical Yii web application, a URL path to a page invokes a controller to load the data for the page using the model and render the page using the view.
It's best to logically group related functions within a single controller. Different methods of the controller, called actions, implement each function. These often correspond to specific pages. For example, http://localhost:8888/hello/web/status/create will invoke the StatusController's create action that we're going to build.
As you develop Status related features, you would group these functions within a single StatusController.php. For now, we'll just build a create function.
In /hello/controllers/, create StatusController.php:
<?php

namespace app\controllers;

use Yii;
use yii\web\Controller;
use app\models\Status;

class StatusController extends Controller
{
    public function actionCreate()
    {
        $model = new Status;

        if ($model->load(Yii::$app->request->post()) && $model->validate()) {
            // valid data received in $model
            return $this->render('view', ['model' => $model]);
        } else {
            // either the page is initially displayed or there is some validation error
            return $this->render('create', ['model' => $model]);
        }
    }
}
?>
Form creation actions typically invoke the model data and then fork depending on whether they're part of a POST operation or not. If not, the empty form is displayed. If they are receiving posted data, they're validated and processed. In our case, this means proceeding to render the view file.
Views
What's a view? Wikipedia says, "A view requests information from the model that it uses to generate an output representation to the user." In Yii, the view uses a PHP-like template language to render the page output into HTML, leveraging data loaded by the model and delivered from the controller.
Views are typically located within a single folder related to the associated controller, e.g. the StatusController views are located in the views/status folder.
In Yii, form code is usually included in what's called a partial view. These files often are named with an underscore prefix. They are meant to be included by other views. This allows the actual form code to be reused by the create and update pages.
First, we'll make the Create view which renders the form. Then, we'll also create a View view for showing us the status update that we post. In upcoming tutorials, when we're working with an actual database, storing and retrieving the data, this will work a bit differently.
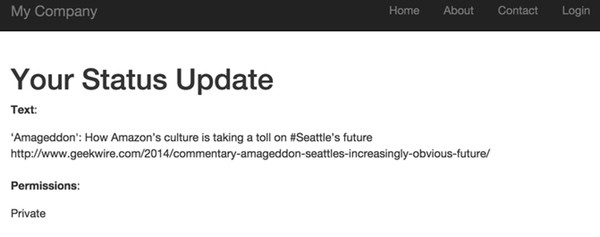
Here's a simple example of our /hello/views/status.view.php view file to render posted data:
<?php
  use yii\helpers\Html;
?>

<h1>Your Status Update</strong></h1>
<p><label>Text</label>:</p>
  <?= Html::encode($model->text) ?>
<br /><br />
<p><label>Permissions</label>:</p>
<?php
echo $model->getPermissionsLabel($model->permissions);
?>
Notice how a view file is a mix of HTML and PHP. When the controller receives posted data, it renders the above view, showing what data the user submitted.
But, now let's talk about forms and build the create form view file.
Forms
Forms are what we use every day in web development to collect data from the user, often to submit user input to a database. Yii provides a great deal of helper code to simplify the process of building, validating, securing and posting data from forms. In Yii, forms are a type of view.
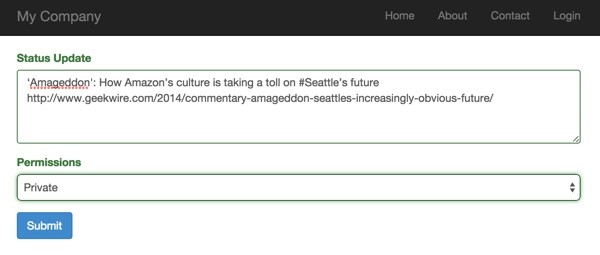
Here's an example form for creating a status update:
<?php
  use yii\helpers\Html;
  use yii\widgets\ActiveForm;
  use app\models\Status;
?>
<?php $form = ActiveForm::begin();?>
    <?= $form->field($model, 'text')->textArea(['rows' => '4'])->label('Status Update'); ?>

    <?=
    $form->field($model, 'permissions')->dropDownList($model->getPermissions(),
             ['prompt'=>'- Choose Your Permissions -']) ?>

    <div class="form-group">
        <?= Html::submitButton('Submit', ['class' => 'btn btn-primary']) ?>
    </div>

<?php ActiveForm::end(); ?>
The Yii2 ActiveForm widget is used to generate HTML for our input fields. Notice how the drop-down list invokes the Status model getPermissions method.

Clicking the Submit button returns to the StatusController's create action. When the posted data is received, it then renders the view.php file instead of the create.php form file.
Here's how the view file appears when rendered with view.php:
Next, let's update the global navigation bar to include links to the Status creation form.
Layouts
Layouts are the templates for most of the outer, repeated elements of a website such as the HTML document wrapper, header, navigation bar, and footer. Since these are common to most pages of a website, they are built once in the layout and not repeated everywhere in the code.
If you look at \hello\views\layouts\main.php, you can see the structure of the outer layout:
<?php
use yii\helpers\Html;
use yii\bootstrap\Nav;
use yii\bootstrap\NavBar;
use yii\widgets\Breadcrumbs;
use app\assets\AppAsset;
/* @var $this \yii\web\View */
/* @var $content string */
AppAsset::register($this);
?>
<?php $this->beginPage() ?>
<!DOCTYPE html>
<html lang="<?= Yii::$app->language ?>">
<head>
<meta charset="<?= Yii::$app->charset ?>"/>
<meta name="viewport" content="width=device-width, initial-scale=1">
<?= Html::csrfMetaTags() ?>
<title><?= Html::encode($this->title) ?></title>
<?php $this->head() ?>
</head>
<body>
<?php $this->beginBody() ?>
<div class="wrap">
<?php
NavBar::begin([
'brandLabel' => 'My Company',
'brandUrl' => Yii::$app->homeUrl,
'options' => [
'class' => 'navbar-inverse navbar-fixed-top',
],
]);
echo Nav::widget([
'options' => ['class' => 'navbar-nav navbar-right'],
'items' => [
['label' => 'Home', 'url' => ['/site/index']],
['label' => 'About', 'url' => ['/site/about']],
['label' => 'Contact', 'url' => ['/site/contact']],
Yii::$app->user->isGuest ?
['label' => 'Login', 'url' => ['/site/login']] :
['label' => 'Logout (' . Yii::$app->user->identity->username . ')',
'url' => ['/site/logout'],
'linkOptions' => ['data-method' => 'post']],
],
]);
NavBar::end();
?>
        <div class="container">
            <?= Breadcrumbs::widget([
                'links' => isset($this->params['breadcrumbs']) ? $this->params['breadcrumbs'] : [],
            ]) ?>
            <?= $content ?>
        </div>
</div>
<footer class="footer">
<div class="container">
<p class="pull-left">© My Company <?= date('Y') ?></p>
<p class="pull-right"><?= Yii::powered() ?></p>
</div>
</footer>
<?php $this->endBody() ?>
</body>
</html>
<?php $this->endPage() ?>
Views mostly represent the inner page bodies of a website—what's between the header and navigation bar and the beginning of the footer. They're rendered when the layout echoes $content:
<div class="container">
<?= Breadcrumbs::widget([
'links' => isset($this->params['breadcrumbs']) ? $this->params['breadcrumbs'] : [],
]) ?>
<?= $content ?>
</div>
Yii allows you to build multiple layouts per application, although this isn't always necessary. It depends on your application. Controllers offer a default layout and you can override this for any given action. If your controllers logically group related activities, it's likely that the user interface will use the same layout for all of the actions within a controller.
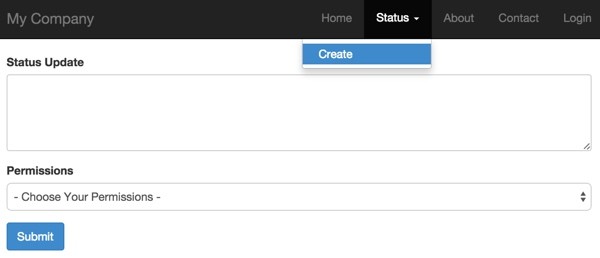
Now, let's update the navigation bar to include a Status menu with a "create" action. Since Yii2 uses Bootstrap for its layouts and styles, we just need to tell it to create a Bootstrap dropdown.
Update the Nav::widget to have a nested array:
            echo Nav::widget([
                'options' => ['class' => 'navbar-nav navbar-right'],
                'items' => [
                    ['label' => 'Home', 'url' => ['/site/index']],
                    [
                       'label' => 'Status',
                       'items' => [
                            ['label' => 'Create', 'url' => ['/status/create']],
                        ],
                    ],
                    ['label' => 'About', 'url' => ['/site/about']],
                    ['label' => 'Contact', 'url' => ['/site/contact']],
                    Yii::$app->user->isGuest ?
                        ['label' => 'Login', 'url' => ['/site/login']] :
                        ['label' => 'Logout (' . Yii::$app->user->identity->username . ')',
                            'url' => ['/site/logout'],
                            'linkOptions' => ['data-method' => 'post']],
                ],
            ]);
Here's what you should see:
What's Next?
Now that you know a bit about how Yii's MVC architecture works in practice, including models, views, controllers, forms and layouts, we'll create a database schema for statuses and use Yii's scaffolding generator, Gii, to build all of this automatically for us. Things will start to move a bit faster.
If you'd like to know when the next Yii2 tutorial arrives, follow me @reifman on Twitter or check my Tuts+ instructor page. My instructor page will include all the articles from this series as soon as they are published.

Comments