My favorite popular productivity tools, iDoneThis and TeamSnippets, give me a simple way to record and share the tasks that I have completed each day with my teammates. Each day, the services send me an email asking me what I completed today. From my email account, I can easily reply with my completed tasks without having to log into the website. Remarkably, a majority of my teammates complete most of their website updates through email replying.
You can also create the same powerful functionality with commenting, receiving content via email, and enabling replies to create, continue, and resolve support tickets. With the Inbound Parse Webhook, from SendGrid’s SMTP Service, you can make your applications interactive by inviting replies and responding to users via their email.
The SendGrid Parse Webhook lets you parse email contents and attachments from any incoming emails and post the data via JSON to your application. The capability allows you to accomplish the following, from email replies to your website application:
- Post blog entries
- Use email replies to update your mailing list or database
- Upload photos and videos
- Start and resolve support ticket requests
Getting Started
The instructions below are for getting the Inbound Parse Webhook up and running locally. Start by cloning this GitHub repository and cd into its directory:
$ git clone https://github.com/scottmotte/sendgrid-parse-api-example.git
$ cd sendgrid-parse-api-example
Set Up Your Credentials
$ mv .env.example .env
Change the Contents of .env to Your SendGrid Username and Password
SENDGRID_USERNAME = your_sendgrid_username
SENDGRID_PASSWORD = your_sendgrid_password
Run the Application
$ npm install
$ node app.js
If npm install doesn’t work for you, you can try installing through MacPorts:
$ sudo port npm install
If you are receiving errors that suggest you’re missing a module, this means that you should install it. For example, I received an error that app.js is not able to instantiate the dotenv variable, and after installing dotenv, it resolved the issue altogether.
$ npm install dotenv
Setup a Tunnel
Use a local tunnel like ngrok to test locally and quickly, rather than deploying code to a live server.
Ngrok allows you to securely expose a local web server to the web and capture traffic for detailed inspection and replay. Download, unzip, and start the ngrok process. After you start the process, ngrok will give you a unique URL for you to inspect locally on.
The instructions below are for getting ngrok to work locally on a Mac. Visit ngrok.com to install a local setup for other operating systems.
$ wget https://dl.ngrok.com/darwin_amd64/ngrok.zip
$ unzip ngrok.zip –d /usr/local/bin
$ ngrok 3000
Set Up SendGrid and MX Records
Note that this can take up to 48 hours.
Once your MX records have fully propagated, you can send emails on production in up to 48 hours.
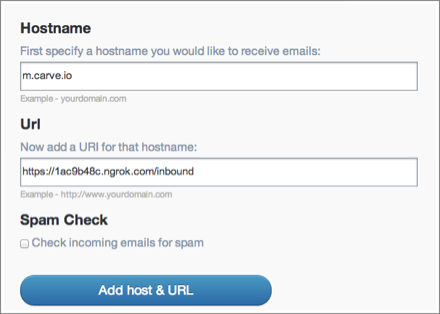
First, after your SendGrid account is provisioned, you can set up your SendGrid Parsing Incoming Emails setting. Click on the “Developers” tab for the “Parsing Incoming Emails” link. In the Hostname field, specify your hostname (i.e. yourdomain.com) that you would like. In the URL field, input the unique URL that ngrok gives you.
Configure an MX record on the hostname you set above to point to mx.sendgrid.net. It should look something like the following.

Now, in two days, your MX records will completely propagate.
Send an Email From Your Personal Email Account
If you send an email to [email protected], in a few minutes, the app you have running will parse and deliver the contents to you in JSON format.
Test and Play With the API
Congratulations, you have set up a simple way to parse your emails efficiently! Now, you are ready to explore and make calls to the API.
Inspecting Payload Contents
If you just need a quick way to inspect the payload contents of the Parse Webhook, you can use RequestBin, a free tool, after setting up your MX records.
Posting From The Command-Line
If you’d like to get your hands dirty from the command line, you can try SendGrid’s free webhook debugger tool, which is a fast way to start seeing how events appear.
At the heart of the tool is a URL that you can set as your Parse Webhook endpoint. Each time you load the URL, you will get a unique ID within the URL.
Below are two examples to get started with your webhook. The GET example will begin listening for new data. From your command-line terminal, paste in the following GET example:
$ curl –X GET \ http://hookdebug.sendgrid.com/v1/events/e6a20fffc9c1968dd64684f0b11b9c29
To paste in whether your Parse Webhook is receiving data, type in the curl command from the POST example into a second terminal screen:
$ curl –X POST \
  -d “foo=bar” \
  -d “alice=bob” \
  http://hookdebug.sendgrid.com/v1/events/e6a20fffc9c1968dd64684f0b11b9c29
The response on your terminal window should now have new content:
{
  “event_id”: “e6a20fffc9c1968dd64684f0b11b9c29”
}
Next, send an email to the domain or sub-domain that you are using for inbound parsing. Within a few minutes, you should see the parsed email as JSON in your terminal window.
Customize Your Parser
As you can see, the details of email data separation and routing of an incoming message to the SendGrid script are done behind the scenes for you. Starting from scratch, you can use the Parse Webhook in many creative ways. You’re now ready to place some real email data through that webhook!
To custom-parse your emails, you can start to customize the code in routes/inbound.js.
For example, you can rewrite the inbound.js file to store attachments in a way that would suit your application and database or even complete an action if the email contents contain a word.
Conclusion
For use cases, case studies and examples, download the Parse Webhook Guide or check out the Parse Webhook API library.
When looking at the Parse Webhook examples, you will notice that the two most common ways it is used are: interacting with your users and collecting data within your applications via email.
With the webhook, you can develop features that make frequent tasks more productive for your users without having them leave their email inbox. Collecting insights and making your emails interactive have never been easier.

Comments