Earlier on in the series we covered how to customise the WordPress login and registration forms. We then added some custom fields to our registration form. Today, in the third and final part of this series, we will be covering how to develop a “my account” section for your site’s users whereby users can edit their profile information.
Page Setup
The first thing we want to do is create a Page Template to house our content. I like to prefix my page templates with the word “template”. So my file is called template-user-profile.php and the opening PHP looks like this:
<?php

/**
 * Template Name: User Profile
 */
I’ve saved this in the root of my theme directory. If you are unfamiliar with WordPress Page Templates I suggest you read the link above. They are extremely handy.
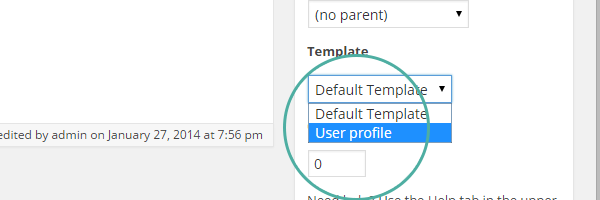
Now let’s head to the WordPress back end and make a page named “profile”, and in the Page Attributes meta box assign it our newly created page template. Once you have published this page, you should have a blank page on the front end: http://yourdomain/profile.
Now to inject some content into our page. We want the structure to be page content (i.e. whatever is written in the WordPress WYSIWYG) and then our profile form to follow.
It’s often helpful to get the code from page.php and use that as a starting point for your Page Templates. This code differs a bit depending on your theme, but it will most likely contain a loop that spits out some page content. The content part is normally fetched using the WordPress function get_template_part(). Right underneath where the content has been retrieved, let’s insert our form HTML. So to recap:
- Copy and paste the code from page.php into our Page Template.
- Find where the content is being output.
- Right under that, insert the following code and then we’ll walk through it:
<form role="form" action="" id="user_profile" method="POST">
<?php wp_nonce_field( 'user_profile_nonce', 'user_profile_nonce_field' ); ?>
<div class="form-group">
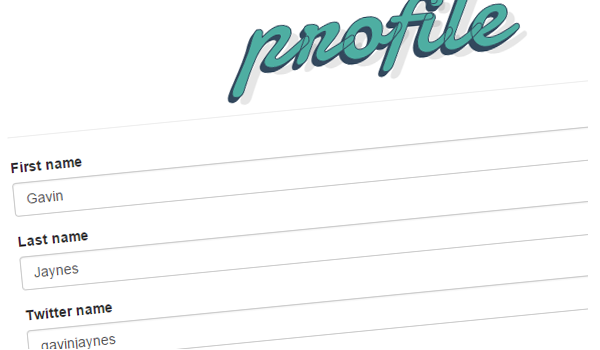
<label for="first_name"><?php _e( 'First name', 'sage' ); ?></label>
<input type="text" class="form-control" id="first_name" name="first_name" placeholder="<?php _e( 'First name', 'sage' ); ?>" value="<?php echo $user_info->first_name; ?>">
</div>
<div class="form-group">
<label for="last_name"><?php _e( 'Last name', 'sage' ); ?></label>
<input type="text" class="form-control" id="last_name" name="last_name" placeholder="<?php _e( 'Last name', 'sage' ); ?>" value="<?php echo $user_info->last_name; ?>">
</div>
<div class="form-group">
<label for="twitter_name"><?php _e( 'Twitter name', 'sage' ); ?></label>
<input type="text" class="form-control" id="twitter_name" name="twitter_name" placeholder="<?php _e( 'Twitter name', 'sage' ); ?>" value="<?php echo $user_info->twitter_name; ?>">
</div>
<div class="form-group">
<label for="email"><?php _e( 'Email address', 'sage' ); ?></label>
<input type="email" class="form-control" id="email" name="email" placeholder="<?php _e( 'Email address', 'sage' ); ?>" value="<?php echo $user_info->user_email; ?>">
</div>
<div class="form-group">
<label for="pass1"><?php _e( 'Password', 'sage' ); ?></label>
<input type="password" class="form-control" id="pass1" name="pass1" placeholder="<?php _e( 'Password', 'sage' ); ?>">
</div>
<div class="form-group">
<label for="pass2"><?php _e( 'Repeat password', 'sage' ); ?></label>
<input type="password" class="form-control" id="pass2" name="pass2" placeholder="<?php _e( 'Repeat password', 'sage' ); ?>">
</div>
<button type="submit" class="btn btn-default"><?php _e( 'Submit', 'sage' ); ?></button>
</form>
There's nothing crazy going on here: the form is using Bootstrap markup as our theme is built on Bootstrap. Other things to note are that the form is being sent using the POST method and we have included a wp_nonce_field—this is a type of security token that helps prevent malicious attacks. If you are unfamiliar with WordPress's Nonces, I'd suggest having a read of this article.
Retrieving the Data
With that in place, you should have a form on the front of the site, but it's not doing much. We want it to display the data we have for the logged-in user. You may have noticed the value attributes in our form are echoing out some PHP.
value="<?php echo $user_info->first_name; ?>"
Right now that $user_info object does not exist as we have not written the code yet, so let's start there. Paste the following code before our form in template-user-profile.php.
<?php

/**
 * Gets the user info.
 * Returned in an object.
 *
 * http://codex.wordpress.org/Function_Reference/get_userdata
 */

$user_id = get_current_user_id();
$user_info = get_userdata( $user_id );
Using some WordPress native functions, it gets the current user's ID, and with that we are able to get the user's data. This is stored in an object called $user_info, and as demonstrated above we can retrieve user data quite easily. To see all the data stored in that object, you can run a var_dump like so: <?php var_dump($user_info); ?>. This can be useful for debugging or just to see what you can access.
Processing the Data
There is one final piece to the puzzle, and that's to process the data, thus allowing users to edit their profiles. In order to keep things organised, I have put the membership code into a file aptly named membership.php. This is in the lib directory and has been included in our functions.php file. Once you have done this, open your newly created membership.php file in a code editor, and let's make the function that will process the users' data.
First, let's quickly run through the logic. When the submit button is hit, we want to check that our nonce field has been sent—this checks that the data is coming from the right place.
If that condition is met, we want to get the current user's ID as we will need this to store the data against. Then we want to arrange our data into a structure WordPress likes—in this case it's an array with specific keys. Before saving the data, we also want to validate and sanitize it. And lastly we want to display messages to our user, either of success or errors.
And the code for all that looks something like this:
<?php

/**
 * Process the profile editor form
 */
function tutsplus_process_user_profile_data() {

    if ( isset( $_POST['user_profile_nonce_field'] ) && wp_verify_nonce( $_POST['user_profile_nonce_field'], 'user_profile_nonce' ) ) {

        // Get the current user id.
        $user_id = get_current_user_id();

        // Put our data into a better looking array and sanitize it.
        $user_data = array(
            'first_name' => sanitize_text_field( $_POST['first_name'] ),
            'last_name' => sanitize_text_field( $_POST['last_name'] ),
            'user_email' => sanitize_email( $_POST['email'] ),
            'twitter_name' => sanitize_text_field( $_POST['twitter_name'] ),
            'user_pass' => $_POST['pass1'],
        );

        if ( ! empty( $user_data['user_pass'] ) ) {

            // Validate the passwords to check they are the same.
            if ( strcmp( $user_data['user_pass'], $_POST['pass2'] ) !== 0 ) {

                wp_redirect( '?password-error=true' );

                exit;
            }

        } else {

            // If the password fields are not set don't save.
            unset( $user_data['user_pass'] );
        }

        // Save the values to the post.
        foreach ( $user_data as $key => $value ) {

            $results = '';

            // http://codex.wordpress.org/Function_Reference/wp_update_user
            if ( $key == 'twitter_name' ) {

                $results = update_user_meta( $user_id, $key, $value );
                unset( $user_data['twitter_name'] );

            } elseif ( $key == 'user_pass' ) {

                wp_set_password( $user_data['user_pass'], $user_id );
                unset( $user_data['user_pass'] );

            } else {

                // Save the remaining values.
                $results = wp_update_user( array( 'ID' => $user_id, $key => $value ) );

            }

            if ( ! is_wp_error( $results ) ) {

                wp_redirect( '?profile-updated=true' );

            }
        }

        wp_redirect( '?profile-updated=false' );

        exit;
    }
}

add_action( 'tutsplus_process_user_profile', 'tutsplus_process_user_profile_data' );
Now you might notice that the data is being saved using three different WordPress functions:
-
update_user_meta()for the Twitter name -
wp_set_password()for the password -
wp_update_user()for the remaining data
And you are right to question this. Basically the custom meta data (the Twitter name) needs to be processed using the relative function and not the general update user function. As for the password, while it can work with wp_update_user(), I have had issues with it and prefer to use this method. Remember this is only a guide, and often the code is aimed at demonstrating different methods for achieving your requirements.
Okay, so now we have our function to process the data, but it's not being called anywhere. At the end of our function you can see there is an action associated with it. So to call that function we just need to use the WordPress provided: do_action();. So paste this line above your form in the User profile page template we created earlier:
<?php do_action( 'tutsplus_process_user_profile' ); ?>
With that in place, when we submit our form it should run through our function and process the data.
Error and Success Messages
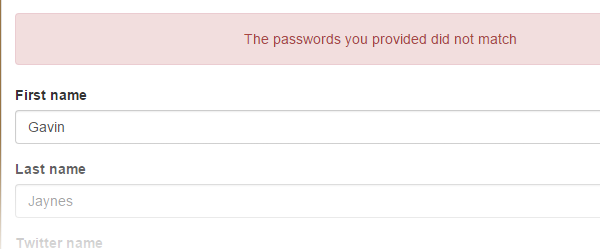
Our profile form should save or reject the data now. Perhaps the two passwords were not the same and did not save. There are no messages to provide user feedback. Let's save our users some grief and give them some messages.
In our tutsplus_process_user_profile() function you may have noticed it appends different query strings to the URL depending on the result of the processing. So if everything is saved and successful then our URL will be appended with ?profile-updated=true, and these vary based on the results. What we need to do is trigger a message based on these responses.
Below I have used a filter to grab onto the content, and through the magic of $_GET we can check the parameters and spit out what we need to.
<?php

/**
 * Display the correct message based on the query string.
 *
 * @param string $content Post content.
 *
 * @return string Message and content.
 */
function tutsplus_display_messages( $content ) {

    if ( 'true' == $_GET['profile-updated'] ) {

        $message = __( 'Your information was successfully updated', 'sage' );
        $message_markup = tutsplus_get_message_markup( $message, 'success' );

    } elseif ( 'false' == $_GET['profile-updated'] ) {

        $message = __( 'There was an error processing your request', 'sage' );
        $message_markup = tutsplus_get_message_markup( $message, 'danger' );

    } elseif ( 'true' == $_GET['password-error'] ) {

        $message = __( 'The passwords you provided did not match', 'sage' );
        $message_markup = tutsplus_get_message_markup( $message, 'danger' );

    }

    return $message_markup . $content;
}

add_filter( 'the_content', 'tutsplus_display_messages', 1 );
Okay, not quite there—we are using a function called tutsplus_get_message_markup() above, but we have not yet defined it. It takes in two parameters:
- a string: the message to display
- a string: the severity of alert to show based on Bootstrap
So let's define our tutsplus_get_message_markup() function:
<?php

/**
 * A little helper function to generate the Bootstrap alerts markup.
 *
 * @param string $message Message to display.
 * @param string $severity Severity of message to display.
 *
 * @return string Message markup.
 */
function tutsplus_get_message_markup( $message, $severity ) {

    $output = '<div class="alert alert-' . $severity . ' alert-dismissable">';
        $output .= '<button type="button" class="close" data-dismiss="alert" aria-hidden="true">';
            $output .= '<i class="fa fa-times-circle"></i>';
        $output .= '</button>';
        $output .= '<p class="text-center">' . $message . '</p>';
    $output .= '</div>';

    return $output;

}
Great. Now our members can see if their data is being saved or not.
Extra Credit
So now we have a working prototype for a membership site. Much of this functionality ships with WordPress, but we've styled and tweaked it to make it a better experience for our users. So now let's just dot our 'I's and cross our 'T's to improve the experience just that little bit more.
Firstly, we want to keep non-logged-in users from being able to access the profile page. A simple redirect to the home page will do. I've made a function that does just that, and I call it on pages I want to be accessed exclusively by logged-in users.
Here's the function, which is placed in membership.php:
<?php

/**
 * Makes pages where this function is called only
 * accessible if you are logged in.
 */
function tutsplus_private_page() {

    if ( ! is_user_logged_in() ) {

        wp_redirect( home_url() );

        exit();

    }

}
Now we can simply call the function at the top of our User Profile page template.
Next up we want to keep users—well, subscribers—out of the admin area. And on top of that, let's remove the admin bar for logged-in users. Again let's put this in our membership.php.
<?php

/**
 * Stop subscribers from accessing the backed
 * Also turn off the admin bar for anyone but administrators.
 */
function tutsplus_lock_it_down() {

    if ( ! current_user_can('administrator') && ! is_admin() ) {

        show_admin_bar( false );

    }

    if ( current_user_can( 'subscriber' ) && is_admin() ) {

        wp_safe_redirect( 'profile' );

    }

}

add_action( 'after_setup_theme', 'tutsplus_lock_it_down' );
And finally, it's not very easy to navigate the login/logout screens. Let's add some user-specific navigation. What I've done is create a function that outputs the relevant code, and this is then called in our templates/header.php where the main navigation is rendered.
<?php

/**
 * Outputs some user specific navigation.
 */
function tutsplus_user_nav() {

    $user_id = get_current_user_id();
    $user_name = get_user_meta( $user_id, 'first_name', true );
    $welcome_message = __( 'Welcome', 'sage' ) . ' ' . $user_name;

    echo '<ul class="nav navbar-nav navbar-right">';

        if ( is_user_logged_in() ) {

            echo '<li>';
                echo '<a href="' . home_url( 'profile' ) . '">' . $welcome_message . '</a>';
            echo '</li>';
            echo '<li>';
                echo '<a href="' . wp_logout_url( home_url() ) . '">' . __( 'Log out', 'sage' ) . '</a>';
            echo '</li>';

        } else {

            echo '<li>';
                echo '<a href="' . wp_login_url() . '">' . __( 'Log in', 'sage' ) . '</a>';
            echo '</li>';

        }

    echo '</ul>';

}
Summary
WordPress is an amazing foundation for a membership application. It already has so much of the functionality associated with this type of application. On top of that, the folks at WordPress have made it pretty easy to hook onto events and filter content so we can extend what is already there.
I hope this has provided you with the methods, ideas and knowledge to develop your own membership sites. This is by no means a full guide on this topic, but rather it serves as a foundation.
Any feedback is welcome, and I shall do my best to answer any questions in the comments.
Things to Note
Please note: if you are downloading the code from the GitHub repository, it includes all the files to get your theme up and running. The idea is that you can grab the repo and just run the necessary Gulp and Bower commands and you'll be away! If you just want the files that contain code specific to this series, the files are listed below:
- all the files in the admin directory
- lib/admin.php
- lib/membership.php
- template-user-profile.php

Comments