If you've been following the development of office communication tools in the past year or so, I'm sure you've heard plenty about Slack. On the surface level, Slack is just another chat application designed for businesses, but because of its attention to detail and its extensibility, many commentators are already saying that the tool will dramatically change how we work in the future.
As developers, we are in a good position to jump on the trend and think about ways we can use Slack as a chat-based user interface for our applications.
That's why, in this tutorial, you will learn how to get started with integrating your PHP application to Slack, by making it post messages to a Slack channel and respond to slash commands.
You can download the source code for the tutorial from the linked GitHub repository, or create it yourself while going through the tutorial.
The tutorial's code consists of two parts:
- a bare-bones but complete interface for communicating with Slack
- a simple example script that uses the Slack class to send notifications and to respond to a slash command
Let's get started.
1. Create Your Application and Connect It to Slack
A quick Google search for the term "Slack PHP" brings up a handful of different Slack interfaces created by other developers, so you could just as well go with an existing project, and hook it to your application.
But the API is not complicated at all, so there is no reason not to have some fun and approach the project from the bottom up. This way, you'll know what's in the API (and your integration). It's always good to demystify things a bit.
At the core of this tutorial is building the Slack interface, but to use and test it, we'll also need an application. For this, I decided to go with simple PHP application that doesn't use any framework.
Here's how the example application will work:
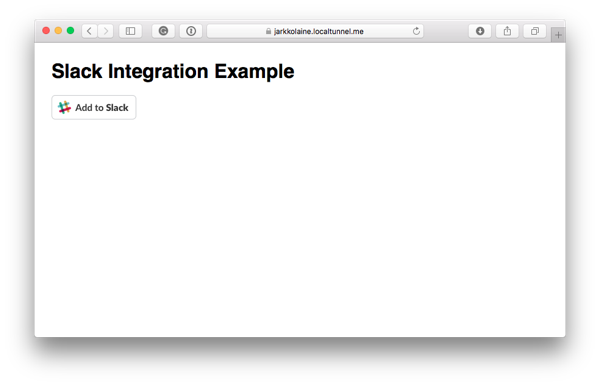
- The first time you run the application, you will see an "Add to Slack" button for connecting the application to a Slack channel.
- Clicking on the button will guide you through Slack's OAuth-based authentication. When the application receives an access token from Slack, it will save it to a text file so that it can later use it to talk to Slack.
- When the OAuth-based authentication is complete, the application will show a simple text field that can be used to send fun notifications ("Oh yeah, I am a robot!") to your Slack channel.
- Finally, behind the scenes, the app will respond to slash commands you or your teammates type on the linked Slack channel.
You can run the application on a PHP-enabled server on the web, or follow the instructions in this tutorial and run it on your local development machine.
The demo application is for demonstration purposes only, so in the end, you will probably take the Slack interface and connect it to your existing WordPress, Laravel, or other PHP project. Throughout the tutorial, I will share some ideas on how you can use the interface class in a real application instead of our simple demo app.
Step 1: Create Your PHP Application
First, let's begin by creating the basic project architecture and putting all files in place.
If you have downloaded the source code from GitHub, you can just quickly browse this step to make sure you understand how the code is organized and then move on to the next step.
Inside the project directory, create the following file structure:
-
index.php: The file for the example application described above. -
slack-interface: A directory that will contain the Slack interface we'll be creating in this tutorial. The directory will contain three files: -
slack-interface/class-slack.php: The Slack interface class. -
slack-interface/class-slack-access.php: A class for holding the Slack access information and passing it to the application using the interface. -
slack-interface/class-slack-api-exception.php: An exception class for passing errors from the interface to the code using it.
Then, with the files in place, let's add some content to each of them so that we have the framework in place for developing the actual functionality.
Start by adding the main HTML form and some placeholder code to index.php:
<?php
/**
 * A lightweight example script for demonstrating how to
 * work with the Slack API.
 */

// Include our Slack interface classes
require_once 'slack-interface/class-slack.php';
require_once 'slack-interface/class-slack-access.php';
require_once 'slack-interface/class-slack-api-exception.php';

use Slack_Interface\Slack;
use Slack_Interface\Slack_API_Exception;

//
// HELPER FUNCTIONS
//

/**
 * Initializes the Slack object.
 *
 * @return Slack    The Slack interface object
 */
function initialize_slack_interface() {
    return null;
}

/**
 * Executes an application action (e.g. 'send_notification').
 *
 * @param Slack  $slack     The Slack interface object
 * @param string $action    The id of the action to execute
 *
 * @return string   A result message to show to the user
 */
function do_action( $slack, $action ) {
    $result_message = '';

    switch ( $action ) {
        default:
            break;
    }

    return $result_message;
}

//
// MAIN FUNCTIONALITY
//

// Setup the Slack interface
$slack = initialize_slack_interface();

// If an action was passed, execute it before rendering the page
$result_message = '';
if ( isset( $_REQUEST['action'] ) ) {
    $action = $_REQUEST['action'];
    $result_message = do_action( $slack, $action );
}

//
// PAGE LAYOUT
//

?>
<html>
    <head>
        <title>Slack Integration Example</title>

        <style>
            body {
                font-family: Helvetica, sans-serif;
                padding: 20px;
            }

            .notification {
                padding: 20px;
                background-color: #fafad2;
            }

            input {
                padding: 10px;
                font-size: 1.2em;
                width: 100%;
            }
        </style>
    </head>

    <body>
        <h1>Slack Integration Example</h1>

        <?php if ( $result_message ) : ?>
            <p class="notice">
                <?php echo $result_message; ?>
            </p>
        <?php endif; ?>

        <form action="" method="post">
            <input type="hidden" name="action" value="send_notification"/>
            <p>
                <input type="text" name="text" placeholder="Type your notification here and press enter to send." />
            </p>
        </form>
    </body>
</html>
Let's take a look at the contents of the script and what's in there at this point:
- On lines 7-13, we first include the library files and then notify PHP that we're going to be using the
SlackandSlack_API_Exceptionclasses from theSlack_Interfacenamespace. The files and the class don't exist yet, but we'll get to them soon. - Next, there are two placeholders for helper functions. The first helper function,
initialize_slack_interface(lines 19-26), will set up theSlackclass for the current session. - The second helper function,
do_action(lines 28-45) will be used to handle other actions except rendering the page—for example, posting the submitted message to your Slack channel, but also receiving incoming slash commands from Slack. - Following the helper functions, there's the "main" functionality of our little application. First, the application initializes the
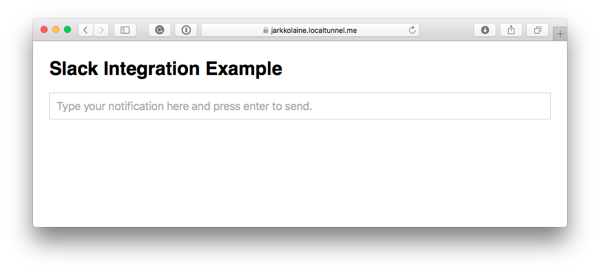
Slackobject (line 52). Then, on lines 54-59, it checks if an action has been requested using theactionparameter. If yes, the application executes the action using ourdo_actionhelper function. - The rest of the script is basic HTML (and some CSS, which I wrote in the same file to keep things simple) that renders the form you saw in the image above.
Next, add some content in the class files that make up our Slack interface.
In class-slack.php, add the following code:
<?php
namespace Slack_Interface;

/**
 * A basic Slack interface you can use as a starting point
 * for your own Slack projects.
 */
class Slack {

    private static $api_root = 'https://slack.com/api/';

    public function __construct() {

    }

}
The class doesn't contain any functionality yet, except for a placeholder constructor and the definition of the root URL for the Slack API. On line 2, you'll also notice that the class is placed in a namespace, Slack_Interface.
Similarly, in class-slack-access.php, add the following code:
<?php
namespace Slack_Interface;

/**
 * A class for holding Slack authentication data.
 */
class Slack_Access {

    public function __construct( $data ) {

    }

}
Finally, add the following contents to class-slack-api-exception.php:
<?php
namespace Slack_Interface;

use Exception;

/**
 * A simple exception class for throwing Slack API errors.
 */
class Slack_API_Exception extends Exception {

}
Now, we have created the framework for our Slack application and are ready to start adding some functionality.
But first, we need to make the application available on the web so that Slack can talk to it.
Step 2: Make Your Server Available on the Internet
Before you can register your application with Slack and make it receive incoming calls from Slack, you first need to make it accessible from the internet.
Slash commands also require that the application is using HTTPS. If you don't care about commands and simply want your application to be able to send notifications, you can skip this part. For this tutorial, however, as incoming slash commands are a big part of what we want to do, we need a solution that gives us HTTPS support.
If your web server already has HTTPS set up, that's a natural way to go.
Another option, in the development phase, is to use a tunneling service such as localtunnel. Localtunnel gives your server a secure URL on the web that can be pointed to your web server, running on your local machine. While not a solution for live applications, when testing the functionality, it both simplifies your workflow (no need to upload files to a server) and gives you HTTPS support out of the box.
To get started, install localtunnel according to the instructions on the tool's website.
Then, start your web server, noting the port your server listens to.
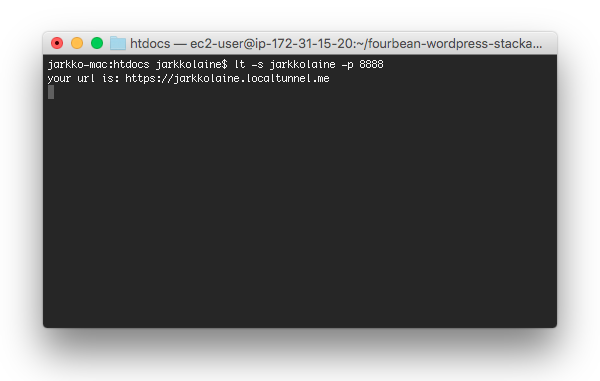
And finally, once your server is up, start localtunnel in the terminal using the following command. Replace your_subdomain with your preferred subdomain and your_port with your web server's port:
lt -s your_subdomain -p your_port
If your requested subdomain is available, localtunnel starts up, and you can access your server through the URL https://your_subdomain.localtunnel.me.
Step 3: Register a New Slack Application
Once your server can be reached from the internet, it's time to register a new Slack application.
To create a Slack application, sign in to your Slack account and visit the New Application page. You can also find the link to this page by clicking on My Apps on the top right corner of your Slack API dashboard when signed in.

The New Application page looks like this:
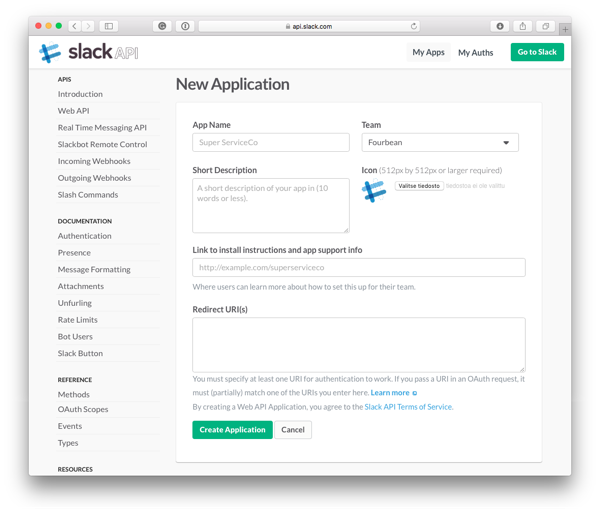
On this page, enter the information about your application and then click Create Application to save it:
- App Name: A name for identifying your application on the list of applications but also in any messages you send back to Slack. I went with "Slack Tutorial".
- Team: The team for which the application will be available. When your application is ready, you can submit it to the app directory. At that point, the Slack team will review it and, if all goes well, make your application available to everyone.
- Short Description: A description that will be shown to users when they are connecting your application to their Slack channels. If just testing, you can leave this empty for now. Same goes for the Link to installation instructions and app support info field.
- Icon: An icon that will be shown to your users when they are connecting your application to their Slack channels as well as in every message posted by your app.
-
Redirect URI(s): A URL that Slack will redirect your users to when they have completed the authentication flow. We'll look into this in more detail in Steps 5 and 6 below, but now, just set the field to point to
index.php?action=oauthin your application, for example, https://your_subdomain.localtunnel.me/slack-integration/index.php?action=oauth.
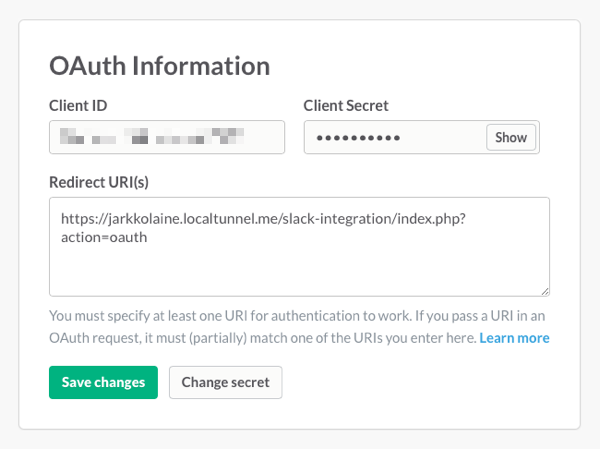
When the Slack application definition has been created, you'll see it listed on the My Apps page. There, you can edit the application's information if needed, and copy its API credentials (listed in a section labeled OAuth Information) to your integration:
Step 4: Store the API Credentials in Your Application
Next, as you will store the API Credentials to your PHP application, it's good to take some time to think about how to do it as securely as possible.
In general, it's not regarded as a good practice to commit such sensitive information to version control. Instead, you might want to go with one of the following options:
- Storing the credentials in your database can be a good idea, for example, in a WordPress plugin where each user will have their own set of API credentials and you want them to be able to set their credentials directly from the Admin Dashboard.
- Another option (a bit more secure than the first) is to define the credentials as constants in a configuration file directly on the server (again, if working with WordPress,
wp-config.phpwould be a natural choice). Just make sure the configuration file isn't exposed to the outside world (or committed to version control). - Finally, you can set the client ID and secret as environment variables on the server. This way, the information isn't stored in a file that could be accidentally leaked outside of the application.
In our implementation, we'll go with a combination of the last two methods. To make the Slack interface aware of the API credentials, add two new functions to the Slack class:
/**
 * Returns the Slack client ID.
 *
 * @return string   The client ID or empty string if not configured
 */
public function get_client_id() {
    // First, check if client ID is defined in a constant
    if ( defined( 'SLACK_CLIENT_ID' ) ) {
        return SLACK_CLIENT_ID;
    }

    // If no constant found, look for environment variable
    if ( getenv( 'SLACK_CLIENT_ID' ) ) {
        return getenv( 'SLACK_CLIENT_ID' );
    }

    // Not configured, return empty string
    return '';
}

/**
 * Returns the Slack client secret.
 *
 * @return string   The client secret or empty string if not configured
 */
private function get_client_secret() {
    // First, check if client secret is defined in a constant
    if ( defined( 'SLACK_CLIENT_SECRET' ) ) {
        return SLACK_CLIENT_SECRET;
    }

    // If no constant found, look for environment variable
    if ( getenv( 'SLACK_CLIENT_SECRET' ) ) {
        return getenv( 'SLACK_CLIENT_SECRET' );
    }

    // Not configured, return empty string
    return '';
}
The two functions are almost exact copies of each other, so let's just go through the first one, get_client_id, to get an idea of what they do:
- First, on lines 7-10, the function checks to see if the client ID has been stored in a constant named
SLACK_CLIENT_ID. If this constant is defined, the function returns its value. - If the constant hasn't been defined, the function continues by checking for an environment variable with the same name (lines 12-15).
- Finally, if no client ID was found, the function returns an empty string.
To use this approach, add your access credentials at the beginning of index.php, or even better, a separate PHP file which you include in index.php but never commit to version control:
// Define Slack application identifiers
// Even better is to put these in environment variables so you don't risk exposing
// them to the outer world (e.g. by committing to version control)
define( 'SLACK_CLIENT_ID', 'Paste your client ID here' );
define( 'SLACK_CLIENT_SECRET', 'Paste your client secret here' );
Step 5: Create a Data Structure for Storing Authorization Information
Now that we have stored the application credentials, it's time to move to the next level of authentication: allowing your users to add the application to their Slack accounts.
The authentication flow consists of three steps:
- If the user hasn't yet added the application to Slack, an "Add to Slack" button is shown in the application.
- After clicking on the button, the user is asked to authorize the application to post notifications and respond to commands on a Slack channel.
- When the user authorizes the application, your application receives a temporary code that it then exchanges to a set of permanent authentication information using the Slack API.
We'll start implementing the flow soon, but first, we'll need a method for storing and using the authentication information once we've received it from Slack.
For this, we'll use the class Slack_Access, which we created earlier in the tutorial.
At the top of the class, first define variables for holding the authorization data:
// Slack OAuth data

private $access_token;
private $scope;
private $team_name;
private $team_id;
private $incoming_webhook;
Then, implement the constructor to read the values for these variables from an array passed in as a parameter:
/**
 * Sets up the Slack_Access object with authentication data.
 *
 * @param array $data   The Slack OAuth authentication data. If the user
 *                      hasn't been authenticated, pass an empty array.
 */
public function __construct( $data ) {
    $this->access_token = isset( $data['access_token'] ) ? $data['access_token'] : '';
    $this->scope = isset( $data['scope'] ) ? $data['scope'] : array();
    $this->team_name = isset( $data['team_name'] ) ? $data['team_name'] : '';
    $this->team_id = isset( $data['team_id'] ) ? $data['team_id'] : '';
    $this->incoming_webhook = isset( $data['incoming_webhook'] ) ? $data['incoming_webhook'] : array();
}
The constructor initializes the variables to the values passed in the $data array, or to empty values if the piece of information isn't present in the attribute array.
Right after the constructor, add a function for checking if the object has been initialized with valid data:
/**
 * Checks if the object has been initialized with access data.
 *
 * @return bool True if authentication data has been stored in the object. Otherwise false.
 */
public function is_configured() {
    return $this->access_token != '';
}
Then, for storing the authentication data, add the following function:
/**
 * Returns the authorization data as a JSON formatted string.
 *
 * @return string   The data in JSON format
 */
public function to_json() {
    $data = array(
        'access_token' => $this->access_token,
        'scope' => $this->scope,
        'team_name' => $this->team_name,
        'team_id' => $this->team_id,
        'incoming_webhook' => $this->incoming_webhook
    );

    return json_encode( $data );
}
The function returns a JSON-formatted string containing the authorization data.
In an actual application, you'll most likely want to tie the authorization information to user accounts and save the JSON data along with user information. However, in our example application—once again—we'll go with a simple approach: we'll assume that only one user (you) will ever use the application, and so we'll only need to store one set of OAuth credentials.
But first, let's move to the Slack class and make it use the functionality we just added to Slack_Access.
Implement the constructor to set up the access object for the current Slack instance:
/**
 * @var Slack_Access    Slack authorization data
 */
private $access;

/**
 * Sets up the Slack interface object.
 *
 * @param array $access_data An associative array containing OAuth
 *                           authentication information. If the user
 *                           is not yet authenticated, pass an empty array.
 */
public function __construct( $access_data ) {
    if ( $access_data ) {
        $this->access = new Slack_Access( $access_data );
    }
}
Right after the constructor, add a function for checking if the authorization data in the Slack object has been set:
/**
 * Checks if the Slack interface was initialized with authorization data.
 *
 * @return bool True if authentication data is present. Otherwise false.
 */
public function is_authenticated() {
    return isset( $this->access ) && $this->access->is_configured();
}
Step 6: Show the Add to Slack Button
With the data structure in place, we can start using the authorization checks in our main application and show the "Add to Slack" button.
Notice that while the Slack_Access class itself can be used in most applications pretty much as is, the solution used in index.php is for demonstration purposes only: as we don't have user management or a database, we will simply save the JSON-formatted access credentials from to_json in a text file.
At this point, the file doesn't exist yet, which means that the application hasn't yet been added to a Slack account, and the "Add to Slack" button should be shown instead of the text field.
To implement the simple storage system, start by replacing index.php's function initialize_slack_interface with the following:
/**
 * Initializes the Slack handler object, loading the authentication
 * information from a text file. If the text file is not present,
 * the Slack handler is initialized in a non-authenticated state.
 *
 * @return Slack    The Slack interface object
 */
function initialize_slack_interface() {
    // Read the access data from a text file
    if ( file_exists( 'access.txt' ) ) {
        $access_string = file_get_contents( 'access.txt' );
    } else {
        $access_string = '{}';
    }

    // Decode the access data into a parameter array
    $access_data = json_decode( $access_string, true );

    $slack = new Slack( $access_data );

    return $slack;
}
On lines 9-14, the function reads the authorization data as a string from a text file called access.txt if the file exists. If the file doesn't exist, the JSON string is initialized to an empty hash.
Then, on line 17, the data is parsed into an array for passing to the Slack interface (on line 19).
Now, we're ready to put it all together and make our little application show the "Add to Slack" button if no authorization data is found.
At the end of index.php, replace the form with the following code snippet:
<?php if ( $slack->is_authenticated() ) : ?>
    <form action="" method="post">
        <input type="hidden" name="action" value="send_notification"/>
        <p>
            <input type="text" name="text" placeholder="Type your notification here and press enter to send." />
        </p>
    </form>
<?php else : ?>
    <p>
        <a href="https://slack.com/oauth/authorize?scope=incoming-webhook,commands&client_id=<?php echo $slack->get_client_id(); ?>"><img alt="Add to Slack" height="40" width="139" src="https://platform.slack-edge.com/img/add_to_slack.png" srcset="https://platform.slack-edge.com/img/add_to_slack.png 1x, https://platform.slack-edge.com/img/[email protected] 2x"></a>
    </p>
<?php endif; ?>
In the code snippet, on line 1, you'll notice that the form is now surrounded with an is_authenticated check so that a user cannot see it before authorizing the application.
Then, in the else branch, on lines 8-12, the code now renders the "Add to Slack" button.
Let's take a look at what's inside the button's a tag:
- First of all, the button points the user into Slack's OAuth authorization flow (
oauth/authorize). - Using the
scopeparameter, the application can define the permissions it needs the user to allow: in our case, we need incoming webhooks (incoming-webhook) for posting notifications and the ability to add new slash commands (commands). For a full list of available permissions, check the API documentation. - Finally, the link needs to include the application's public key (
client_id), which we stored to our application earlier in the tutorial.
The rest is just basic HTML for showing the button's image.
Now, when you open the application in your web browser, here's what you should see:
Step 7: Complete the OAuth Authentication
Now, the "Add to Slack" button is in place. But what happens when the user clicks on it?
First, the user will see Slack's app authentication page, which looks like this:
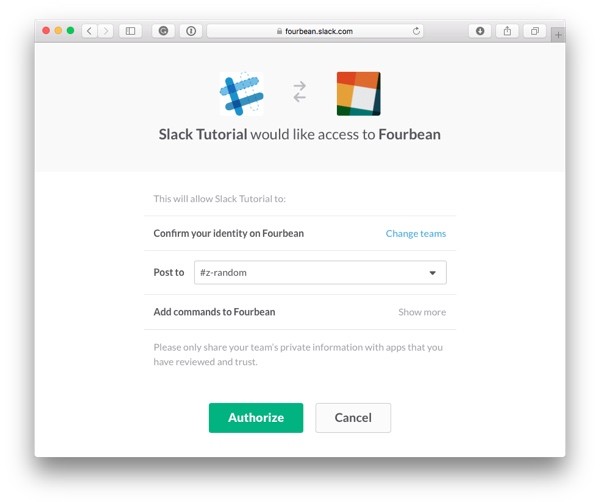
Then, if all looks good to the user, he or she will click on the Authorize button, at which point the execution returns to your application.
You'll recall that when we defined the application in Slack, we set a callback URL (YOUR_URL/index.php?action=oauth).
To handle this callback, we'll use the actions system we created earlier in the tutorial. In your actual application, you'll have to implement the callback URLs in a way that works well for the platform you're using. For example, in WordPress, you could very well create a custom permalink using the rewrite engine.
However, while the way of receiving the callback will differ based on application, what we do with the data received from Slack remains the same.
Replace the still empty do_action function with the following:
/**
 * Executes an application action (e.g. 'send_notification').
 *
 * @param Slack  $slack     The Slack interface object
 * @param string $action    The id of the action to execute
 *
 * @return string   A result message to show to the user
 */
function do_action( $slack, $action ) {
    $result_message = '';

    switch ( $action ) {

        // Handles the OAuth callback by exchanging the access code to
        // a valid token and saving it in a file
        case 'oauth':
            $code = $_GET['code'];

            // Exchange code to valid access token
            try {
                $access = $slack->do_oauth( $code );
                if ( $access ) {
                    file_put_contents( 'access.txt', $access->to_json() );
                    $result_message = 'The application was successfully added to your Slack channel';
                }
            } catch ( Slack_API_Exception $e ) {
                $result_message = $e->getMessage();
            }
            break;

        default:
            break;

    }

    return $result_message;
}
When the user returns from the authorization flow, this function gets called with $action set to 'oauth'. Along with the request, the application receives a one-time token, which it reads on line 17.
Then, on line 21, to complete the authorization, the function calls a function in our Slack class, do_oauth.
As you'll remember from earlier, when initializing the Slack interface, we tried to load the authentication data from a text file, access.txt. When the file wasn't found, the application decided that the user hadn't yet authenticated the application and showed the "Add to Slack" button.
Now, after the OAuth authentication has been successfully completed, on line 23, the function saves the data to that file.
But before we get there, to complete the authentication flow, we still need to implement the do_oauth function in the Slack class.
This function will call the Slack API to exchange the code that was passed to the OAuth callback function with authentication data that can be stored permanently and used to communicate with Slack until the user revokes the authorization.
To do this, we'll need a way of making an HTTP request to the Slack server. There are many ways to make HTTP requests in PHP, and what's presented here is not the only way. For example, if you're developing for WordPress, you might want to go with wp_remote_get and wp_remote_post.
This time, however, to keep everything independent from any particular application development framework, I decided to go with a free library with a beautiful and clean syntax, Requests.
Install the library according to the instructions on its website. In the source code in the Tuts+ GitHub repository, you'll find the ready-made Composer configuration for including the library to our application.
Once you have installed Requests (or your choice of HTTP library), add the do_oauth function to the Slack class:
/**
 * Completes the OAuth authentication flow by exchanging the received
 * authentication code to actual authentication data.
 *
 * @param string $code  Authentication code sent to the OAuth callback function
 *
 * @return bool|Slack_Access    An access object with the authentication data in place
 *                              if the authentication flow was completed successfully.
 *                              Otherwise false.
 *
 * @throws Slack_API_Exception
 */
public function do_oauth( $code ) {
    // Set up the request headers
    $headers = array( 'Accept' => 'application/json' );

    // Add the application id and secret to authenticate the request
    $options = array( 'auth' => array( $this->get_client_id(), $this->get_client_secret() ) );

    // Add the one-time token to request parameters
    $data = array( 'code' => $code );

    $response = Requests::post( self::$api_root . 'oauth.access', $headers, $data, $options );

    // Handle the JSON response
    $json_response = json_decode( $response->body );

    if ( ! $json_response->ok ) {
        // There was an error in the request
        throw new Slack_API_Exception( $json_response->error );
    }

    // The action was completed successfully, store and return access data
    $this->access = new Slack_Access(
        array(
            'access_token' => $json_response->access_token,
            'scope' => explode( ',', $json_response->scope ),
            'team_name' => $json_response->team_name,
            'team_id' => $json_response->team_id,
            'incoming_webhook' => $json_response->incoming_webhook
        )
    );

    return $this->access;
}
Let's go through the function line by line:
On lines 14-18, the function initializes parameters for the HTTP request. Worth noting is that the client ID and secret are passed as request options to use HTTP's basic authentication mechanism.
On line 21, you'll notice that we send the one-time token received in the callback function back to the Slack API to identify the request.
The POST request is sent on line 23. Then, the function proceeds by parsing the response and either setting up and returning the authorization data (lines 33-44) if all went well, or throwing an exception (lines 28-31) if there was an error with the request.
Now, the "Add to Slack" flow is ready. When you give it a try, you should see the following:
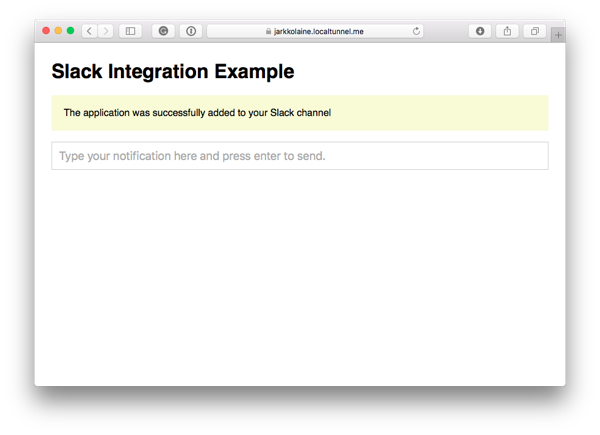
Also, if you look into your project directory, you should find a text file called access.txt, with the authentication data stored in it.
Now, we're ready for the fun part: making the application post to your Slack channel.
2. Send a Notification to a Slack Channel
Posting notifications to a Slack channel is a powerful way to keep a team up to date on events that are important to them. A web store might send notifications of new purchases, a bug tracking software could automatically notify developers, and the list goes on.
In our example, as you already saw in the UI earlier, we'll send any notification the user submits using the text field.
But the functionality for sending any other type of notifications is the same, so once it's ready, you can use the same code for sending your own, more complex notifications.
Step 1: Create a Function for Sending a Notification
In the Slack class, add the following function:
/**
 * Sends a notification to the Slack channel defined in the
 * authorization (Add to Slack) flow.
 *
 * @param string $text          The message to post to Slack
 * @param array $attachments    Optional list of attachments to send
 *                              with the notification
 *
 * @throws Slack_API_Exception
 */
public function send_notification( $text, $attachments = array() ) {
    if ( ! $this->is_authenticated() ) {
        throw new Slack_API_Exception( 'Access token not specified' );
    }

    // Post to webhook stored in access object
    $headers = array( 'Accept' => 'application/json' );

    $url = $this->access->get_incoming_webhook();
    $data = json_encode(
        array(
            'text' => $text,
            'attachments' => $attachments,
            'channel' => $this->access->get_incoming_webhook_channel(),
        )
    );

    $response = Requests::post( $url, $headers, $data );

    if ( $response->body != 'ok' ) {
        throw new Slack_API_Exception( 'There was an error when posting to Slack' );
    }
}
Posting a notification to a Slack channel is done using a webhook, an authorization-specific URL that Slack exposes to the application for posting to a channel.
We didn't pay much attention to it earlier in the "Add to Slack" flow, but if you look at the data in Slack_Access again, you'll notice that Slack returns a field called incoming_webhook. This field is an array with two fields inside it: the URL we should post our notifications to, and the channel the user selected for the application's messages.
To access that data, add the following two functions to the Slack_Access class:
/**
 * Returns the webhook URL for posting notifications.
 *
 * @return string   The incoming webhook URL
 */
public function get_incoming_webhook() {
    if ( is_array( $this->incoming_webhook ) && isset( $this->incoming_webhook['url'] ) ) {
        return $this->incoming_webhook['url'];
    }

    return '';
}

/**
 * Returns the channel to which the user has authorized the application
 * to post notifications.
 *
 * @return string   The selected Slack channel's ID
 */
public function get_incoming_webhook_channel() {
    if ( is_array( $this->incoming_webhook ) && isset( $this->incoming_webhook['channel'] ) ) {
        return $this->incoming_webhook['channel'];
    }

    return '';
}
Now, let's go back to the send_notification function above, and look at how these functions are used to send the notification.
On line 19, you'll notice that the HTTP request is sent to the incoming webhook URL stored in the authorization data.
And later, on line 24, the channel is passed in the request parameters, along with the text and any attachments we want to post.
Step 2: Use the Notification Sending Function in the Example Application
Now that we have implemented the function for sending notifications, let's attach the functionality to our user interface and test it.
Add the following new case branch to the do_action function in index.php:
// Sends a notification to a Slack channel
case 'send_notification':
    $message = isset( $_REQUEST['text'] ) ? $_REQUEST['text'] : 'Hello!';

    try {
        $slack->send_notification( $message );
        $result_message = 'Notification sent to Slack channel.';
    } catch ( Slack_API_Exception $e ) {
        $result_message = $e->getMessage();
    }
    break;
This code snippet reads the message from the request parameters (line 3) and uses the send_notification function we just created to post it to Slack (line 6).
As the form was created already at the beginning of the tutorial, you're now ready to send your first message to your Slack channel. Type something in the text field and hit Enter to submit the form.
Then, take a look at your Slack channel to see your message:

Step 3: Use Attachments to Make Your Notifications More Informative
In the send_notification function, you probably noticed a parameter called attachments. I didn't mention it yet as it doesn't fit so well with the example application. However, attachments are a powerful way to pass more interesting information about your application's events to the Slack channel, and you'll probably want to use them in your applications.
So, let's experiment a bit with attachments by modifying the send_notification call from Step 2 a bit. Replace the $slack->send_notification() call with the following piece of code:
$attachments = array(
    array(
        'fallback' => 'Jarkko just posted a new bread recipe.',

        'title' => 'Sprouted Wheat Bread',
        'title_link' => 'https://bread-magazine.com/sprouted-wheat-flour/',

        'text' => 'Jarkko just posted a new bread recipe. Check it out.',

        'color' => '#7CD197',

        'fields' => array(
            array(
                'title' => 'Preparation time',
                'value' => ':hourglass: 24 hours',
                'short' => true
            ),
            array(
                'title' => 'Difficulty',
                'value' => 'Medium',
                'short' => true
            ),
        ),
        'image_url' => 'https://s3.amazonaws.com/interested/wordpress/wp-content/uploads/2015/02/12093547/sprouted-bread.jpg'
    )
);

$slack->send_notification( $message, $attachments );
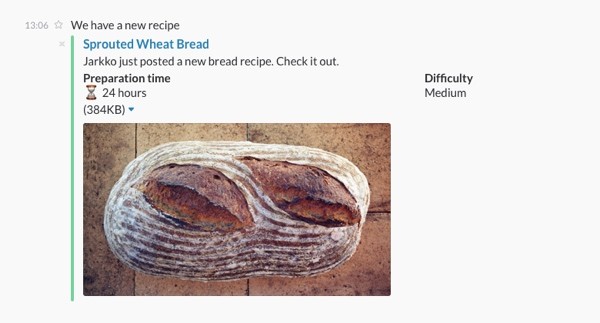
The attachment specified in the code above is an imaginary notification about the addition of a new bread recipe in a recipe database. It's there just as an example, so go ahead and modify it to see how changes you make to it affect the output on the Slack channel.
-
fallback: A required plain text message that is shown if the attachment cannot be displayed. -
title: A title for the attachment, styled using a bigger font. -
title_link: A URL that will be opened when the user clicks on the link. In our example, this would show the recipe. -
text: Text that will be shown inside the attachment. -
color: The color for the line on the left side of the attachment. -
fields: A list of data fields to show in the attachments. In the example, they are used for displaying some information about the recipe. -
image_url: A URL to an image to show in the attachment.
Here's what you'll see when you post the notification with the attachment specified above:
Play with the parameters and see how changing them affects the messages posted on your Slack channel: modify the attributes, send a new notification, and take a look at what changed.
For more information about the attachments, take a look at the Slack documentation.
3. Make Your Application Respond to Slash Commands
Your application can now talk to Slack. Next, we'll make the communication work also the other way: by adding slash commands, we can make Slack work as an interface to our application.
In a real-world application, this has many use cases. Marking a bug as being fixed, marking an order as shipped, or asking for a joke are just a few that come to mind.
Let's go ahead and implement the joke request to post a joke whenever someone types /joke on the Slack channel.
Step 1: Define a Slash Command
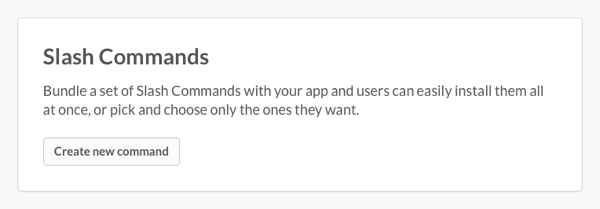
First, visit your Slack Application's settings page to define the new slash command.
Scroll down to the section with the title, Slash Commands, and click on Create new command.
In the next screen, enter the required information for specifying the new command, and click Save.
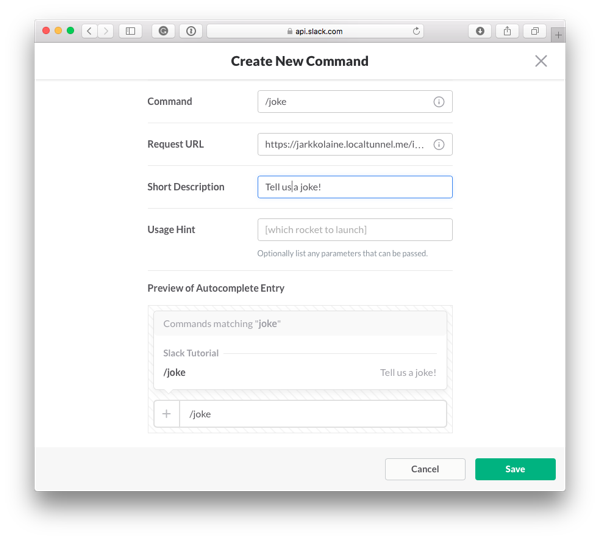
Here are brief descriptions of the fields on this page:
-
Command: The slash command, including the slash character. For example,
/joke. -
Request URL: The URL on your server that should be called when someone types this slash command on a Slack channel. This is where localtunnel comes in handy: the URL needs to be HTTPS and available for connecting from the internet. Use the following URL format to make the request URL compatible with the functionality we'll build in Step 2 below:
YOUR_SERVER/index.php?action=command. - Short Description: A description that is shown in the autocomplete popup when someone is typing the command.
- Usage Hint: If the command takes parameters, you can describe them here. This text is also visible in the autocomplete dialog.
After saving the command, you'll find your new command shown in the Slash Commands section. You can use the buttons to edit or delete it.
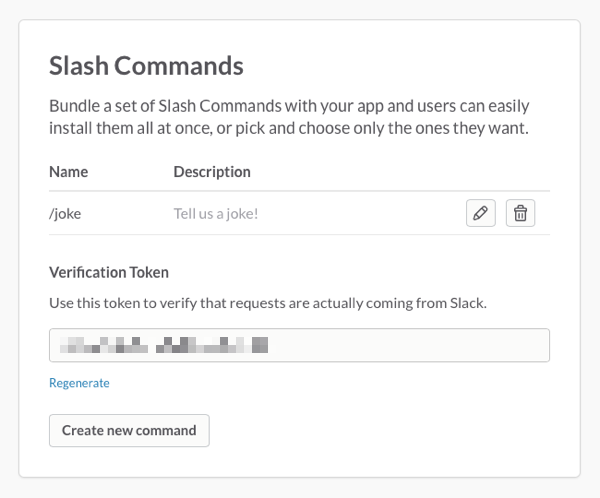
Below the list of commands, you'll find a string labeled Verification Token.
You can use this token to verify that the commands are indeed coming from Slack before executing them. Store the token in your application in the same way you did for the client ID and secret earlier in the tutorial, for example by adding a constant at the beginning of index.php:
define( 'SLACK_COMMAND_TOKEN', 'Paste your command verification token here' );
Step 2: Create a System for Keeping Track of Slash Commands in Your Application
Now, Slack will identify the command when someone types it in the Slack chat window (you can try it now to see the autocomplete popup).
When the user submits the command, Slack will call our server at the Request URL specified in the previous step. Now, we'll need to implement the functionality to make our application respond to it correctly.
As you can add more than one slash command to your Slack application, it's good to support a variable number of slash commands. That's why we'll start by creating a system for keeping track of slash commands in the application.
First, in the Slack class, add the following variable to hold the commands:
/**
 * @var array $slash_commands   An associative array of slash commands
 *                              attached to this Slack interface
 */
private $slash_commands;
In the class's constructor, add a line to initialize the array:
$this->slash_commands = array();
Then, create a function for adding a new slash command to the array:
/**
 * Registers a new slash command to be available through this
 * Slack interface.
 *
 * @param string    $command    The slash command
 * @param callback  $callback   The function to call to execute the command
 */
public function register_slash_command( $command, $callback ) {
    $this->slash_commands[$command] = $callback;
}
Now that you have a list of slash commands, add a function for executing a command:
/**
 * Runs a slash command passed in the $_POST data if the
 * command is valid and has been registered using register_slash_command.
 *
 * The response written by the function will be read by Slack.
 */
public function do_slash_command() {
    // Collect request parameters
    $token      = isset( $_POST['token'] ) ? $_POST['token'] : '';
    $command    = isset( $_POST['command'] ) ? $_POST['command'] : '';
    $text       = isset( $_POST['text'] ) ? $_POST['text'] : '';
    $user_name  = isset( $_POST['user_name'] ) ? $_POST['user_name'] : '';

    // Use the command verification token to verify the request
    if ( ! empty( $token ) && $this->get_command_token() == $_POST['token'] ) {
        header( 'Content-Type: application/json' );

        if ( isset( $this->slash_commands[$command] ) ) {
            // This slash command exists, call the callback function to handle the command
            $response = call_user_func( $this->slash_commands[$command], $text, $user_name );
            echo json_encode( $response );
        } else {
            // Unknown slash command
            echo json_encode( array(
                'text' => "Sorry, I don't know how to respond to the command."
            ) );
        }
    } else {
        echo json_encode( array(
            'text' => 'Oops... Something went wrong.'
        ) );
    }

    // Don't print anything after the response
    exit;
}
Let's go through the function to see what it does:
First, on lines 8-12, the function collects data from the request parameters:
-
tokenis used to verify that the request is a valid Slack command request. -
commandcontains the slash command that should be executed. -
textis the string of text that was typed after the command. It can be used to pass parameters to your slash command. -
user_nameis the username of the user who sent the slash command.
On line 15, the function does the verification by comparing the token that was passed in the request parameters to the one that we stored in the previous step.
If the token is valid, the function continues to execute the command, if one with the given command name has been registered in the Slack class. The execution of the command is done on line 20, where the function makes a call to the callback function specified for the command.
Then, on line 21, the response is encoded into a JSON string and printed out. Notice that the function ends with an exit call to make sure nothing more gets printed after the response.
To complete the functionality, add the function get_command_token to retrieve the command verification token for the application:
/**
 * Returns the command verification token.
 *
 * @return string   The command verification token or empty string if not configured
 */
private function get_command_token() {
    // First, check if command token is defined in a constant
    if ( defined( 'SLACK_COMMAND_TOKEN' ) ) {
        return SLACK_COMMAND_TOKEN;
    }

    // If no constant found, look for environment variable
    if ( getenv( 'SLACK_COMMAND_TOKEN' ) ) {
        return getenv( 'SLACK_COMMAND_TOKEN' );
    }

    // Not configured, return empty string
    return '';
}
The slash command functionality in the Slack class is now complete, and all that's left to do before we can implement our first command is to connect the callback URL to this code.
To do that, add a new case branch in the do_action function in index.php:
// Responds to a Slack slash command. Notice that commands are
// registered at Slack initialization.
case 'command':
    $slack->do_slash_command();
    break;
Step 3: Register and Test the Slash Command
Now that we have created a system for handling slash commands in our application, let's use it to implement the functionality for the /joke command.
First, at the end of the function initialize_slack_interface, add the following lines of code to register the command and pass in the name of the function that will handle the command:
// Register slash commands
$slack->register_slash_command( '/joke', 'slack_command_joke' );
Then, create the function:
/**
 * A simple slash command that returns a random joke to the Slack channel.
 *
 * @return array    A data array to return to Slack
 */
function slack_command_joke() {
    $jokes = array(
        "The box said 'Requires Windows Vista or better.' So I installed LINUX.",
        "Bugs come in through open Windows.",
        "Unix is user friendly. It’s just selective about who its friends are.",
        "Computers are like air conditioners: they stop working when you open Windows.",
        "I would love to change the world, but they won’t give me the source code.",
        "Programming today is a race between software engineers striving to build bigger and better idiot-proof programs, and the Universe trying to produce bigger and better idiots. So far, the Universe is winning."
    );

    $joke_number = rand( 0, count( $jokes ) - 1 );

    return array(
        'response_type' => 'in_channel',
        'text' => $jokes[$joke_number],
    );
}
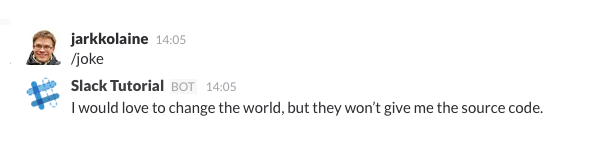
As this function was created just as a demo, it doesn't do much: it randomly picks one of the (rather bad) jokes and returns it in a format expected by Slack.
Notice that while this command function doesn't take any parameters, for a more complex example, you can add two parameters: $text to access any data that the user typed after the command, and $user_name to get the name of the user who submitted the command.
To test the command, go ahead and type /joke on the Slack channel.
Conclusion and Ideas for the Future
You have now completed the tutorial and know how to integrate your PHP application with Slack. During the tutorial, you have also built tools for sending notifications to a Slack channel as well as responding to commands your users type directly in Slack.
The next step is to put these ideas to work for real.
Think about your application and look for places where talking to Slack and listening to commands coming from Slack could make the experience more useful and enjoyable for your users, and implement them.
The platform is quickly evolving, and so is the API. Keep an eye on where it's going, and build something amazing!

Comments