Are you a hybrid app developer wanting to include face detection into your app, but you don't have any idea where to start? As a start, you could read An Introduction to Face Detection on Android, which shows you how to natively implement face detection on Android. But if you are like me and you don't want to write Java code to create a React Native module that does this for you, then you are in the right place.
In this tutorial, we look at the Face Detection API, which is part of Microsoft Cognitive Services. This API allows developers to easily implement face detection functionality in apps. In this tutorial, I am going to assume that this isn't your first React Native app. If you are new to React Native, then I recommend you first read Facebook's Getting Started tutorial on the React Native website. That tutorial shows you how to set up your environment and create your first React Native project.
Prerequisites
Even though we focus on the Android platform in this tutorial, with a bit of work, you can add support for other platforms. Make sure you have Android Studio installed. You can download Android Studio from Google's developer portal.
1. What Is the Face Detection API?
Before we start writing our app, I would like to take a moment to talk about the API we will be using for face detection. Microsoft's face detection API provides face detection and face recognition functionality via a cloud-based API. This allows us to send an HTTP request containing either an image or a URL of an existing image on the web, and receive data about any faces detected in the image.
Sending Requests to the API
You can make requests to Microsoft's face detection API by sending a POST request to https://api.projectoxford.ai/face/v1.0/detect. The request should contain the following header information:
- Content-Type: This header field contains the data type of the request body. If you are sending the URL of an image on the web, then the value of this header field should be application/json. If you are sending an image, set the header field to application/octet-stream.
- Ocp-Apim-Subscription-Key: This header field contains the API key used for authenticating your requests. I will show you how to obtain an API key later in this tutorial.
By default, the API only returns data about the boxes that are used to enclose the detected faces in the image. In the rest of this tutorial, I will refer to these boxes as face boxes. This option can be disabled by setting the returnFaceRectangle query parameter to false. The default value is true, which means that you don't have to specify it unless you want to disable this option.
You can supply a few other optional query parameters to fetch additional information about the detected faces:
-
returnFaceId: If set totrue, this option assigns a unique identifier to each of the detected faces. -
returnFaceLandmarks: By enabling this option, the API returns an array of face landmarks of the detected faces, including eyes, nose, and lips. This option is disabled by default. -
returnFaceAttributes: If this option is enabled, the API looks for and returns unique attributes for each of the detected faces. You need to supply a comma-separated list of the attributes that you are interested in, such as age, gender, smile, facial hair, head pose, and glasses.
Below is a sample response that you get from the API given the following request URL:
https://api.projectoxford.ai/face/v1.0/detect?faceId=true&faceLandmarks=true&faceAttributes=age,gender,smile,facialHair,headPose,glasses
[
    {
        "faceId": "c5c24a82-6845-4031-9d5d-978df9175426",
        "faceRectangle": {
            "width": 78,
            "height": 78,
            "left": 394,
            "top": 54
        },
        "faceLandmarks": {
            "pupilLeft": {
                "x": 412.7,
                "y": 78.4
            },
            "pupilRight": {
                "x": 446.8,
                "y": 74.2
            },
            "noseTip": {
                "x": 437.7,
                "y": 92.4
            },
            "mouthLeft": {
                "x": 417.8,
                "y": 114.4
            },
            "mouthRight": {
                "x": 451.3,
                "y": 109.3
            },
            "eyebrowLeftOuter": {
                "x": 397.9,
                "y": 78.5
            },
            "eyebrowLeftInner": {
                "x": 425.4,
                "y": 70.5
            },
            "eyeLeftOuter": {
                "x": 406.7,
                "y": 80.6
            },
            "eyeLeftTop": {
                "x": 412.2,
                "y": 76.2
            },
            "eyeLeftBottom": {
                "x": 413.0,
                "y": 80.1
            },
            "eyeLeftInner": {
                "x": 418.9,
                "y": 78.0
            },
            "eyebrowRightInner": {
                "x": 4.8,
                "y": 69.7
            },
            "eyebrowRightOuter": {
                "x": 5.5,
                "y": 68.5
            },
            "eyeRightInner": {
                "x": 441.5,
                "y": 75.0
            },
            "eyeRightTop": {
                "x": 446.4,
                "y": 71.7
            },
            "eyeRightBottom": {
                "x": 447.0,
                "y": 75.3
            },
            "eyeRightOuter": {
                "x": 451.7,
                "y": 73.4
            },
            "noseRootLeft": {
                "x": 428.0,
                "y": 77.1
            },
            "noseRootRight": {
                "x": 435.8,
                "y": 75.6
            },
            "noseLeftAlarTop": {
                "x": 428.3,
                "y": 89.7
            },
            "noseRightAlarTop": {
                "x": 442.2,
                "y": 87.0
            },
            "noseLeftAlarOutTip": {
                "x": 424.3,
                "y": 96.4
            },
            "noseRightAlarOutTip": {
                "x": 446.6,
                "y": 92.5
            },
            "upperLipTop": {
                "x": 437.6,
                "y": 105.9
            },
            "upperLipBottom": {
                "x": 437.6,
                "y": 108.2
            },
            "underLipTop": {
                "x": 436.8,
                "y": 111.4
            },
            "underLipBottom": {
                "x": 437.3,
                "y": 114.5
            }
        },
        "faceAttributes": {
            "age": 71.0,
            "gender": "male",
            "smile": 0.88,
            "facialHair": {
                "mustache": 0.8,
                "beard": 0.1,
                "sideburns": 0.02
            }
        },
        "glasses": "sunglasses",
        "headPose": {
            "roll": 2.1,
            "yaw": 3,
            "pitch": 0
        }
    }
]
This sample response is pretty self-explanatory so I am not going to dive deeper into what each attribute stands for. The data can be used to show the detected faces, their different attributes, and how you can show them to the user. This is achieved by interpreting the x and y coordinates or the top and left positioning.
Acquiring an API Key
To use Microsoft's face detection API, each request needs to be authenticated with an API key. Here are the steps you need to take to acquire such a key.
Create a Microsoft Live account if you don't already have one. Sign in with your Microsoft Live account and sign up for a Microsoft Azure Account. If you don't have a Microsoft Azure account yet, then you can sign up for a free trial, giving you access to Microsoft's services for 30 days.
For the face detection API, this allows you to send up to twenty API calls per minute for free. If you already have an Azure account, then you can subscribe to the Pay-As-You-Go plan so you only pay for what you use.
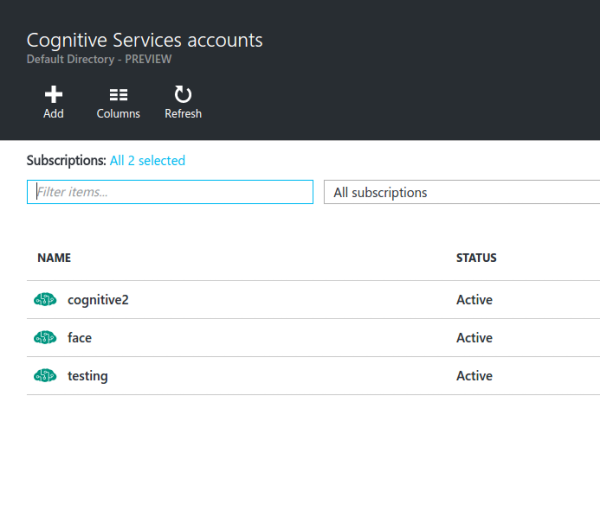
Once your Microsoft Azure account is set up, you are redirected to the Microsoft Azure Portal. In the portal, navigate to the search bar and enter cognitive services in the search field. Click the result that says Cognitive Services accounts (preview). You should see an interface similar to the following:
Click the Add button and fill out the form you are presented with:
- Account Name: Enter the name that you want to give to the resource.
- API Type: Select the face detection API.
- Pricing Tier: For testing purposes, select the free tier (up to 20 API calls per minute). If you want to use the service in production, select another option that fits your application's needs.
- Subscription: Select the free trial if you are using a new Microsoft Azure account. Otherwise, select the Pay-As-You-Go option.
- Resource Group: Select an existing one if you already have one. Otherwise, create a new resource group by selecting the new option and enter a name for the resource group.
- Location: Select West US.
In the next step, you need to agree to Microsoft's terms and conditions to continue. Click the Create button and wait for the resource to finish deploying.
Once the deployment is finished, click the All resources link in the left sidebar to view the resources you currently have. The one that you just created should be listed in there. If it isn't, try refreshing the page.
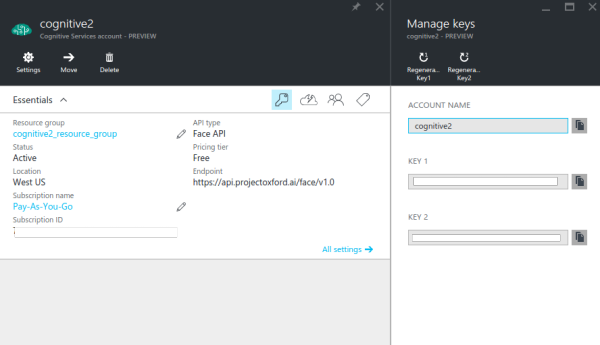
Click the resource that you created and click the key icon to view the API keys associated with the resource. By default, two keys are generated and you can use either one of those.
2. Building the App
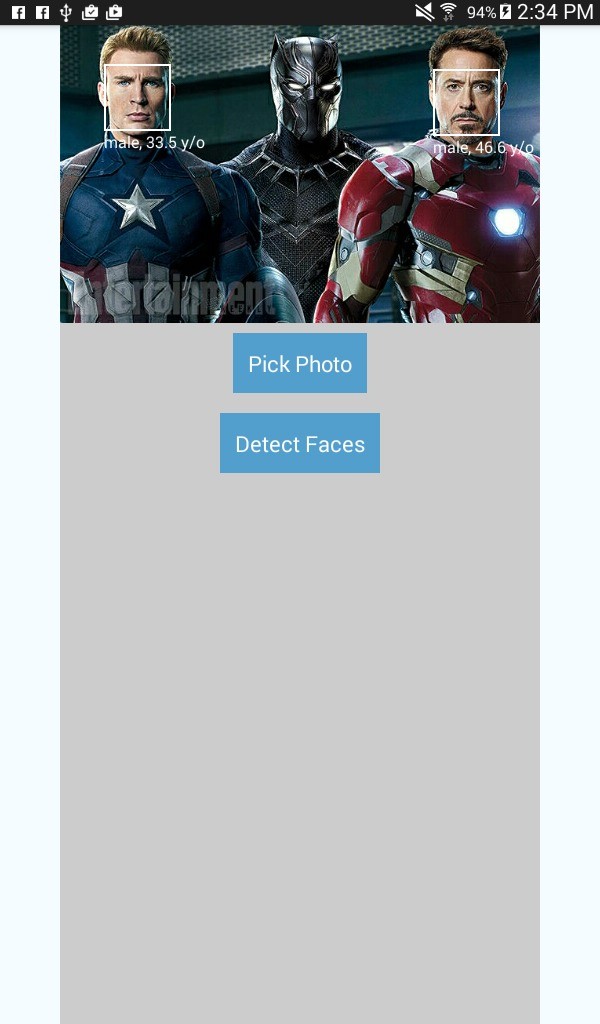
Before we start building the app, let me first give you a brief overview of what the app is about. As I mentioned earlier, we will be building a face detection app. The app will have two buttons, one for picking an image and one for detecting the faces. The button for picking an image will ask the user to select a source, the camera of the device or the gallery.
If the camera is selected, the default camera app will be launched. If the gallery is selected, the app will let the user select a photo from the gallery. Once a photo is selected, the button for detecting faces becomes visible. Tapping this button will send a request to Microsoft's face detection API, which returns the data for the detected faces. Using the response of the API, little boxes are drawn around the detected faces, including labels for the gender and age of the person.
This is what the app is going to look like:
Step 1: Installing Dependencies
We are now ready to build the app. Let's start by installing the dependencies. Open a new terminal window in your working directory and execute the following command:
react native init FaceDetector
This creates a new React Native project for us, which, at the time of writing, is at version 0.25. When the setup process has completed, navigate to the project folder.
Next, we install three libraries that we will be using to develop the app:
npm install lodash react-native-fetch-blob react-native-image-picker --save
-
lodash: We only use lodash for its
mapmethod. We use this method to convert the results we get back from the API into a component that we will render. - react-native-image-picker: This library is used for adding the ability to pick an image using the camera or an image from the gallery.
-
react-native-fetch-blob: This library is used for sending network requests that have blob content. The face detection API specifically needs the blob of the photo, but the
fetchAPI doesn't support it out of the box, which is why we use this library to handle it for us.
Step 2: Configuring the Project
Since not all React Native modules support the React Native Package Manager yet, we need to manually configure the project so that the modules will work without issues. Specifically, we need to configure the project for react-native-image-picker to work properly.
Inside your working directory, open the android/settings.gradle file and add the following snippet immediately after include ':app':
include ':react-native-image-picker'
project(':react-native-image-picker').projectDir = new File(settingsDir, '../node_modules/react-native-image-picker/android')
Open the android/app/build.gradle file and find the dependencies section. It should look something like this:
dependencies
    compile fileTree(dir: "libs", include: ["*.jar"])
    compile "com.android.support:appcompat-v7:23.0.1"
    compile "com.facebook.react:react-native:+"  // From node_modules
}
Add the following snippet to the list of dependencies:
compile project(':react-native-image-picker')
Open android/app/src/main/AndroidManifest.xml and add the following snippet below the default system permissions that are needed by React Native.
<uses-permission android:name="android.permission.CAMERA" />
<uses-permission android:name="android.permission.WRITE_EXTERNAL_STORAGE"/>
<uses-feature android:name="android.hardware.camera" android:required="false"/>
<uses-feature android:name="android.hardware.camera.autofocus" android:required="false"/>
For your reference, the default system permissions are:
<uses-permission android:name="android.permission.INTERNET" />
<uses-permission android:name="android.permission.SYSTEM_ALERT_WINDOW"/>
Open android/app/src/main/java/com/facedetector/MainActivity.java and add the following import statement at the top of the MainActivity class.
import com.imagepicker.ImagePickerPackage;
I've mentioned the use of rnpm earlier. If you don't have it installed on your computer yet, now would be a good time to do so:
npm install rnpm -g
Once installed, execute the rnpm link command to automatically link the modules that you have installed in settings.gradle, build.gradle, AndroidManifest.xml, and MainActivity.java.
rnpm link
It takes care of everything we did manually for react-native-image-picker. We have gone through the manual process of adding a dependency so you know what rnpm does under the hood.
Step 3: App Entry Point Component
We are now ready to write some code. First, open index.android.js and replace the contents of this file with the following:
import React from 'react';

import {
  AppRegistry,
  Component,
  StyleSheet,
  Text,
  View
} from 'react-native';

import Detector from './components/Detector';

const image_picker_options = {
  title: 'Select Photo',
  takePhotoButtonTitle: 'Take Photo...',
  chooseFromLibraryButtonTitle: 'Choose from Library...',
  cameraType: 'back',
  mediaType: 'photo',
  maxWidth: 480,
  quality: 1,
  noData: false,
  path: 'images'
};

const api_key = 'YOUR FACE DETECTION API KEY';

class FaceDetector extends Component {
  render() {
    return (
      <View style={styles.container}>
        <Detector imagePickerOptions={image_picker_options} apiKey={api_key} />
      </View>
    );
  }
}

const styles = StyleSheet.create({
  container: {
    flex: 1,
    justifyContent: 'center',
    alignItems: 'center',
    backgroundColor: '#F5FCFF',
  }
});

AppRegistry.registerComponent('FaceDetector', () => FaceDetector);
What we have above is boilerplate code for a React Native entry point file. First, we import the components that we need.
import React from 'react';

import {
  AppRegistry,
  Component,
  StyleSheet,
  Text,
  View
} from 'react-native';

import Detector from './components/Detector';
We then declare the options that the Detector component is going to need. This includes the options for the image picker and the API key that you got from Microsoft Azure earlier. Don't forget to enter your API key and assign it to api_key.
const image_picker_options = {
  title: 'Select Photo',
  takePhotoButtonTitle: 'Take Photo...',
  chooseFromLibraryButtonTitle: 'Choose from Library...',
  cameraType: 'back', //front or back camera?
  mediaType: 'photo', //the type of file that you want to pick
  maxWidth: 480, //the target width in which to resize the photo
  quality: 1, //0 to 1 for specifying the quality of the photo
  noData: false, //if set to true it disables the base64 of the file
};

//the API Key that you got from Microsoft Azure
const api_key = 'YOUR FACE Detection API KEY';
Next, we create the entry point component and, inside the main container, use the Detector component. Don't forget to pass in the necessary properties:
class FaceDetector extends Component {
  render() {
    return (
      <View style={styles.container}>
        <Detector imagePickerOptions={image_picker_options} apiKey={api_key} />
      </View>
    );
  }
}
We also define the styles:
const styles = StyleSheet.create({
  container: {
    flex: 1,
    justifyContent: 'center',
    alignItems: 'center',
    backgroundColor: '#F5FCFF',
  }
});
And finally, we register the component:
AppRegistry.registerComponent('FaceDetector', () => FaceDetector);
Step 4: Button Component
Create a new file in the components directory and name it Button.js. This component will allow us to easily create buttons that perform a specific action. Later on, you will see how this is used in the Detector component. For now, know that you need to pass in onpress, button_styles, button_text_styles, and text as properties to customize the look and functionality of each button.
import React from 'react';

import {
  AppRegistry,
  Component,
  Text,
  View,
  TouchableHighlight
} from 'react-native';

export default class Button extends Component {

  render(){
    return (
      <View>
        <TouchableHighlight underlayColor={"#E8E8E8"} onPress={this.props.onpress} style={this.props.button_styles}>
          <View>
              <Text style={this.props.button_text_styles}>{this.props.text}</Text>
          </View>
        </TouchableHighlight>
      </View>
    );
  }
}

AppRegistry.registerComponent('Button', () => Button);
Step 5: Detector Component
Still inside the components directory, create a new file, name it Detector.js, and add the following code to it. This component is where the magic happens. Take a moment to browse the implementation.
import React from 'react';

import {
  AppRegistry,
  Component,
  StyleSheet,
  Text,
  View,
  Image
} from 'react-native';


import NativeModules, { ImagePickerManager } from 'NativeModules';

import Button from './Button';

import RNFetchBlob from 'react-native-fetch-blob';

import _ from 'lodash';

export default class Detector extends Component {
  constructor(props) {
      super(props);
  	this.state = {
  		photo_style: {
  			position: 'relative',
  			width: 480,
  			height: 480
  		},
  		has_photo: false,
  		photo: null,
  		face_data: null
  	};
  }

  render() {
    return (
      <View style={styles.container}>

		<Image
        	style={this.state.photo_style}
        	source={this.state.photo}
        	resizeMode={"contain"}
      	>
			{ this._renderFaceBoxes .call(this) }
      	</Image>

		<Button
            text="Pick Photo"
            onpress={this._pickImage.bind(this)}
            button_styles={styles.button}
            button_text_styles={styles.button_text} />

        { this._renderDetectFacesButton.call(this) }

      </View>
    );
  }


  _pickImage() {

	this.setState({
		face_data: null
	});

	ImagePickerManager.showImagePicker(this.props.imagePickerOptions, (response) => {

	  if(response.error){
	  	alert('Error getting the image. Please try again.');
	  }else{

	    let source = {uri: response.uri};

	    this.setState({
	      photo_style: {
			position: 'relative',
			width: response.width,
			height: response.height
	      },
	      has_photo: true,
	      photo: source,
	      photo_data: response.data
	    });

	  }
	});

  }

  _renderDetectFacesButton() {
  	if(this.state.has_photo){
	  	return  (
			<Button
	            text="Detect Faces"
	            onpress={this._detectFaces.bind(this)}
	            button_styles={styles.button}
	            button_text_styles={styles.button_text} />
	  	);
  	}
  }

  _detectFaces() {

	RNFetchBlob.fetch('POST', 'https://api.projectoxford.ai/face/v1.0/detect?returnFaceId=true&returnFaceAttributes=age,gender', {
		'Accept': 'application/json',
	    'Content-Type': 'application/octet-stream',
	    'Ocp-Apim-Subscription-Key': this.props.apiKey
	}, this.state.photo_data)
	.then((res) => {
		return res.json();
	})
	.then((json) => {

		if(json.length){
			this.setState({
				face_data: json
			});
		}else{
			alert("Sorry, I can't see any faces in there.");
		}

		return json;
	})
	.catch (function (error) {
		console.log(error);
    	alert('Sorry, the request failed. Please try again.' + JSON.stringify(error));
	});


  }

  _renderFaceBoxes () {

  	if(this.state.face_data){

	  	let views = _.map(this.state.face_data, (x) => {

	  		let box = {
	  			position: 'absolute',
	  			top: x.faceRectangle.top,
				left: x.faceRectangle.left
	  		};

			let style = {
				width: x.faceRectangle.width,
				height: x.faceRectangle.height,
				borderWidth: 2,
				borderColor: '#fff',
			};

			let attr = {
				color: '#fff',
			};

		  	return (
		  		<View key={x.faceId} style={box}>
					<View style={style}></View>
					<Text style={attr}>{x.faceAttributes.gender}, {x.faceAttributes.age} y/o</Text>
		  		</View>
		  	);
	  	});

	  	return <View>{views}</View>
  	}

  }

}

const styles = StyleSheet.create({
  container: {
    flex: 1,
   	alignItems: 'center',
   	alignSelf: 'center',
    backgroundColor: '#ccc'
  },
  button: {
	margin: 10,
	padding: 15,
	backgroundColor: '#529ecc'
  },
  button_text: {
  	color: '#FFF',
    fontSize: 20
  }
});

AppRegistry.registerComponent('Detector', () => Detector);
Let's break it down so you know exactly what is going on. We start by importing the libraries we need. This includes React and its default components, the image picker, the button component, the react-native-fetch-blob library, and lodash.
import React from 'react';

import {
  AppRegistry,
  Component,
  StyleSheet,
  Text,
  View,
  Image
} from 'react-native';


import NativeModules, { ImagePickerManager } from 'NativeModules';

import Button from './Button';

import RNFetchBlob from 'react-native-fetch-blob';

import _ from 'lodash';
Inside the class declaration, we have the constructor that is executed before the component is mounted. Here we set the default styling for the selected photo, the boolean value that's used as a basis for whether to show the button for detecting faces or not, the photo itself, and face_data, which is used as the data source for constructing the face boxes.
export default class Detector extends Component {
  constructor(props) {
    super(props);
    this.state = {
  		photo_style: {
  			position: 'relative',
  			width: 480,
  			height: 480
  		},
  		has_photo: false,
  		photo: null,
  		face_data: null
  	};
  }

  ...
}
Next is the render() method, which renders the selected photo and the two buttons, pick image and detect faces. Notice that we are calling three other methods below, _renderFaceBoxes(), _pickImage(), and _renderDetectedFacesButton(). We will walk through these methods shortly, but for now know that they are used to simplify the implementation of the render() method.
Also note that we are using call and bind instead of calling the methods directly. This is because methods inside ES6 classes aren't automatically bound to the class. This menas you need to either use bind or call to bind the methods to this, which refers to the class itself. If you don't know the difference between bind and call, check out this Stack Overflow question on the difference between call, apply, and bind.
render() {
  return (
    <View style={styles.container}>

      	<Image
	        style={this.state.photo_style}
	        source={this.state.photo}
	        resizeMode={"contain"}
	      >
	    { this._renderFaceBoxes.call(this) }
	    </Image>

  		<Button
          text="Pick Photo"
          onpress={this._pickImage.bind(this)}
          button_styles={styles.button}
          button_text_styles={styles.button_text} />

      	{ this._renderDetectFacesButton.call(this) }

    </View>
  );
}
The _pickImage() method is called when the button for picking images is pressed. This sets face_data to null so that existing face boxes, if any, are removed. It then opens the dialog for choosing where to obtain a photo from, the camera or the gallery.
The dialog uses the object that was passed from index.android.js to customize its settings. Once a photo has been picked, a response containing the local URI and base64 representation of the photo, its dimensions (width and height), and other important information about the file is returned. We use this data to update the state, which updates the user interface of the app.
Note that earlier we specified a maxWidth of 480 for the image picker options. This means that the selected image is resized to that width and the height is automatically adjusted to maintain the aspect ratio. This is why we are updating the width and height in photo_style to resize the Image component so that the photo fits it nicely.
position is set to relative so that the absolutely positioned face boxes get constrained inside the Image component. photo is used as the source for the Image component and photo_data is the base64 representation of the photo. We need to put it in the state so that we can use it later on when making the request to the API.
_pickImage() {

  this.setState({
    face_data: null
  });

  ImagePickerManager.showImagePicker(this.props.imagePickerOptions, (response) => {

    if(response.error){
      alert('Error getting the image. Please try again.');
    }else{

      let source = {uri: response.uri}; //the source of the photo to display

      this.setState({
        photo_style: {
          	position: 'relative',
      		width: response.width,
      		height: response.height
        },
        has_photo: true,
        photo: source,
        photo_data: response.data
      });

    }
  });

}
The _renderDetectFacesButton() method is responsible for rendering the button for detecting faces. It only displays the button if has_photo in state is set to true.
_renderDetectFacesButton() {
  if(this.state.has_photo){
    return  (
    <Button
            text="Detect Faces"
            onpress={this._detectFaces.bind(this)}
            button_styles={styles.button}
            button_text_styles={styles.button_text} />
    );
  }
}
When the detect faces button is pressed, the _detectFaces() method is executed. This method makes a POST request to the Face Detection API, passing in the base64 representation of the selected photo along with some options as query parameters.
Note that we are passing in the base64 representation of the photo, but the file blob is what actually gets sent to the server because we are using the react-native-fetch-blob library. Once we get a response back, we update the state with the face_data to render the face boxes.
_detectFaces() {

  RNFetchBlob.fetch('POST', 'https://api.projectoxford.ai/face/v1.0/detect?returnFaceId=true&returnFaceAttributes=age,gender', {
      'Accept': 'application/json',
      'Content-Type': 'application/octet-stream',
      'Ocp-Apim-Subscription-Key': this.props.apiKey
  }, this.state.photo_data)
  .then((res) => {
    return res.json();
  })
  .then((json) => {

    if(json.length){
      this.setState({
        face_data: json
      });
    }else{
      //an empty array is returned if the API didn't detect any faces
      alert("Sorry, I can't see any faces in there.");
    }

    return json;
  })
  .catch (function (error) {
    console.log(error);
      alert('Sorry, the request failed. Please try again.' + JSON.stringify(error));
  });


}
Notice that, in the above code, we handle cases in which the API isn't able to detect any faces in the photo by alerting the user. This can happen because of two reasons:
- The photo doesn't contain any faces.
- The faces in the photo are not recognizable by the face detection algorithm, because they are either too large or too small, large face angles (head pose), insufficient or too much lighting, or something is blocking a portion of the face.
The _renderFaceBoxes() method returns the face boxes based on the face_data that is currently in state. We use lodash's map() function to loop through the face data. Each box is absolutely positioned so that everything starts off at the upper left edge of the Image component. The top and left position and the width and height of each box are based on the values stored in the faceRectangle object.
_renderFaceBoxes() {

  if(this.state.face_data){

    let views = _.map(this.state.face_data, (x) => {

      let box = {
        position: 'absolute',
        top: x.faceRectangle.top,
          left: x.faceRectangle.left
      };

      let style = {
        width: x.faceRectangle.width,
        height: x.faceRectangle.height,
        borderWidth: 2,
        borderColor: '#fff',
      };

      let attr = {
        color: '#fff',
      };

      return (
        <View key={x.faceId} style={box}>
        	<View style={style}></View>
        	<Text style={attr}>{x.faceAttributes.gender}, {x.faceAttributes.age} y/o</Text>
        </View>
      );
    });

    return <View>{views}</View>
  }

}
Before we register the component, we add the styles.
const styles = StyleSheet.create({
  container: {
    flex: 1,
    alignItems: 'center',
    alignSelf: 'center',
    backgroundColor: '#ccc'
  },
  button: {
  margin: 10,
  padding: 15,
  backgroundColor: '#529ecc'
  },
  button_text: {
    color: '#FFF',
    fontSize: 20
  }
});
And finally, we register the component.
AppRegistry.registerComponent('Detector', () => Detector);
3. Build and Run
Build and run the application to see if everything is working properly. Don't forget to enter the API key you obtained from the Microsoft Azure Portal. With a valid API key, the application won't be able to detect any faces.
Conclusion
That's it. In this tutorial, you learned how to create a face detection app using Microsoft's face detection API. While doing so, you learned how to add a service to Microsoft Azure and make a request to the face detection API.
If you want to learn more about the face detection API, check out its official documentation and the Cognitive Services API Reference.

Comments