For a long time, it was a given that communicating with computers happened through a user interface on a physical device: writing commands on the keyboard or tapping or clicking on icons. Talking to your computer in natural language was something that only happened in science fiction.
But the world is changing, and voice user interfaces are finally entering our homes and offices, blurring the line between computing and real life.
Amazon Echo, and Alexa, the voice service that powers it, are some of the first examples of this new technology.
In this tutorial, we will use Alexa Skills Kit, AWS Lambda, and some template source code from Amazon to create a trivia game that can be played using an Amazon Echo device or any Alexa-enabled device, like an Amazon Fire TV, an Echo Dot, or an Amazon Tap.
After completing the tutorial, you will have a good basic understanding of creating new skills for Alexa, and will be ready to participate in exploring the new frontier of voice-driven user experiences.
A Quick Architecture Overview
An Alexa skill—a voice-driven Alexa app—consists of two parts:
- The skill, defined in the Amazon Developer Portal. This is what ties it all together, by linking the phrases the user says to interact with the game (for example, "start reindeer games") to the application's logic.
- A web service that gets called whenever the user gives a command to the skill. The service can run on any secure web server that responds to the JSON-based API.
In this tutorial, we'll run the web service on AWS Lambda, a service that executes code in response to events, thus saving the developer the trouble of maintaining a server. Lambda also links seamlessly to the Alexa Skills Kit, which makes it an excellent tool for running the code for Alexa Skills.
We will implement the server functionality as a Node.js module, so to complete the tutorial, you'll need a basic understanding of JavaScript. Node.js experience is a plus, but absolutely not a requirement to complete the tutorial.
1. Create the Lambda Function
Let's start building the game by setting up an AWS Lambda function to run its business logic.
Step 1: Get Started With AWS Lambda
To use Lambda, you'll first need an Amazon Web Services (AWS) account.
If you already have an account, click on Sign In to the Console in the top right corner of the page to get started.
If you are a new user, you'll see a different link, Create an AWS Account, instead. Click on the link, and follow the instructions on the page to register for a free tier account.
During the registration, you will need to enter valid credit card information. But don't worry, you won't be charged unless your usage exceeds the free usage tier, which for Lambda means 1 million free requests and up to 3.2 million seconds of "compute time" per month—way more than enough for going through the tutorial and testing its functionality.
Once you've completed the registration and signed in to the AWS Console, you can activate Lambda for your account.
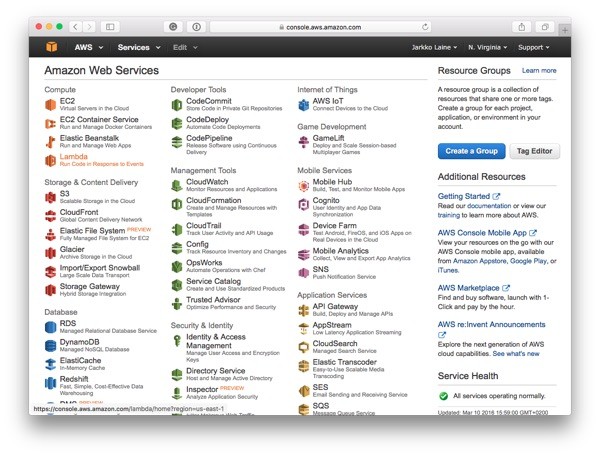
First, check the top-right corner of the page to verify that you are using the US East (N. Virginia) region.
Then, in the list of services, select Lambda:
If this is your first time using the tool, you'll see the following screen with some information about what you can do with it.
Click Get Started Now.

Step 2: Configure the Lambda Function
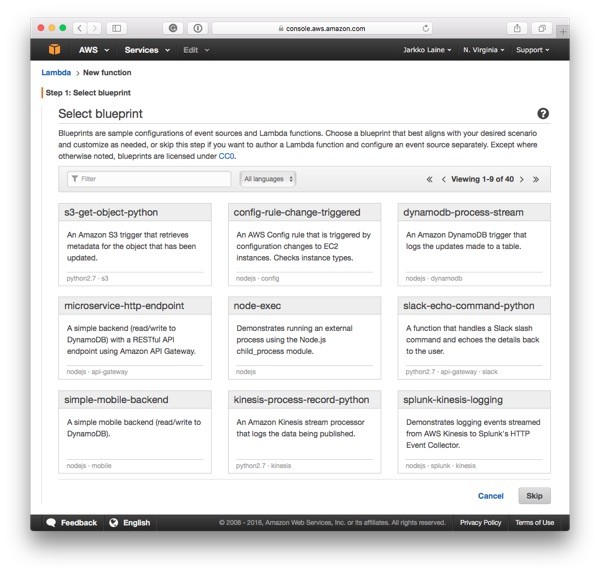
As you haven't created any Lambda Functions yet, the UI starts in the New function wizard. First, it shows you a list of blueprints, sample Lambda configurations for various common use cases.
We are going to build our trivia game from scratch, so scroll down and click the Skip button at the bottom of the page.
The next step in the wizard is "Configure Function":
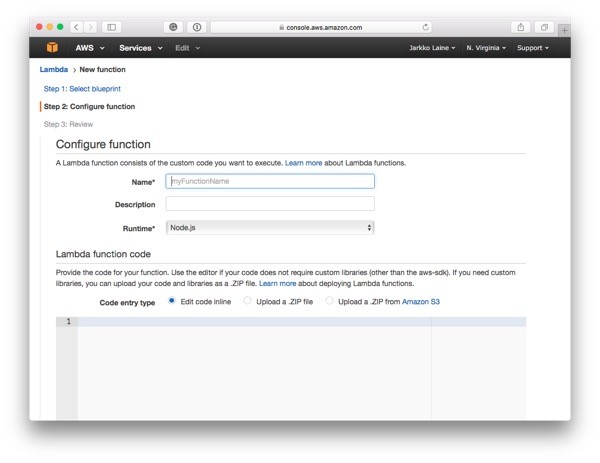
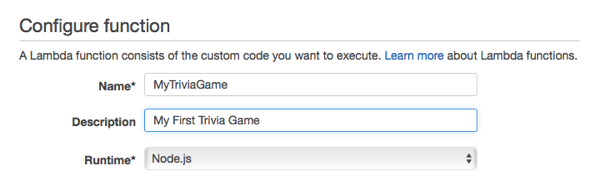
Enter some information about your new Lambda function:
-
Name: Select a descriptive name for the function. This name is not the one you'll expose to the Alexa users yet, so you don't need to worry about making it unique outside your Lambda account. Just come up with something descriptive that will help you recognize the function in your AWS Lambda console. In the example, we'll go with
MyTriviaGame, but you can choose anything you like. - Description: This field is optional, and it's used for documenting your work. You can enter something like "My first Trivia Game" if you want to.
- Runtime: The server language to use for running your code. AWS Lambda supports Node.js, Java, and Python. In this tutorial, we'll use Node.js.
Next on the page, you'll see an editor for entering the function's code.
Before we get to it, though, scroll down and configure the rest of the options:

-
Handler: Specify the JavaScript function that Lambda should invoke when it runs your code, in the format
<JavaScript file name>.<function name>. When using the inline editor, the code is saved asindex.js. And as we'll soon see, the handler function in the trivia game is calledhandler. So, to use that function, type inindex.handler.
-
Role: The IAM security role to use when running the Lambda function. Select "Basic execution role" in the drop-down to create a new role. If you have used Lambda before, you may have a role called
lambda_basic_execution. In that case, you can use the existing one.
A new window or tab for configuring the role will show up. If nothing happens, make sure that your browser settings are set to allow popups, and then try again.
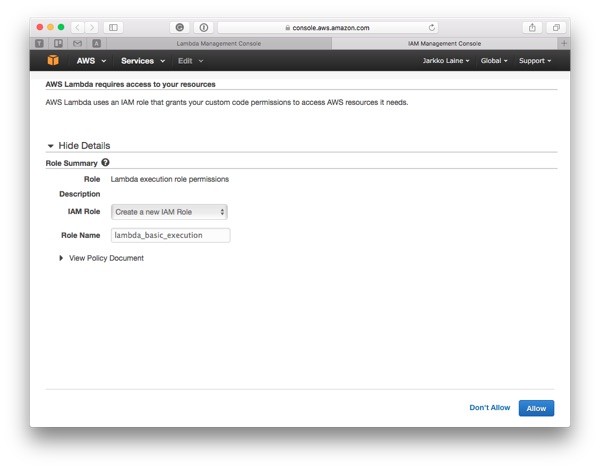
No changes are needed to these default values. Click Allow to create the new IAM rule and to return to the previous page. Also leave the fields in Advanced settings at their default values.
Then, with the configuration ready, let's put in the code.
Step 3: Add the JavaScript Code
When defining a Lambda function, you can either write your code in an inline editor right in the Amazon Lambda interface or upload it as a zip file. The inline editor is currently capped at 20KB, so for bigger functions, or if you need to split your code into multiple files (for example if you use libraries), the zip file approach is the way to go.
This time, however, we won't create anything too complex, so we are fine using the inline editor.
Copy the source code from Amazon's "Reindeer Games" sample skill and paste it into the code editor. Reindeer Games is a complete trivia game implementation that you can freely use as a template for your own game.
In the rest of this step, we'll go through the main parts of the trivia game's code to see how it interacts with the Alexa Skills Kit configuration we will create later in the tutorial, and to give you some pointers to get you started with exploring and customizing the code on your own.
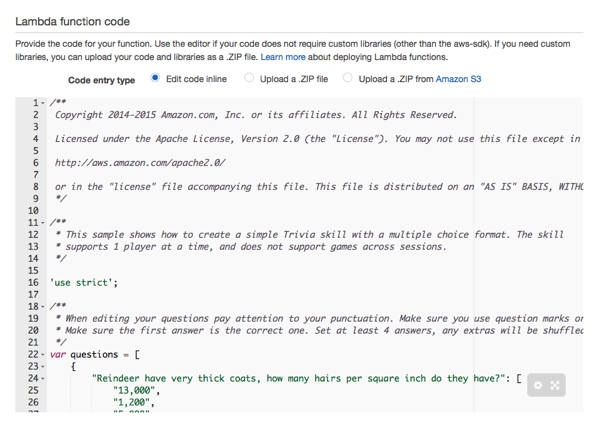
The JavaScript code begins with a data structure (lines 18-265 in the template source code) that contains the questions for the trivia game. Each trivia question consists of a question and an array with at least four options: the correct answer followed by at least three wrong ones:
/**
 * When editing your questions pay attention to your punctuation. Make sure you use question marks or periods.
 * Make sure the first answer is the correct one. Set at least 4 answers, any extras will be shuffled in.
 */
var questions = [
    {
        "Reindeer have very thick coats, how many hairs per square inch do they have?": [
            "13,000",
            "1,200",
            "5,000",
            "700",
            "1,000",
            "120,000"
        ]
    },
    {
        "The 1964 classic Rudolph The Red Nosed Reindeer was filmed in:": [
            "Japan",
            "United States",
            "Finland",
            "Germany"
        ]
    },

    // ...
];
When customizing the trivia game, replace the questions with your own: add at least 20, but preferably more. A pretty good number would be 100 questions. Also, remember that the correct answer always comes first.
Next, after the questions, on lines 267-305, you'll find the handler function we specified in the previous step. Whenever Alexa Skills Kit sends a request to the Lambda function, this function, handler, is called.
The function takes two parameters:
-
eventwill contain an object with information about the request. -
contextwill represent the state of the Lambda function (for example, how much time is left before the function times out). The context parameter is also used for sending a response back to the caller.
For more information, see the AWS Lambda documentation.
Here's what the function looks like:
// Route the incoming request based on type (LaunchRequest, IntentRequest,
// etc.) The JSON body of the request is provided in the event parameter.
exports.handler = function (event, context) {
    try {
        console.log("event.session.application.applicationId=" + event.session.application.applicationId);

        /**
         * Uncomment this if statement and populate with your skill's application ID to
         * prevent someone else from configuring a skill that sends requests to this function.
         */

//     if (event.session.application.applicationId !== "amzn1.echo-sdk-ams.app.05aecccb3-1461-48fb-a008-822ddrt6b516") {
//         context.fail("Invalid Application ID");
//      }

        if (event.session.new) {
            onSessionStarted({requestId: event.request.requestId}, event.session);
        }

        if (event.request.type === "LaunchRequest") {
            onLaunch(event.request,
                event.session,
                function callback(sessionAttributes, speechletResponse) {
                    context.succeed(buildResponse(sessionAttributes, speechletResponse));
                });
        } else if (event.request.type === "IntentRequest") {
            onIntent(event.request,
                event.session,
                function callback(sessionAttributes, speechletResponse) {
                    context.succeed(buildResponse(sessionAttributes, speechletResponse));
                });
        } else if (event.request.type === "SessionEndedRequest") {
            onSessionEnded(event.request, event.session);
            context.succeed();
        }
    } catch (e) {
        context.fail("Exception: " + e);
    }
};
On lines 278-280 (12-14 in this snippet), you'll find a commented-out if structure. This check is needed to prevent other skills than the one you'll soon configure from calling your Lambda function.
For now, leave the code as it is. Later in the tutorial, once you've created your Alexa Skill and have a unique ID for it, return to this check and replace the example application ID on line 278 with the new ID. Then, uncomment the code to put it to use.
Every request from the Alexa Skills Kit has a type, passed in event.request.type.
In all, there are three request types, all of which the service needs to respond to separately:
-
LaunchRequest: Sent when the user launches the Skill. The example code calls the helper functiononLaunchto initialize the game, pick the questions, and send back the first question along with a welcome message. -
SessionEndedRequest: Sent when the user stops using the skill by saying "exit", by not responding for a while, or if an error occurs. The example code calls the helper functiononSessionEnded, which is currently just a placeholder and doesn't do anything. -
IntentRequest: Sent when the user speaks a command that maps to an intent. The example code calls the helper functiononIntent.
Amazon's documentation explains that:
"[A]n intent represents a high-level action that fulfills a user’s spoken request. Intents can optionally have arguments called slots that collect additional information needed to fulfill the user’s request."
When a user speaks a command, Alexa converts it to text and compares it to a list of phrases the application understands. Each phrase is mapped to an intent definition so that your code doesn't have to worry about parsing the free-form input from the user but can rely on the intents to organize its communication with the user.
You'll soon see how to specify the intents for your skill, but first, let's take a look at the onIntent function to see how the game handles the intents.
You can find the function on lines 327-371 in the source code:
/**
 * Called when the user specifies an intent for this skill.
 */
function onIntent(intentRequest, session, callback) {
    console.log("onIntent requestId=" + intentRequest.requestId
        + ", sessionId=" + session.sessionId);

    var intent = intentRequest.intent,
        intentName = intentRequest.intent.name;

    // handle yes/no intent after the user has been prompted
    if (session.attributes && session.attributes.userPromptedToContinue) {
        delete session.attributes.userPromptedToContinue;
        if ("AMAZON.NoIntent" === intentName) {
            handleFinishSessionRequest(intent, session, callback);
        } else if ("AMAZON.YesIntent" === intentName) {
            handleRepeatRequest(intent, session, callback);
        }
    }

    // dispatch custom intents to handlers here
    if ("AnswerIntent" === intentName) {
        handleAnswerRequest(intent, session, callback);
    } else if ("AnswerOnlyIntent" === intentName) {
        handleAnswerRequest(intent, session, callback);
    } else if ("DontKnowIntent" === intentName) {
        handleAnswerRequest(intent, session, callback);
    } else if ("AMAZON.YesIntent" === intentName) {
        handleAnswerRequest(intent, session, callback);
    } else if ("AMAZON.NoIntent" === intentName) {
        handleAnswerRequest(intent, session, callback);
    } else if ("AMAZON.StartOverIntent" === intentName) {
        getWelcomeResponse(callback);
    } else if ("AMAZON.RepeatIntent" === intentName) {
        handleRepeatRequest(intent, session, callback);
    } else if ("AMAZON.HelpIntent" === intentName) {
        handleGetHelpRequest(intent, session, callback);
    } else if ("AMAZON.StopIntent" === intentName) {
        handleFinishSessionRequest(intent, session, callback);
    } else if ("AMAZON.CancelIntent" === intentName) {
        handleFinishSessionRequest(intent, session, callback);
    } else {
        throw "Invalid intent";
    }
}
As you can see, most of the function is an if..else structure that compares the intent name from the request to a set of intents the game accepts. Depending on the intent name, it then calls a matching gameplay function.
For example, when the game receives a request with the intent name AnswerIntent, it knows that the request is an answer to the current question and calls the function handleAnswerRequest to handle it.
Step 4: Save the Lambda Function
As this is a tutorial on creating a skill for Alexa-enabled devices rather than game development, we won't dig deeper into the game's logic. But now you should have some ideas for where to start poking to explore the code on your own.
Scroll down to the end of the page and click Next to save the configuration.
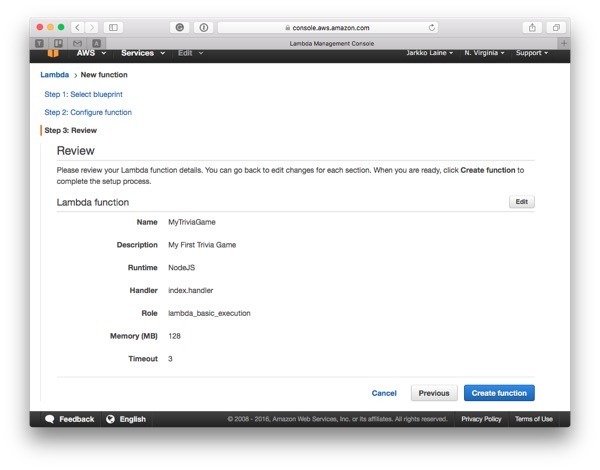
In the wizard's final step, you'll see an overview of the Lambda function setup. Check that everything looks correct, and then click Create function.
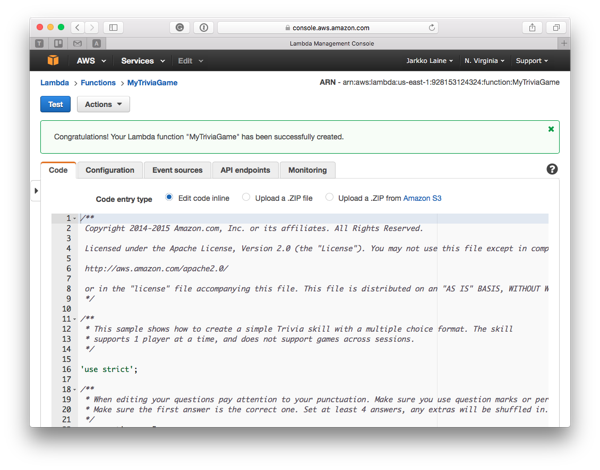
The Lambda function has now been created.
If you need to change any of the options from the wizard, you can do it on the Configuration tab.
Step 5: Define How the Lambda Function Gets Triggered
Now that you have created the function and put its code in place, it's time to specify how it gets called. We'll do this by adding an event source.
First, click on the Event sources tab.
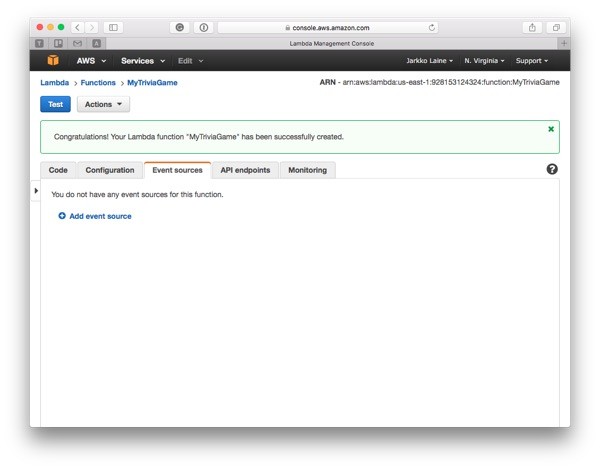
On this tab, once configured, you'll find a list of event sources that have been set up for this Lambda function. Click on the Add event source link to add one.
A popup for choosing the type of event source opens:
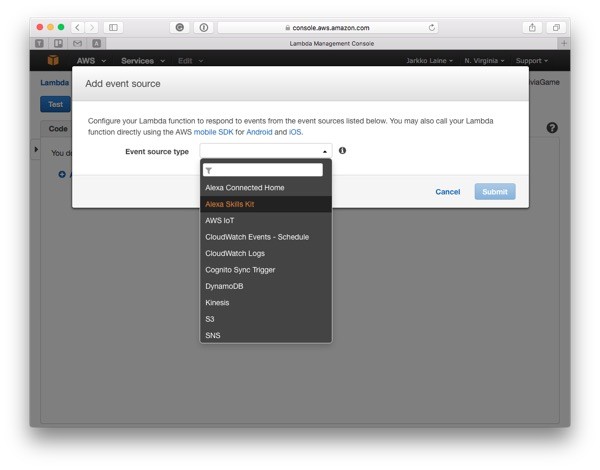
Select Alexa Skills Kit. Then click Submit.
That's all the configuration you need to do to make the Lambda function listen to events from Alexa Skills Kit.
The new event source is now listed on the Event sources tab:
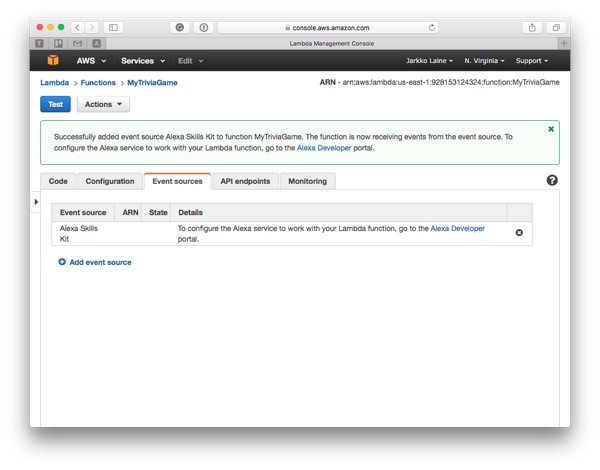
Notice the identifier with the label ARN in the top right corner. You'll soon use it to configure the Alexa Skill to call the correct Lambda function.
Now, let's define the skill.
2. Set Up the Skill in the Amazon Developer Portal
You have now put the logic for the trivia game in place and configured the function to execute at requests from the Alexa Skills Kit.
What is left is to create the skill so that you and your users can use an actual Alexa-enabled device such as the Amazon Echo to talk to the code.
To do this, we'll use the Amazon Developer Portal.
Step 1: Create an Amazon Developer Account
Start by signing up for a developer portal account.
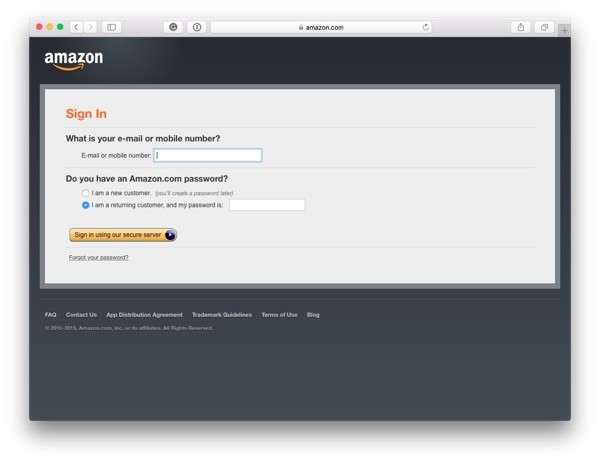
Click on Sign in or Create Free Account in the top-right corner of the Amazon Developer page. First, you'll see the default Amazon login. Use it to either create a brand new account or use your existing Amazon account (the same one you used when signing up for AWS, for example) to sign in.
If you haven't used the developer portal before, you'll be asked to enter some information about your company and to accept the application distribution agreement. This information is shared between any apps you might create for the Amazon Marketplace using this account.
Finally, in the last step, the sign-up flow asks you about payments. Currently, Alexa Skills cannot be sold or purchased, so if you only plan to develop Alexa Skills, choose No for both questions to skip any monetization-related setup steps. If you decide to monetize your applications later, you can always return to the setup when it becomes relevant.
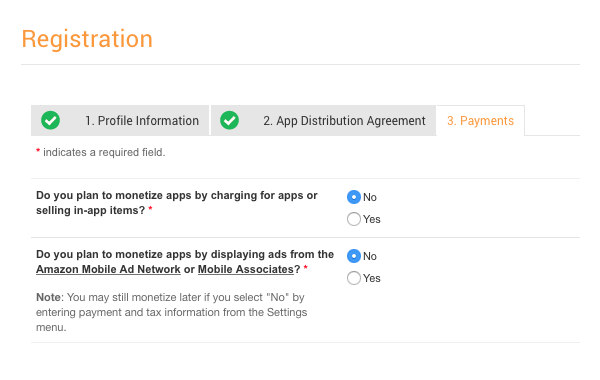
Click on Save and Continue.
Now, you're signed up and ready to add your first skill.
Step 2: Add Your First Alexa Skill
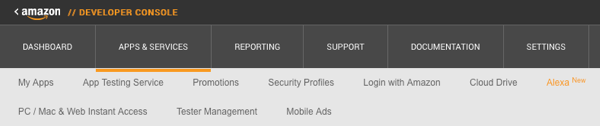
Once signed in to the Developer Console, navigate to the Alexa Skills Kit page: first, click on Apps & Services on the top menu, and then in the sub menu, select Alexa.
On this page, you'll see the following options:
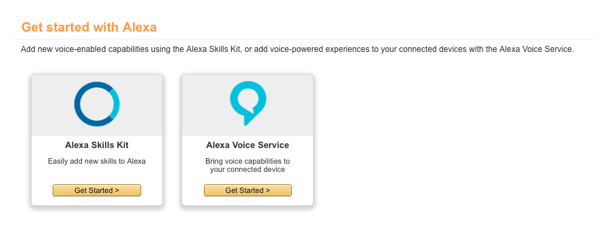
Select Alexa Skills Kit by clicking on its Get Started button.
In the screen that shows up, you'll find all the Alexa Skills you've built:
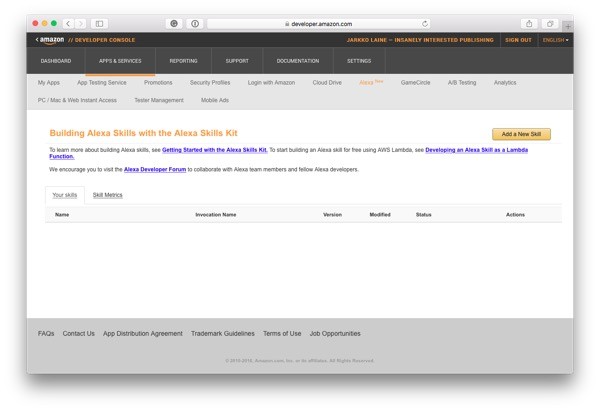
The list is still empty, so click on Add New Skill to begin defining your first one using a five-step wizard that will lead you all the way to publishing the skill so other Alexa users can find and use it.
First, on the Skill Information tab, enter some basic information to identify your new skill.
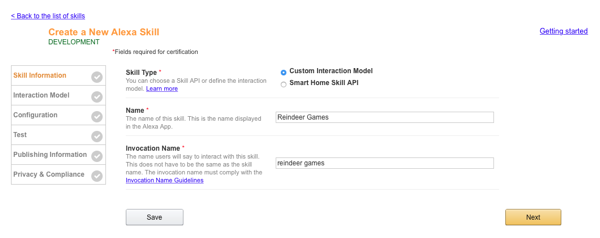
- Skill Type: Choose “Custom Interaction Model” since you will create a custom skill where you define the interaction model. You can learn more about the different types of Alexa skills here.
- Name: A descriptive name for the Skill. Once you publish your skill, this is the name your potential users will see. In the example, Amazon uses Reindeer Games, but you should select something of your own as that name is already in use.
- Invocation Name: The name that the users will use when they want to tell Alexa to execute this skill, for example, "Alexa, open Reindeer Games." Notice that it doesn't have to be the same as the skill's name. When deciding on the invocation name, test your ideas with an Echo device to make sure the name you pick is easy for Alexa to recognize. This way you can be sure that your users will be able to activate your skill without any extra trouble.
Once the information is in place, click Next.
Notice that you can always come back to edit this information later if there are mistakes. After saving the step, you'll also find the Skill's Application ID by coming back to this step (so you can use it in your JavaScript code to verify the requests, as I mentioned earlier).
Step 3: Define the Interaction Model
An interaction model is the link between the user talking to the Alexa-enabled device—for example, Amazon Echo—and the Lambda function we set up earlier. In a way, it is the user interface definition for our piece of voice-driven software.
The model consists of an Intent Schema that defines the set of Intents used by the skill, intent parameters, known as Slots, and Utterances, phrases that the user will say to execute one of the intents defined in the Intent Schema.
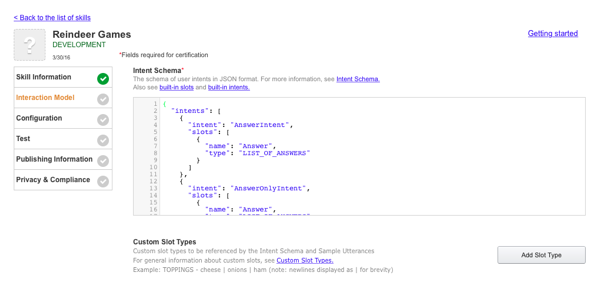
Intent Schema
Copy and paste the following piece of code to the text field labeled Intent Schema:
{
  "intents": [
    {
      "intent": "AnswerIntent",
      "slots": [
        {
          "name": "Answer",
          "type": "LIST_OF_ANSWERS"
        }
      ]
    },
    {
      "intent": "AnswerOnlyIntent",
      "slots": [
        {
          "name": "Answer",
          "type": "LIST_OF_ANSWERS"
        }
      ]
    },
    {
      "intent": "DontKnowIntent"
    },
    {
      "intent": "AMAZON.StartOverIntent"
    },
    {
      "intent": "AMAZON.RepeatIntent"
    },
    {
      "intent": "AMAZON.HelpIntent"
    },
    {
      "intent": "AMAZON.YesIntent"
    },
    {
      "intent": "AMAZON.NoIntent"
    },
    {
      "intent": "AMAZON.StopIntent"
    },
    {
      "intent": "AMAZON.CancelIntent"
    }
  ]
}
Looking at the data structure, you'll notice how the intent names defined in the list match those in the JavaScript code we looked at earlier in the tutorial. For example, the first intent, AnswerIntent, is the one mapped to the function that checks if the user's answer is correct or not.
For more information about designing a voice interface, see the Alexa Skills Kit documentation.
Slots
While most of the intents are only identifiers with nothing more than a name, a couple of them specify parameters, known as slots.
Still looking at AnswerIntent, notice that the intent defines one parameter, Answer, with the slot type LIST_OF_ANSWERS.
LIST_OF_ANSWERS is a custom slot type, so we have to specify it in the configuration.
Click on Add Slot Type, and enter the following information:
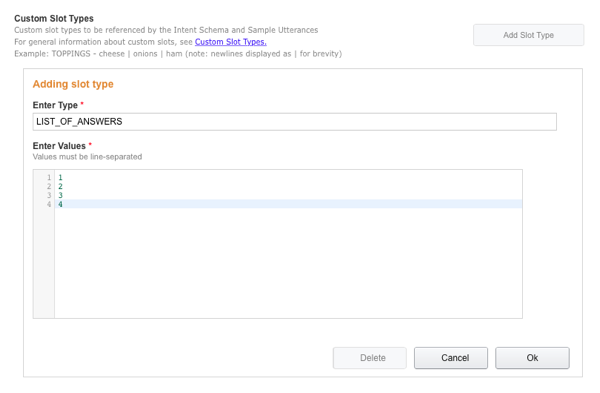
-
Enter Type: The name of the slot type, as referenced by the Intent Schema. Type in
LIST_OF_ANSWERS. -
Enter Values: The accepted values for the slot, one value per line. Enter numbers from
1to4, each on its line to allow the user to answer the questions by saying the correct answer's number.
Then click OK.
Now, let's go back to the JavaScript and look up a function named isAnswerSlotValid (lines 599-603) to see how the function uses the slot to retrieve the user's answer:
function isAnswerSlotValid(intent) {
    var answerSlotFilled = intent.slots && intent.slots.Answer && intent.slots.Answer.value;
    var answerSlotIsInt = answerSlotFilled && !isNaN(parseInt(intent.slots.Answer.value));
    return answerSlotIsInt && parseInt(intent.slots.Answer.value) < (ANSWER_COUNT + 1) && parseInt(intent.slots.Answer.value) > 0;
}
Here, you can see that the intent object contains an attribute, slots, for passing any parameters defined in the Intent Schema.
In this case, there is just one, Answer. So, by looking at intent.slots.Answer.value, the function can see which answer the user selected and check if it is the correct one for the current question.
Sample Utterances
Finally, to complete the interaction model, you'll need to define Sample Utterances, sentences that the user can say to invoke the intentions specified in the schema.
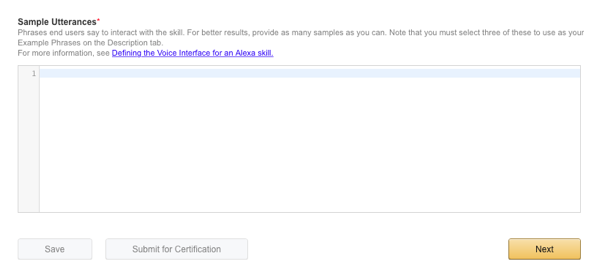
In the text field, enter one phrase per line, using the format <Intent Name> <Phrase>. To include the parameter slot, use {Answer}. Then, when the user says that phrase, Alexa will parse it and call the service passing in the matching Intention and the parsed value for the Answer slot.
Start by inserting the following sample utterances. Then, you can continue by adding as many utterances as you like. In fact, the more (relevant) phrases you can come up with, the better.
AnswerIntent the answer is {Answer}
AnswerIntent my answer is {Answer}
AnswerIntent is it {Answer}
AnswerIntent {Answer} is my answer
AnswerOnlyIntent {Answer}

AMAZON.StartOverIntent start game
AMAZON.StartOverIntent new game
AMAZON.StartOverIntent start
AMAZON.StartOverIntent start new game

DontKnowIntent i don't know
DontKnowIntent don't know
DontKnowIntent skip
DontKnowIntent i don't know that
DontKnowIntent who knows
DontKnowIntent i don't know this question
DontKnowIntent i don't know that one
DontKnowIntent dunno
With these utterances in place, for example, when the user says, "two is my answer," Alexa will send an IntentRequest to the Lambda function, passing AnswerIntent as the intent and 2 as the value for the Answer slot.
Click Next to save your interaction model. Building the interaction model can take a minute or two, so give it some time. Then, once the build completes, you're ready to configure your Alexa Skill.
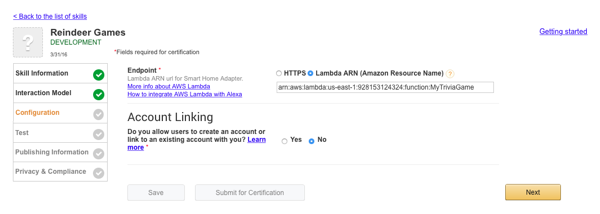
Step 4: Configure Your Alexa Skill
On the Configuration tab, enter some information to configure your skill and to define the web service that is responsible for its logic.
- Endpoint: The method for executing the skill's functionality. Our code is at AWS Lambda, so select Lambda ARN. Then, in the text field, enter the identifier I pointed out at the end of part one of the tutorial.
- Account Linking: Select No.
Once the information is in place, click Next. You're ready to start testing your new Alexa Skill!
3. Test the Trivia Game
While the best way to test your new Alexa Skill is to play the trivia game on an actual Echo device, you can also test the skill right there in your browser, using the tools in the next step of the Add New Skill flow.
Step 1: Test the Game in a Simulator
On the testing page, you'll find two testing tools:
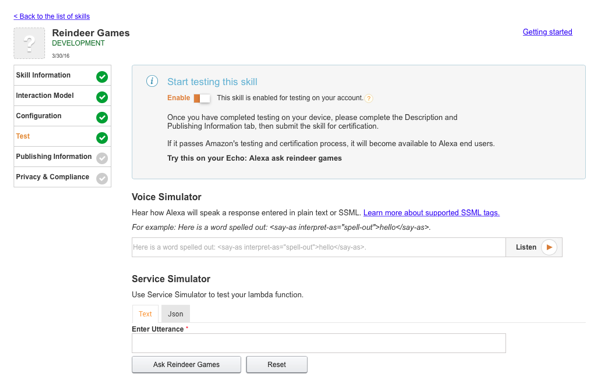
- Voice Simulator can be used to test how Alexa speaks any sentence. This is useful, for example, when designing the questions for your trivia game: if a question doesn't sound right in the voice simulator, try again and replace it with a version that does.
- Service Simulator tests the functionality of the skill, almost as if you were using an actual Alexa-enabled device. Using this tool, you can type in an utterance and see how your application, through the Alexa Skills Kit, responds to it.
So, let's put the game to test, using the Service Simulator.
In the Enter Utterance text box, type:
open reindeer games
Then, click on the Ask Reindeer Games button below it.
The testing tool uses your interaction model to parse the command and then makes a request to the skill's Lambda function.
If all goes well, you will see the JSON request and response shown below the command box:
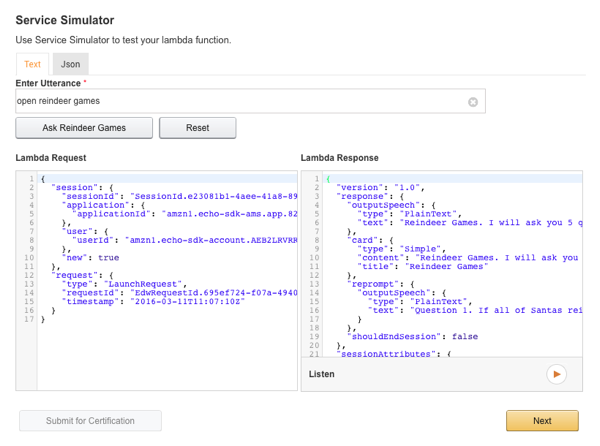
On the left-hand side, you'll see the request that Alexa Skills Kit sent to your Lambda function, and on the right, how your code responded to it.
Now, you can analyze the JSON response, or for a more authentic Echo experience, click on the Listen button to hear Alexa speak the response for you.
Once you've heard the question, try to answer it. Pick one of the utterance formats you specified in the previous step and type it in the Enter Utterance text field.
For example:
the answer is four
Notice that you have to write the number as a word and not the actual number 4.
Did you get the answer right? Keep testing with different utterances and flow changes until you feel confident that the application is working as expected—and you have a good understanding of how it works.
If something goes wrong and you receive an invalid response from the server, here are some common errors you might want to check, as listed by the example code's developers:
- Did you copy the correct ARN for your Lambda function into your Skill in the Developer Portal?
- Are you using the right invocation name? Maybe you changed it into something different than reindeer games and are now still testing with the example name?
- Are you saying launch, start or open?
- Are you sure you have no other skills in your account with the same invocation name?
- For this template specifically, you need to have a minimum of seven questions and answers for the business logic to function.
Step 2: Test the Game on a Device
As we saw in the previous step, the online tool is just as good as an actual device for testing the application's logic and interaction schema.
What this testing method won't show you, however, is how well Alexa will be able to understand and parse the utterances. So, if you're creating a skill that you plan to publish, you can also do some final testing using a device rather than just these online tools before you submit your skill.
The Amazon Alexa certification team will also do thorough testing before accepting your skill to the marketplace. If your skill is not ready for certification yet, they will send you additional feedback to let you know about the required edits and to help you get your skill ready for publishing.
To test the game on your Echo device, first register the device with the email address you used to sign up for your developer account on the Amazon Developer Portal. Once that's done, you can use the skill just like a real end user would.
See the Alexa documentation for more testing instructions.
4. Publish Your Alexa Skill
When your skill is ready for prime time, you can go ahead and release it to the world to see.
Don't go publishing the example application as is, though.
Instead, make the game your own, using the template and what you've learned in this tutorial as the basis for your amazing new Skill. Modify the code in the AWS Lambda editor to replace the questions, add new utterances to the skill configuration, and maybe make some other modifications that feel right for your version of the trivia game.
Then, on the Test tab, once you're confident about your application, click Next to move to the final two steps leading to publishing the skill.
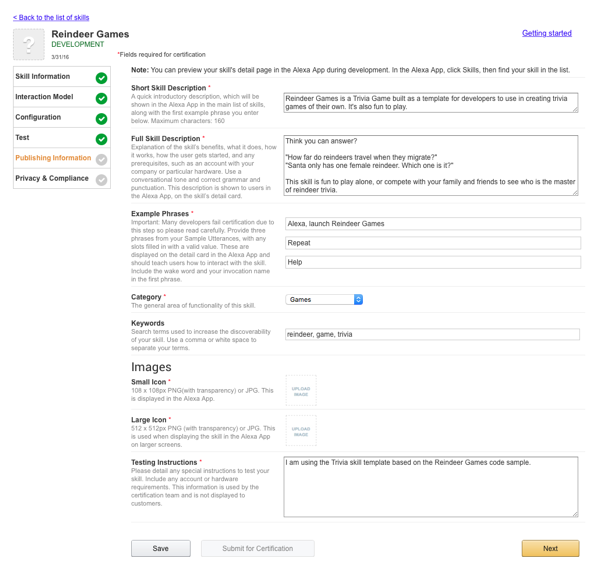
On the Publishing Information tab, describe the skill in as much detail as needed to make it easy for new users to find your skill, get an idea of how it works and why it's worth giving a try, and how to use it. This is the only opportunity you have for attracting new users!
The icon is also an important marketing element. It should be something potential users will notice and get curious about. Also, be sure only to upload images that you have the right to use.
At any point while editing the data, you can save changes by clicking Save and preview the Skill's description page in the Alexa Companion App. That's also where the descriptions will show up when the skill is live.
Go through the fields carefully, paying close attention to the instructions. In the screenshot above, you can see the example values from Amazon's Reindeer Games template.
If you use variations of these values, remember to replace "Reindeer Games" in Example Phrases with your skill's invocation name.
The Testing Instructions are only visible to the Amazon Alexa certification team. You can just mention: "I am using the Trivia skill template based on the Reindeer Games code sample."
Then, when you are ready, click Next.
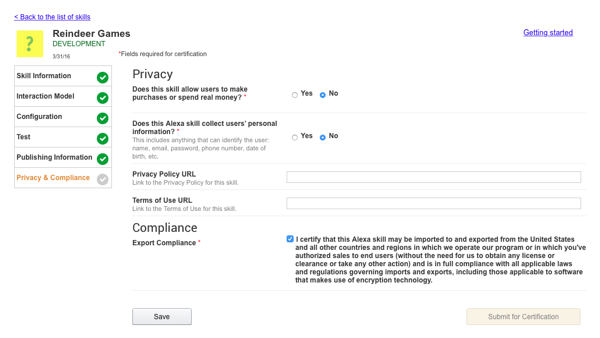
In this final step, you'll answer a few questions about your game's privacy options.
For a trivia game based on this tutorial, select No for both Yes/No questions: the skill doesn't allow users to spend money, or collect user information.
Privacy Policy URL and Terms of Use URL are optional.
When you think the game is ready, click Submit for Verification. Then wait for input from the Alexa Skills team: you will receive progress emails and possibly some suggestions on how you can make your skill even better.
And if all goes well, in a little while your trivia game will be available for users to try on an Amazon Echo or any Alexa-enabled device!
What's Next?
You have now implemented your first Alexa Skill and should have a pretty good understanding of the building blocks and process used for building one. But this is just the beginning.
Dig deeper, dream up new ways to use the voice interface, or add a voice interface to your existing web application. The market for voice-driven applications is only getting started, and there are still many unused ideas left for you to implement.
Have fun crafting the future!

Comments