Subscription boxes are an increasingly popular business these days. You can find them for everything from grooming products to healthy snacks, kids games and even ice cream. In this tutorial, I’ll show you how to quickly build a web app to test if you can find the first 1,000 customers for your subscription box idea!
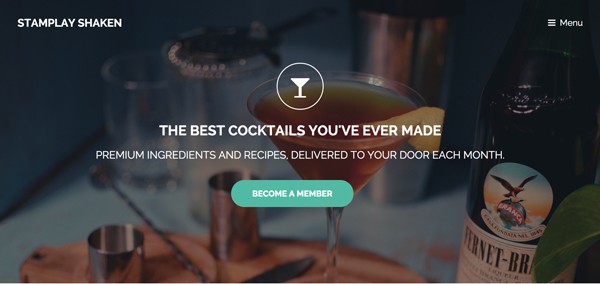
Our app is inspired by cocktail subscription service Shaken and includes the following features:
- Sign up users via Facebook.
- Activate recurring payments via Stripe.
- Pause and reactivate subscriptions.
- Send transactional emails.
- Add users to a MailChimp list.
This tutorial will show you how to configure a full-featured back-end and how to build the AngularJS front-end that hooks up to it.
The full codebase of the front-end can be found on GitHub.
Coupon: Stamplay has provided Tuts+ readers an exclusive coupon to provide 6 months of the plus plan for free ($600 value). The coupon code is CODETUTSPLUS and it expires on October 10. Sign up now for free to redeem it.
1. Stamplay: API Lego for Developers
Stamplay is a web-based development platform that gives developers an incredibly fast way to build fully integrated applications. Stamplay handles the trouble of talking to many different APIs so you don’t have to.
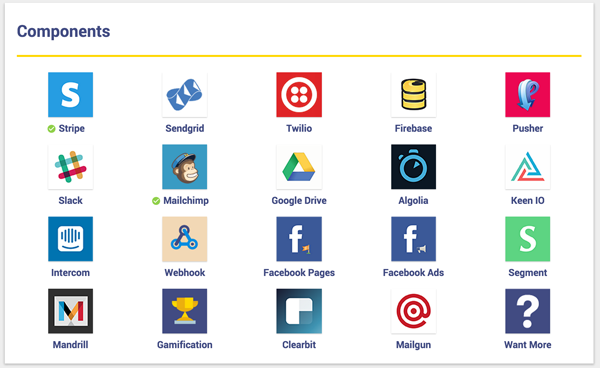
Stamplay is built around the concept of components; components are the building blocks of our application. We can see the different tools available to us under Tasks > Components.
Once logged in, you are greeted with this simple and elegant dashboard. We’ll create an application here. Name it whatever you please, but remember that this name is what we’ll use to identify our application. This will also be used as the URL for our application when it’s hosted.
In our case, we are using "tutsplus", and our application will be hosted at https://tutsplus.stamplayapp.com.
Now let’s start configuring the back end.
1.1 Configuring the Back End: Integrating Facebook Signup
This app will feature a Facebook login. We’ll be able to interact with the Facebook API and handle login and signup, all without a single line of code. Since we want our users to sign up with Facebook, we’ll need to head over to the Facebook Developers page and create a new developer app.

Select Website, and once you get your app created, we’ll be able to grab two things that we need from Facebook to integrate with Stamplay:
- App ID
- App Secret
These two things can be found under Settings > Basic.

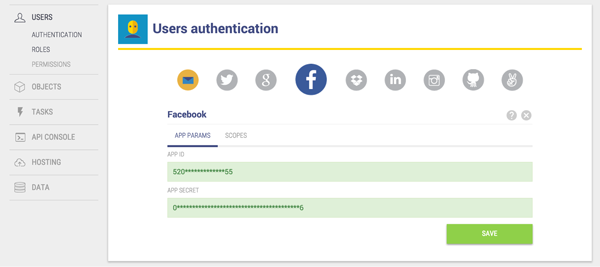
Now that we have our App ID and App Secret, we can plug those into Stamplay.
Head back to Stamplay and select Users from the main menu, and then Authentication. Add Facebook as the signup service, copy and paste the App ID and App Secret, and click Save.
You’re now able to register users via Facebook!
Now that we’ve hooked up our Facebook credentials, Stamplay provides a convenient API URL to handle logging in with Facebook. Let’s go there now and see our Facebook login in action.
Go to https://tutsplus.stamplayapp.com/auth/v1/facebook/connect.
And boom! You have your Facebook login up and running.
1.2 Configuring the Back End: Managing Data With Objects
Not everything can be handled with components, so Stamplay provides us with an easy way to handle custom data. Think of this as the back-end database interface for your application.
Orders will be tracked with an Object called orders. It has the following five properties:
- active (boolean) // to track whether the subscription is active or not
- address (plain_object) // user’s address info
- plan (string) // the plan the user subscribed to
- stripesubscription (string) // the subscription Id generated by Stripe
- user (user_id) // the unique _id of our user

Stamplay will instantly expose RESTful APIs as soon as you create the object. The endpoint will look like this: https://APPID.stamplayapp.com/api/cobject/v1/orders.
1.3 Configuring Stripe
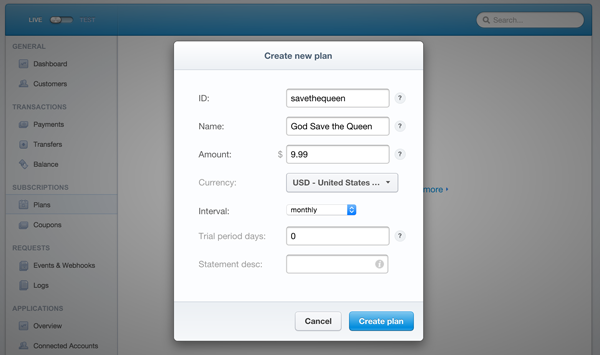
We’ll need to bill our customers periodically, and thankfully this is easy to do with Stripe! Its recurring payment processing is implemented within the Plan concept. Stripe Plans are objects representing the cost and billing cycle of your subscriptions.
To set this up you’ll need to create your plan in the Stripe console > Plans:
Once done, head back to Stamplay and connect the Stripe component in Task > Components. Select the Stripe module and click the Connect button.
Now the Stripe account will be linked to the Stamplay app, which can perform API requests on our behalf.
After a successful Stripe connection you’ll end up on a view like this one.

1.4 Configuring MailChimp
To configure MailChimp, the process is pretty similar; simply connect your MailChimp account as you previously did with Stripe, and you’ll see a page like this:

2. Adding Automation With Tasks
This is the server-side part of our application, where the bulk of the magic happens! Let’s say that we want do a couple of things:
- Email a “Welcome” message when a user signs up with Facebook.
- Add users to a MailChimp list when they sign up.
These two things would normally require a good chunk of code, but not with Stamplay...
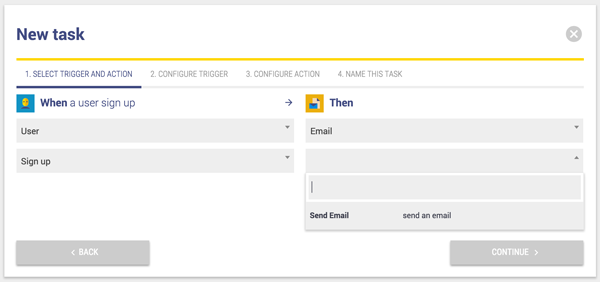
2.1 Welcome Email
A wizard will walk you through the configuration of the task. Under Tasks > Manage, create a new Task and set it up the way you want. Here’s how we’ve set up the welcome email task:
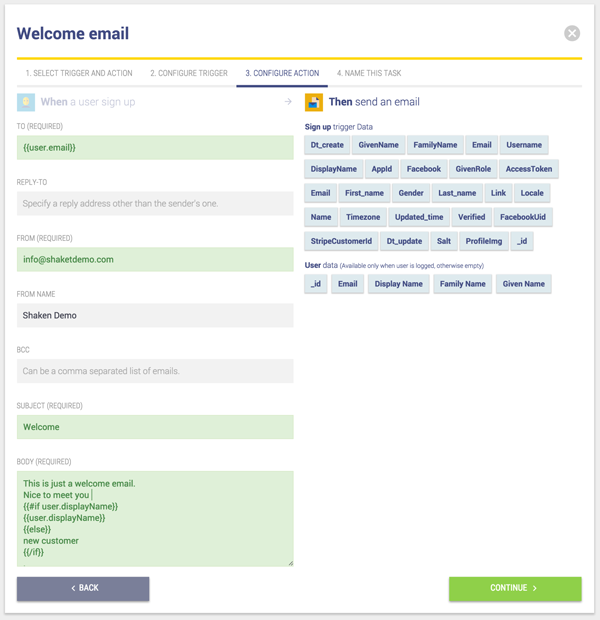
Then you can configure the action leveraging the variables coming out from the trigger (in this case, the user). Here’s how we configured ours:
2.2 Push Users to a MailChimp List
Pushing users’ emails to your mailing list on MailChimp is straightforward.
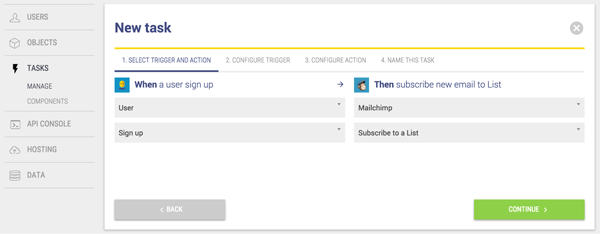
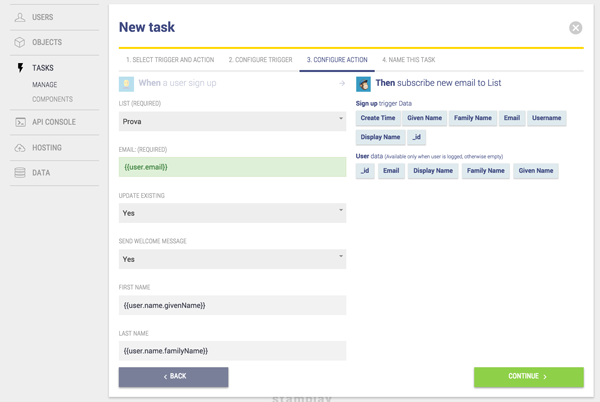
Under Tasks > Manage, create a new Task and set it up the way you want. Here is how we’ve set up the MailChimp subscribe task.
3. The Front End
To start working on our front end, we’ll need to use the Stamplay CLI tool.
3.1 Install the Stamplay CLI
This tool will give us the ability to work with our Stamplay applications. It allows us to:
- deploy applications
- start a local server for development
- initialize a Stamplay project
- roll back versions
- download the latest version
$ npm install -g stamplay-cli
Let’s create a new folder and initialize our Stamplay application to that folder.
$ mkdir tutsplus && cd tutsplus
$ stamplay init
You’ll be prompted to enter your appId (name of your app) and your apiKey. In this case, they are tutsplus and 4****0 respectively.
This will create a stamplay.json file in the root of your app so that when deploying, Stamplay will know your credentials.
{
  "appId": "tutsplus",
  "apiKey": "4e****0",
  "public": "./",
  "ignore": [
    "stamplay.json",
    "**/.*",
    "**/node_modules/**"
  ]
}
3.2 Building the Front End
To hit the ground running with a good design, we started from one of the many cool free HTML5 templates powered by Templated.co. The one we used is called Retrospect.
Let’s download it and unzip it to our project folder. Then let’s install some additional libraries here using Bower. Run the following command and we’ll be good to go:
$ bower install angular angular-ui-router angular-stamplay stamplay-sdk angular-route --save
In order to use Stamplay with Angular, we will need to:
- load the Stamplay SDK
- configure the Stamplay application
- load Angular
- load Angular UI Router
- load the Angular-Stamplay library (just a service wrapper for the SDK)
Here are the lines required to do all of that. We’ll add them below the </footer> tag of our index.html file:
<html>
    <head>  ...	</head>
	<body class="landing">
	...

	<footer id="footer">
		<div class="inner">
			….
		</div>
	</footer>
	<!-- Scripts -->
	<script src="assets/js/jquery.min.js"></script>
<script src="assets/js/skel.min.js"></script>
	<script src="assets/js/util.js"></script>
	<script src="assets/js/main.js"></script>

      <script src="/bower_components/stamplay-sdk/dist/stamplay.min.js"></script>
<script type="text/javascript">
      		Stamplay.init('subscribeboxdemo');
      </script>
      <script src="/bower_components/angular/angular.min.js"></script>
      <script src="/bower_components/angular-route/angular-route.min.js"></script>
      <script src="/bower_components/angular-ui-router/release/angular-ui-router.js"></script>
      <script src="/bower_components/angular-stamplay/angular-stamplay.js"></script>

	</body>
</html>
Make sure you’ve typed your own AppId into the Stamplay.init function. We can now start our local server to make sure everything’s loading correctly. Run the following:
stamplay start
You will see that your application is ready to go at http://localhost:8080.
3.3 The Angular Application
We’ll be creating some files for our Angular application:
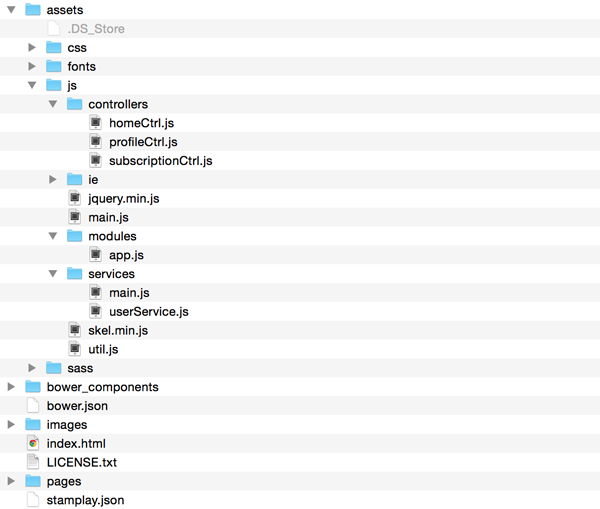
The two services files will use the Stamplay SDK and angular-stamplay libraries to help our application interact with our Stamplay data.
The most important is userService.js. It has a few functions and helps us grab data or create data. For a more in-depth look at what the Stamplay SDK is capable of, be sure to check out the documentation.
UserService.js leverages the Stamplay JS SDK to provide to our Angular app the following functionalities:
- login
- logout
- isLogged
- saveAddress
- getUserModel
- createCard
- subscribe
- unsubscribe
/assets/js/services/userService.js
/*global angular, Stripe, console*/
'use strict';

angular
  .module('tutsplus.service')
  .factory('userService', ['$q', '$stamplay',
    function ($q, $stamplay) {
var user = $stamplay.User().Model;
    return {
	  login: function () {
		return user.login('facebook');
	  },
	  logout: function () {
	  	return user.logout();
	  },
	  isLogged: function () {
		return user.isLogged();
	  },
	  saveAddress: function (address, city, zipcode) {
		// Save user’s address information
	},
	getUserModel: function () {
	// Get User informations
},
	createCard: function (cardObj) {
		// Collect Credit card information and store it via Stripe
	},
	subscribe: function (planId) {
		// Subscribe user
	},
	unsubscribe: function (planId) {
		// Cancel user subscription
	}
     };
   }]);
Our application will have three pages:
- home.html, the main landing page where the user will be able to sign up
- subscriptions.html, where users can view the boxes available for a subscription
- profile.html, where users can edit their information and cancel a subscription
These pages are managed by three controllers (as suggested by best practices), which are homeCtrl.js, subscriptionCtrl.js, and profileCtrl.js.
Page templates and controllers are tied together by the main Angular app.
Here’s the foundation of our app.js:
/*global angular*/
'use strict';
angular.module('tutsplus', ['tutsplus.service', 'ngRoute', 'ui.router', 'ngStamplay']);

angular
  .module('tutsplus')
  .config(function ($stateProvider, $urlRouterProvider) {
    $urlRouterProvider.otherwise('/');
	$stateProvider
		.state('home', {
			url: '/',
			templateUrl: '/pages/home.html',
			controller: 'homeCtrl',
			controllerAs: 'home'
		})
		.state('subscriptions', {
		url: '/subscriptions',
			templateUrl: '/pages/subscriptions.html',
			controller: 'subscriptionCtrl',
			controllerAs: 'sub'
		})
		.state('profile', {
			url: '/profile',
			templateUrl: '/pages/profile.html',
			controller: 'profileCtrl',
			controllerAs: 'profile'
		});
})
/*
 * Save logged user, if present, in the rootScope
 */
.run(['$rootScope', 'userService',
	function ($rootScope, userService) {
		userService.getUserModel()
			.then(function (userResp) {
				$rootScope.user = userResp;
			});
	}
]);
Now we just need to load our new files in index.html below the libraries we added earlier.
/index.html
   ...head of the index.html file..
  <script src="/bower_components/angular/angular.min.js"></script>
  <script src="/bower_components/angular-route/angular-route.min.js"></script>
  <script src="/bower_components/angular-ui-router/release/angular-ui-router.js"></script>
  <script src="/bower_components/angular-stamplay/angular-stamplay.js"></script>

  <script src="/assets/js/services/main.js"></script>
  <script src="/assets/js/services/userService.js"></script>
  <script src="/assets/js/modules/app.js"></script>

  <script src="/assets/js/controllers/homeCtrl.js"></script>
  <script src="/assets/js/controllers/subscriptionCtrl.js"></script>
  <script src="/assets/js/controllers/profileCtrl.js"></script>
</body>
</html>
3.4 Front-End Authentication
We wired up our Facebook application earlier, and now we need to provide our users a way to use it! All of the authentication is handled by Stamplay. We don’t need to code anything up; we just need to link our users to the authentication path that Stamplay has provided for us.
The authentication process looks like this:
- Link users to our authentication URL.
- Authentication happens on Facebook.
- Facebook sends a user back to our application with a token.
- Stamplay handles storing that token and our user is authenticated.
We only need to manually configure the first of those steps. Let’s apply our Angular app with ng-app and ng-controller to index.html and add some Angular directives to connect the homepage with our homeCtrl.js. We are also going to remove everything between the <nav> and the <footer> of the original template and replace it with a <div ui-view></div> tag element.
This element will dynamically display the content of the current page.
/index.html
   ...head of the index.html file..
<body class="landing" ng-app="tutsplus">
<!-- Header -->
<header id="header" class="alt">
    <h1><a href="index.html">Stamplay Shaken</a></h1>
	 <a href="#nav">Menu</a>
</header>
<!-- Nav -->
<nav id="nav" ng-controller="homeCtrl as home">
	<ul class="links">
		<li><a ui-sref="home">Home</a></li>
		<li><a ng-show="home.isLogged" ui-sref="profile">My Profile</a></li>
		<li><a ui-sref="subscriptions">New Subscription</a></li>
		<li><a ng-show="home.isLogged" href ng-click="home.logout()">Logout</a></li>
</ul>
</nav>

<div ui-view></div>

<footer>
   ...end of the index.html file..
When the application starts, the router will check the URL and load the appropriate view. Inside the first <section> of home.html, we can easily spot all the Angular directives that paired with the homeCtrl.js functions.
/pages/home.html
<section id="banner">
    <i class="icon fa-glass"></i>
	<h3 ng-show="home.isLogged">Welcome {{ home.user.instance.displayName }}</h3>
	<h2>The best cocktails you've ever made</h2>
	<p>Premium ingredients and recipes, delivered to your door each month.</p>
	<ul class="actions">
		<li><a class="button big special"
		ng-show="!home.isLogged"
		ng-click="home.signUp()">
		Become a member
		</a></li>
		<li><a class="button big special"
		ng-show="home.isLogged"
		ui-sref="subscriptions">
		New subscription
		</a></li><br>
		<li><a class="button big special"
		ng-show="home.isLogged"
		ui-sref="profile">
		View your subscriptions
		</a></li>
	</ul>
</section>
/assets/js/controllers/homeCtrl.js
/*global angular*/
'use strict';

angular
    .module('tutsplus')
	.controller('homeCtrl', ['$rootScope', 'userService',
		function ($rootScope, userService) {
			var homeModel = this;
			homeModel.isLogged = userService.isLogged();

			$rootScope.$watch('user', function (newVal) {
				homeModel.user = newVal;
				homeModel.isLogged = userService.isLogged();
			}, true);

			homeModel.signUp = function () {
				userService.login();
			};

			homeModel.logout = function () {
				userService.logout();
			};
		}
	]);
Now if a user clicks the “Become a member" button, they will be asked to log in with their Facebook account. We had to deploy because authentication won’t work from localhost:8080. Facebook wants to return a user to a full qualified domain.
At this point, deploy your application again using:
$ stamplay deploy
After a user successfully logs in, we want them to be able to subscribe to one of our plans.
3.5 Creating Stripe Customers
Customers are the other main component of subscriptions. In a broad sense, a customer is just a generic way to associate your own users with your Stripe account. Typically you'll want to associate some metadata, like an email address, with a customer. Customer objects can also store a credit card, which is how they'll be billed later on.
Creating a new customer via the API is easy, as the Stamplay JS SDK already provides all the required support. Our app associates a Stripe customer to our own users right after the signup or login—this is managed via userService.js in the getUserModel function.
/assets/js/services/userService.js
.. head of userService.js ...
getUserModel: function () {
  var def = $q.defer();
  user.currentUser()
  .then(function () {
    //create a stripe customer if doesn't exist
if (user.isLogged()) {
		if (!user.get('stripeCustomerId')) {
			$stamplay.Stripe().createCustomer(user.get('id'))
			.then(function (sResponse) {
				var saveUser = $stamplay.User().Model;
				user.set('stripeCustomerId', sResponse.customer_id);
				user.set('subscriptions', sResponse.subscriptions);
			saveUser.set('stripeCustomerId', user.get('stripeCustomerId'));
				saveUser.set('subscriptions', user.get('subscriptions'));
				saveUser.set('_id', user.get('_id'));
				saveUser.save()
				.then(function () {											def.resolve(user);
});
			})
	} else {
			def.resolve(user);
			}
		} else {
			def.resolve(user)
		}
	})
	.catch(function (err) {
		def.reject(err);
	});
return def.promise;},
.. tail of userService.js ...
The code above verifies whether the user is logged in or not, and if they already have a stripeCustomerId property. If not, it creates a Stripe customer with $stamplay.Stripe().createCustomer(user.get('id')) and stores the stripeCustomerId as an additional property of the logged user.
This control is triggered every time the app starts by the app.js Angular module.
/assets/js/modules/app.js
.run(['$rootScope', 'userService',
function ($rootScope, userService) {
    	userService.getUserModel()
		.then(function (userResp) {
			$rootScope.user = userResp;
		});
	}
])
3.6 Subscribing to a Plan
Now we need to finally charge our user when they purchase a plan. The template subscriptions.html, tied to the controller subscriptionCtrl.js, displays to our users the subscription plans they can choose from.
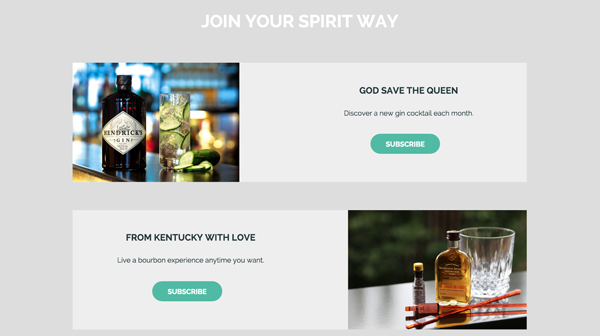
When the user selects one of the subscriptions, the payment form will be displayed, allowing the user to finalize their purchase. The subscription page lists the articles at the very top and contains two more sections (the payment and thank-you sections), both hidden.
/pages/subscription.html
<!-- articles section starts -->
<section id="three" class="wrapper style3 special">
<div class="inner">
<header class="major narrow ">
<h2>Join your spirit way</h2>
</header>
<article class="feature left">
<span class="image"><img src="images/gin.jpg" alt=""/></span>
<div class="content">
<h3>God save the queen</h3>
<p>Discover a new gin cocktail each month.</p>
<ul class="actions">
<li ng-show="sub.isLogged"><a href class="button special" ng-click="sub.openSubscribe('tplanOne')">Subscribe</a>
</li>
</ul>
</div>
</article>
<article class="feature right">
<!-- second article here -->
</article>
…
</section>
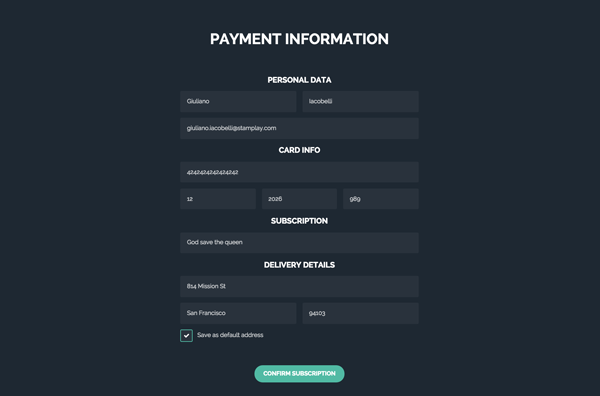
<section id="payment-form" class="wrapper style2 special" ng-show="sub.showPayment">
<div class="inner">
<header class="major narrow">
<h2>Payment information</h2>
</header>
<form>
<div class="container 50%">
<div class="row uniform 50%">
<div class="12u$">
<h3>Personal data</h3>
</div>
<div class="6u 12u$(xsmall)">
<input name="firstname" placeholder="First name" type="text" value="{{sub.user.get('name').givenName}}"/>
</div>
<div class="6u$ 12u$(xsmall)">
<input name="familyname" placeholder="Family Name" type="text" value="{{sub.user.get('name').familyName}}"/>
</div>
<div class="12u$">
<input name="email" placeholder="Email" type="text" value="{{sub.user.get('email')}}"/>
</div>
<div class="12u$">
<h3>Card info</h3>
</div>
<div class="12u">
<input name="cardnumber" placeholder="Card number" type="text"
value="{{sub.card.number}}"/>
</div>
<div class="4u">
<input name="expiremonth" placeholder="Expire month" type="text" value="{{sub.card.expM}}"/>
</div>
<div class="4u">
<input name="expireyear" placeholder="Expire year" type="text"
value="{{sub.card.expY}}"/>
</div>
<div class="4u">
<input name="cvc" placeholder="CVC" type="text" value="{{sub.card.cvc}}"/>
</div>
<div class="12u$">
<h3>Subscription</h3>
</div>
<div class="12u">
<select ng-model="sub.selectedPlanId">
<option value="tplanOne">God save the queen</option>
<option value="tplanTwo">From kentucky with love</option>
<option value="tplanThree">The rum diary</option>
</select>
</div>
<div class="12u$">
<h3>Delivery details</h3>
</div>
<div class="12u">
<input name="address" placeholder="Address" type="text" ng-model="sub.address.address" />
</div>
<div class="6u">
<input name="city" placeholder="City" type="text" ng-model="sub.address.city"/>
</div>
<div class="6u">
<input name="zipcode" placeholder="Post Code" type="text" ng-model="sub.address.zipcode"/>
</div>
<div class="12u$" style="text-align:left">
<input name="defaultadress" type="checkbox" ng-model="sub.saveAddress">
<label ng-click="sub.saveAddress = !sub.saveAddress">Save as default address</label>
</div> </div>
</div>
<ul class="actions">
<li><input type="submit" class="special" value="Confirm subscription" ng-click="sub.subscribe($event)"/></li>
</ul>
</form>
</div>
</section>
...
In order to pass the information related to the selected subscription we’ll use a function called openSubscribe(‘planName’) from subscriptionCtrl.js.
/assets/js/controllers/subscriptionCtrl.js
subModel.openSubscribe = function (planId) {
            subModel.showPayment = true;
            subModel.showThankyou = false;
            subModel.selectedPlanName = subModel.selectedPlanMap[planId];
            subModel.selectedPlanId = planId;
        //Scroll to payment
        $timeout(function () {
            $location.hash('payment-form');
            $anchorScroll();
        });
};
This function makes the payment form visible that will be displayed along with user data and the selected plan.
This form collects the user’s information, the selected subscription, and the credit card values.
To collect credit card values we need to add Stripe’s JavaScript client to get a token for the card, and then we use Stamplay’s Stripe function to finalize the plan. In our index.html, let’s import the Stripe.js library and initialize it with our test key.
/index.html
...
      <script src="/bower_components/angular/angular.min.js"></script>
      <script src="/bower_components/angular-route/angular-route.min.js"></script>
      <script src="/bower_components/angular-ui-router/release/angular-ui-router.js"></script>
      <script src="/bower_components/angular-stamplay/angular-stamplay.js"></script>

      <script type="text/javascript" src="https://js.stripe.com/v2/"></script>
      <script type="text/javascript">
          Stripe.setPublishableKey('pk_test_**********************0');
      </script>

      <script src="/assets/js/services/main.js"></script>
      <script src="/assets/js/services/userService.js"></script>
      <script src="/assets/js/modules/app.js"></script>
...
Finally, the subscription can be processed. When Confirm Subscription is clicked, our subscriptionCtrl.js starts the subscription process, leveraging userService.js.
/assets/js/controllers/subscriptionCtrl.js
...
subModel.subscribe = function ($event) {
$($event.currentTarget).prop('disabled', 'disabled');
    if (subModel.saveAddress) {
	userService.saveAddress(subModel.address.address, subModel.address.city, subModel.address.zipcode);
	}
	userService.createCard({
	number: subModel.card.number,
		exp_month: subModel.card.expM,
		exp_year: subModel.card.expY,
		cvc: subModel.card.cvc
	})
	.then(function () {
		return userService.subscribe(subModel.selectedPlanId);
	})
	.then(function () {
		subModel.showPayment = false;
		subModel.showThankyou = true;
		$($event.currentTarget).removeProp('disabled');
	}).catch(function (err) {
		$($event.currentTarget).removeProp('disabled');
	});
};
…
Before saving the credit card, let’s update the user with their address information. We’ll see later why this is useful at this stage.
A user can be bound to only one credit card. This is why the createCard function checks whether the user already has one with $stripe.getCreditCard(user.get('id')). If no card is present, then we proceed to add the card.
Before binding the card to the user, we need to add the Stripe client-side JavaScript library to securely convert the credit card values to a token. Once we have the token, we can pass it to Stamplay JS SDK and bind the card to the user $stamplay.Stripe().createCreditCard.
/assets/js/service/userService.js
...
createCard: function (cardObj) {
   var def = $q.defer();
   var $stripe = $stamplay.Stripe();

   $stripe.getCreditCard(user.get('id'))
        .then(function (response) {
            var nDef = $q.defer();
            if (response.card_id) {
                nDef.resolve();
            } else {
                Stripe.card.createToken(cardObj, function (err, response) {
                var token = response.id;
                $stamplay.Stripe().createCreditCard(user.get('id'), token)
                    .then(function (response) {
                        nDef.resolve(response);
                    })
                    .catch(function (err) {
                        nDef.reject(new Error(err));
                    });
                });
            }
           return nDef.promise;
            })
            .then(function () {
                def.resolve();
            })
            .catch(function (err) {
                console.log(err);
            });
            return def.promise;
   }
…
To test the Stripe implementation, we prefilled the credit card information with the test values below. For information on testing in Stripe, check out the documentation.
- n.4242 4242 4242 4242
- date: 07/2020
- cvc: 424
The subscription flow then continues by calling the userService.js subscribe function. This completes the process by submitting the subscription request to Stripe.
/assets/js/services/userService.js
...
 subscribe: function (planId) {
        var def = $q.defer();
        $stamplay.Stripe().createSubscription(user.get('id'), planId)
            .then(function () {
                return $stamplay.Stripe().getSubscriptions(user.get('id'));
            })
            .then(function (response) {
                user.set('subscriptions', response.data);
                var saveUser = $stamplay.User().Model;
                saveUser.set('subscriptions', user.get('subscriptions'));
                saveUser.set('id', user.get('id'));
                  saveUser.save()
                .then(function () {
                    def.resolve();
                });
            })
            .catch(function (err) {
                console.log(err);
                def.reject(err);
            });

            return def.promise;
        }
The subscription function is simple. Once we ensure that the user exists and has a credit card, we only need to call $stamplay.Stripe().createSubscription.
The last step is to keep track of the subscriptions by creating orders and receiving notifications for each new subscription that we sell via the website. Let’s go back to Stamplay and set up some tasks.
4. Adding Final Automation
We want to bind subscription data to an order and vice versa. This will allow our users to deactivate their subscription if they choose.
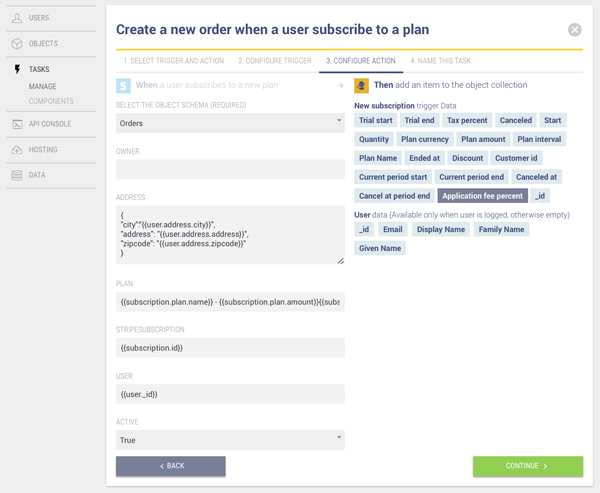
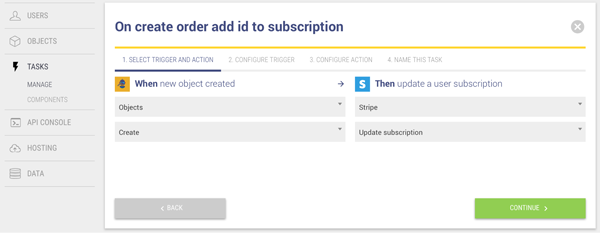
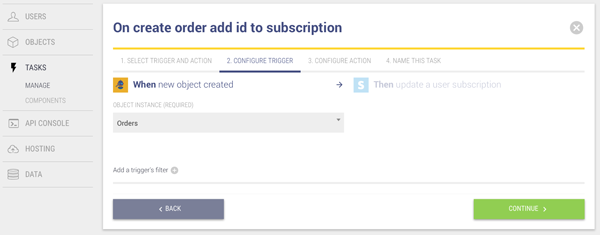
4.1 When a New Subscription Is Submitted, Create an Order

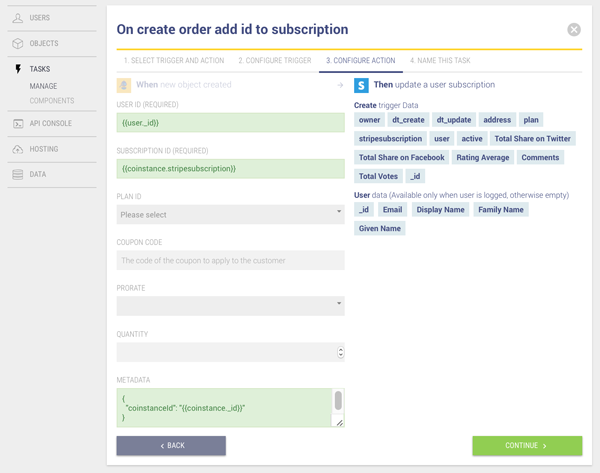
When a subscription has been submitted, we want to create a new instance of an order object. The order will keep track of the subscriptionId that has just been created by Stripe, the userId, the plan, and the address.
When a task is triggered by a logged-in user, we can use any of their properties to feed the action that follows. This is why we tied the address to our users in subscriptionCtrl.js. This lets us store them in the order object even if the subscription trigger’s data doesn’t provide this information. So you can see the order’s address property being filled with data fetched from the user, e.g. {{user.address.city}}.
4.2 When a New Order Is Made, Bind It With the Related Subscription
To have a reference of the order also in the subscription on Stripe, we can update the subscription’s Metadata field as follows. First let’s select the appropriate trigger and the action from the Objects and Stripe component.
Since we saved our order to the Subscription Id, we can now edit Stripe’s subscriptions by Id.
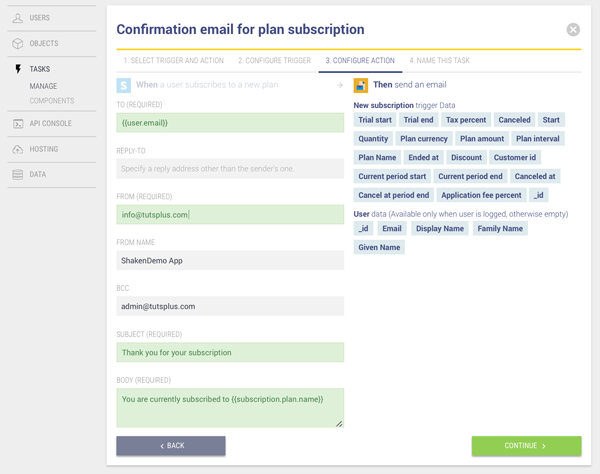
4.3 When a New Order Is Made, Notify Both the User and the App Administrator With an Email

Conclusion
In this tutorial, we reviewed how to get started with creating a web application using Stamplay. We implemented the social sign-in functionality and successfully authenticated the user against the Stamplay database. We created RESTful APIs to manage orders. We’ve been able to connect our app to the MailChimp and Stripe APIs and glue them together with a few back-end automations.
Coupon: Stamplay has provided Tuts+ readers an exclusive coupon to provide 6 months of the plus plan for free ($600 value). The coupon code is CODETUTSPLUS and it expires on October 10. Sign up now for free to redeem it.

Code from the above tutorial is available on GitHub. Do let us know your thoughts in the comments below.

Comments