In my previous tutorial, I guided you through the steps of getting started with creating and maintaining a production-safe WordPress site using a "Dev-Test-Live" three-environment setup on Pantheon. In such a configuration, you always update your code in a Dev environment, then test it in a Test environment, and only once everything is looking good, push it to the Live server.
While this is a significant improvement compared to running a single-environment WordPress installation and uploading your changes straight to the live server, we can do better!
"Asking experts to do boring and repetitive, and yet technically demanding tasks is the most certain way of ensuring human error that we can think of, short of sleep deprivation, or inebriation."
This quote from David Farley sums up the problem with our current setup: while having three environments and a process for using them helps, we're still doing all of the work manually, which can easily lead to mistakes.
In this tutorial, to help eliminate this issue as much as possible, I will first show you how you can do some of the repetitive tasks more quickly using Pantheon's command-line tools, and then we will look at automation. More specifically, we'll look at automating your acceptance tests using a continuous integration server and the Behat testing framework.
After completing the tutorial, you will have a solid understanding of the principles of developing and setting up a reliable, easy-to-maintain WordPress site on Pantheon. You'll also be equipped with many ideas on how to make your configuration even better, one small improvement at a time.
Let's get started!
1. Using the Terminus Command-Line Tool to Control Your Pantheon Site
While Pantheon's Web Dashboard gives you a clear visual presentation of what is happening on your three servers and great tools for managing them, there are times when you'll prefer a command-line tool instead.
It could be to save time: when you work on your site, you'll soon notice that time spent on a simple but repetitive task—such as committing your changes or deploying them to the Test environment—piles up and becomes an important part of what you do every day. Or it could be just because you like to work on the command line. Or maybe you want to create a script that bundles multiple actions like committing your code, deploying it to Test, and clearing the cache in one command.
Pantheon's command-line tool, Terminus, lets you do all of this—and more.
Step 1: Install Terminus
Before you can start using Terminus, you'll need to install it on your computer.
The installation and usage instructions presented in this tutorial are for a Unix-based system (such as Mac OS X or Linux). If you're on Windows, the commands are a bit different—check the official Terminus installation instructions for more information.
Terminus has the following system requirements, so make sure you have them installed before proceeding:
Although it's not required by Terminus, I recommend you also install Composer to complete the tutorial. I'm also assuming that you're already using Git as we talked about it in the previous tutorial.
There are a few different ways to install Terminus (you can see the installation instructions for details), but let's go with a simple one that doesn't require many additional tools to run.
In your console window, type:
$ curl https://github.com/pantheon-systems/terminus/releases/download/0.11.1/terminus.phar -L -o /usr/local/bin/terminus && chmod +x /usr/local/bin/terminus
The command installs Terminus to /usr/local/bin/terminus on your computer.
Once the installation finishes, you can test it by issuing the following command:
$ terminus art
One of a few different ASCII art logos should show up. Here's the Terminus lightning fist icon, for example:
Step 2: Log in to Terminus
Before you can use Terminus to manage your Pantheon account and the sites linked to it, you'll need to log in.
There are two options for doing this: you can either log in using your email and Pantheon password or use a machine token to identify the computer you're signing in on.
We'll go with the machine token approach as it gives you an extra level of security. If your computer gets compromised and you need to disable the login for it, you can revoke the machine token, and no one can access your account from that computer anymore. Machine tokens are also useful if you run Terminus on multiple machines and automated scripts—for example on your continuous integration server.
Every machine token you create gives the machine's users the same access to your Pantheon account as you have. So be sure to revoke any tokens you are no longer using.
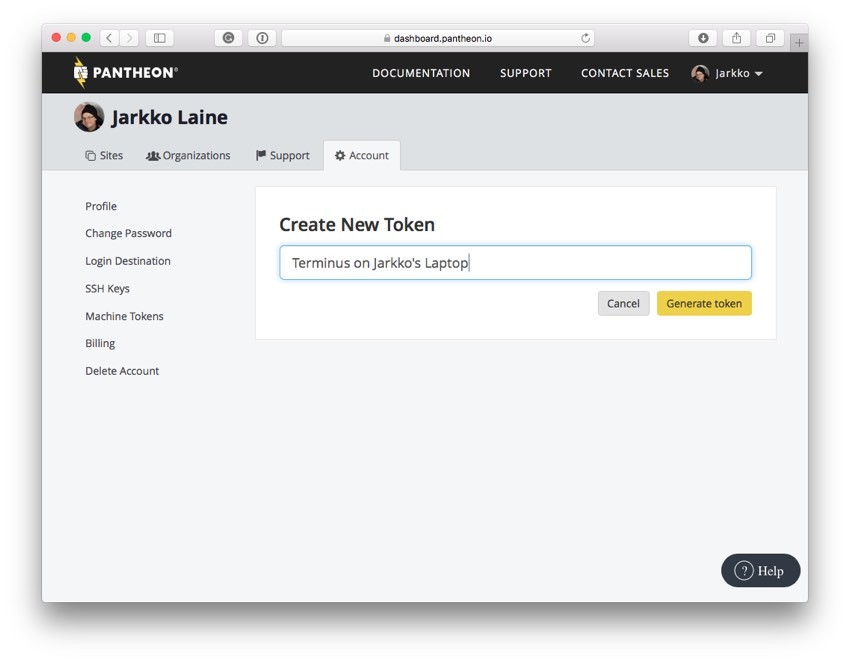
To create your first machine token, sign in to your Pantheon account. Then, on the Account tab, select the menu option Machine Tokens.
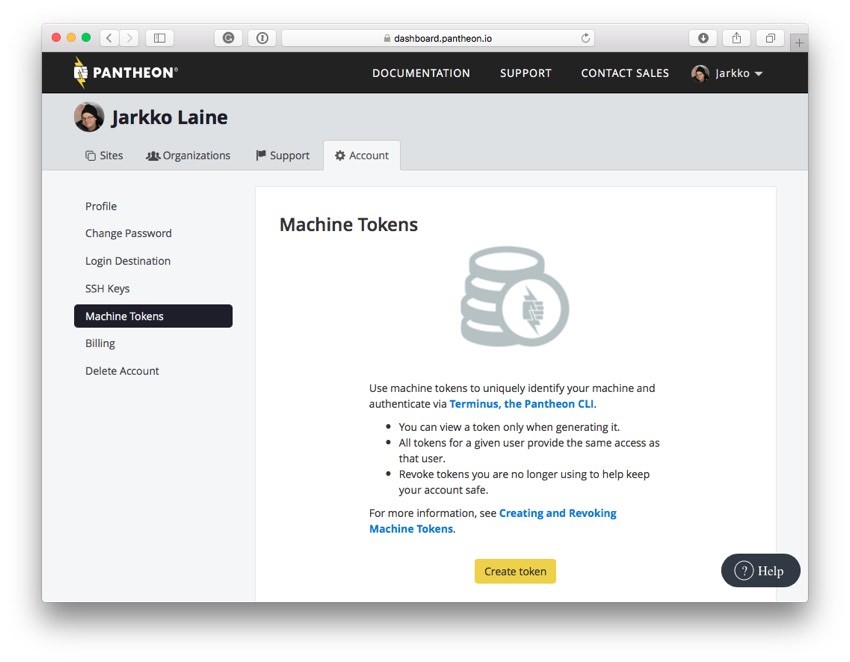
Click Create token. Then, on the next screen, enter a descriptive name and click Generate token.
Next, you'll see a popup displaying the newly created token along with a command for storing it to Terminus on your computer.
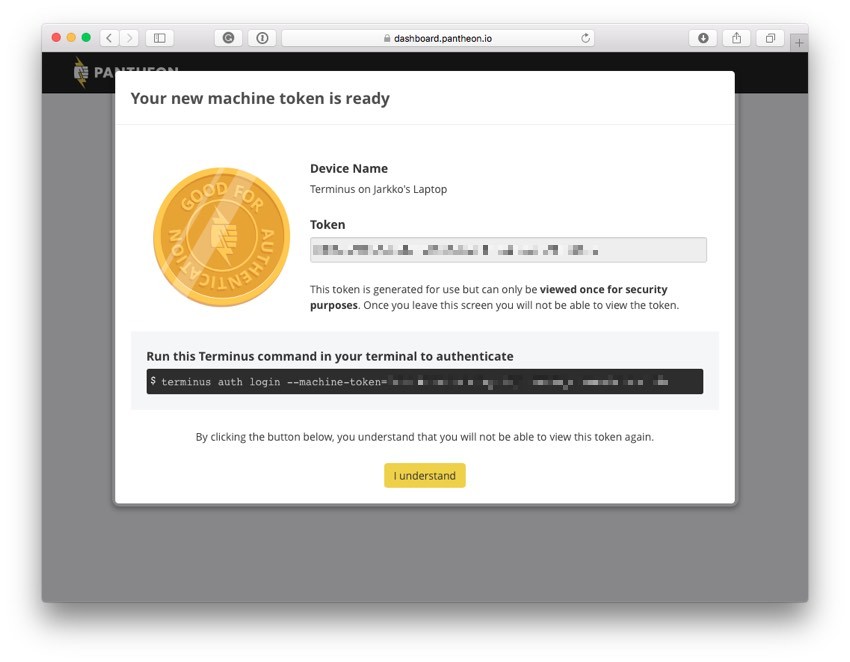
Copy the Terminus command and run it on the command line.
$ terminus auth login --machine-token=TOKEN
Once the command finishes, Terminus is ready to be used on your computer.
Let's take a look at what you can do with it!
Step 3: An Overview of Terminus Commands
In the rest of the tutorial, we'll use Terminus commands here and there as we set up automated testing for your WordPress site. That will just scratch the surface, however, so before we get to it, let's take a look at some of the commands and how you can learn more about them.
This way, once you've completed the tutorial, you'll have pointers you can use to find out more and further improve your workflow to match your preferences.
You can find an up-to-date list of Terminus commands in the Terminus Wiki.
The list doesn't include documentation for the commands, so when you see a command you might want to use, use the Terminus tool to find out more about it by typing:
$ terminus help <command> <subcommand>
If you leave out <subcommand>, Terminus will show you the list of subcommands available for the command specified.
Now, let's take a look at some useful commands you can use to perform actions from the previous tutorial directly on the command line.
Managing Your Sites
To see a list of all your sites on Pantheon, type:
$ terminus sites show
There are also commands for creating a new site (terminus sites create) and importing a site (terminus sites import) without visiting the Dashboard. These can be useful if you are an agency and create new sites often. For the rest of us, the Dashboard does its work just fine.
One more useful command if you run many sites is terminus sites mass-update, which you can use to update all of your dev sites with an available upstream update (in our case, a new WordPress version).
Pushing and Deploying Your Changes
Most of the work when developing a new site is writing, deploying, and testing code. So, whether you work in Git or SFTP mode, you'll be doing a lot of this. That's why it's also the one area where you'll benefit the most from using the command-line interface rather than making every action through the Web Dashboard.
These actions are grouped under the site command—you can see a full list by typing:
$ terminus help site
As this is where most of the action on Pantheon takes place, you'll see that there are many subcommands. Take your time to explore them as you work on your site, but for now, let's look at some of the most useful.
If you are working in SFTP mode, as we did throughout most of the previous tutorial, you'll have to commit your changes to version control to store them and to be able to deploy them to the Test and Live environments.
You can do that through the CLI, using the following command:
$ terminus site code commit --site=<site> --message=<message>
Replace <site> with your site's ID (for example, tutorial-example-site) and <message> with a descriptive commit message.
You can also use the site code command for other functionality related to version control. Take a look at the command's help page for more information.
Once you have committed your changes (or pushed them directly to version control, if you are in Git mode), you can deploy them to Test and Live using the site deploy command:
$ terminus site deploy --site=<site> --env=<test|live> [--sync-content] [--cc] [--note=<note>]
Using this command, you can either deploy from Dev to Test or Test to Live. To specify which one you are doing, set the --env attribute to the correct value (test or live). When deploying to Test, you also have the option to clone the environment's data from the Live environment automatically (--sync-content)—leave the flag out if you don't want to sync the data. If you specify the --cc flag, Pantheon will clear the cache after the deployment. If you want to add a deploy note, you can do that using the --note parameter.
To update a single site's upstream (in our case, the base WordPress installation) to its latest version, you can use the command:
$ terminus site upstream-updates <list|apply> --site=<site>
Select either list to just list the updates or apply to actually make them happen.
In addition to these actions, you can use terminus site to do many other things such as run backups, manually clear the cache, clone content between environments, and work with Multidev environments. Check the help page for a full list of commands and parameters.
Controlling Your WordPress Site
For WordPress developers like you and me, a big part of the power of Terminus lies in the fact that it allows us to run WP-CLI commands on the target environment. This way, you can, for example, install and update plugins on your customers' sites without visiting the WordPress dashboard at all.
The command to run a WP-CLI command on your Pantheon dev server is:
$ terminus wp <commands>... [--site=<site>]
So, for example, to push configuration changes from WP-CFM on Dev to Git and then to the Test environment (an excellent example of a repetitive task just waiting to be automated) using Terminus, you could use the following commands:
$ terminus wp 'config push site_options' --site=tutorial-example-site --env=dev
$ terminus site code commit --site=tutorial-example-site --env=dev --message="Pushed configuration changes to site_options.json"
$ terminus site deploy --site=tutorial-example-site --env=test --cc --note="Deploy code for options.json configuration"
$ terminus wp 'config pull site_options' --site=tutorial-example-site --env=test
Replace tutorial-example-site with your actual site id and site_options with the id of the options bundle you created on WP-CFM.
As you continue working with Pantheon and Terminus, I'm sure you'll find more and more ways to use the command-line interface to speed up and automate your work.
So, keep experimenting!
2. Getting Started With Testing Your WordPress Site
In the previous tutorial, you saw how you can use the Test environment to test your code thoroughly before it goes to the Live server for everyone to use. While that's a great idea, making sure you have checked everything is a lot of work that involves checklists and clicking on things over and over again. In other words, it's a very likely place for slip-ups.
That's why it's the perfect step in your process for some automation!
In the rest of the tutorial, we'll create a simple test setup using the testing tool Behat and make it run automatically every time you deploy your code from Dev to Test on Pantheon. To do this, we'll use a combination of Pantheon's on-server scripting tool Quicksilver and a continuous integration server running in the cloud.
We'll start by setting up the tests and making them run on your computer.
Step 1: Create a New Project for Holding Your Behat Tests
Behat is an open-source Behavior-Driven Development framework for PHP that allows you to write test cases for checking that the actual user experience matches what you expect.
Let's begin by setting up Behat in a new directory, which we can later deploy to the continuous integration server. The Behat tests will run locally (later on the CI server), testing the Pantheon site running in your Test environment.
We'll start our Behat setup by downloading a quick start template from GitHub and then customizing it for our needs. In a suitable directory on your computer, run the following commands to download the package:
$ curl https://codeload.github.com/ari-gold/WordPress-Behat-Quickstart/zip/master > WordPress-Behat-Quickstart.zip
$ unzip WordPress-Behat-Quickstart.zip
$ rm WordPress-Behat-Quickstart.zip
As you unzip the package, a new directory, WordPress-Behat-Quickstart-master, is created. Rename the directory to something that better matches our use:
$ mv WordPress-Behat-Quickstart-master wp-pantheon-behat
Then change into that directory:
$ cd wp-pantheon-behat
In that directory, you'll find some configuration templates and two starter features that you can build on to create your Behat tests.
But before we look at them, let's finish the installation. The installation is done using Composer, so if you don't have Composer installed yet, download and install it before continuing.
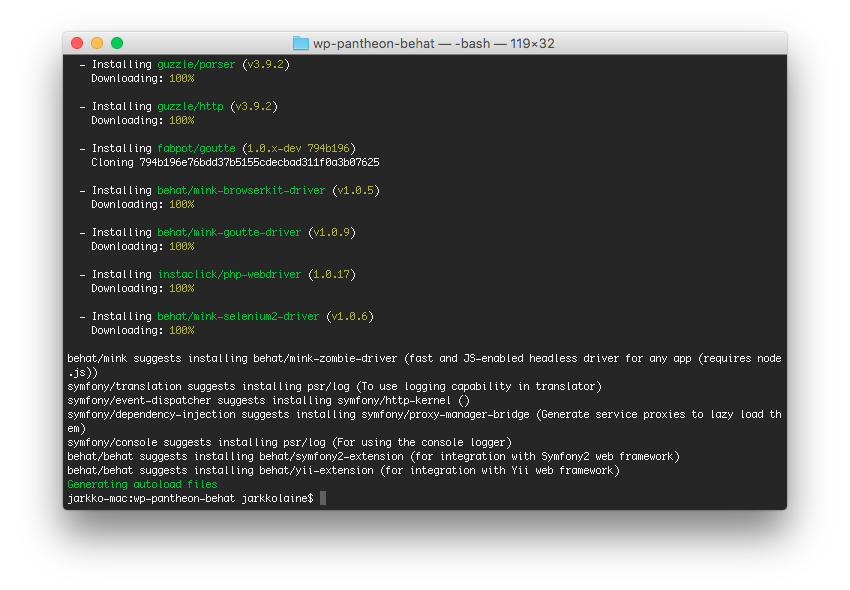
As the quick start package already contains a composer.json and composer.lock configuration for installing Behat, all you need to do is to type the following command on the command line:
$ composer install
Composer will download the required packages and store them in the right place. As the installation runs, and finally completes, you should see something like this:
To run Behat, you'll need two configuration files: behat.yml and behat.local.yml.
The quick start project already contains default files for both, but the file for behat.local.yml is stored as behat.local.yml.sample to prevent you from committing your local configuration (which can include passwords, for example) to Git. The project also contains a .gitignore file with behat.local.yml in it.
Copy the sample configuration:
$ cp behat.local.yml.sample behat.local.yml
You can use this file for storing any environment or user specific configuration that shouldn't be committed to the actual behat.yml file. In this tutorial, our tests are so simple that all we need is to make sure the file is present.
Next, let's look at the second configuration file, behat.yml.
Modify the file by replacing the URL specified with the id base_url with your test environment's URL. In the end, the file should look like this, where http://test-tutorial-example-site.pantheonsite.io is your test server's URL:
# behat.yml
default:
    extensions:
        Behat\MinkExtension\Extension:
            base_url: http://test-tutorial-example-site.pantheonsite.io/
            goutte: ~
            selenium2: ~
            show_cmd: "/Applications/Firefox.app/Contents/MacOS/firefox %s"


imports:
  - behat.local.yml
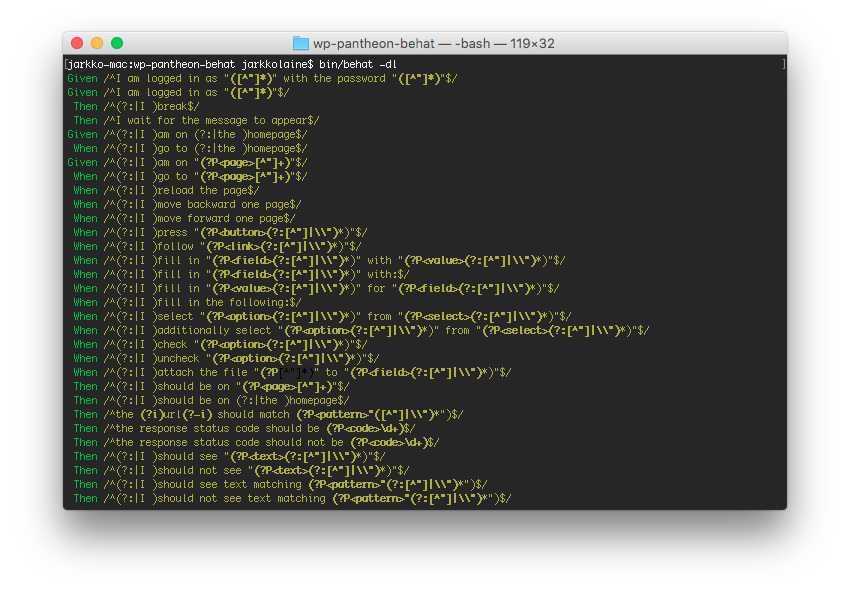
Once you've updated the configuration, test that everything is working by listing the test scenarios available in the directory:
$ bin/behat -dl
You will see a long list of regular expressions describing the test scenarios from your features directory:
Next, let's take a closer look at the tests and run one against your test server.
Step 2: Run Your First Test
Tests in Behat are called features, and as I briefly mentioned above, they are stored in text files in the features directory—one file per feature to test.
If you look in the directory, you'll find two features specified in the quick start package: homepage_works.feature and blog.feature. You can use them as a starting point for your tests and then add as many more as you like while building a complete set of tests for your WordPress site.
Let's start with homepage_works.feature, a quick test that checks that a visitor arriving at your site can load the home page:
@smoke
Feature: As a visitor I should be able to load the home page

Scenario: Home page loads
    Given I am on the homepage
    Then I should see "Test with Robots"
Behat features are written in a format called Gherkin, which, as you can see from this snippet, looks like plain English—just a bit more carefully formulated than a note between the two of us would be. Or as the Behat documentation says, "a form that both the business and developers can clearly understand."
In this tutorial, I won't go deep into explaining how to use Behat to build your tests. For that, I recommend reading Behat's getting started documentation.
For our needs at this point, it's enough to understand that a feature consists of one or more Scenarios, which describe how the user acts and what should happen as a result. If this looks like magic, it isn't. Behind the scenes, Behat uses regular expressions to map your scenario steps to PHP functions defined either in your test suite (see features/bootstrap), or a library such as Mink, which we use to simulate a user browsing the web.
For example, the line "I am on the homepage" translates to the function iAmOnHomepage() in the Mink library, and navigates Mink's virtual browser to the root of the website specified in behat.yml—your Test server.
Now, let's customize the test just enough to make it pass on your test server. At the moment, the test expects to find the text "Test with Robots" on your home page. In other words, unless you have that text written there, the test will fail.
So replace that snippet with a sentence you know you'll find on your front page (for example, your site's title) and save the changes.
Then run the following command to run all tests tagged with @smoke. In this case, just this one test.
$ bin/behat --tags=smoke
You should see the test pass:
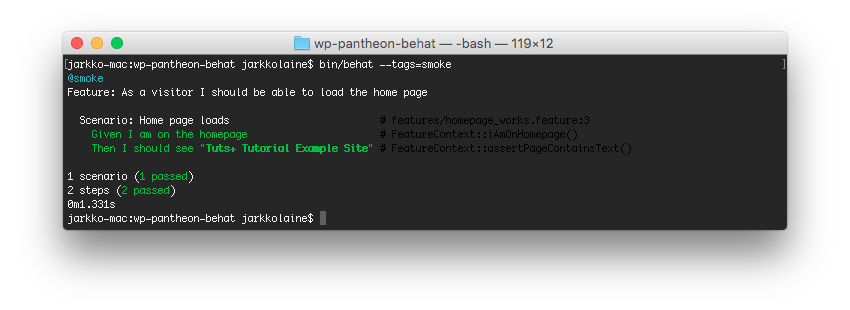
You have now set up a test that runs successfully on your development machine, testing the WordPress site on your Pantheon Test environment.
The collection of tests is still very limited, and for a real-life server, this is just the beginning. So, after completing the tutorial, come back to this step, and dig deeper into Behat to create tests that will really put your server to the test, checking all those little things you would check yourself were you testing the site manually.
But now, let's move on to the next step in our journey to automatic acceptance testing and make the test run in the cloud.
3. Making Your Behat Tests Run in the Cloud
Continuous Integration (CI) is a software development practice where code is merged to the main branch several times a day and tested automatically at every push. Today, this usually means that you have a continuous integration service running in the cloud watching your Git repository. Then, every time you push a new commit to version control, the CI service fires up, pulls the code from Git, and builds and tests it.
In this tutorial, we'll use pieces from this approach to develop a setup that better accommodates the Pantheon three environment workflow: instead of running the tests at every git push, we'll run them when new code is deployed to the Test server.
We'll use Circle CI as our continuous integration server as it has a free level which is powerful enough for the tutorial's needs and an API that we can call from Pantheon to initiate the build. In your own implementation, you can also use another continuous integration server, such as such as Travis CI or Jenkins, with some changes to the process explained in the tutorial.
Step 1: Push Your Tests to Git
Most cloud-based continuous integration services are closely linked to version control, supporting either Bitbucket or GitHub. Some support both. But unless you set up your own CI server, for example using Jenkins, you'll have to maintain a repository separate from your Pantheon account for the continuous integration setup.
One option would be to maintain the entire site at GitHub or Bitbucket and deploy it from the continuous integration server to Pantheon using Terminus. While that would be closer to the continuous integration ideal, it's also a rather complicated setup and—in my opinion—breaks the idea of the Pantheon workflow.
That's why in our setup, we'll store only the test setup in a GitHub repository linked to the CI service and maintain the site's code on Pantheon as we've done so far.
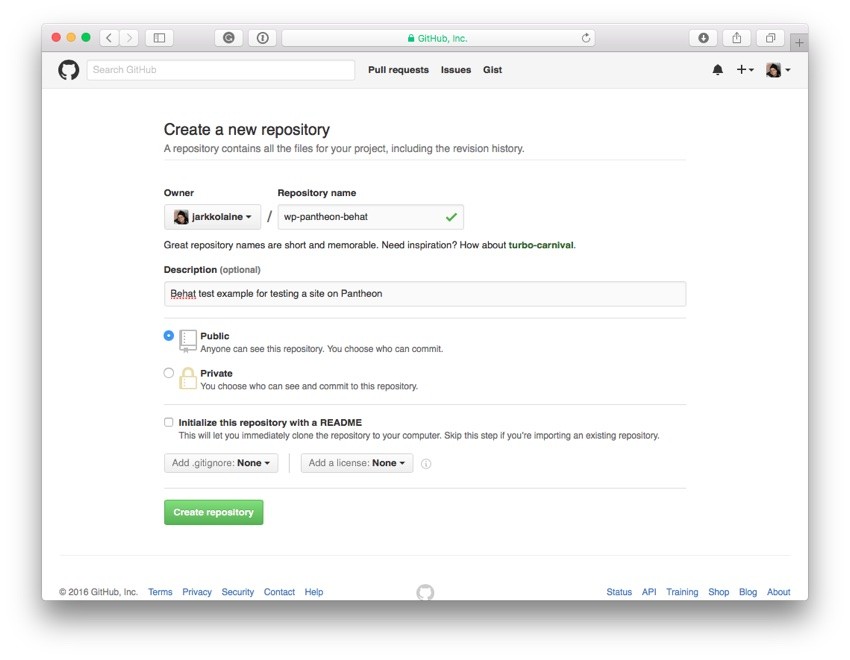
First, sign up to GitHub and create a new repository:
Then in your wp-pantheon-behat directory, initialize Git and commit your changes:
$ git init
$ git add .gitignore behat.yml composer.json composer.lock features
$ git commit -m "First commit"
Notice that the files installed by Composer are not stored in git. They will be installed again automatically on the CI server as a part of the test script.
Then, push the data to your new GitHub repository:
$ git remote add origin https://github.com/jarkkolaine/wp-pantheon-behat.git
$ git push -u origin master
Your test setup is now available on GitHub. Let's connect it to the continuous integration server!
Step 2: Set Up the Continuous Integration Server
First, sign up for a free Circle CI account using your GitHub account.
Once you have signed in, Circle will ask you to pick a project from your GitHub account to build. For example, here, you can see the wp-pantheon-behat project at the top of the list on the right.
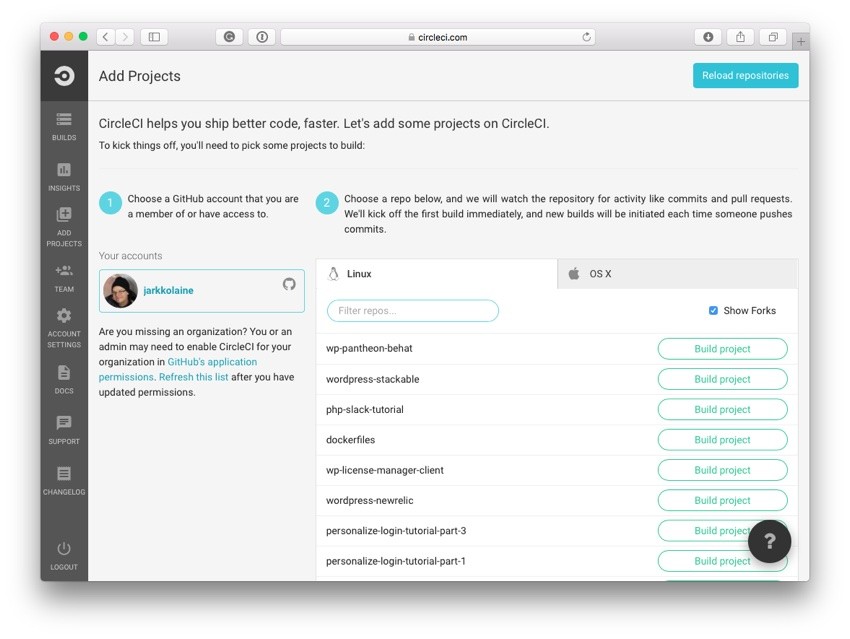
Click on the Build project button next to the project.
Circle CI immediately begins the build. It clones the project from Git, installs any Composer dependencies—in this case, the Behat testing tools—and then runs the tests.
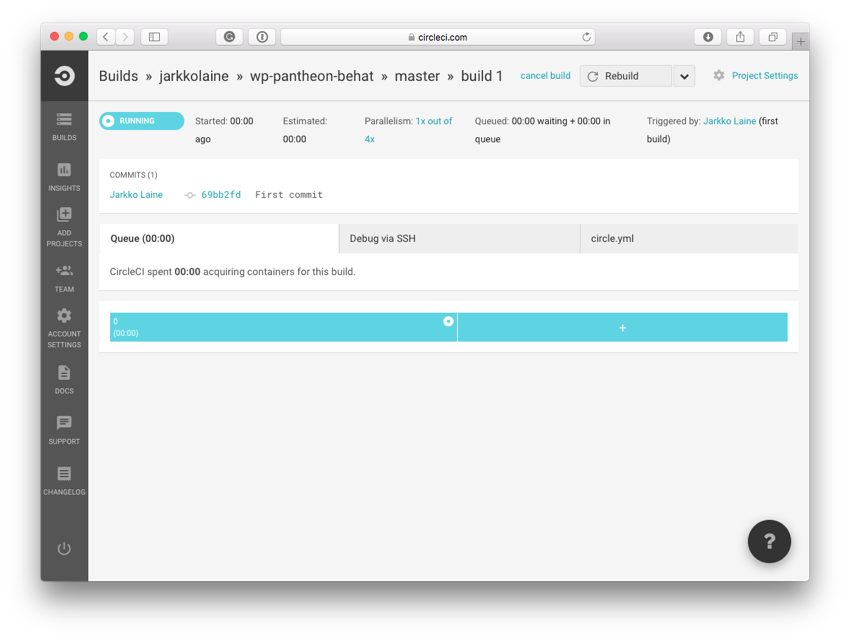
In your first build, Circle CI will run into an error:
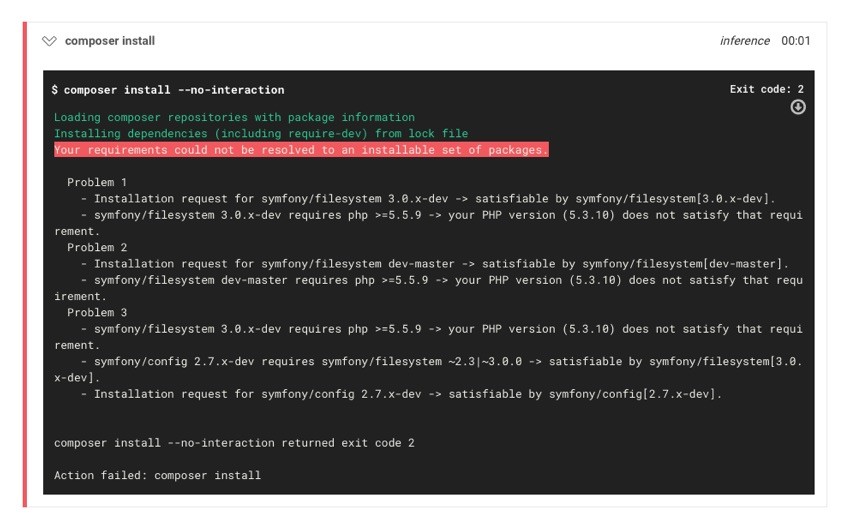
By default, Circle CI runs PHP version 5.3.10, which is too old for some of the libraries used by Behat. Luckily, this is easy to fix.
In your wp-pantheon-behat directory, create a new file, circle.yml. This file will contain any customizations we want to make to our Circle CI configuration.
In the file, insert the following:
machine:
  php:
    version: 5.5.11
Commit the file to Git and push it to your GitHub repository.
$ git add circle.yml
$ git commit -m "Added PHP version requirement"
$ git push origin master
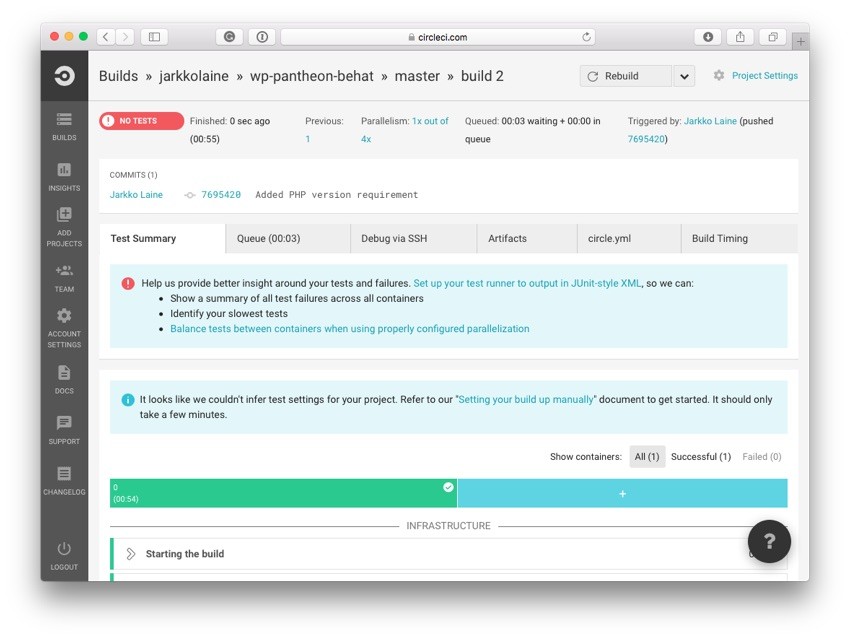
Then jump back to Circle CI, where you'll see that the continuous integration system has started running the test again.
This time, the Composer step should run successfully. But there's still some configuration to do: while the build passed, Circle CI didn't find our tests!
To fix this, let's tell Circle how to run our Behat tests.
In circle.yml, add a new section, test, right below the PHP version configuration we just created:
machine:
  php:
    version: 5.5.11

test:
  pre:
    - mv behat.local.yml.sample behat.local.yml
  override:
    - mkdir $CIRCLE_TEST_REPORTS/behat
    - ./bin/behat --format junit --out $CIRCLE_TEST_REPORTS/behat --tags=smoke
Let's take a look at the snippet.
First, in the pre section, we tell Circle CI to create a behat.local.yml configuration file using the template before it tries to run the tests.
Then, in the section labeled override, we define the sequence of actions that Circle CI should take whenever it's time to run the tests.
The Behat command is a little different from what we used when running the tests locally. That's because we want to print test results in a JUnit-like XML format that can be parsed by the CI server. The $CIRCLE_TEST_REPORTS variable is a reference to a directory where Circle CI expects to find the test reports.
Commit and push the changes again and go back to Circle CI to verify that the tests now run successfully.
4. Using Quicksilver to Initiate the Tests at Deploy Time
Now that you have set up your Behat tests and run them on a continuous integration server, the last remaining step is to connect this setup with your Pantheon workflow by making Pantheon trigger a new build on Circle CI every time you deploy your changes to the Test environment.
We'll do this using Pantheon's Quicksilver Platform Hooks, a system that gives developers the ability to link scripts to events in the Pantheon workflow.
Triggering a new build on Circle CI is just one example of what you can achieve using Quicksilver hooks, so I recommend you look into its documentation and examples, and come up with more uses of your own once done with the tutorial.
Step 1: Define a Quicksilver Action
Quicksilver is already installed on your Pantheon environment, so you can start using it just by defining your first Quicksilver action.
A Pantheon site's Quicksilver configuration consists of a configuration file, pantheon.yml, placed at the root of the site's code directory, and the actual scripts written in PHP.
You can upload these files using SFTP as we did in the previous tutorial, or use the Git mode.
To do the changes in Git mode, first set your site's Connection Mode to Git:

Click on Git Connection Info to copy the command for cloning your git repository and run it in a suitable directory on your command line:
$ git clone ssh://[email protected]:2222/~/repository.git tutorial-example-site
Once the clone command has finished, add a pantheon.yml file in the directory using your favorite text editor, with the following contents:
api_version: 1

workflows:
  deploy:
    after:
        - type: webphp
          description: Initiate a new build at Circle CI
          script: private/scripts/circle_ci_notify.php
In this configuration file, you will list all the scripts you want to hook with your Pantheon workflows, defining whether you want the script to be run before or after that event. For any event, you can add as many scripts as you need.
Currently, the following workflows are available for hooking into:
-
deploy: Triggered when your code is deployed to Test or Live. Scripts run on the target environment. -
sync_code: Triggered when code is pushed via Git or committed in the Pantheon Dashboard. Scripts run on the committed-to environment. -
clone_database: Triggered when data is cloned between environments. Scripts run on the target environment. -
clear_cache: Triggered when the cache is cleared. Scripts run on the cleared environment.
Each script, or action, consists of a type (currently, only webphp, which means PHP code run on the target environment is supported), a description, and a script, a path to a script file relative to your code repository.
So, looking at the pantheon.yml file above, you'll see that we want to run the script, private/scripts/circle_ci_notify.php, right after a deploy event.
Step 2: Create a PHP Script for Your Quicksilver Action
To function, our Quicksilver action hook still needs the script.
Our script will call the Circle CI API's new build action to make the tests run again. For this, we need to retrieve and store Circle CI API credentials in a secure way on the Pantheon Test environment.
In your Circle CI dashboard, click on Account Settings on the left side menu, and then select the API Tokens tab to create a new API token.
Give your new token a descriptive name and click on Create new token.
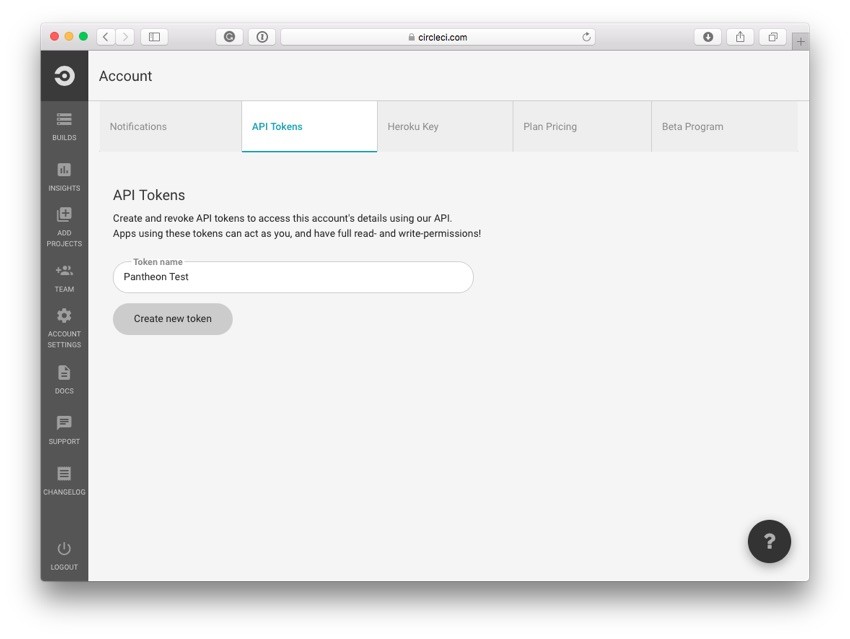
Now, you have an API token you can use to talk to the Circle CI API.
Committing API secrets or other sensitive data to version control is considered bad practice. So, let's use a safer way to pass the API credentials to your script instead, by creating a configuration file and uploading to a secure location on the Test server.
In a directory outside the exported code repository, create a file named secrets.json. In that file, place the following contents:
{ "username":"YOUR USER NAME", "project":"wp-pantheon-behat", "token":"YOUR API KEY" }
Then, upload it to your test environment, in a directory called files/private, using SFTP. Notice that the file system (the files directory on your server) is separate from the code, and files in it never go to version control.
The Terminus command site connection-info prints out information for connecting to your environment, based on the site, environment, and connection method you pass in as parameters.
So, to connect to your test environment's file system using SFTP, you can use this command—as a little trick, surrounding the command with backtick (`) characters runs the printed out command instead of just showing it to you (naturally, you can also use your favorite SFTP client):
$ `terminus site connection-info --env=test --site=tutorial-example-site --field=sftp_command`
Now that you are connected to the server, it's time to upload the configuration file:
sftp> cd files
sftp> mkdir private
sftp> put secrets.json
sftp> exit
The credentials are now in place. Let's create the script.
In your code repository, create a directory private/scripts, and inside it, add a new PHP script, circle_ci_notify.php.
This is a regular PHP script that gets run on the event's target environment—in the case of the deploy event, either Test or Live.
<?php
// Check environment
if ( ! isset( $_ENV['PANTHEON_ENVIRONMENT'] ) || $_ENV['PANTHEON_ENVIRONMENT'] !== 'test' ) {
        die( 'Automatic tests should only be run on the Test environment' );
}

// Load a secrets file
$secrets = _get_secrets('secrets.json');

// Use a curl POST request to trigger the Circle CI API action
$url = 'https://circleci.com/api/v1/project/';
$url = $url . $secrets['username'] . '/' . $secrets['project'] . '?circle-token=' . $secrets['token'];
$curl = curl_init( $url );

// Declare request as a post and setup the fields
curl_setopt( $curl, CURLOPT_POST, true );

// All parameters are optional, so we can send an empty array
curl_setopt( $curl, CURLOPT_POSTFIELDS, json_encode( array() ) );

// Execute the request
$response = curl_exec( $curl );

if ( $response ) {
        echo "Build Queued";
} else {
        echo "Build Failed";
}

/**
 * Get secrets from secrets file.
 *
 * @param string $file path within files/private that has your json
 */
function _get_secrets( $file ) {
    $secrets_file = $_SERVER['HOME'] . '/files/private/' . $file;
    if ( ! file_exists( $secrets_file ) ) {
        die( 'No secrets file found. Aborting!' );
    }

    $secrets_json = file_get_contents( $secrets_file );
    $secrets = json_decode( $secrets_json, 1 );

    if ( $secrets == FALSE ) {
        die( 'Could not parse json in secrets file. Aborting!' );
    }
    return $secrets;
}
Let's go through the script line by line.
On lines 2-5, the script verifies that it is being run in the Test environment.
Then, on line 8, it reads in the API parameters from the JSON file you just uploaded to the file system, using a helper function, _get_secrets, specified at the end of the file, on lines 37-50.
Then, on lines 10-22, the script makes an HTTP call to the Circle CI API to initiate the build.
Finally, on lines 24-28, the script checks the response from the API call and prints out a simple success message. If you like, this is a good place for further development: you could, for example, make the script post a notification to your team's Slack channel!
Now, you're all set. Commit and push your changes to your Git repository.
Once the git push finishes, you'll notice the following output, with Pantheon letting you know that it detected your newly created pantheon.yml and applied its actions to the Dev environment.
remote:
remote: PANTHEON NOTICE:
remote:
remote: Changes to `pantheon.yml` detected.
remote:
remote: Successfully applied `pantheon.yml` to the 'dev' environment.
remote:
remote:
However, as I mentioned earlier, the deploy task gets run on the target environment. So, before our script can run, we'll need to deploy the changes to Test.
Let's do that using the Terminus command-line interface (you can also use the Web Dashboard, if you like):
$ terminus site deploy --site=tutorial-example-site --env=test --sync-content --note="Added Quicksilver event for Circle CI"
Our Quicksilver script is now available in the Test environment.
To see it in action, make a change to your Dev environment's codebase (for example by installing a new plugin or modifying your child theme) and commit and deploy your changes to Test.
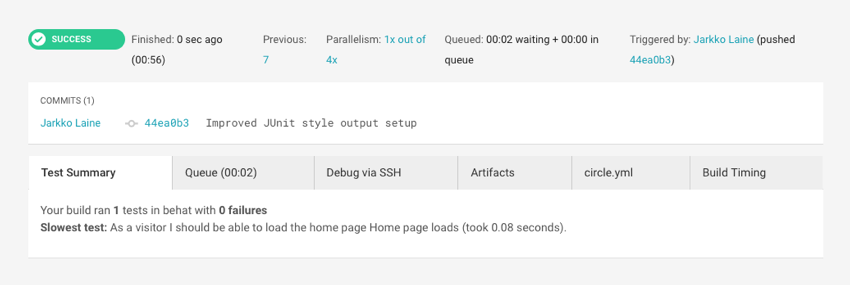
When you visit your Circle CI dashboard, you'll see that a new build was triggered and is running, testing that your Test site's front page can be loaded alright.
You can also use Terminus to check that the script is run correctly. To do this, before deploying your changes, on the command line, run the command:
$ terminus workflows watch --site=tutorial-example-site
Now, when the deployment finishes, you'll see something like this, telling you about your Quicksilver action:
[2016-05-19 13:01:24] [info] Finished workflow b532f7fe-1dc1-11e6-9914-bc764e10b0ce Deploy code to "test" (test) at 2016-05-19 13:01:10
    id: 'b532f7fe-1dc1-11e6-9914-bc764e10b0ce'
    description: 'Deploy code to "test"'
    env: 'test'
    time: '2016-05-19 13:01:10'
[2016-05-19 13:01:26] [info]
------ Operation: Initiate a new build at Circle CI finished in 3s (test) ------
{
  "compare" : null,
  "previous_successful_build" : {
    "build_num" : 9,
    "status" : "success",
    "build_time_millis" : 55657
  },
  ...
Conclusion
The automated testing setup is now complete: whenever you deploy code from your Pantheon Dev environment to Test, a new build will be triggered on Circle CI and run the Behat tests against your Test environment. If something goes wrong, Circle will send you an email telling about a broken build so you can fix it and try again.
But this is just the beginning.
First, you'll need to write more tests. Think of all the things you check to make sure your site is working correctly, and then write Behat features for testing them. Then, think about how your visitors and customers might use the site, and write tests for those use cases as well.
You can also improve the Circle CI configuration by, for example, adding a Slack notification about a successful test. This way, you'll know that your automated tests pass and can do a final check yourself before pushing the changes live. Later, once you feel confident about your tests, you might even consider modifying your circle.yml to use Terminus to deploy the code from Test to Live automatically after a successful build!
The possibilities don't end here, though! You can also use Quicksilver to add more automated scripts to your workflow. Take a look at some examples from Pantheon's engineers. Then create some of your own!
Little by little, as you automate your testing and development process, you're creating a more and more secure and safe workflow.

Comments