Windows Phone apps that use live tiles, authenticate users with single-sign on, and share data between devices and users generally employ cloud services. Most cloud platforms offer general purpose capabilities to store data and execute code, but you have to add a lot of infrastructure code to glue these capabilities together. Azure Mobile Services let you add cloud services to your app in minutes.
Introduction
This tutorial shows you how to add a backend service to a Windows Phone app using Azure Mobile Services. You will create a new mobile service and a simple to-do app that stores its data in the cloud using the new mobile service. In this tutorial, you will learn how to:
- create a mobile service and add tables to it
- update the app to use the mobile service
- test the mobile service hosted on Azure Mobile Services
To follow along with me, you need a Windows Azure account. You can sign up for a Windows Azure trial if you don't have an account yet.
1. Create a Mobile Service
We first need to set up a new mobile service that can be used by the Windows Phone app. The mobile service that you will create in this tutorial is a JavaScript backend mobile service. It enables you to use JavaScript for server-side business logic. Follow these steps to create a new mobile service using the Azure Management Portal.
Step 1: Add a Mobile Service
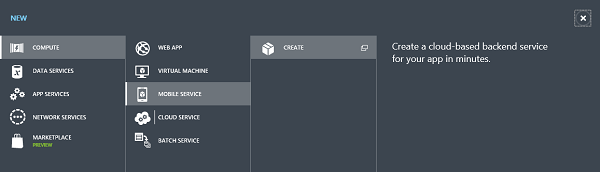
Log in to the Azure Management Portal and click the NEW button in the navigation bar. Expand Compute > Mobile Service and click Create.
Step 2: Select Database Type, Region, and Runtime
In the New Mobile Service wizard, select a free 20 MB SQL database or use one of your existing databases. Select JavaScript from the Backend menu and enter a subdomain for the new mobile service in the URL text box.

Note that the name of the mobile service needs to be unique. An error is displayed next to URL when the name/subdomain you entered isn't available.
Step 3: Specify Database Settings
When you create a new mobile service, it is automatically associated with a SQL database. The Azure Mobile Services backend then provides built-in support for enabling remote apps to securely store and retrieve data from it, without you having to write or deploy any custom server code.
To configure the database, enter the name of the database in the Name field. Next, enter Server Login Name and Server Login Password to access the SQL database server.
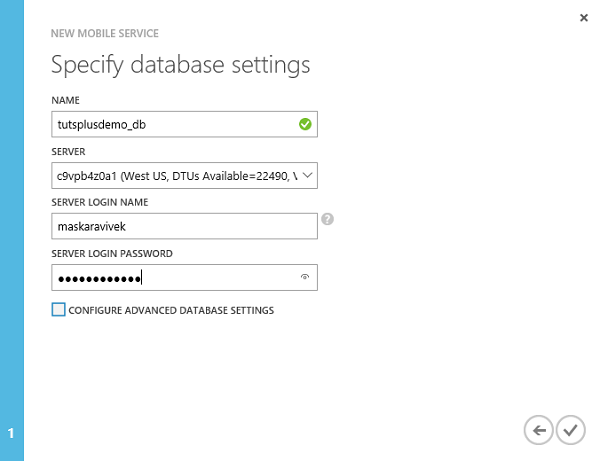
Click the checkmark in the bottom right to complete the process. You have now created a new mobile service that can be used by your mobile apps. Before you can start storing data, you first need to create a table that can store your application's data.
Note that the use of a database in a different region is not recommended because of additional bandwidth costs and higher latencies.
2. Add a Table to the Mobile Service
In this step, we will add a table named ToDoItem to the mobile service, which will be used by the client app to save the user's to-do items.
Step 1: Create a New Table
From the Data tab in the Azure Management Portal, click Create to add a new table to the mobile service. Name the table ToDoItem and set a permission level against each operation. For the ToDoItem table, I have used the default permission settings.

Click the checkmark in the bottom right to complete the table setup process. In just a few seconds, you have added the ToDoItem table to the mobile service.
Step 2: Add Columns to the Table
The ToDoItem table already contains a number of columns for storing id, creation date, deleted status, updated date, and version information. To make the table useful for our application, we need to add two additional columns, one for storing the text of the to-do item and one for storing the to-do item's status.
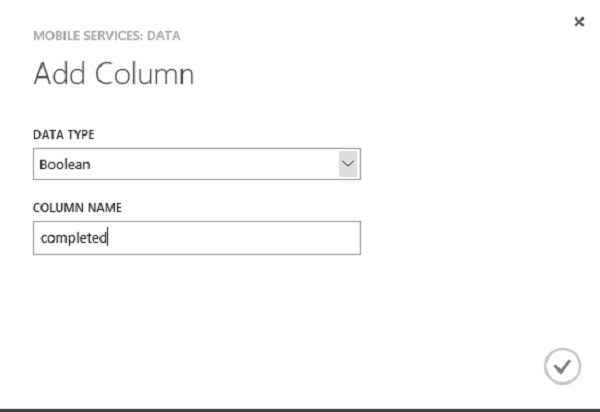
To add the additional columns, click Add Column from the Columns tab of the ToDoItem table. The text column is of type String and the completed column is of type Boolean.
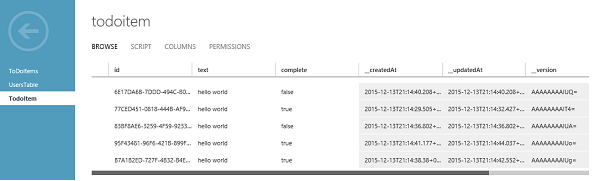
These are the columns of the ToDoItem table.

3. Configure the App to Use the Mobile Service
The app needs to be configured correctly to use the mobile service. You need to add code to connect your app to your mobile service and save data to the cloud.
Right-click the project name in the Solution Explorer and choose Add > Connected Service from the menu. In the Add Connected Service dialog box that appears, choose Azure Mobile Services and click Configure.
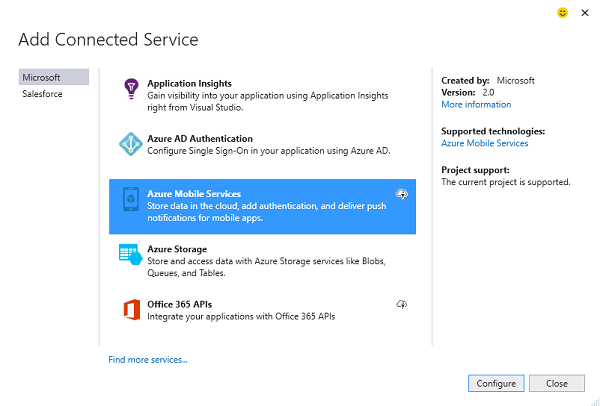
Next, choose the mobile service that you created earlier from the list of existing services in your account. You will need to provide your credentials to connect and list the mobile services in your Windows Azure account.
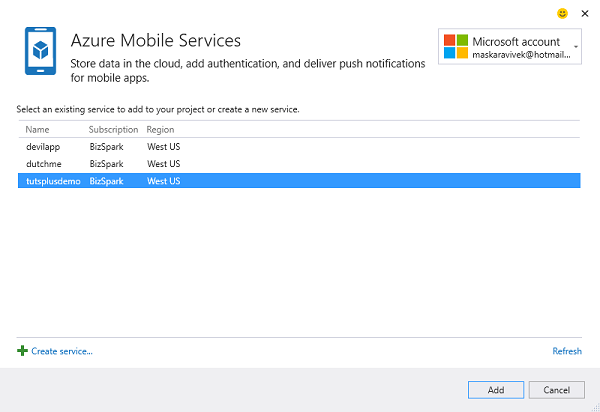
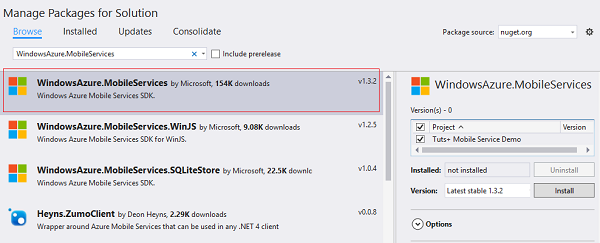
Select the mobile service we created and click Add to complete the process. The wizard will then add all the required references to your project. The references can also be added manually by installing the required package using NuGet. Right-click your client project, select Manage NuGet Packages, search for the WindowsAzure.MobileServices package, and add a reference for the package.
The wizard installs the required NuGet packages, adds a reference for the mobile service's client library to the project, and updates the project source code. The wizard also adds a new static field to the App class that looks like this:
public static Microsoft.WindowsAzure.MobileServices.MobileServiceClient
    todolistClient = new Microsoft.WindowsAzure.MobileServices.MobileServiceClient(
        "https://todolist.azure-mobile.net/",
        "XXXXXXXXXXXXXXXXXXXXXXXXXXXXXXXXX");
This code provides access to your new mobile service in your app by using an instance of the MobileServiceClient class. The client is created by supplying the URI and the application key of the new mobile service. This static field is available to all the pages in your app. You need to add this code manually to App.xaml.cs if you are not using the wizard.
4. Update the App to Use the Mobile Service
You need to update your Windows Phone app to use the mobile service as a backend service. You only need to make changes to the MainPage.cs project file.
Step 1: Add the ToDoItem Class Definition
Add a new model class, ToDoItem, to your project. The model class contains properties corresponding to the columns in the ToDoItem table we created earlier.
public class ToDoItem
    {
        public string Id { get; set; }

        [Newtonsoft.Json.JsonProperty(PropertyName = "text")]
        public string Text { get; set; }

        [Newtonsoft.Json.JsonProperty(PropertyName = "complete")]
        public bool Complete { get; set; }

        public ToDoItem() {}

        public ToDoItem(string text, bool status = false)
        {
            Text = text;
            Complete = status;
        }
    }
The JsonPropertyAttribute method is used to define the mapping between property names in the client app and column names in the corresponding table. A reference to Newtonsoft.Json package must be added to the project to make this work.
Step 2: Add Code to Insert and Fetch Items
Add the following using statement to MainPage.xaml.cs:
using Microsoft.WindowsAzure.MobileServices;
Add the following lines at the top of MainPage.xaml.cs to create a mobile services-aware binding collection and proxy class for the database table.
private MobileServiceCollection<ToDoItem, ToDoItem> items;
private IMobileServiceTable<ToDoItem> todoTable =
    App.tutsplusdemoClient.GetTable<ToDoItem>();
Next, create an InsertToDoItem method to insert a new item into the table. Add the async modifier to the method and add the following code to insert an item.
public async Task InsertToDoItem(ToDoItem toDoItem)
{
    await todoTable.InsertAsync(toDoItem);
    items.Add(toDoItem);
}
This code works if your table has permissions set to Anybody with an Application Key. If you change the permissions to secure your mobile service, you'll need to add user authentication support. See Adding Authentication Using Azure Mobile Services.
Create a RefreshTodoItems method that sets the binding to the collection of items in the ToDoItem table, which contains all of the ToDoItem objects returned from the mobile service. We display a message box if a problem occurs while executing the query.
private async Task RefreshTodoItems()
{
    MobileServiceInvalidOperationException exception = null;
    try
    {
        // Query that returns all items.
        items = await todoTable.ToCollectionAsync();
    }
    catch (MobileServiceInvalidOperationException e)
    {
        exception = e;
    }
    if (exception != null)
    {
        await new MessageDialog(exception.Message, "Error loading items").ShowAsync();
    }
    else
    {
        ListItems.ItemsSource = items;
        this.ButtonSave.IsEnabled = true;
    }
}
Step 3: Add Controls to MainPage.xaml
We now have to update MainPage.xaml to display to-do items and add the ability to add to-do items. Below is what the XAML code could look like for a simple user interface that contains a TextBox to insert items and a ListView to view to-do items.
<Grid x:Name="ContentPanel" Grid.Row="1" Margin="18,0,18,0">
    <Grid.RowDefinitions>
        <RowDefinition Height="Auto" />
        <RowDefinition Height="Auto" />
        <RowDefinition Height="*" />
    </Grid.RowDefinitions>
    <Grid.ColumnDefinitions>
        <ColumnDefinition Width="4*" />
        <ColumnDefinition Width="2*" />
    </Grid.ColumnDefinitions>
    <TextBox Grid.Row="0" Grid.Column="0" Name="TextInput" Text="" />
    <Button Grid.Row ="0" Grid.Column="1" Name="ButtonSave" Click="ButtonSave_Click" IsEnabled="False" Margin="10, 0, 0, 0">Save</Button>
    <Button Grid.Row="1" Grid.ColumnSpan="2" Name="ButtonRefresh" Click="ButtonRefresh_Click" HorizontalAlignment="Stretch">Refresh</Button>
    <ListView  Grid.Row="2" Grid.ColumnSpan="2" Name="ListItems">
        <ListView.ItemTemplate>
            <DataTemplate>
                <StackPanel Orientation="Horizontal">
                    <CheckBox Name="CheckBoxComplete" IsChecked="{Binding Complete, Mode=TwoWay}" Checked="CheckBoxComplete_Checked" Content="{Binding Text}" Margin="10,5" VerticalAlignment="Center"/>
                </StackPanel>
            </DataTemplate>
        </ListView.ItemTemplate>
    </ListView>
</Grid>
The InsertToDoItem method is called when the Save button is tapped, which inserts the to-do item into the table.
private async void ButtonSave_Click(object sender, RoutedEventArgs e)
{
    var todoItem = new TodoItem { Text = TextInput.Text };
    await InsertTodoItem(todoItem);
}
The RefreshToDoItems method is invoked when the Refresh button is tapped. In this method, we fetch all the items in the table.
private async void ButtonRefresh_Click(object sender, RoutedEventArgs e)
{
    ButtonRefresh.IsEnabled = false;

    //await SyncAsync(); // offline sync
    await RefreshTodoItems();

    ButtonRefresh.IsEnabled = true;
}
5. Test the Mobile Service
The final step of this tutorial is to review the data stored in the mobile service. In the Windows Azure classic portal, click the ToDoItem table under the Data tab of your mobile service. Under the Browse tab, you can view all the items in the table.
Conclusion
This tutorial demonstrates the basics of using Azure Mobile Services as a backend for a Windows Phone app. Creating a mobile service and using it in the app to store data in the cloud is easy to implement.
More complex scenarios involve supporting offline data sync. You can also add offline data sync support to the app following this tutorial. You can restrict table permissions to allow only authenticated users to update the table following this Envato Tuts+ article.
Feel free to download the tutorial's source files for reference. Remember to configure the app to use Azure Mobile Services before deploying it.

Comments