
When WordPress started out, it was just a blogging platform, but it has continuously evolved into a full content management system, offering its users the ability to create and publish awesome websites and blogs. The plugin database is one of the largest and is continuously growing. The biggest attraction for me is the simplicity of the WordPress engine. It requires very little to get up and running with a WordPress-powered blog.
Saying it's simple and
minimal doesn’t mean that it can’t be modified to one’s own liking or
requirements. You can turn a WordPress-powered website into a photo blog, a
professional online portfolio, a news website, an online community, or even an
online e-commerce store. You are limited only by your imagination when using
WordPress!
Developers are sometimes control freaks. OK, most
of the time they are control freaks. They want to control each and every little thing
that goes into the making of their app or website. Having said that, WordPress
offers a multitude of options so that you can extend it in whatever
direction takes your fancy. You can create plugins for your website by using
the WordPress API.
Once you have created a plugin, you get it hosted in the WordPress plugin repository. Alongside that is the theme repository, where you can submit your own created theme. You can create custom post types, taxonomies and metadata specific to your app or website. Speaking of applications, you can easily manage users, databases, and HTTP requests. That is what we are going to look in this tutorial.
We will be setting up a Cloud SQL instance in Google App Engine for our WordPress website. This will allow our website to use Google's servers, which will affect the loading time of our WordPress website or blog. The overall result will be rapid loading time and smooth handling of the traffic hitting your website or blog.
What Is Google App Engine?
According to Google:
“Google App Engine is a Platform as a Service (PaaS) offering that lets you build and run applications on Google's infrastructure. App Engine applications are easy to build, easy to maintain, and easy to scale as your traffic and data storage needs change."
Since we are dealing with Google, we'll be able to use the infrastructure of the Big G. Essentially we'll be using the same servers to host our WordPress website or blog, so we can say that we are using Google to host something other than Blogger.
Getting Set Up for Google App Engine
To use the Google App Engine, we require a machine that can run a local server and Python. You will need to set up a local server on your machine first. This will help in future, as you can test an update for your website before pushing it online. To set up a complete local server for the purpose of using the Google App Engine, we'll need the following software from the internet.
The most important and obvious thing is Google
App Engine Software Development Kit (SDK) for PHP (SDK), and a local server using MySQL server. You should also be running an installation
of Python. Get a fresh copy of WordPress to be used on your local server, or you can download the attachment, which has all the files ready to enable Google App Engine for WordPress.
Step 1
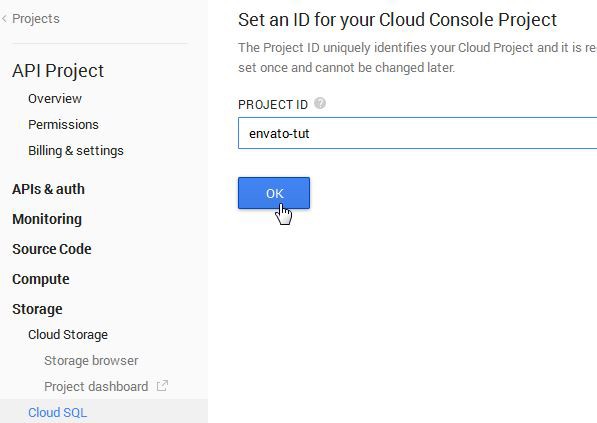
Sign up with Google Cloud Platform, because we’ll be needing a Cloud SQL instance. Setting up an instance is easy. You will need to create a new project in the Google Developers Console. So we'll set up a test project for this tutorial.
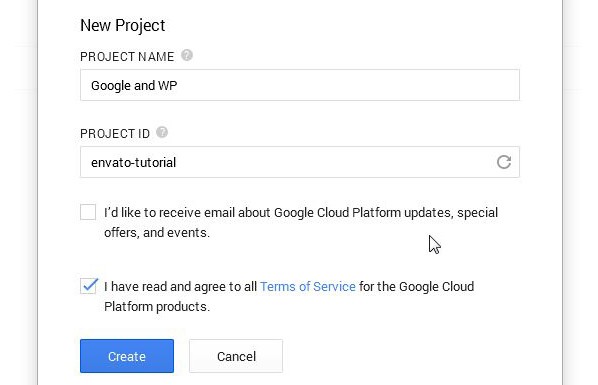
After entering the necessary details, go to Storage > Cloud SQL > New Instance. Enter the name of the instance, and hold onto it because we’ll be using the same name to connect to WordPress with it. You will need to enable billing so that you can connect with this instance.
Step 2
Next
we’ll move on to setting up a local server so that we can run WordPress in
Google App Engine. For that you will need to create three files: aap.yaml,
cron.yaml, and php.ini. While you are at it, download the latest version of WordPress and extract it onto your hard drive. Put the extracted folder and the
three files in a new folder, and name it App Engine. The code for these files is as follows.
App.yaml
application: name_of_project_id
version: wpfromstarterproject
runtime: php
api_version: 1
handlers:
- url: /(.*\.(htm$|html$|css$|js$))
  static_files: wordpress/\1
  upload: wordpress/.*\.(htm$|html$|css$|js$)
  application_readable: true
- url: /wp-content/(.*\.(ico$|jpg$|png$|gif$))
  static_files: wordpress/wp-content/\1
  upload: wordpress/wp-content/.*\.(ico$|jpg$|png$|gif$)
  application_readable: true
- url: /(.*\.(ico$|jpg$|png$|gif$))
  static_files: wordpress/\1
  upload: wordpress/.*\.(ico$|jpg$|png$|gif$)
- url: /wp-admin/(.+)
  script: wordpress/wp-admin/\1
  secure: always
- url: /wp-admin/
  script: wordpress/wp-admin/index.php
  secure: always
- url: /wp-login.php
  script: wordpress/wp-login.php
  secure: always
- url: /wp-cron.php
  script: wordpress/wp-cron.php
  login: admin
- url: /xmlrpc.php
  script: wordpress/xmlrpc.php
- url: /wp-(.+).php
  script: wordpress/wp-\1.php
- url: /(.+)?/?
  script: wordpress/index.php
Cron.yaml
cron:
- description: wordpress cron tasks
  url: /wp-cron.php
  schedule: every 2 hours
Php.ini
google_app_engine.enable_functions = "php_sapi_name, gc_enabled"
allow_url_include = "1"
upload_max_filesize = 8M
In the app.yaml
file, change your-project-id to the one we created a few moments ago, and save
it.
Step 3
Start the
MySQL Command Line Client. It will ask you for the password. I set mine to
“root” when I installed the MySQL server, so I typed in "root" and hit Enter.
We’ll be using the console to create a database for us. Enter the code create database wp_database;, where wp_database is the name of the database we want to create.
Now our
database has been created and we want WordPress to use it.
Navigate to the extracted copy of WordPress and open up wp-config.php. Enter the details for the database and the username. Also you have to replace the line that reads define('DB_HOST', 'localhost'); with the following piece of code.
if(isset($_SERVER['SERVER_SOFTWARE']) && strpos($_SERVER['SERVER_SOFTWARE'],'Google App Engine') !== false) {
  define('DB_HOST', ':/cloudsql/YOUR_PROJECT_ID:wordpress');
}else{
  define('DB_HOST', 'localhost');
}
Replace your_project_id with your Cloud SQL Instance ID name, and save it.
.jpg)
Step 4
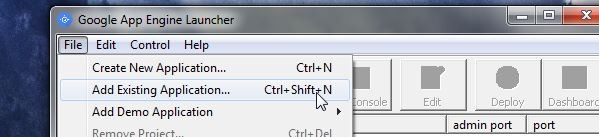
Execute the Google App Engine Launcher, and when it starts hit Control-Shift-N or go to the file
and click on Add Existing Application… Browse to the folder we named "App
Engine", and hit OK. The Google App Engine will read the app.yaml file and load
the data from it.
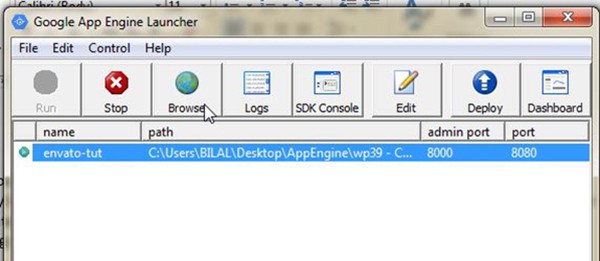
Press the green button to run the application engine. Wait a few moments and then click on the Browse button. The first time you browse your app, it will present you with the famous WordPress five-minute install page. Add in the details like username and password. Also you probably don’t want the search engine to index it, so uncheck that box.
Now you are ready to start creating your application. Once you have created the application, go back to the Google App Engine Launcher, select your project and click on the Deploy button. You will be asked to enter the login details. Enter your email id, and for password use the Google App Password Generator.

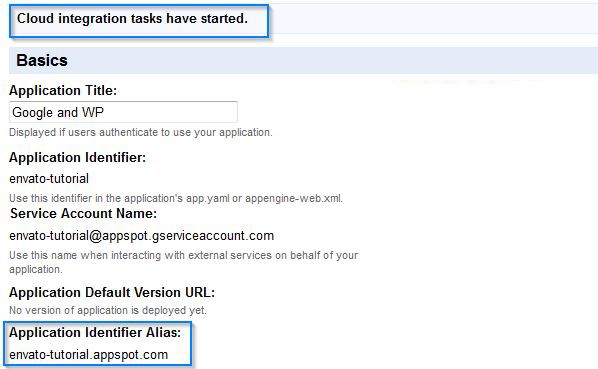
Once you have deployed your application, now you can access your app with http://<PROJECT_ID>.appspot.com/wp-admin/install.php. Just a couple of steps and we are finished. Log in to the App Engine and click on your recently deployed WordPress project. We want to activate Cloud Integration for our app so that we can upload media from within WordPress.
Click Application Settings in the left sidebar, scroll down to the bottom until you see Create, and click to activate it. You will see a new message saying that the cloud integration services have started.
Step 5
The last
thing to do is to install the Google App Engine Plugin for WordPress
locally. After installing the plugin, activate it. Now you will see a new link
under the Settings tab in WordPress. Navigate to App Engine and fill in the
necessary information. Make sure that your default bucket name shows up
(envato-tutorial.appspot.com). After that, hit the Save button and you are good to
go.

Conclusion
You may want to hold onto the local copy of your WordPress installation. Because of security reasons, your website is static and you cannot change themes or install plugins on a Google App Engine powered WordPress site. So what you can do is install themes and plugins locally, and then deploy WordPress again using Google App Engine Launcher.
If you followed the steps and were able to get everything working, give yourself a pat on the back. No, seriously, give yourself a treat. What we have done now will help your blog or website to load speedily and will support uploading images and other media to blog posts. Actually you have given your blog the advantage of using the big G’s incredible and powerful infrastructure. From now on, your blog will elegantly handle its incoming traffic.

Comments