Haptic feedback adds a whole new dimension to mobile user interaction. Learn how to use the new iPhone 7 haptic feedback APIs to provide your users with a tactile response.
What Is Haptic Feedback?
In iOS 10 we have a new API to provide feedback to the user. Haptic feedback is an extension to the visual feedback that every user is used to already. If you have an iPhone 7 or iPhone 7 Plus, you may have noticed a small vibration of the device while scrolling a date picker or when changing the value of a switch—that's haptic feedback. The new UIFeedbackGenerator class can be used to implement the same behavior in your apps.
When to Use It
The first rule of haptic feedback from the iOS Human Interface Guidelines: do not overuse it! You shouldn't send useless feedback to your users. If you do, they might decide to turn off this feature for their whole device. Because it can be disabled, don't use haptic feedback as your only method of feedback with your user. It may not be available on some devices, and the requests will silently be ignored on older devices that don't support it.
In general, haptic feedback should be a response to an user-initiated action. In this way, it's easier for users to correlate the feedback with its source.
Finally, if you want to play a sound at the same time, you should take care to synchronize it.
How to Choose the Right Feedback
Apple's What's New in iOS 10 document specifies that one of the following three concrete classes should be used:
-
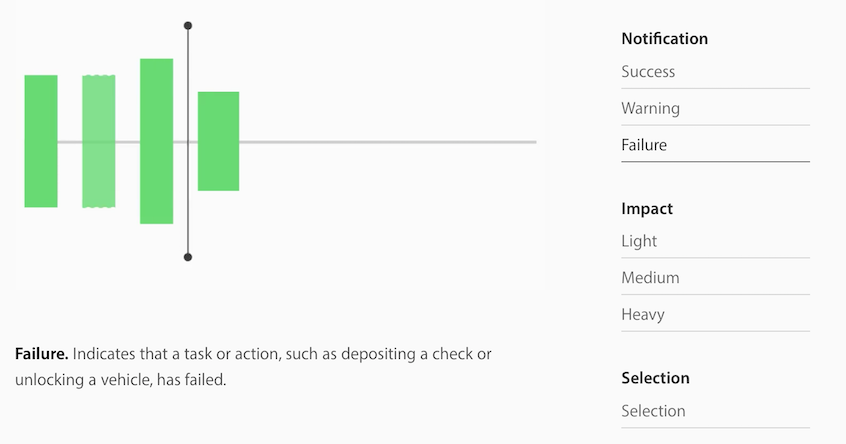
UIImpactFeedbackGeneratorprovides a physical metaphor that complements the visual experience. For example, the user might feel a thud when a view slides into place or two objects collide. It has three variations: success, warning, and failure. -
UINotificationFeedbackGeneratorindicates that a task or action, such as depositing a check or unlocking a vehicle, has completed, failed, or produced a warning. It has three variations: light, medium, and heavy. -
UISelectionFeedbackGeneratorindicates that the selection is actively changing. For example, the user feels light taps while scrolling a picker wheel. This feedback is intended for communicating movement through a series of discrete values, not making or confirming a selection.
To explain these different types, the documentation has videos with sound to illustrate the pattern of each feedback type. Try them out yourself at the Apple Developer site.
How to Perform Feedback
Now let's start coding! We are going to build a very simple iOS app that gives a success feedback when a button is pressed. Open Xcode 8 and create a new iOS project.
Add a button in your Storyboard file and create an IBAction to trigger the feedback.

A feedback generator lifecycle looks like this:
- Instantiate the generator.
- Prepare the generator (optional).
- Trigger feedback.
- Release the generator (optional).
I'll walk you through each of these steps below.
Instantiate the Generator
First, declare a new variable of type UINotificationFeedbackGenerator. If you would like to use another type of feedback, just change this class.
var feedbackGenerator: UINotificationFeedbackGenerator? // Declare the generator type.
Initialize the generator in viewDidLoad:
override func viewDidLoad() {
    super.viewDidLoad()
    feedbackGenerator = UINotificationFeedbackGenerator()  // Instantiate the generator.
}
Prepare the Generator
If you know in advance that the user is going to trigger a feedback, you should call the prepare() method. This will reduce the latency between your method call and the actual hardware feedback. An example is when you want to give multiple feedbacks during a gesture. In this case, first prepare the generator so that the latency is reduced.
Trigger Feedback
In the example that we are building, we have no way to know when the user will press the button. For this reason, inside the action we trigger the feedback right away.
@IBAction func triggerNotification(_ sender: UIButton) {
    feedbackGenerator?.notificationOccurred(.success)      // Trigger the haptic feedback.
}
Release the Generator
We have declared the generator as optional so that, in case we don't need it anymore, we can set it as nil to release all its resources. This is an optional step.
There is currently no way to test haptic feedback in the Simulator. You should get your hands on an iPhone 7 and test out the flow of the app with the new feedback system in action. Run the app on your iPhone 7 and press the button on the screen. You should feel a success feedback!
When adding feedback support to your own app, make sure it feels right in the context that your users would expect, otherwise they could be confused.
Conclusion
Haptic feedback is a new great feature to make your app feel more realistic. Users always appreciate seeing that your app supports the latest features of their device, so go ahead and implement it right away.
In the meantime, check out some of our other courses and tutorials about Swift app development and new features in iOS 10.


Comments