In March of 2015, Google released the Places API for Android as a part of Google's Play Services. This API allows developers to access a wealth of information from Google to provide users with an experience tailored to their current location by using the names and information of places, rather than a set of coordinates.
In this tutorial, you will learn how to present your users with the Place Picker component, use the Places API to guess the user's current place, search for a place by its ID, and allow the user to type into a text field to present them with predictive results.
1. Getting Set Up
If you don't already have an Android public API key, you will need to create a public Google API key for Android applications. You can do this by visiting the Google's Developers Console. Instructions for creating a key based on your signing certificate and package name are available in Google's documentation and are beyond the scope of this article.
When you've created a key, search for the Places API and set it to enabled. Some calls to the Places API are limited in how many requests can be sent per 24 hour period. At the time of writing, an account without a billing profile can send up to 1,000 requests while an account with a billing profile can send 150,000 requests. If you require more, you can submit a request to have this limit increased as described in the Usage Limits documentation.
With the API key ready to use, it is time to start working on the demo project. Create a project in Android Studio and set the minimum supported SDK version to at least 9. This is the minimum requirement for using Google's Play Services.
Once Android Studio has created the Hello World template project, open the build.gradle file and, under the dependencies node, add the required dependency of Play Services 7.0. This is the latest at the time of writing, but you can verify the latest version by checking Google's documentation.
dependencies {
    compile fileTree(dir: 'libs', include: ['*.jar'])
    compile 'com.android.support:appcompat-v7:22.0.0'
    compile 'com.google.android.gms:play-services:7.0.0'
}
Next, open AndroidManifest.xml, add the required permissions for the project, and state that OpenGL version 2 is required by the application.
<uses-permission android:name="com.google.android.providers.gsf.permission.READ_GSERVICES"/>
<uses-permission android:name="android.permission.ACCESS_FINE_LOCATION" />

<uses-feature
    android:glEsVersion="0x00020000"
    android:required="true"/>
The last thing you will need to do in the manifest is adding two <meta-data> tags to set the gms version and API key for the app within the <application> tag.
<meta-data
    android:name="com.google.android.geo.API_KEY"
    android:value="@string/google_api_key" />
<meta-data
    android:name="com.google.android.gms.version"
    android:value="@integer/google_play_services_version" />
When you're done with the manifest, you are ready to start writing code. As this is a component from Play Services, you will need to initialize your GoogleApiClient and connect/disconnect it during your Activity's life cycle. We do this in the onCreate, onStart, and onStop methods of the Activity class.
@Override
protected void onCreate( Bundle savedInstanceState ) {
    //--Snippet
    mGoogleApiClient = new GoogleApiClient
            .Builder( this )
            .enableAutoManage( this, 0, this )
            .addApi( Places.GEO_DATA_API )
            .addApi( Places.PLACE_DETECTION_API )
            .addConnectionCallbacks( this )
            .addOnConnectionFailedListener( this )
            .build();
}

@Override
protected void onStart() {
    super.onStart();
    if( mGoogleApiClient != null )
        mGoogleApiClient.connect();
}

@Override
protected void onStop() {
    if( mGoogleApiClient != null && mGoogleApiClient.isConnected() ) {
        mGoogleApiClient.disconnect();
    }
    super.onStop();
}
2. Using the Place Picker Widget
The Place Picker widget is a user interface component provided by Play Services that allows the user to see a map of their surrounding area. The component includes a list of nearby places that can be used by your app. By using this component, you are able to follow a standard design that your users will know how to interact with while being able to save on development time.

To use the Place Picker, you need to create an intent and listen for the Activity result to retrieve the Place selected by the user. The following method shows how you would launch this Activity.
private void displayPlacePicker() {
    if( mGoogleApiClient == null || !mGoogleApiClient.isConnected() )
        return;

    PlacePicker.IntentBuilder builder = new PlacePicker.IntentBuilder();

    try {
        startActivityForResult( builder.build( getApplicationContext() ), PLACE_PICKER_REQUEST );
    } catch ( GooglePlayServicesRepairableException e ) {
            Log.d( "PlacesAPI Demo", "GooglePlayServicesRepairableException thrown" );
    } catch ( GooglePlayServicesNotAvailableException e ) {
        Log.d( "PlacesAPI Demo", "GooglePlayServicesNotAvailableException thrown" );
    }
}
The PlacePicker.IntentBuilder is used to create the Intent that will be used to launch the Place Picker. It also has an method available, setLatLngBounds, that lets you place a geographic boundary from a southwest corner to a northeast corner to control the search area.
The Intent can be built using the build method from PlacePicker.IntentBuilder and launched using the startActivityForResult method from your Activity. It should be noted that using the build method does have the possibility of throwing a GooglePlayServicesRepairableException or a GooglePlayServicesNotAvailableException exception, so those should be checked for using a standard try/catch block and handled gracefully if they occur.
If the user selects a location from the place picker list, that Place object is packaged into an Intent and sent back to the calling Activity. Using the PlacePicker.getPlace method, you can extract the Place data from the returned Intent.
protected void onActivityResult( int requestCode, int resultCode, Intent data ) {
    if( requestCode == PLACE_PICKER_REQUEST && resultCode == RESULT_OK ) {
        displayPlace( PlacePicker.getPlace( data, this ) );
    }
}
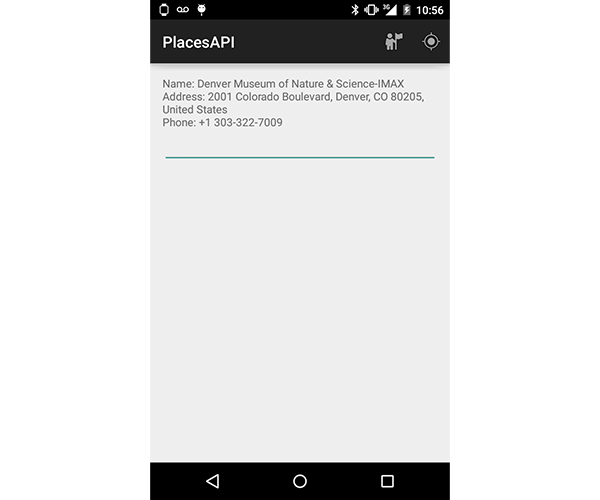
Once the Place object is extracted, it can be treated as a model object to display or use within your app.
private void displayPlace( Place place ) {
    if( place == null )
        return;

    String content = "";
    if( !TextUtils.isEmpty( place.getName() ) ) {
        content += "Name: " + place.getName() + "\n";
    }
    if( !TextUtils.isEmpty( place.getAddress() ) ) {
        content += "Address: " + place.getAddress() + "\n";
    }
    if( !TextUtils.isEmpty( place.getPhoneNumber() ) ) {
        content += "Phone: " + place.getPhoneNumber();
    }

    mTextView.setText( content );
}
3. Finding the User's Current Place
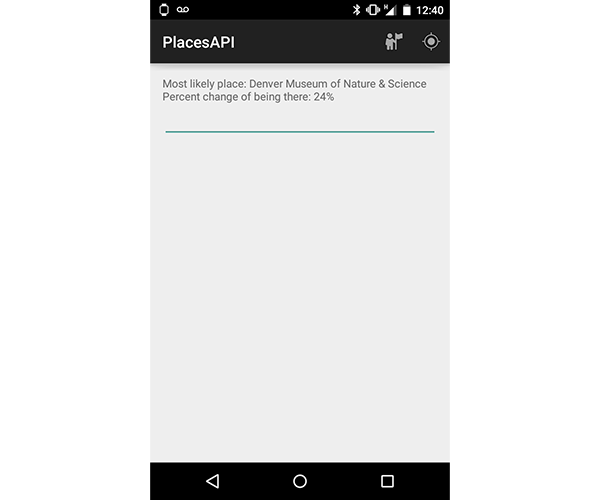
Another interesting feature of the Places API is that you can use it to guess if the user is currently at a listed place. The API will also provide a likelihood so that you can make informed decisions about how your app should interact with the user. It should be noted that this is one of the features of the API that requires a request against your allotted usages.
To detect the user's place, you will need to use the Places.PlacesDetectionApi.getCurrentPlace method to create a PendingIntent that returns with a PlaceLikelihoodBuffer object. Using a ResultCallBack, you can take the first, and most likely, place from the buffer and use that in your app.
If your app needs more information, you can extract other PlaceLikelihood items from the buffer by looping through it. The likelihood that this place is where the user is currently located is passed back in each PlaceLikelihood object as a floating point value from 0.0 to 1.0, 1.0 being almost a guaranteed match. Don't forget to call release on the PlaceLikelihoodBuffer to avoid any memory leaks.
private void guessCurrentPlace() {
    PendingResult<PlaceLikelihoodBuffer> result = Places.PlaceDetectionApi.getCurrentPlace( mGoogleApiClient, null );
    result.setResultCallback( new ResultCallback<PlaceLikelihoodBuffer>() {
        @Override
        public void onResult( PlaceLikelihoodBuffer likelyPlaces ) {

            PlaceLikelihood placeLikelihood = likelyPlaces.get( 0 );
            String content = "";
            if( placeLikelihood != null && placeLikelihood.getPlace() != null && !TextUtils.isEmpty( placeLikelihood.getPlace().getName() ) )
                content = "Most likely place: " + placeLikelihood.getPlace().getName() + "\n";
            if( placeLikelihood != null )
                content += "Percent change of being there: " + (int) ( placeLikelihood.getLikelihood() * 100 ) + "%";
            mTextView.setText( content );

            likelyPlaces.release();
        }
    });
}
4. Predicting Places
The next, and most complex, topic we will go over in this tutorial is predicting and displaying places to the user as they enter a search query. Again, this API call also counts towards the API's usage limits. However, it is invaluable for making your app more useable.
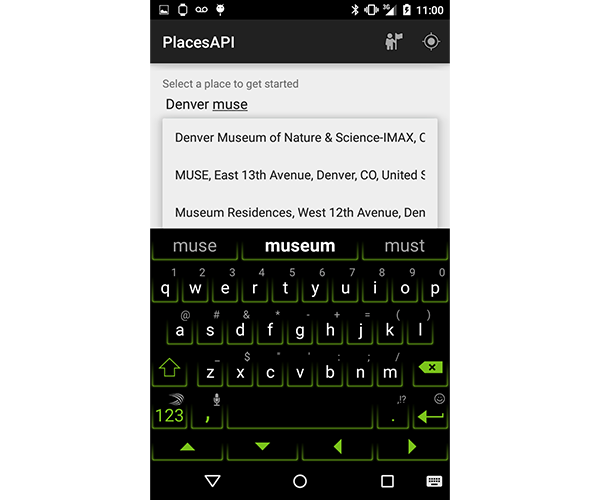
For this portion of the tutorial, you will use an AutoCompleteTextView and a custom adapter in the app to type the name of a place for predictions. Almost all of the work is done in the adapter. However, we will need to pass a reference to the GoogleApiClient to the adapter for it to access the API.
This can be done in the standard GoogleApiClient callback, onConnected, and we can remove the instance of the client in onStop where mAdapter is an instance of our custom Adapter class, AutoCompleteAdapter.
@Override
protected void onStop() {
    if( mGoogleApiClient != null && mGoogleApiClient.isConnected() ) {
        mAdapter.setGoogleApiClient( null );
        mGoogleApiClient.disconnect();
    }
    super.onStop();
}

@Override
public void onConnected( Bundle bundle ) {
    if( mAdapter != null )
        mAdapter.setGoogleApiClient( mGoogleApiClient );
}
To trigger an API call whenever the user types a new letter into the AutoCompleteTextView, you need to override the getFilter method of the ArrayAdapter. This method is triggered whenever the user changes the content of the view associated with the adapter. It allows you to change the content of the adapter of the AutoCompleteTextView. In the following example, constraints is the content of the view.
@Override
public Filter getFilter() {
    return new Filter() {
        @Override
        protected FilterResults performFiltering(CharSequence constraint) {

            if( mGoogleApiClient == null || !mGoogleApiClient.isConnected() ) {
                Toast.makeText( getContext(), "Not connected", Toast.LENGTH_SHORT ).show();
                return null;
            }

            clear();

            displayPredictiveResults( constraint.toString() );

            return null;
        }

        @Override
        protected void publishResults(CharSequence constraint, FilterResults results) {
            notifyDataSetChanged();
        }
    };
}
The displayPredictiveResults method is where the actual interaction with the API occurs. There are a few different objects that can be made to customize your predictions.
The first is a LatLngBounds object that creates a square boundary from a southwest point to a northeast point to localize the query. If null is passed instead of an initialized LatLngBounds object, then no geographic restrictions will be placed on the query.
LatLngBounds bounds = new LatLngBounds( new LatLng( 39.906374, -105.122337 ), new LatLng( 39.949552, -105.068779 ) );
The second object that you can create to customize the query is a filter for the API request. The filter for the Places AutoCompletePredictions call is a list of Integer objects representing different types of filters. At this point, only one filter type can be applied to a query. The acceptable values can be found in the documentation. If the Integer list is empty or null is passed, then all result types are returned.
Once you are ready to make the request, you can use the Places.GeoDataApi.getAutocompletePredictions method to return a PendingIntent, which can be associated with a ResultCallback to display the returned information.
It's important to note that a custom object representing the AutoCompletePrediction objects from the buffer is used to store the data in the ArrayAdapter. Otherwise an IllegalArgumentsException exception would be thrown as soon as the buffer is released, which is crucial to avoid a memory leak.
private void displayPredictiveResults( String query )
{
    //Southwest corner to Northeast corner.
    LatLngBounds bounds = new LatLngBounds( new LatLng( 39.906374, -105.122337 ), new LatLng( 39.949552, -105.068779 ) );

    //Filter: https://developers.google.com/places/supported_types#table3
    List<Integer> filterTypes = new ArrayList<Integer>();
    filterTypes.add( Place.TYPE_ESTABLISHMENT );

    Places.GeoDataApi.getAutocompletePredictions( mGoogleApiClient, query, bounds, AutocompleteFilter.create( filterTypes ) )
        .setResultCallback (
            new ResultCallback<AutocompletePredictionBuffer>() {
                @Override
                public void onResult( AutocompletePredictionBuffer buffer ) {

                    if( buffer == null )
                        return;

                    if( buffer.getStatus().isSuccess() ) {
                        for( AutocompletePrediction prediction : buffer ) {
                            //Add as a new item to avoid IllegalArgumentsException when buffer is released
                            add( new AutoCompletePlace( prediction.getPlaceId(), prediction.getDescription() ) );
                        }
                    }

                    //Prevent memory leak by releasing buffer
                    buffer.release();
                }
            }, 60, TimeUnit.SECONDS );
}
The content in AutoCompleteAdapter is displayed using a android.R.layout.simple_list_item_1 layout and standard ViewHolder pattern in getView.
@Override
public View getView( int position, View convertView, ViewGroup parent ) {
    ViewHolder holder;

    if( convertView == null ) {
        holder = new ViewHolder();
        convertView = LayoutInflater.from( getContext() ).inflate( android.R.layout.simple_list_item_1, parent, false  );
        holder.text = (TextView) convertView.findViewById( android.R.id.text1 );
        convertView.setTag( holder );
    } else {
        holder = (ViewHolder) convertView.getTag();
    }

    holder.text.setText( getItem( position ).getDescription() );

    return convertView;
}
When an item is clicked from this list, the ID of the selected Place is passed to the onItemClickedListener and searched for to display.
5. Searching for a Place by ID
The final part of this tutorial covers finding a Place object based on its ID. This works similarly to the other API calls by creating a PendingIntent and interacting with a returned buffer to retrieve the place. Like the other buffer objects you have worked with, the PlaceBuffer must call release to avoid any memory leaks.
private void findPlaceById( String id ) {
    if( TextUtils.isEmpty( id ) || mGoogleApiClient == null || !mGoogleApiClient.isConnected() )
        return;

   Places.GeoDataApi.getPlaceById( mGoogleApiClient, id ) .setResultCallback( new ResultCallback<PlaceBuffer>() {
       @Override
       public void onResult(PlaceBuffer places) {
           if( places.getStatus().isSuccess() ) {
               Place place = places.get( 0 );
               displayPlace( place );
               mPredictTextView.setText( "" );
               mAdapter.clear();
           }

           //Release the PlaceBuffer to prevent a memory leak
           places.release();
       }
   } );
}
Conclusion
The Places API is a powerful tool for making your apps aware of the user's location to provide them with contextual information. In this tutorial, you have learned how to use the Place Picker component, guess the user's place, present them with predictive results when searching, and find a place based on a given ID. In addition to the topics covered here, it is also possible to submit new places to Google to help expand the information the API has access to.

Comments