Google Play Game Services provide the opportunity to add social features to your games through users' Google+ accounts. In this tutorial, we will demonstrate how you can add leaderboards to an Android app, submitting user scores, and presenting the current leaderboard standings within the game.
Using leaderboards involves preparing your IDE, configuring the leaderboard in the Google Play Developer Console, and adding functionality to your app.
If you completed the recent tutorial on adding achievements to Android apps, you will be able to skip some of the steps in this one. The attached source code includes the same app we used for the achievements tutorial, with both achievements and leaderboards functionality added.
1. Prepare Your IDE
Step 1
To use Google Play Services, you need certain utilities installed in your development environment. In addition, since we are using Game Services, we will install the BaseGameUtils library, which reduces the amount of coding we need to implement features such as Google+ sign-in.
To get started, create a new app or use an existing one. If you followed the achievements tutorial, you can use the app you built for that tutorial. If you are creating your own game, decide what you want to use leaderboards for and when you plan on submitting a user score. Each leaderboard score will be a number. You can configure the leaderboard to regard lower or higher number values as better in terms of position in the leaderboard, but naturally this will depend on the purpose of your game.
The code in the download folder includes a simple game in which the user guesses a number. We will use the number of guesses required to get the correct answer as the leaderboard score. In this case, fewer guesses are better, so the leaderboard will present the lowest scores first. For simplicity, we will limit the number of guesses a user can take. This is a trivial example to demonstrate the leaderboard concept and functionality. Your own games will likely involve more complexity.
Step 2
Let's get Eclipse ready for developing with Google Play Game Services. Open the Android SDK Manager and scroll to the Extras folder. Expand the folder and select Google Play Services plus the Google Repository. Install the Google APIs Platform from one of the recent Android versions as well if you want to test on the emulator. Install the chosen packages.
Step 3
Eclipse will also need to reference some additional resources in the workspace. On your computer, navigate to the location of the Google Play Services Library, which should be in the Android SDK folder, at extras/google/google_play_services/libproject/google-play-services_lib/. Copy and paste the library somewhere else on your computer.
We now need a reference to this copy in Eclipse. Choose Import > Android > Import Existing Android Code into Workspace from the File menu. Select the location of the copy you made. The imported library should now show up as a new project in Eclipse. Right-click it and choose Properties. In the Android section, choose a Google APIs build target and check the Is Library checkbox.
Step 4
Importing the BaseGameUtils resource is slightly different. The library is hosted on GitHub. You can find it in the Downloads section, under Sample Games. Download the library and save it to your computer.
As you did for the Google Play Services library, choose Import > Android > Import Existing Android Code into Workspace from the File menu to bring the BaseGameUtils library into Eclipse. Right-click to navigate to the new project properties and make sure the project is marked as a library by checking Is Library.
Step 5
We can now make the app refer to these two resources within the workspace. Right-click your app in the Package Explorer and choose Properties. Navigate to the Android section and select Add in the Library section. Choose both the Google Play Services library and BaseGameUtils, and add them to your app.
2. Prepare Your Game in the Developer Console
Step 1
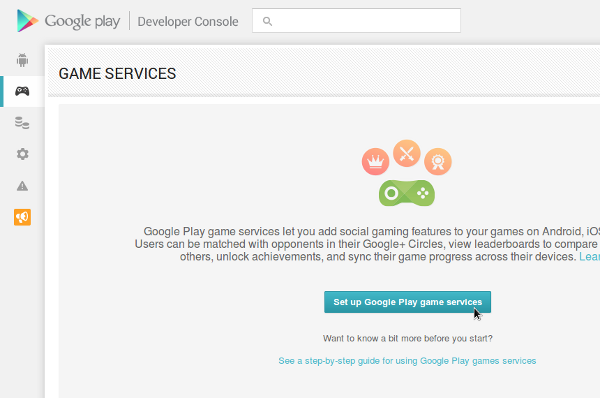
Before you can create a leaderboard, the app needs to be listed in the Google Play Developer Console. Log in and click the Game Services button to the left. If you already did this for your app in the achievements tutorial, you do not need to do it again. You can jump to section 3 on creating a leaderboard.
Click Set up Google Play game services.
Click to add a new game, select I don't use any Google APIs in my game yet, and choose a name and category for your game. Click Continue to go to the next step.

Add your game's title. You can add other details later.
Step 2
Let's now link the app so that we can refer to this Developer Console listing in the app itself. Click the Linked Apps entry in the list on the left and choose Android.
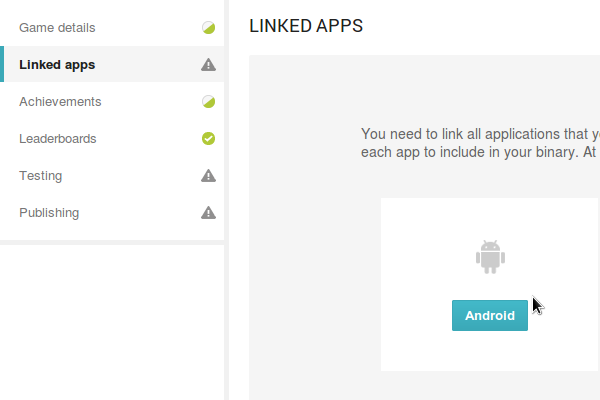
Enter your app info including the package name, making sure it's the same as the one you are using in your project.
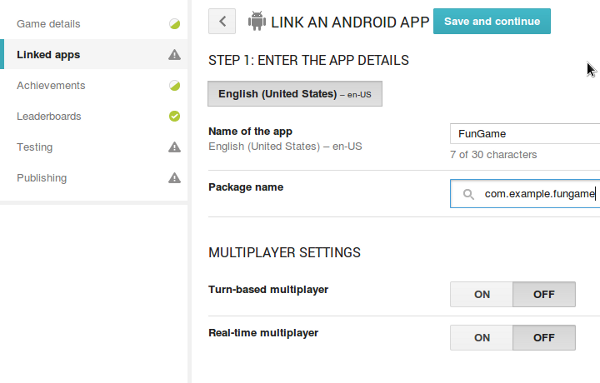
Save and click Authorize your app now. For the moment, you can just add the app name, but you can enter more details later. Choose Installed Application in the Client ID area, with Android as the type and enter your package name. You now need to use the keytool utility to generate a signing certificate. You can use the following command in a terminal or command prompt in combination with the debug certificate:
keytool -exportcert -alias androiddebugkey -keystore ~/.android/debug.keystore -list -v
The terminal or command prompt will write out the fingerprint for the certificate. Copy what you see after SHA1 and paste it into the Developer Console in the Signing Certificate Fingerprint text area.
Select Create Client and copy the ID for the application, which is listed next to the app name in the Developer Console. You will be adding the ID to your app along with the ID for the leaderboard we are about to create.
3. Create a Leaderboard
Step 1
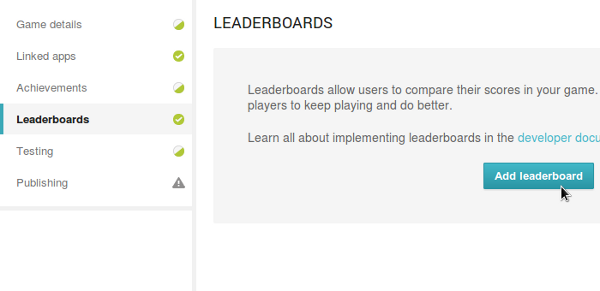
Still in the Developer Console, let's now create a new leaderboard. Select the Leaderboards section in your app listing and click Add leaderboard.
Make sure you understand the concept of Leaderboards on Android—and in Google Play Game Services generally. You can read an overview on the Google Play Game Services website. You can actually do a lot of different things with leaderboards, so consider what we do in this tutorial just a starting point.
Enter the details for your new leaderboard. For our sample code, we use the name Least Guesses and select Smaller is Better in the Ordering section.
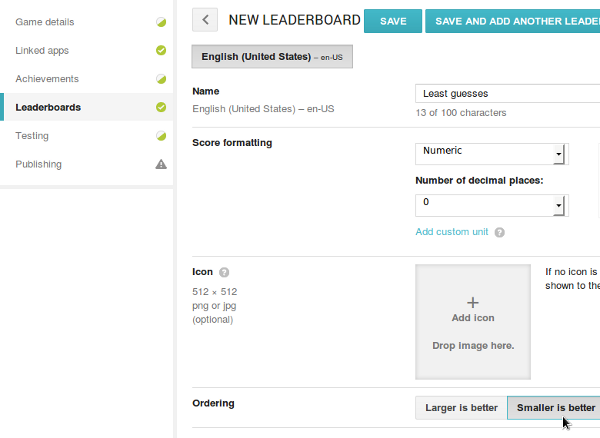
Add an icon if you like. If you don't a standard image will be used. Save your new leaderboard and copy its ID.
Step 2
In the Testing section for your app in the Developer Console, you can add accounts that will be granted access to test the game. By default, you will see your own Google account email listed there, so you should be able to use it for testing your app.
4. Prepare Your Game for Accessing Games Services
Step 1
It's time to get the app ready for leaderboard access in Eclipse. If you completed the achievements tutorial you can skip some of this section. Let's first add the IDs for the app and the leaderboard. Open or create a res/values/ids.xml resource file. Use the following syntax to enter the IDs you copied for the app and the new leaderboard when you created them in the Developer Console:
<string name="app_id">1234567890</string>
<string name="number_guesses_leaderboard">abcdefg1234567</string>
Save the file and open the project's Manifest. Add the following inside the application element:
<meta-data
 android:name="com.google.android.gms.games.APP_ID"
 android:value="@string/app_id" />
<meta-data
 android:name="com.google.android.gms.version"
 android:value="@integer/google_play_services_version" />
The app is now set up to link to the listings we added in the Developer Console.
Step 2
When you utilize Google Services in your Android apps, you need your users to sign into their Google accounts. You can take a number of approaches to implement this, but we are going to automate parts of this process by using the BaseGameActivity class together with standard buttons for signing in and out. Additionally, when the activity starts, the app will attempt to log the user in straight away.
Open your app's main layout file and add buttons for sign in/out:
<!-- sign-in button -->

<com.google.android.gms.common.SignInButton
 android:id="@+id/sign_in_button"
 android:layout_width="wrap_content"
 android:layout_height="wrap_content" />

<!-- sign-out button -->

<Button
 android:id="@+id/sign_out_button"
 android:layout_width="wrap_content"
 android:layout_height="wrap_content"
 android:text="Sign Out"
 android:visibility="gone" />
Step 3
Add these imports to your main Activity class:
import com.google.android.gms.games.Games;
import com.google.example.games.basegameutils.BaseGameActivity;
Make the Activity class extend the BaseGameActivity class and listen for clicks:
public class MainActivity extends BaseGameActivity implements View.OnClickListener
Prepare to respond to clicks on the sign in/out buttons in onCreate:
findViewById(R.id.sign_in_button).setOnClickListener(this);
findViewById(R.id.sign_out_button).setOnClickListener(this);
Now add the following standard methods to an onClick method in the class:
@Override
public void onClick(View view) {
    if (view.getId() == R.id.sign_in_button) {
		beginUserInitiatedSignIn();
	}
	else if (view.getId() == R.id.sign_out_button) {
		signOut();
		findViewById(R.id.sign_in_button).setVisibility(View.VISIBLE);
		findViewById(R.id.sign_out_button).setVisibility(View.GONE);
	}
}
The methods we call here are provided by the BaseGameActivity class our Activity class is inheriting from, so we don't need to handle the details manually. Finally, we add a couple of standard callbacks:
public void onSignInSucceeded() {
    findViewById(R.id.sign_in_button).setVisibility(View.GONE);
	findViewById(R.id.sign_out_button).setVisibility(View.VISIBLE);
}

@Override
public void onSignInFailed() {
	findViewById(R.id.sign_in_button).setVisibility(View.VISIBLE);
	findViewById(R.id.sign_out_button).setVisibility(View.GONE);
}
When we call on the leaderboard functionality, we will first check that the app has a connection to Google Services. You could alternatively add code to these methods to manage your app's awareness of whether or not Play Services can be called on.
5. Implement Your Leaderboard
Step 1
Now we can let the app use the leaderboard. The code in the sample app uses the following layout. I won't go into detail explaining the layout as your own apps will have a different layout.
<RelativeLayout xmlns:android="http://schemas.android.com/apk/res/android"
    xmlns:tools="http://schemas.android.com/tools"
	android:layout_width="match_parent"
	android:layout_height="match_parent"
	android:paddingBottom="@dimen/activity_vertical_margin"
	android:paddingLeft="@dimen/activity_horizontal_margin"
	android:paddingRight="@dimen/activity_horizontal_margin"
	android:paddingTop="@dimen/activity_vertical_margin"
	tools:context="com.example.fungame.MainActivity" >

	<LinearLayout
		android:id="@+id/sign_in_buttons"
		android:layout_width="fill_parent"
		android:layout_height="wrap_content"
		android:layout_alignParentTop="true"
		android:orientation="horizontal" >

		<!-- sign-in button -->

		<com.google.android.gms.common.SignInButton
			android:id="@+id/sign_in_button"
			android:layout_width="wrap_content"
			android:layout_height="wrap_content" />

		<!-- sign-out button -->

		<Button
			android:id="@+id/sign_out_button"
			android:layout_width="wrap_content"
			android:layout_height="wrap_content"
			android:text="Sign Out"
			android:visibility="gone" />
	</LinearLayout>

	<RelativeLayout
		android:id="@+id/gameArea"
		android:layout_width="fill_parent"
		android:layout_height="wrap_content"
		android:layout_below="@id/sign_in_buttons" >

		<TextView
			android:id="@+id/guess_text"
			android:layout_width="fill_parent"
			android:layout_height="wrap_content"
			android:layout_centerHorizontal="true"
			android:text="Guess the number!"
			android:textSize="30sp"
			android:textStyle="bold" />

		<LinearLayout
			android:layout_width="fill_parent"
			android:layout_height="wrap_content"
			android:layout_below="@id/guess_text"
			android:orientation="vertical" >

			<LinearLayout
				android:layout_width="fill_parent"
				android:layout_height="wrap_content"
				android:orientation="horizontal" >

				<Button
					android:id="@+id/btn7"
					android:layout_width="0dp"
					android:layout_height="match_parent"
					android:layout_margin="1dp"
					android:layout_weight="1"
					android:background="#ff000033"
					android:gravity="center"
					android:onClick="btnPressed"
					android:padding="5dp"
					android:tag="7"
					android:text="7"
					android:textColor="#ffffffff"
					android:textSize="30sp"
					android:textStyle="bold" />

				<Button
					android:id="@+id/btn8"
					android:layout_width="0dp"
					android:layout_height="match_parent"
					android:layout_margin="1dp"
					android:layout_weight="1"
					android:background="#ff000033"
					android:gravity="center"
					android:onClick="btnPressed"
					android:padding="5dp"
					android:tag="8"
					android:text="8"
					android:textColor="#ffffffff"
					android:textSize="30sp"
					android:textStyle="bold" />

				<Button
					android:id="@+id/btn9"
					android:layout_width="0dp"
					android:layout_height="match_parent"
					android:layout_margin="1dp"
					android:layout_weight="1"
					android:background="#ff000033"
					android:gravity="center"
					android:onClick="btnPressed"
					android:padding="5dp"
					android:tag="9"
					android:text="9"
					android:textColor="#ffffffff"
					android:textSize="30sp"
					android:textStyle="bold" />
			</LinearLayout>

			<LinearLayout
				android:layout_width="fill_parent"
				android:layout_height="wrap_content"
				android:layout_weight="1"
				android:orientation="horizontal" >

				<Button
					android:id="@+id/btn4"
					android:layout_width="0dp"
					android:layout_height="match_parent"
					android:layout_margin="1dp"
					android:layout_weight="1"
					android:background="#ff000033"
					android:gravity="center"
					android:onClick="btnPressed"
					android:padding="5dp"
					android:tag="4"
					android:text="4"
					android:textColor="#ffffffff"
					android:textSize="30sp"
					android:textStyle="bold" />

				<Button
					android:id="@+id/btn5"
					android:layout_width="0dp"
					android:layout_height="match_parent"
					android:layout_margin="1dp"
					android:layout_weight="1"
					android:background="#ff000033"
					android:gravity="center"
					android:onClick="btnPressed"
					android:padding="5dp"
					android:tag="5"
					android:text="5"
					android:textColor="#ffffffff"
					android:textSize="30sp"
					android:textStyle="bold" />

				<Button
					android:id="@+id/btn6"
					android:layout_width="0dp"
					android:layout_height="match_parent"
					android:layout_margin="1dp"
					android:layout_weight="1"
					android:background="#ff000033"
					android:gravity="center"
					android:onClick="btnPressed"
					android:padding="5dp"
					android:tag="6"
					android:text="6"
					android:textColor="#ffffffff"
					android:textSize="30sp"
					android:textStyle="bold" />
			</LinearLayout>

			<LinearLayout
				android:layout_width="fill_parent"
				android:layout_height="wrap_content"
				android:layout_weight="1"
				android:orientation="horizontal" >

				<Button
					android:id="@+id/btn1"
					android:layout_width="0dp"
					android:layout_height="match_parent"
					android:layout_margin="1dp"
					android:layout_weight="1"
					android:background="#ff000033"
					android:gravity="center"
					android:onClick="btnPressed"
					android:padding="5dp"
					android:tag="1"
					android:text="1"
					android:textColor="#ffffffff"
					android:textSize="30sp"
					android:textStyle="bold" />

				<Button
					android:id="@+id/btn2"
					android:layout_width="0dp"
					android:layout_height="match_parent"
					android:layout_margin="1dp"
					android:layout_weight="1"
					android:background="#ff000033"
					android:gravity="center"
					android:onClick="btnPressed"
					android:padding="5dp"
					android:tag="2"
					android:text="2"
					android:textColor="#ffffffff"
					android:textSize="30sp"
					android:textStyle="bold" />

				<Button
					android:id="@+id/btn3"
					android:layout_width="0dp"
					android:layout_height="match_parent"
					android:layout_margin="1dp"
					android:layout_weight="1"
					android:background="#ff000033"
					android:gravity="center"
					android:onClick="btnPressed"
					android:padding="5dp"
					android:tag="3"
					android:text="3"
					android:textColor="#ffffffff"
					android:textSize="30sp"
					android:textStyle="bold" />
			</LinearLayout>

			<LinearLayout
				android:layout_width="fill_parent"
				android:layout_height="wrap_content"
				android:layout_weight="1"
				android:orientation="horizontal" >

				<Button
					android:id="@+id/btn0"
					android:layout_width="0dp"
					android:layout_height="match_parent"
					android:layout_margin="1dp"
					android:layout_weight="1"
					android:background="#ff000033"
					android:gravity="center"
					android:onClick="btnPressed"
					android:padding="5dp"
					android:tag="0"
					android:text="0"
					android:textColor="#ffffffff"
					android:textSize="30sp"
					android:textStyle="bold" />

				<Button
					android:id="@+id/btnAgain"
					android:layout_width="0dp"
					android:layout_height="match_parent"
					android:layout_margin="1dp"
					android:layout_weight="1"
					android:background="#ffffff00"
					android:enabled="false"
					android:gravity="center"
					android:onClick="btnPressed"
					android:padding="5dp"
					android:tag="-1"
					android:text="Again"
					android:textColor="#ffffff00"
					android:textSize="30sp"
					android:textStyle="bold" />
			</LinearLayout>
		</LinearLayout>
	</RelativeLayout>

	<LinearLayout
		android:id="@+id/play_buttons"
		android:layout_width="fill_parent"
		android:layout_height="wrap_content"
		android:layout_below="@id/gameArea"
		android:gravity="center"
		android:orientation="horizontal" >

		<!-- show achievements -->

		<Button
			android:id="@+id/show_achievements"
			android:layout_width="wrap_content"
			android:layout_height="wrap_content"
			android:text="Achievements" />

		<!-- show leaderboards -->

		<Button
			android:id="@+id/show_leaderboard"
			android:layout_width="wrap_content"
			android:layout_height="wrap_content"
			android:text="Leaderboard" />
	</LinearLayout>

</RelativeLayout>
We add buttons to access both achievements and leaderboards for the app. If you haven't completed the achievements tutorial, then you can remove the achievements button.
Back in your application's Activity class, we will be using these instance variables:
private Button button0, button1, button2, button3, button4, button5,
    button6, button7, button8, button9, buttonAgain;
private int number;
private Random rand;
private TextView info;
private int numGuesses=0;
If you completed the achievements tutorial you may notice an additional variable, numGuesses, to keep track of the number of user guesses each time they play the game.
You will need the following additional code in the onCreate method of the Activity class. If you're not using the achievements button, then remove the line that references it.
findViewById(R.id.show_achievements).setOnClickListener(this);
findViewById(R.id.show_leaderboard).setOnClickListener(this);

button0=(Button)findViewById(R.id.btn0);
button1=(Button)findViewById(R.id.btn1);
button2=(Button)findViewById(R.id.btn2);
button3=(Button)findViewById(R.id.btn3);
button4=(Button)findViewById(R.id.btn4);
button5=(Button)findViewById(R.id.btn5);
button6=(Button)findViewById(R.id.btn6);
button7=(Button)findViewById(R.id.btn7);
button8=(Button)findViewById(R.id.btn8);
button9=(Button)findViewById(R.id.btn9);
buttonAgain=(Button)findViewById(R.id.btnAgain);

info=(TextView)findViewById(R.id.guess_text);

rand=new Random();
number=rand.nextInt(10);
We also use the following methods for disabling and enabling the buttons during gameplay:
private void disableNumbers(){
    button0.setEnabled(false); button0.setTextColor(Color.parseColor("#ff000033"));
	button1.setEnabled(false); button1.setTextColor(Color.parseColor("#ff000033"));
	button2.setEnabled(false); button2.setTextColor(Color.parseColor("#ff000033"));
	button3.setEnabled(false); button3.setTextColor(Color.parseColor("#ff000033"));
	button4.setEnabled(false); button4.setTextColor(Color.parseColor("#ff000033"));
	button5.setEnabled(false); button5.setTextColor(Color.parseColor("#ff000033"));
	button6.setEnabled(false); button6.setTextColor(Color.parseColor("#ff000033"));
	button7.setEnabled(false); button7.setTextColor(Color.parseColor("#ff000033"));
	button8.setEnabled(false); button8.setTextColor(Color.parseColor("#ff000033"));
	button9.setEnabled(false); button9.setTextColor(Color.parseColor("#ff000033"));
	buttonAgain.setEnabled(true); buttonAgain.setTextColor(Color.parseColor("#ff000033"));
}
private void enableNumbers(){
	button0.setEnabled(true); button0.setTextColor(Color.WHITE);
	button1.setEnabled(true); button1.setTextColor(Color.WHITE);
	button2.setEnabled(true); button2.setTextColor(Color.WHITE);
	button3.setEnabled(true); button3.setTextColor(Color.WHITE);
	button4.setEnabled(true); button4.setTextColor(Color.WHITE);
	button5.setEnabled(true); button5.setTextColor(Color.WHITE);
	button6.setEnabled(true); button6.setTextColor(Color.WHITE);
	button7.setEnabled(true); button7.setTextColor(Color.WHITE);
	button8.setEnabled(true); button8.setTextColor(Color.WHITE);
	button9.setEnabled(true); button9.setTextColor(Color.WHITE);
	buttonAgain.setEnabled(false); buttonAgain.setTextColor(Color.parseColor("#ffffff00"));
}
We also need the following method we specified as onClick attribute for the number buttons in the layout. The player taps one of these to make a guess:
public void btnPressed(View v){
    int btn = Integer.parseInt(v.getTag().toString());
	if(btn<0){
		//again btn
		numGuesses=0;
		number=rand.nextInt(10);
		enableNumbers();
		info.setText("Set the number!");
	}
	else{
		//number button
		numGuesses++;
		if(btn==number){
			info.setText("Yes! It was "+number);
			if(getApiClient().isConnected()){
				Games.Achievements.unlock(getApiClient(),
						getString(R.string.correct_guess_achievement));
				Games.Leaderboards.submitScore(getApiClient(),
						getString(R.string.number_guesses_leaderboard),
						numGuesses);
			}
			disableNumbers();
		}
		else if(numGuesses==5){
			info.setText("No! It was "+number);
			disableNumbers();
		}
		else
			info.setText("Try again!");
	}
}
Take a moment to look over the code. Even if you completed the app in the achievements tutorial, there are some changes to the logic in addition to the extra leaderboard code. If the player taps the Again button, we reset the numGuesses variable to 0. If the user taps a number button, we increment numGuesses. If you aren't using achievements, you can remove any code that references achievements.
We submit the score to the leaderboard when the user guessed correctly. The user can make up to five guesses.
The key line here is submitScore. We pass the number of guesses the player took to get the correct number. If the number of guesses is lower than any existing entry for the user in the leaderboard, their entry will be replaced with this new value. Notice that we use the string resource value we defined for the leaderboard.
Step 2
Before we finish, let's allow the user to view the game leaderboard by tapping the Leaderboard button we added. We used the following code in onClick for the achievements:
else if (view.getId() == R.id.show_achievements){
    startActivityForResult(Games.Achievements.getAchievementsIntent(
		getApiClient()), 1);
}
Presenting the leaderboard is similar:
else if(view.getId() == R.id.show_leaderboard){
    startActivityForResult(Games.Leaderboards.getLeaderboardIntent(
		getApiClient(), getString(R.string.number_guesses_leaderboard)),
		2);
}
This will let the user see the current standings within the leaderboard. The integer parameter is arbitrary.
When you run the app, it will attempt to log the user in, checking for permissions, and confirming login if successful:
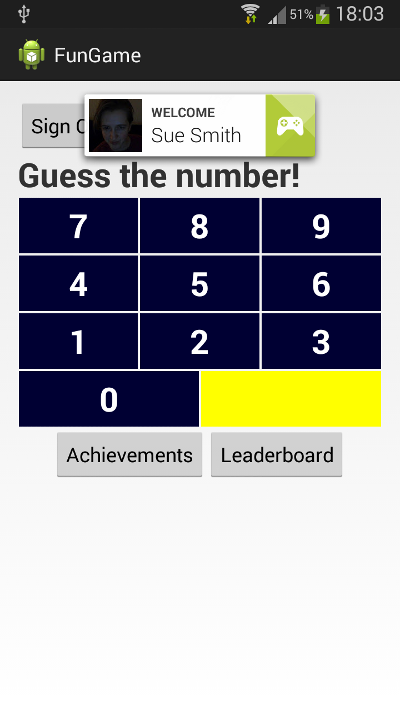
The user is free to choose to sign out and back in whenever they like, but if they leave the app, it will attempt to automatically log them back in when they open it again. When the user guesses correctly, their score will be submitted to the leaderboard. Pressing the Leaderboard button will present the current standings:
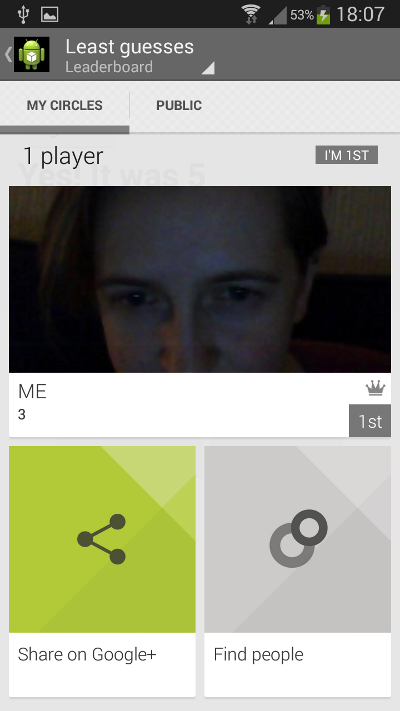
From here, the user can access social features of Google Services via their Google account. You can set your apps up to use public and social leaderboards. Social leaderboards present listings of people in the user's circles, which can be managed for the game itself. For a public leaderboard, the user must have opted to share their scores publicly.
Conclusion
In this tutorial, we have implemented basic leaderboard functionality with Google Play Game Services. Note that you can do much more with leaderboards in your apps. For example, you can request leaderboard data for particular time-scales such as daily, weekly, and all-time. If a leaderboard contains a lot of scores, it is possible for your app to only fetch the top scores or the scores closest to the current player. Try experimenting with some of these enhancements in your own apps.

Comments