Flash's text formatting capabilities are really great, but the only transformations we can perform are the usual MovieClip examples. If your designer asks you to place well-formatted text on a circular path, there's no built-in transformation tool to get the job done…
We will see how to explode the TextField and place all the characters along such a curve, preserving the text formatting and character spacing. Finally, we'll take a look at how to draw text along a spiral.
Final Result Preview
Let's take a look at the final result we will be working towards:
Alter the text in the textfield and toy around with the parameters..
Imagine this fictional scenario: Monday morning, you're drinking your coffee, and then your graphic designer comes and wakes asks you "Hey, I'm designing the game loading animation, and I'd like to have the loading progress text fit this circle; I guess you have something I can copy and paste to do the job ?"
And the fact is that you don't have already something to easily lay out the text in this way. So you come here and read this article. We will go step by step to build what you're after, starting with the basic mathematics knowledge to place a point along a circle, find which place to put it, according to its original position in a container, how to preserve the character formatting and spacing (otherwise your designer would never accept your solution) and then compile all these parts into a generic class that will make it easy to set up and transform any dynamic text to apply this circular layout.
The font used in the demo is the free Elegan Tech font you can download and freely use from dafont.com
The first steps will show in detail how to create the test Flash movie. If you are already familiar with the usage of Flash components and their event handling, you might want to jump directly to Step 10 where the real work begins, once the starting points are set.
Step 1: Demo Interface Demo Flash File
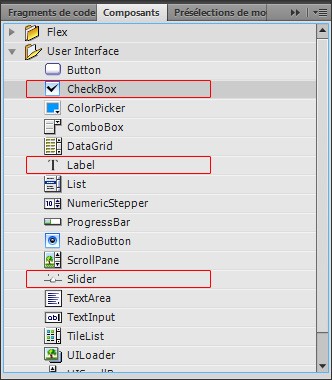
Start by creating a new CircularTextTest.fla file with Flash Professional, then open the Components window and drag a slider, a label and a checkbox to your Flash library.
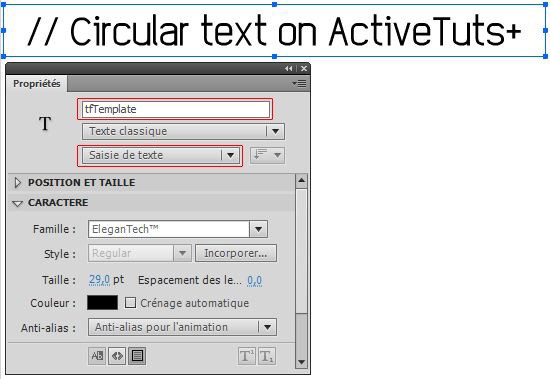
In the Flash file, create a large text field, then set it as an input TextField and give it the name: tfTemplate. For this demo we have chosen to use the EleganTech font, so set the TextField's font value to this, then import the font and make sure the necessary characters range are imported.
Drag and drop the checkbox from the library to your stage, then copy and paste it 3 times. Each checkbox will be used to set a demo parameter: show/hide anchors, turn text outside/inside, trim (or not) the empty space.
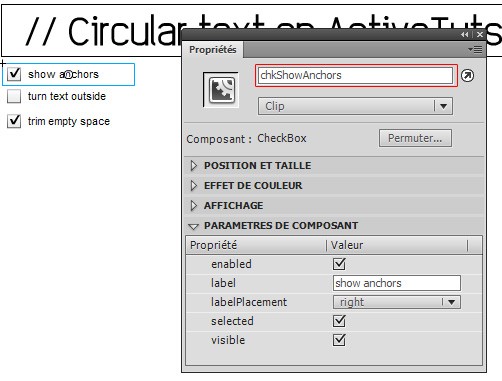
The label and selected values are up to you, to set the initial values of the demo. The important thing is to set the instance names of the checkboxes to be able to use them. The first one will be chkShowAnchors, the second one chkTxtOutside and the third one chkTrimWhite.
Finally we will need one slider to set the value of the circle radius, and another to adjust the character offset from the anchors we will place. Each slider will come with a label in which we will display the actual value. So you can drag and drop a label and a slider from the library to the stage, then set their names and parameters like on this screenshot.
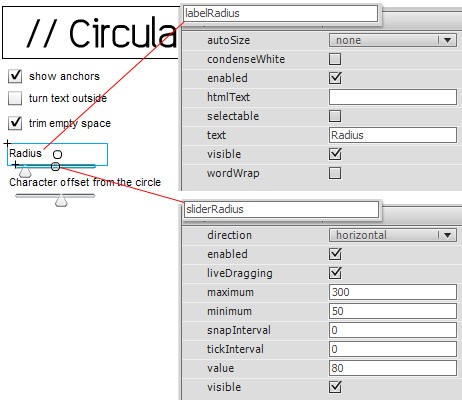
Apart from the instance names which are mandatory, the important parameters are the slider value, which we will be used as the initial default value, the min and max values. The liveDragging parameter will make the slider send an event while it is being dragged, so that we will update the circle in real time when the user moves the slider. If liveDragging isn't checked, the update will only occur when the user release the slider.
Now you can create the second slider and its associated label, respectively named sliderCharOffset and labelOffset. For the demo I have used the default value of 7, min and max values from -50 to 50, but this is up to you, you can set it to fit your needs.
At last you can set the document class to be CircularTextTest, which will host all the demo code. The class isn't yet created, this is the next step, right now you just have to set the class name in the Flash file, as explained in the How to Use a Document Class in Flash Quick Tip.
The Flash file is now complete. If you have any doubt you might check the file from the downloadable sources.
Step 2: Demo Interface Demo Class
In this step we create the class, associate it with the Flash file and write down its basic content: an addedToStage handler function and the basic createCircularText routine that we will call to transform the text.
Let's create the CircularTextTest.as Class file alongside your Flash file. The very first steps will be to import the classes we need, to declare the assets we have put on the stage and to prepare the routine we will call to do the work.
package  {

	import fl.controls.CheckBox;
	import fl.controls.Label;
	import fl.controls.Slider;
	import fl.events.SliderEvent;

	import flash.display.MovieClip;
	import flash.events.Event;
	import flash.events.MouseEvent;
	import flash.events.TextEvent;


		public class CircularTextTest extends MovieClip
		{
			/* ----- Assets defined in the Flash timeline for the demo ----- */
			/** The editable TextField */
			public var tfTemplate:TextField;
			/** Checkbox:  show character anchors */
			public var chkShowAnchors:CheckBox;
			/** Checkbox: text orientation */
			public var chkTxtOutside:CheckBox;
			/** Checkbox: trimWhite/condenseWhiteSpace */
			public var chkTrimWhite:CheckBox;
			/** Slider : the value of the circle radius */
			public var sliderRadius:Slider;
			/** The label to display the current radius value */
			public var labelRadius:Label;
			/** Slider : the offset of the characters from the circle */
			public var sliderCharOffset:Slider;
			/** The label to display the current offset value */
			public var labelOffset:Label;


			public function CircularTextTest() {
				stop();
				addEventListener(Event.ADDED_TO_STAGE, onAddedToStage);
			}

			protected function onAddedToStage(evt:Event):void
			{
				createCircularText();
			}

			protected function createCircularText():void
			{
				// Here will comes all the interesting code
			}


		}

}
This is the basic structure, now we will have to fill the blanks to make sure we use the values from the input field, checkboxes, and sliders.
Step 3: Demo Interface Input TextField
We need to make sure we know when the content of the TextField is modified, so we will complete the initSwf initialization handler to add event listeners to the change and textInput events. These events will call their own callback, which will in turn call the createCircularText() routine. This extra step is there for if you want to perform some validation stuff depending of the event type; to give an example, you might want to add some code to make sure the text is valid, or to perform some special stuff when the text is empty, before calling the createCircularText() method.
protected function onAddedToStage(evt:Event):void
{
	tfTemplate.addEventListener(TextEvent.TEXT_INPUT, onTextInputHandler, false,0,true);
	tfTemplate.addEventListener(Event.CHANGE, onTextChangeHandler, false,0,true);

	createCircularText();
}

protected function onTextInputHandler(evt:TextEvent):void
{
	createCircularText();
}
protected function onTextChangeHandler(evt:Event):void
{
	createCircularText();
}
Step 4: Demo Interface Text Direction Checkbox
The checkbox is already set up and ready in Flash, so we just need to listen for updates to the chkTxtOutside checkbox. Exactly like for the input field, we update our initialization routine to add an event listener for the change event from the checkbox. This time we will use only one generic onCheckBoxChange event callback for all the checkboxes, that we will create right now.
protected function onAddedToStage(evt:Event):void
{
	// ...
	// Previous code still here
	// ...

	chkTxtOutside.addEventListener(Event.CHANGE, onCheckBoxChange, false, 0, true);
	//stage.addEventListener(MouseEvent.CLICK, onCheckBoxChange); // Lazy-man listener to update the circle after every click on any component.

	createCircularText();
}

protected function onCheckBoxChange(event:Event):void
{
	createCircularText();
}
If you read the comments you might notice I have left commented a very lazy implementation that you might find useful when creating a quick and dirty test: adding a click event listener on the stage to call the update will generate more updates than are really needed, but when your goal is only to make sure the update routine is called to test your code, this might be a time-saver.
Step 5: Demo Interface Show Anchors Checkbox
I guess you have understood how it works, so the next steps will sound very familiar: we will continue to add event listeners to the change/update events of the components the user will interact with.
protected function onAddedToStage(evt:Event):void
{
	// ...
	// Previous code still here
	// ...

	chkShowAnchors.addEventListener(Event.CHANGE, onCheckBoxChange, false, 0, true);

	createCircularText();
}
Step 6: Demo Interface Radius Slider
Listening for the update of the slider will work like the checkboxes, but we will also update the label contents to display the value to the user, editing the label text to display the slider value.
protected function onAddedToStage(evt:Event):void
{
	// ...
	// Previous code still here
	// ...

	sliderRadius.addEventListener(SliderEvent.CHANGE, onRadiusChange, false,0,true);

	createCircularText();
}

protected function onRadiusChange(evt:SliderEvent):void
{
	labelRadius.text = "Radius : " + sliderRadius.value;
	createCircularText();
}
Step 7: Demo Interface Text Offset Slider
Obviously this is almost the same story as the radius, but with a different label and a different slider.
protected function onAddedToStage(evt:Event):void
{
	// ...
	// Previous code still here
	// ...

	sliderCharOffset.addEventListener(SliderEvent.CHANGE, onCharOffsetChange, false,0,true);

	createCircularText();
}

protected function onCharOffsetChange(evt:SliderEvent):void
{
	labelOffset.text = "Character offset from the circle : " + sliderCharOffset.value;
	createCircularText();
}
Step 8: Demo Interface Generate Circle
Right now we have done all the work to make sure the createCircularText routine is called every time something has changed, to create the text circle. Now it is time to create the text circle in this routine.
To transform the text, we will call CircularText.generateText(templateTextField, targetHostClip, options), with all the options being stored in a CircularTextOptions instance. The inner working of these classes will be the matter of the next steps, right now we have to read the values from our components and send them to these objects that will do the job for us. These classes will be stored in the utils.clips package, so we have to make sure we add these contents in the import statements.
We will need a clip in which to place the circle of individual character MovieClips; this will be called animHost.
package  {

	// ....
	// Previous import still here
	import utils.clips.*;	//for the classes we will later create

	public class CircularTextTest extends MovieClip
	{
		/** The movieclip that will 'host' all the created character clips */
		public var animHost:MovieClip;

		protected function createCircularText():void
		{
			// For the purpose of the demo we create a movieclip at the center of the stage
			if (animHost == null)
			{
				animHost = new MovieClip();
				animHost.x = 275;
				animHost.y = 200;
				addChild(animHost);
			} else {
				// We make sure the previous character clips are removed
				for (var i:int = animHost.numChildren; i>0; i--) {
					animHost.removeChildAt(0);
				}
			}

			var options:CircularTextOptions = new CircularTextOptions();
			if (chkTxtOutside.selected) {
				options.characterOrientation = CircularTextOptions.CHARACTER_ORIENTATION_OUTSIDE;
			} else {
				options.characterOrientation = CircularTextOptions.CHARACTER_ORIENTATION_INSIDE;
			}
			options.radius 		 = sliderRadius.value;
			options.radiusOffset = sliderCharOffset.value;
			options.trimWhite 	 = chkTrimWhite.selected;
			options.showAnchors  = chkShowAnchors.selected;
			CircularText.generateText(tfTemplate, animHost, options);

		}
Step 9: Demo Interface Turning Circle
To complete the demo, let's make the circle turn! To do this we just need to create a Timer object, make it tick 25 times a second, and call an update handler every time it does so. The update function simply increments the circle's host MovieClip's rotation property by a small amount. That's it -- you have made it turn.
package  {

	// ....
	// Previous import still here
	import flash.events.TimerEvent;
	import flash.utils.Timer;

		public class CircularTextTest extends MovieClip
		{
			/** A Timer object to call an update callback and spin the circle */
			protected var rotationTimer:Timer;

			protected function createCircularText():void
			{
				// ...
				// Previous code still here

				// We create a timer to turn the movieClip
				if (rotationTimer == null)
				{
					rotationTimer = new Timer(1/25, 0);
					rotationTimer.addEventListener(TimerEvent.TIMER , onTimer, false,0,true);
					rotationTimer.start();
				}
			}

			protected function onTimer(event:TimerEvent):void
			{
				animHost.rotation += 0.1;
			}
Step 10: Main Code Linear Position to Angle
We'll now convert a linear position to an angle. We will know the linear x position of the text, and we need to transform this to a position on a circle. To convert a point on a segment to a point on a circle, we need a few things:
- The segment size, which will be the template
TextField's width. Let's call this xMax. - The x position on the segment, which will be the character position in the template.
- The circle radius, which we will set.
- The alpha angle to plot the point on the circle. This angle will be computed from x and the segment size. We will consider adding a phase, which is an offset.
To make things simple: when x will be 0, alpha will also be 0. On the other side when x equal xMax, then alpha = 360° (or in radians: 2*PI).
For all the intermediate positions, alpha = 2*PI * x/xMax (in radians).
We will need this value both in radians - because Math.sin() and Math.cos() ask for it - and in degrees - because we will have to turn our MovieClip to make the character 'look' at the center, and MovieClip rotations are in degrees. But we will come back to this in the next part.
If we choose to add an offset (or a phase, at it's often called for angular values), then it's just a simple addition to do.
Finally, to get the position of the character on the circle from its center, it's very basic trigonometry:
clip.x = radius * Math.cos(angleInRadians);
clip.y = radius * Math.sin(angleInRadians);
Step 11: Main Code Common Pitfall
Let's look at a common pitfall in getting the character positions. The most obvious values that come to mind for xMax is to use the number of characters in your text, and for x, to use the current character's position. But this is really over-simplified and will lead us to unaesthetic results. If you're using a monospace font, it will be okay. But if you're using a more common font, then the offset between two successive values of x will always be the same, whether the character is a small one like a dot or a wide one like w. This means that either some letters will be squashed together or some letters will be spread very far apart.
If our source TextField has complex text formatting, mixing different fonts and font sizes, it becomes obvious that the tenth character out of 20 will almost never be at the center of the TextField.
Step 12: Main Code Spacing and Formatting
We're going to use the character boundaries to take care of the character spacing and text formatting.
ActionScript provides us with the sourceTf.getBounds(sourceTf.parent); method to get the exact dimensions of the TextField (this method is available for any DisplayObject). The getBounds method requires a target coordinate space. The most common usage of our transformation will be to create the circle at the same level as the template TextField, so we'll use the template TextField's parent coordinate space to take care of any higher level transformations.
Using the character position in the source string is too limited, so we won't use such a basic measure. We will call sourceTextField.getCharBoundaries(nthCharacter) to get the position and size of any character. This will return a Rectangle, so we will know the width of the character and its exact position.
We might want to trim the extra white space before and after the real text, so that you could use a wide dynamic TextField, but only compute the really used text width to place the characters on the circle without extra white space. To do so, we will have to get the actual position of the first and last characters. There's one caveat: if you're trying to get the boundaries of a control character, like carriage return, it will return null. Therefore we will loop the latest characters to find the last one which does have boundaries:
var i:int;
var charCnt:int = sourceTf.length;
var charBounds:Rectangle;

// the default 'source' bounds are the whold textFields bounds
var templateBounds:Rectangle = sourceTf.getBounds(sourceTf.parent);

// If we trim the 'extra' white, then the boundaries of the last visible character
if (options.trimWhite)
{
	charBounds = sourceTf.getCharBoundaries(0);
	templateBounds.left = charBounds.left;
	charBounds = null;
	i = 1;
	do {
		charBounds = sourceTf.getCharBoundaries(sourceTf.length-i);
		i++;
	} while (charBounds == null);
	templateBounds.right = charBounds.right;
}
After this code block, the templateBounds variable will have the desired width (as we will see later, option.trimWhite is a Boolean, specifying whether we ignore the extra white space of the TextField).
We now have a correct xMax value, and I guess you've understood that we will use the same getCharBoundaries method to get the accurate x position of each character in the source TextField, giving us the x values to use in our formulas above.
Step 13: Main Code Formatting our Parameters
Before going further in coding, we will formalize the options we will handle, and put them all in a parameter class. We will use this "options container" in the next steps to easily cover different variations of circular transformation. This option class could be a simple generic Object, but using predefined constants and values makes the usage of the CircularText class easier, enables strong typing - therefore making it easier to find errors at compile time - and enables us to set default values.
package utils.clips
{
	public class CircularTextOptions
	{

		static public const CHARACTER_ORIENTATION_INSIDE:Number = 90;
		static public const CHARACTER_ORIENTATION_OUTSIDE:Number = -90;

		/** Radius of the circle */
		public var radius:Number = 100;
		/** Angular offset to apply (to make the text spin around the circle */
		public var phase:Number = 0;


		/** Character orientation, can be
		 * CircularTextOptions.CHARACTER_ORIENTATION_INSIDE or
		 * CircularTextOptions.CHARACTER_ORIENTATION_OUTSIDE */
		public var characterOrientation:Number = CHARACTER_ORIENTATION_INSIDE;

		/** Useful for debugging, this option enables the display of the
		 * character anchor points (might help to fine-tune offests, ...) */
		public var showAnchors:Boolean = false;

		/** Offset in pixel from the circle to the character. By setting both
		 * the radius and this offset, you can control the character spacing. */
		public var radiusOffset:Number = 0;

		/** This option sets whether the circle is based on the with of the source
		 * textField or the width of its contents. ('white space' characters
		 * are still computed; this is not a condenseWhite-like option) */
		public var trimWhite:Boolean = true;

		public function CircularTextOptions()
		{
		}
	}
}
Step 14: Main Code Character Placement
We've already gone through the math to convert a position on the x axis to a position on the circle. Now we will create new MovieClips for each character and place each one according to its x position, and set its text formatting to match the source format and reproduce the same appearance.
We will need a few local variables to store the intermediate values :
var degrees:Number;
var radians:Number;
var charContainer:MovieClip;
var radius:Number = options.radius;
Then we will start looping through all the source characters
for (i = 0; i < charCnt; i++)
{
	charBounds = sourceTf.getCharBoundaries(i);
	if (charBounds != null) // special chars, like carriage return, do not have bounds, hence this test
	{
		//...
	}
}
As this snippet tells you, some characters don't have boundaries, so we need to take care of them. We don't need to display invisible characters.
Step 15: Main Code Character Orientation
Before converting the original x to its angular position, we need to take care of the character orientation: if the character will look 'inside' the circle, then the angle grow with the x value. If we decide to make the characters look to the 'outside' of the circle, then it will be read like with a mirror, and we need to invert the angle growth, otherwise it would not really be readable.
If the text is looking 'inside', we will arrange the characters clockwise. If the text is facing 'outside', we need to turn counter-clockwise while placing the characters.
If this is still not clear, just change the minus in options.phase - (charBounds.right - 0.5*charBounds.width) * 360/templateBounds.width to a plus and publish it to see immediately how it would look if you do not take care of the character orientation. Finally we convert the degrees to radians, as the sin() and cos() need angles in radians for their arguments.
// Compute the angular offset of the char based on its metrics
if (options.characterOrientation == CircularTextOptions.CHARACTER_ORIENTATION_INSIDE)
{
	degrees = options.phase  + (charBounds.left + 0.5*charBounds.width) * 360/templateBounds.width;
} else {
	degrees = options.phase  - (charBounds.right - 0.5*charBounds.width) * 360/templateBounds.width;
}
radians = degrees*(Math.PI/180);
Now we can create the container for the character and place it in our host, taking care of the angle we have just computed:
charContainer = new MovieClip();
if (options.characterOrientation == CircularTextOptions.CHARACTER_ORIENTATION_INSIDE)
{
	charContainer.rotation = Math.round(degrees)+ options.characterOrientation;
	charContainer.x = radius * Math.cos(radians);
	charContainer.y = radius * Math.sin(radians);
} else {
	charContainer.rotation = Math.round(degrees)+ options.characterOrientation;
	charContainer.x = radius * Math.cos(radians);
	charContainer.y = radius * Math.sin(radians);
}
host.addChild(charContainer);
Remember that the characterOrientation value will be one of the following numbers, so the options.characterOrientation used here will turn the character, making it face the desired direction without additional calculations:
public class CircularTextOptions
	{
		static public const CHARACTER_ORIENTATION_INSIDE:Number = 90;
		static public const CHARACTER_ORIENTATION_OUTSIDE:Number = -90;
Step 16: Main Code Formatting
Now that we have created a MovieClip host for this character, placed it along the circle and turn it in the right direction, we should put something in it, like a TextField with the character, otherwise nothing would be visible ;-)
This is pretty basic: create a new TextField, and set all its attributes. The most important one is to use embedFonts, so that the text will still be visible after being rotated.
// Set Text and TextFormat
newTf  = new TextField();
newTf.type		  = TextFieldType.DYNAMIC;
newTf.selectable    = false;
newTf.embedFonts    = true;
newTf.autoSize      = TextFieldAutoSize.CENTER;
newTf.antiAliasType = AntiAliasType.NORMAL;
newTf.text = sourceTf.text.charAt(i);
We have a TextField with the text in it, now we have to format this text to looks like the original. We will use a try/catch to warp the setTextFormat because if something goes wrong in your text formatting, because of missing fonts, the error will pop up here, and this will help you debug your font issues.
charTf = sourceTf.getTextFormat(i);
try {
	newTf.setTextFormat(charTf);
} catch (e:Error) {
	trace('textFormat error');// place a breakpoint here to watch for potential font issues...
}
Finally we have to center the TextField into the target MovieClip we created in the previous step, to make sure they look aligned on the circle. The radiusOffset parameter we use here complete the circle radius: when fine-tuning the look of your circular text, having both the circle radius - which set where the character containers are - and an offset make easier to set the desired character spacing. It could be totally done without this offset, but makes life easier for some designer working with our snippets.
newTf.x = -(charBounds.width)/2;
newTf.y = -(charBounds.height) + options.radiusOffset;
That's it, we're done. We have gone through all the steps and now have a fully working routine.
Step 17: Main Code Class so Far
And here comes the complete CircularText class we have built throughout the steps of this tutorial:
package utils.clips
{
	import fl.text.TLFTextField;

	import flash.display.MovieClip;
	import flash.events.Event;
	import flash.events.MouseEvent;
	import flash.geom.Rectangle;
	import flash.text.TextField;
	import flash.text.TextFieldAutoSize;
	import flash.text.TextFieldType;
	import flash.text.TextFormat;
	import flash.text.AntiAliasType;
	import flash.text.Font;

	/**
	 * Use CircularText.generateText(templateTextfield, targetMovieClip,
	 * options) to create a well-spaced character distribution around a circle
	 * in the target movieclip.
	 */
	public class CircularText
	{


		public function CircularText()
		{
		}


		/**
		 * @param sourceTf  The Textfield wich is used as source and template.
		 * 					Typically a dynamix textField, invivisible, in which
		 * 					the text and textFormat are set by the rest of the
		 * 					program.
		 * @param host		The target movieClip in which the text circle will
		 * 					be created.
		 * @param options	A CircularTextOptions object with formatting option
		 * 					to make the text circle looks like we want to.
		 */
		static public function generateText(sourceTf:TextField,
											host:MovieClip,
											options:CircularTextOptions=null):void
		{
			if (options == null) options = new CircularTextOptions();

			// We explode the original textField into smaller clips, each one containing a character

			var newTf:TextField;
			var charTf:TextFormat;
			var i:int;
			var charCnt:int = sourceTf.length;
			var charBounds:Rectangle;

			// the default 'source' bounds are the whold textFields bounds
			var templateBounds:Rectangle = sourceTf.getBounds(sourceTf.parent);

			// If we trim the 'extra' white, then the boundaries of the last visible character
			if (options.trimWhite)
			{
				charBounds = sourceTf.getCharBoundaries(0);
				templateBounds.left  = charBounds.left;
				charBounds = null;
				i = 1;
				do {
					charBounds = sourceTf.getCharBoundaries(sourceTf.length-i);
					i++;
				} while (charBounds == null); // Take care of null-boundareis character like carriage return

				templateBounds.right = charBounds.right;
			}

			var degrees:Number;
			var radians:Number;
			var charContainer:MovieClip;
			var radius:Number = options.radius;
			for (i = 0; i < charCnt; i++)
			{
				charBounds = sourceTf.getCharBoundaries(i);
				if (charBounds != null) // special chars, like carriage return, do not have bounds, hence this test
				{
					// Compute the angular offset of the char based on its metrics
					if (options.characterOrientation == CircularTextOptions.CHARACTER_ORIENTATION_INSIDE)
					{
						degrees = options.phase  + (charBounds.left + 0.5*charBounds.width) * 360/templateBounds.width;
					}else {
						degrees = options.phase  - (charBounds.right - 0.5*charBounds.width) * 360/templateBounds.width;
					}
					radians = degrees*(Math.PI/180);

					// Create a new Textfield to render this character
					newTf  = new TextField();
					charTf = sourceTf.getTextFormat(i);

					// Set Text and TextFormat
					newTf.type = TextFieldType.DYNAMIC;
					newTf.selectable = false;
					newTf.embedFonts = true;
					newTf.autoSize = TextFieldAutoSize.CENTER;
					newTf.antiAliasType = AntiAliasType.NORMAL;

					newTf.text = sourceTf.text.charAt(i);
					try {
						newTf.setTextFormat(charTf);
					} catch (e:Error) {
						trace('textFormat error');// place a breakpoint here to watch for potential font issues...
					}

					newTf.x = -(charBounds.width)/2;
					newTf.y = -(charBounds.height) + options.radiusOffset;

					charContainer = new MovieClip();
					if (options.showAnchors)
					{
						// here comes the graphic aspect of the anchors, if you want something else
						charContainer.graphics.beginFill(0xff00ff, 1);
						charContainer.graphics.drawRect(0,0,5,5);
						charContainer.graphics.endFill();
					}
					charContainer.addChild(newTf);

					if (options.characterOrientation == CircularTextOptions.CHARACTER_ORIENTATION_INSIDE)
					{
						charContainer.rotation = Math.round(degrees)+ options.characterOrientation;
						charContainer.x = radius * Math.cos(radians);
						charContainer.y = radius * Math.sin(radians);
					} else {
						charContainer.rotation = Math.round(degrees)+ options.characterOrientation;
						charContainer.x = radius * Math.cos(radians);
						charContainer.y = radius * Math.sin(radians);
					}

					host.addChild(charContainer);
				}
			}

		}
	}
}
Step 18: Main Code Apply the Transformation
We have seen all the parts, and put them together in a utility class. Now we have just to call this method to generate a circular display of the TextField.
// tfTemplate is the TextField containing the source text to transform
// animHost is a movieClip in which we will create the circle
var options:CircularTextOptions = new CircularTextOptions();
options.characterOrientation = CircularTextOptions.CHARACTER_ORIENTATION_INSIDE;
options.radius 		 = 50;
options.radiusOffset = 0;
options.trimWhite 	 = true;
options.showAnchors  = false;
CircularText.generateText(tfTemplate, animHost, options);
Does this code look like something you've already seen? Well it should, because this sample usage is really close to the createCircularText method we built at the beginning. Now you might see that almost everything is in place.
Step 19: Main Code A Simple Demo
Now that all the code is complete, you might compile the demo we have built in the first steps (or open it from the downloadable sources).
For those who jumped over the first section, the code in the demo is very basic: simple listeners to update the circular text when something is changed. It has an addedToStage listener to set up the other listeners on the input components (a TextField, some Sliders and some Checkboxes); several listener functions which all call the createCircularText(); and this createCircularText() routine which sets up the options object with the values read from the components and calls the CircularText.generateText method exactly like in our snippets above.
Step 20: Main Code Creating Subclasses
Typically if you're on a project which involves several displays of circular text, you might find it useful to create inherited styling subclasses, like SmallCircularTextOptions and LargeCircularTextOptions to set the default values you want to use in each case. This way you won't have to type the parameters each time you need to generate a text transformation.
public class SampleSmallCircularTextOptions extends CircularTextOptions
{

	public function SampleSmallCircularTextOptions()
	{
		super();
		radius = 50;
		characterOrientation = CHARACTER_ORIENTATION_INSIDE;
		// showAnchors = AppManager.isDebug; // Here read the debug setting from your application
	}
}
With this class, creating the circular text only requires a source TextField and a target MovieClip to host the circle, giving us a really small amount of code:
// tfTemplate is the TextField containing the source text to transform
// animHost is a movieClip in which we will create the circle
CircularText.generateText(tfTemplate, animHost, new SampleSmallCircularTextOptions());
Step 21: Extension Circle to a Spiral
Do you want to go further? If this is the kind of transformation you use in your projects, you might notice that it is now really easy to modify the coordinate calculations to create something else than a circle. Here we will quickly look at how to make a spiral.
So let's start by thinking about how to plot our point on a spiral. Basically there are two differences from placing the letters on a circle and alongside a spiral:
- The radius from the center to a character is not constant: each step the radius is increased (or decreased) by a small amount when walking along a spiral
- The path length might be longer than just
2*PI*Radius, so that the characters go ‘below' the previous ones.
Here comes the updates of the CircleTextOptions variables to be able to store these two parameters:
/* ---- Spiral specific options ---- */
/** By default, only 1 turn, therefore a circle */
public var turnCount:Number = 1;
/** Damping make the 'circle' radius smaller (or bigger) each time;
    if it's equal to one, then the radius doesn't change */
public var spiralDamping:Number = 1;
Then we need to update our CircularText.generateText() method to take care or these parameters. As mentioned, the radius will no longer be constant.
var radius:Number = options.radius;
for (i = 0; i < charCnt; i++)
{
	// Spiral update : after each character the spiral damping is applied
	radius *= options.spiralDamping;
This way, the initial radius value will be the same as our circle. Then for each character it will be multiplied. The default value of 1 will keep the radius unchanged, but if we set a slightly smaller amount, like 0.97, the radius will be smaller each step.
Then we want to control the length of the spiral. Just after calculating the degrees value for the current character, we want to multiply it by the turn count of the spiral. If the spiral loops only one time, it will be like a circle (if the radius is left unchanged). If the spiral loops more than one time, the characters will overlap. So the degrees value has to be multiplied by turnCount to transform our value for 1 turn to its new value for n turns.
degrees = options.turnCount * degrees;
That's it, nothing more to do to have a customizable spiral! You might want to edit the createCircularText() method of the test class CircularTextTest to try it.
// Previous option settings still there ...
// Spiral update : We will use a damping != 1 and a number of turn != 1
options.turnCount 	  = 1.5;
options.spiralDamping = 0.97;

CircularText.generateText(tfTemplate, animHost, options);
And here comes the corresponding updated SWF. You might want to add sliders to control the turnCount and damping values if you want to play with different values easily.
Conclusion
I hope this tutorial successfully highlighted the common pitfalls one will encounter while playing with text measurements, exploding a TextField and recreating the original text formatting. Do play with the sources and fine-tune it to your needs. Thanks for reading!

Comments