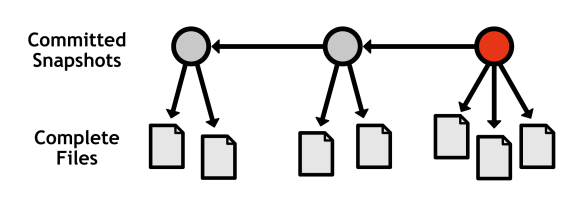
Maintaining a series of "safe" revisions of a project is the core function of any version control system. Git accomplishes this by recording snapshots of a project. After recording a snapshot, you can go back and view old versions, restore them, and experiment without the fear of destroying existing functionality.
SVN and CVS users should note that this is fundamentally different from their system's implementation. Both of these programs record diffs for each file-an incremental record of the changes in a project. In contrast, Git's snapshots are just that-snapshots. Each commit contains the complete version of each file it contains. This makes Git incredibly fast since the state of a file doesn't need to be generated each time it's requested:
This chapter introduces the basic workflow for creating snapshots using the working directory, staging area, and committed history. These are the core components of Git-based revision control.
The Staging Area
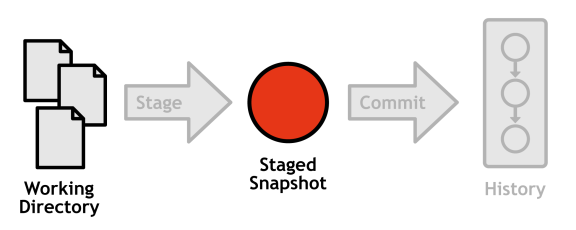
Git's staging area gives you a place to organize a commit before adding it to the project history. Staging is the process of moving changes from the working directory to the staged snapshot.
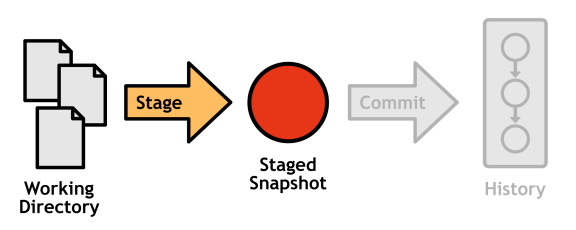
It gives you the opportunity to pick-and-choose related changes from the working directory, instead of committing everything all at once. This means you can create logical snapshots over chronological ones. This is a boon to developers because it lets them separate coding activities from version control activities. When you're writing features, you can forget about stopping to commit them in isolated chunks. Then, when you're done with your coding session, you can separate changes into as many commits as you like via the stage.
To add new or modified files from the working directory to the staging area, use the following command:
git add <file>
To delete a file from a project, you need to add it to the staging area just like a new or modified file. The next command will stage the deletion and stop tracking the file, but it won't delete the file from the working directory:
git rm --cached <file>
Inspecting the Stage
Viewing the status of your repository is one of the most common actions in Git. The following command outputs the state of the working directory and staging area:
git status
This will result in a message that resembles the following (certain sections may be omitted depending on the state of your repository):
# On branch master
# Changes to be committed:
#
#       new file:   foobar.txt
#
# Changes not staged for commit:
#
#       modified:   foo.txt
#
# Untracked files:
#
#       bar.txt
The first section, "Changes to be committed" is your staged snapshot. If you were to run git commit right now, only these files would be added to the project history. The next section lists tracked files that will not be included in the next commit. Finally, "Untracked files" contains files in your working directory that haven't been added to the repository.
Generating Diffs
If you need more detailed information about the changes in your working directory or staging area, you can generate a diff with the following command:
git diff
This outputs a diff of every unstaged change in your working directory. You can also generate a diff of all staged changes with the --cached flag:
git diff --cached
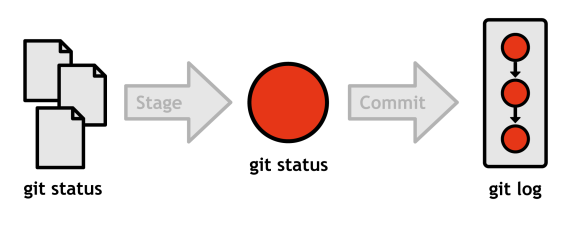
Note that the project history is outside the scope of git status. For displaying committed snapshots, you'll need git log.
git statusCommits
Commits represent every saved version of a project, which makes them the atomic unit of Git-based version control. Each commit contains a snapshot of the project, your user information, the date, a commit message, and an SHA-1 checksum of its entire contents:
commit b650e3bd831aba05fa62d6f6d064e7ca02b5ee1b
Author: john <[email protected]>
Date:   Wed Jan 11 00:45:10 2012 -0600

    Some commit message
This checksum serves as a commit's unique ID, and it also means that a commit will never be corrupted or unintentionally altered without Git knowing about it.
Since the staging area already contains the desired changeset, committing doesn't require any involvement from the working directory.
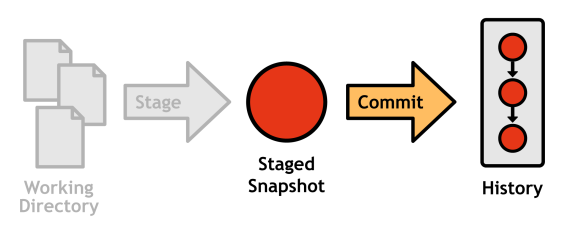
To commit the staged snapshot and add it to the history of the current branch, execute the following:
git commit
You'll be presented with a text editor and prompted for a "commit message." Commit messages should take the following form:
<commit summary in 50 characters or less.>
<blank line>
<detailed description of changes in this commit.>
Git uses the first line for formatting log output, e-mailing patches, etc., so it should be brief, while still describing the entire changeset. If you can't come up with the summary line, it probably means your commit contains too many unrelated changes. You should go back and split them up into distinct commits. The summary should be followed by a blank line and a detailed description of the changes (e.g., why you made the changes, what ticket number it corresponds to).
Inspecting Commits
Like a repository's status, viewing its history is one of the most common tasks in Git version control. You can display the current branch's commits with:
git log
We now have the only two tools we need to inspect every component of a Git repository.
git status vs. git logThis also gives us a natural grouping of commands:
- Stage/Working Directory:
git add,git rm,git status - Committed History:
git commit,git log
Useful Configurations
Git provides a plethora of formatting options for git log, a few of which are included here. To display each commit on a single line, use:
git log --oneline
Or, to target the history of an individual file instead of the whole repository, use:
git log --oneline <file>
Filtering the log output is also very useful once your history grows beyond one screenful of commits. You can use the following to display commits contained in <until> but not in <since>. Both arguments can be a commit ID, a branch name, or a tag:
git log <since>..<until>
Finally, you can display a diffstat of the changes in each commit. This is useful to see what files were affected by a particular commit.
git log --stat
For visualizing history, you might also want to look at the gitk command, which is actually a separate program dedicated to graphing branches. Run git help gitk for details.
Tagging Commits
Tags are simple pointers to commits, and they are incredibly useful for bookmarking important revisions like public releases. The git tag command can be used to create a new tag:
git tag -a v1.0 -m "Stable release"
The -a option tells Git to create an annotated tag, which lets you record a message along with it (specified with -m).
Running the same command without arguments will list your existing tags:
git tag
This lesson represents a chapter from Git Succinctly, a free eBook from the team at Syncfusion.

Comments